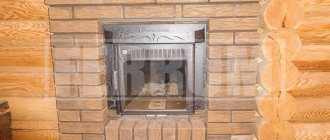
The heart of every sauna is the stove, and it is this that should be given maximum attention.
It is not necessary to buy heating equipment - a heating device for a bathhouse, assembled with your own hands, will warm up the bathhouse no worse than a purchased one.
A sauna stove must perform two important functions at once:
- warm up the air in the room;
- heat the water needed for taking a shower.
The operating principle of heating equipment from the manufacturer and that which is created independently is no different. The only difference is that factory models may have additional functions, and their design is more attractive in comparison with a home-made stove.
Advantages and disadvantages of a waste oil stove
A factory or homemade waste oil furnace is characterized by a number of advantages:
- ensuring fast and efficient heating of enclosed spaces in the form of greenhouses, domestic buildings, warehouses and technical rooms;
- independence of the device from electricity and gas;
When ensuring normal operation, the stove does not create a lot of soot and burning
- unique design features of the device that allow you to carry out the cooking process;
- ease of operation;
- no open flame;
- reliability of the structure, which is made of metal products connected by welding;
- when ensuring normal operation, the stove does not create a lot of soot and burning;
- due to its light weight and dimensions, the device can be transported;
- the stove can be made from scrap metal;
- during operation of the device, combustion of oil and its vapor is ensured;
- The stove can be combined with a water heating system by installing a tank on top.
A closed type furnace is not without its drawbacks, among which are the following:
- the possibility of clogging the supply tube with waste oil;
- the need to install a chimney with a length of at least 4 m;
- presence of hot open surfaces;
The exhaust furnace provides fast and efficient heating of various types of enclosed spaces
- weekly cleaning of the chimney and oil container from accumulated waste;
- high probability of contamination of clothing and premises during contact with fuel;
- the container with fuel should be located in a warm room;
- unpleasant smell of used oil;
- the flame in the apparatus can be extinguished only after the fuel has completely burned out;
- if used incorrectly, the fire hazard increases;
- characteristic humming noise during operation of the furnace;
- The fuel ignites only when it is heated to its flash point.
Important! Before pouring oil into the system, it should be filtered.
conclusions
Thus, using pipe scraps of a sufficiently large diameter, you can make a good stove intended for a bath.
The main conclusion is this: if you are both a welder and a mechanic, then you will solve the problem of making an oil stove without much difficulty. You will only have to tinker with setting up and organizing the supply of waste in the dropper.
3 types of chimney heat exchangers - convection, air and water economizer
As you understand, simply making a stove using diesel fuel and exhausting it is not enough; you also need to properly take away the maximum heat from it, and not let it fly out uselessly into the chimney. The following methods are practiced:
- As mentioned above, you can lay a chimney at a slope along the entire length of the room, and then take it vertically to the street.
- Use a household fan to blow the housing.
- Scald the body of the potbelly stove with additional heat-removing fins.
- Make and install an economizer (popularly called a register and a boiler) on the chimney - a samovar-type heat exchanger. These are used in solid fuel boilers and consist of several smoke pipes washed from the outside with water.
We invite you to read: How (is it possible) to heat a brick oven with coal (stone)?
The simplest way to remove heat from a heated firebox is to weld convection fins
Important point. It is not recommended to blow through the body of the miracle stove for obvious reasons. The water circuit installed on the chimney must be connected to a heating system with forced circulation and an open expansion tank to protect it from boiling. During periodic combustion, the pipelines are filled with antifreeze.
Connection diagram of a water economizer to radiator heating
Operating principle of a waste oil furnace
The prototype for oil furnaces operating on waste oil is kerogas, which was previously used in villages and dachas. It used kerosene as fuel, the vapors of which were burned in a separate chamber. To save on fuel, a waste oil burning option was developed. It can be purchased for free or at a reasonable cost at any service station.
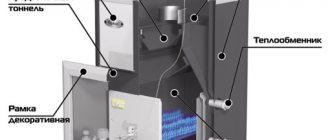
Components of a waste oil stove
Creating a homemade stove during mining is not a difficult process. The main task is to properly organize the system for a productive oil combustion process. To ensure complete combustion of vapors, heavy components must first be split into light ones, which is carried out as a result of pyrolysis. The oil must be properly heated for efficient evaporation.
The operating principle of an oil furnace during mining is as follows. First of all, the mining is ignited in the lower chamber of the apparatus. The combustion intensity is regulated using a throttle valve in the device body, through which air enters the chamber. Oil vapor mixed with oxygen rises upward through a vertical pipe. The pipe is connected to the upper tank, which is the afterburner chamber.
The mixture is mixed under the influence of the Coriolis force (force of inertia). The intensity of the process is achieved by choosing the correct diameter and length of the combustion chamber. To ensure complete combustion, air must flow through the damper in sufficient quantity. To do this, it is additionally sucked through holes made in a vertical perforated pipe connecting the tanks.
The combustion intensity is regulated using a throttle valve in the device body
The gas flow is directed to the final combustion chamber, in which the upper part is expanded. During its manufacture, a horizontal separation is made between the chimney inlet and the combustion chamber outlet, which is necessary to ensure a temperature jump between the nitrogen oxide and oxygen afterburning zones. At temperatures below 600 °C, nitrogen oxides are more active than oxygen. As they decompose, they oxidize fuel particles. With increasing temperature, oxygen acts as the main oxidizing agent. Harmful substances are released into the atmosphere through the chimney.
Important! To ensure efficient oil combustion, the temperature in the upper tank must be low.
Example of calculating furnace dimensions
As mentioned above, fuel consumption is about 1...2 liters per hour. At the same time, the radiated heat is about 11 kW/hour per liter. Thus, the furnace can produce 11...22 kW per hour. To calculate the required volume of the firebox taking into account the burning time, we accept:
- volume of the room (garage) – 7x4x2.5=70 cubic meters, area 28 sq.m.;
- We believe that for every square meter of a garage-type room, at least 500 W are required (basic 100 W, we enter coefficients for all external walls, non-insulated roof and foundation, large entrance opening, metal structure);
- Accordingly, an area of 28 squares requires 14 kW of energy per hour.
By slightly increasing the minimum power of the stove (increasing the draft), we will obtain the required temperature in the room. But fuel consumption will increase to approximately 1.5...1.6 liters per hour. Therefore, for a burning time of at least 6 hours, the volume of the firebox should be 10 liters. This corresponds to 0.001 cubic meters, that is, the container should have a size of, for example, 10x10x10 cm.
Important: with large firebox sizes, it becomes necessary to extinguish the fire in the furnace during exhaust before the fuel burns out completely. The extinguishing process is shown in the video.
The length of the pipe is 40 cm, respectively, its diameter is 10 cm. The area of the lateral surface of the cylinder is equal to its height multiplied by the circumference of the base (diameter multiplied by the number π), in our case 40x3.14x10 = 1256 cm2. Accordingly, the area of all holes is one tenth of the total - 125.6 cm2. Considering that the area of one hole with a diameter of 10 mm is equal to πx0.52=3.14x0.25=0.78 sq.cm, such a pipe will require 125.6/0.78=160 holes.
Note! The accepted value is the area of the holes 10% of the total area of the side surface of the pipe - conditionally! The number of holes during manufacturing is taken, among other things, from the strength of the product and is usually noticeably less!
Considering that the unfolded cylinder is a 31x40 cm rectangle, and the holes should be placed in a checkerboard pattern, we will have to make 12 vertical rows of 13 or 14 holes each. Marking vertical rows is simple - divide the upper or lower circumference of the base of the pipe into 12 parts in any geometric way and draw vertical drilling lines.
The distance between the rows will be 3.3 cm. Marking the vertical rows is a little more difficult, since in every second row it is necessary to shift the upper (or lower) marking point by half the distance between the holes. Considering that we need to make holes not on the edge of the pipe, we add 1 to the planned number of holes and calculate the step: for 13 holes it will be 40/(13 1)=2.85 cm, for 14 – 40/(14 1)=2 .6 cm.
Important: when drilling, the axis of the drill must be directed towards the axis of the pipe!
Waste oil furnace: types of designs
There are several types of oil furnaces that operate on waste oil. The classic model is the pyrolysis apparatus. It is made from ready-made containers in the form of barrels, pipes, cylinders or from alloy sheets. Oil is poured into the lower vessel, which splits when there is insufficient air. In the upper tank, intensive combustion of its vapor occurs, due to which a lot of heat is released.
Temperature regulation is carried out by air supply. Such a furnace requires constant cleaning of the chambers from accumulated fractions. It does not have mechanical temperature control.
Oil is poured into the lower vessel of the stove, which splits when there is insufficient air.
At the oil recovery stove, a guaranteed air supply to the second chamber is realized with the help of a fan. The combustion process is more efficient, so warm air evenly enters the room.
The operating principle of a stove with a drip supply of fuel is similar to the operating mechanism of diesel engines. It is economical. However, the independent process of manufacturing the device is very labor-intensive, so it is better to purchase a factory device of this type. In addition, it should be taken into account that homemade drip stoves are picky about the quality of the oil, which must be preheated before feeding into the stove.
The most efficient model is a supercharged waste oil furnace. It, in comparison with a potbelly stove, has a higher cost. Additional heat comes from blowing fans. Supercharging can be done using a car cooler motor, and the heater is blown by a 220 V home propeller.
Standard layout of a waste oil furnace
Types of homemade stoves in development
Essentially, it is used motor oil, lubricating the engine and chassis.
During the operation of equipment, oil, an initially fairly pure petroleum product, becomes saturated with slag - metal particles (the result of friction and mechanical damage to parts), soot, salts, and resinous compounds. As a result of such saturation, the oil is no longer suitable for lubrication, but it burns well - which allows the product to be used as fuel. The composition of the waste burns approximately 85%, and during the combustion process it produces about 11 kW/hour of thermal energy per liter. Thus, the product’s fuel qualities are comparable to diesel fuel.
Important: if the oil is heavily clogged with solids, it is advisable to filter it before use.
At the same time, an oil furnace using filtered exhaust will work longer and better; it will have to be cleaned less often to remove carbon deposits.
Since during the combustion process engine oil, especially used one, does not emit the most pleasant odor, and from a health point of view it is not very useful, it is better not to use stoves of this kind in residential premises. If there is no other way out, high-quality removal of combustion products is mandatory.
Typically, stoves are installed in non-residential premises - utility rooms, garages, sheds, workshops, and so on - where constant heating is not required, but only warming up the air for a relatively short time.
Due to the fact that even the simplest designs of such a “garage stove” make it possible to regulate the intensity of fuel combustion, it is possible to ensure either an economical mode of its use and gradual heating of the premises, or increased consumption with very fast heating of the air volume.
Engine oil contaminated with impurities will not ignite itself. Therefore, the operating principle of any oil stove is based on the thermal decomposition of fuel - pyrolysis. Simply put, to obtain heat, the waste must be heated, evaporated and burned in the furnace firebox, supplying air in excess. There are 3 types of devices where this principle is implemented in different ways:
- The simplest and most popular direct combustion design with afterburning of oil vapors in an open perforated pipe (the so-called miracle stove).
- Drip furnace using waste oil with a closed afterburner;
- Babington burner. How it works and how to make it yourself is described in detail in our other publication.
The efficiency of heating potbelly stoves is low and amounts to a maximum of 70%. Note that the heating costs indicated at the beginning of the article are calculated based on the indicators of factory heat generators with an efficiency of 85% (to get acquainted with the full picture and compare oil with firewood, you can go here). Accordingly, fuel consumption in home-made heaters is much higher - from 0.8 to 1.5 liters per hour versus 0.7 liters for diesel boilers per 100 m² of area. Take this fact into account when starting to manufacture a furnace for testing.
The pyrolysis stove shown in the photo is a cylindrical or square container, one-quarter filled with used oil or diesel fuel and equipped with an air damper. A pipe with holes is welded on top, through which secondary air is sucked in due to the chimney draft. Even higher is an afterburning chamber with a partition for collecting heat from combustion products.
The principle of operation is as follows: the fuel must be ignited using a flammable liquid, after which the evaporation of the waste and its primary combustion will begin, causing pyrolysis. Combustible gases entering the perforated pipe flare up upon contact with the oxygen flow and are completely burned. The intensity of the flame in the firebox is controlled by an air damper.
This stove has only two advantages during testing: simplicity and low cost and independence from electricity. The rest is all downsides:
- stable natural draft is required for operation; without it, the unit begins to smoke into the room and die out;
- water or antifreeze that gets into the oil causes mini-explosions in the firebox, causing fiery drops to splash from the afterburner in all directions and the owner has to put out the fire;
- high fuel consumption - up to 2 l/hour with low heat transfer (the lion's share of the energy flies into the chimney);
- The one-piece housing is difficult to clean from soot.
Although the potbelly stoves look different, they operate on the same principle; in the right photo, fuel vapors burn out inside the wood stove
Some of these shortcomings can be leveled out with the help of successful technical solutions, which will be discussed below. During operation, you should adhere to fire safety rules and prepare used oil - settle and filter.
The cardinal difference of this furnace is the following:
- a perforated pipe is placed inside a steel casing made from a gas cylinder or pipe;
- fuel enters the combustion zone in the form of drops falling to the bottom of a bowl located under the afterburner;
- To increase efficiency, the unit is equipped with air pressurization using a fan, as shown in the diagram.
Dripper diagram with bottom supply of fuel from the fuel tank by gravity.
The real disadvantage of a drip stove is the difficulty of execution for a beginner. The fact is that you cannot rely entirely on other people’s drawings and calculations; the heater must be manufactured and configured to suit your operating conditions and the fuel supply must be properly organized. That is, repeated improvements will be required.
The flame heats the body of the heating unit in one zone around the burner
The second negative point is typical for supercharged stoves. In them, a jet of flame constantly hits one place in the body, which is why the latter will burn out quite quickly if it is not made of thick metal or stainless steel. But the listed disadvantages are more than offset by the advantages:
- The unit is safe to use because the combustion zone is completely enclosed by an iron casing.
- Acceptable waste oil consumption. In practice, a well-tuned potbelly stove with a water circuit burns up to 1.5 liters in 1 hour to heat 100 m² of area.
- It is possible to wrap the body with a water jacket and convert the exhaust furnace into a boiler.
- The fuel supply and power of the unit can be adjusted.
- Undemanding to the height of the chimney and ease of cleaning.
Boiler with pressurized air, burning waste engine oil and diesel fuel
Requirements for installation and operation of an oil furnace
It is required that the stove be located in an empty room, near which there should be no flammable surfaces. Particular attention is paid to self-made devices. They should not be placed on a shelf or other support that could catch fire.
A homemade furnace for mining should be located on a flat base, which can be concrete or brick. It is necessary that the distance between the apparatus and the wall be at least 1 m. To create good draft, the chimney must have a length of more than 4 m. Insulation should be provided on its external side to prevent the formation of acid condensation.
The used oil should not contain any solvent or other flammable element, so such components should be kept away from the furnace. It is also unacceptable for moisture to get into the container with oil. This will cause a fire in the oven. In the event of an emergency, a fire extinguisher should be used to extinguish the fire.
Important! In the room where the stove is located, there must be a good system of natural supply and exhaust ventilation.
The operating principle of a stove with a drip supply of fuel is similar to the operating mechanism of diesel engines
Before starting work, oil is poured into a container in an amount equal to half the volume of the tank, which will provide the necessary space for the formation of vapor. For the vapors to become enriched with oxygen, you need to wait some time. Then the fuel is ignited using long matches. As soon as the process of ignition of vapors begins, the damper is closed halfway.
To increase the performance of the mini-furnace during mining, you can install a sealed tank with liquid above its upper chamber. To supply and drain water, fittings are attached to it, which are located at different levels. Another option for increasing productivity is the necessary air convection, which is carried out using a fan located near the upper chamber. By taking warm air from the stove, it helps to cool it, which has a positive effect on the life of the device.
How to build a stove from a pipe?
Do-it-yourself sauna stove from a pipe
One of the most common homemade options is a bath stove made from a pipe. Let's consider how such construction is carried out.
Metal stoves can be made from a sheet of steel or, for example, from an old barrel. But if there is a piece of pipe of suitable diameter on the farm, then it is worth using this “blank”.
A homemade stove for a bathhouse made from a pipe can be made with a vertical or horizontal direction of a piece of rolled pipe. By using prefabricated stove pipes, the amount of welding work required when making sheet metal stoves is reduced.
Preparing parts
To make a good stove from a pipe, you will need a piece of rolled pipe with a diameter of 50 cm and a length of 1.5 meters. The thickness of the pipe walls must be at least 10 mm.
The workpiece should be cut into two parts, measuring 0.6 and 0.9 meters, respectively. A longer piece is needed to build a firebox and heater, and the remaining piece will be used to make a tank.
Making a furnace
An example of using a pipe stove in a bathhouse
- First of all, you should take care of the blower. A hole 5 cm high and 20 cm wide is cut at the bottom of a long section of pipe. A thick round steel plate is welded above the hole.
- Next, a niche for the firebox is formed and a door is made for it. The door is hung on hinges or hooks.
- A piece of pipe is welded above the firebox, which will be used as a heater. The height of the segment is 30-35 cm.
- A steel coupling is installed in the upper part of the future furnace, which will be required to fix the water heating boiler.
Assortment of pipe bath stoves
When building a sauna stove with your own hands, a water heating tank is also formed from a pipe.
- For its manufacture, a piece of pipe 0.6 m high is used.
- A steel circle – the bottom – is welded to the end part of the pipe section.
- A hole is cut in the bottom of the tank to accommodate the chimney. It should be moved towards the rear wall of the tank.
- The chimney is fixed to the bottom of the tank by welding. It is important that the seam is of high quality to prevent water leaks into the firebox.
- The upper part of the tank is closed with a metal lid with holes made for the passage of the chimney and for filling with water. The chimney is welded tightly to the lid, and a neck with a lid is installed in the hole for filling water.
A pipe stove installed in a bathhouse
After making a sauna stove from a pipe with your own hands is completed, you should begin installing it. At the same time, it is necessary to remember to comply with the rules ensuring fire safety.
Regardless of whether you purchased ready-made equipment or made homemade sauna stoves from pipes, when installing them you should be guided by the standards set out in SNiP 41-01-2003:
- If the bathhouse has wooden walls (or walls lined with wood), then the distance from the stove to the wall surface should be at least 1 meter.
- The distance from the stove to the wall can be reduced to 20 cm if the wall is lined with refractory bricks or sheathed with metal sheets.
- It is advisable to install bath stoves made of pipes on a pedestal that rises 20 cm from the floor.
- It is advisable to secure the fuel loading area by placing a sheet of metal in front of the firebox.
- The stove is installed so that the firebox doors are turned towards the entrance, and the heater chamber doors are turned in the opposite direction.
DIY options for increasing the efficiency of a mini-oven
Waste oil furnaces are often used to heat a garage or small workshop. It is not recommended to use such a device in a building where people are constantly present. This is due to the fact that the stove absorbs oxygen, which has a negative effect on the human respiratory organs. If the device is intended to heat a living space, it should be located in a separate room.
It is not recommended to use such a stove in a room where people are constantly present.
To improve the efficiency of the device, additional devices can be used. A waste oil furnace with a water circuit is organized by tying the coil body or installing a water jacket on the chimney. In the first case, the coil is made of copper pipe. It is built into the heating system of the house.
The water jacket is made of sheet metal in the form of a container, which is located in the upper part of the housing. It circulates a liquid coolant. For the stove to operate efficiently, the tank must contain up to 30 liters of water. Such a device will allow you to heat a large area.
An exhaust furnace with a water circuit must be equipped with an expansion tank with an emergency drain, necessary in case of boiling of the liquid. It is not recommended to install a membrane container here.
Another option for increasing the efficient operation of the furnace is to use an air heat exchanger, which is represented by a fan. No design changes are made to the device, and the heating of the room is improved. The fan is located near the upper chamber. When it cools, the heated air spreads across the area of the room. You can also pass air through a box located on top of the stove, or through a pipe that is installed in the afterburner chamber.
An exhaust furnace with a water circuit must be equipped with an expansion tank with emergency drain
Sauna stove design
An example of using a metal stove in a bathhouse
A high-quality sauna stove from a pipe can be built with your own hands.
The main elements of this design are:
- Furnace firebox.
- Located inside the body or an open container intended for bath stones.
- Ash pit chamber.
Between the chambers special elements are installed - gratings. A separate element is a tank for heating water. In some models it is part of the stove body, in others it is located on supports above the chamber with bath stones.
There are options for stoves with a separate water heating tank, which is connected to the stove by pipes or hoses.
Another important element is the chimney pipe, which is necessary to remove products generated during fuel combustion outside the room.
Popular options for pre-fabricated furnaces, their characteristics
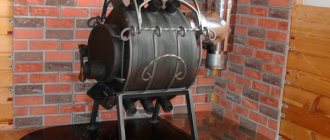
The Teplamos NT-612 stove is often chosen as a device used for heating a garage. The power of such a drip fanless heater can vary between 5-15 kW. Fuel consumption is 0.5-1.5 l/hour.
This furnace for use in a garage is a closed type device. It is equipped with a chimney, an air supply pipe and a built-in tank designed for 8 liters of fuel. Fuel combustion occurs in the inner chamber. The operation of the device begins with electrical heating of the plasma bowl. When the required temperature is reached, fuel is supplied and air is forced into the combustion chamber. The average cost of the device is 30 thousand rubles.
Important! For normal operation of the stove, it must be preheated with a small amount of diesel fuel, which is poured into a special bowl.
Another popular model is the Zhar-25 (MS-25) stove. This device can operate not only on waste oil, but also on diesel fuel. The device operates from the electrical network, which powers the internal fan. The thermal power of the furnace varies from 25 to 50 kW. It is designed to heat a room up to 500 square meters. m. Maximum fuel consumption is 4.5 l/hour. The device has large dimensions. Its weight reaches 130 kg. This stove needs to be equipped with a good chimney. You can buy it for 45 thousand rubles.
The exhaust furnace is equipped with a chimney, an air supply pipe and a built-in tank
Do-it-yourself stove made of sheet metal and pipes
Depending on the type of device, the structure can be created from pipes of different diameters or from iron sheets. To work you will need the following tools:
- grinder with cutting and grinding wheel;
- sheet metal and pipes;
- welding machine and electrodes;
- metal corners;
- metal paint that can withstand high temperatures.
Before making a furnace for testing, a detailed drawing of the apparatus is made. You can create it yourself or use ready-made options that are easy to find on websites on the Internet.
The first step is to make the lower part of the chamber connecting to the fuel tank. It looks like a rounded or straight tank with a lid where two pipes are located. The first is used to supply oil, and the second is used to strengthen the pipe that goes into the middle part of the device. Elements for the tank are cut out with a grinder and connected according to the drawing.
Depending on the type of device, the structure can be created from pipes of different diameters or from iron sheets
The bottom and metal corners are welded to the walls of the tank, which act as the legs of the structure. To create a lid, a sheet of metal is taken and holes are made in it. The first, with a diameter of 100 mm, is located in the center; the second, 60 mm in size, is located closer to the edge. The lid should be removable, which will make cleaning the stove easier.
A pipe about 37 cm long and 100 mm in diameter is used to supply oxygen. It has holes along the entire length of the element necessary for the supply of oxygen. The pipe is welded perpendicular to the cover at the bottom of the apparatus. An air damper is fixed on it, which will be secured with a rivet or bolts. The hole under the damper should be 6 cm in size. It is intended for supplying oil and igniting fuel.
The design of the upper tank is carried out by analogy with the design of the lower tank according to the drawing of a furnace using waste oil with your own hands. The walls of the product must have a thickness of at least 350 mm. A bottom with a diameter of 10 cm is cut out of the bottom of the tank, which should be placed closer to the edge. A small piece of pipe with a diameter of 11 cm is welded to the bottom of the hole. This is necessary to connect the element to the gas combustion tank.
Before making a furnace for testing, a detailed drawing of the apparatus is completed
Since the top cover of the supercharged exhaust furnace is exposed to high temperatures, a metal sheet with a thickness of at least 6 mm should be used for its manufacture. There is an opening in the lid for the chimney pipe, which should coincide with the opening at the bottom of the container. Between these elements, a partition made of dense metal sheet is mounted, located near the smoke hole. A pipe is attached to the top of the lid, connecting to the chimney part. The self-production process can be seen in detail in the video of the furnace being tested.
Important! To give the structure rigidity and stability, a metal spacer in the form of a piece of pipe with a diameter of 200-300 mm is welded between the chambers.
Required materials and tools
To manufacture the device you will need sheet steel from 4 mm. The thickness of the metal is important: the thicker it is, the more durable the finished stove design will be. Experts recommend using a sheet of five to ensure the reliability and resistance of the structure to temperature deformations.
To work you will need tools:
- cutting torch;
- Bulgarian;
- welding machine, electrodes;
- drilling machine, electric drill, set of drills (in particular, a drill with a diameter of 10 mm for making holes on the surface of the combustion chamber);
- measuring tools: tape measure, ruler, caliper.
In some cases, other devices may be useful. Practice shows that the presence of high-quality equipment contributes to the creation of the most successful designs, so you should not skimp on tools.
Step-by-step instructions for making a waste oil stove with your own hands from a cylinder
The device can be made from old items using the presented drawings of a waste oil furnace. For this process you will need a gas cylinder with a capacity of 50 liters. You should also prepare:
- pipe with a diameter of 80-100 mm and a length of 4 m;
- steel corner for making a stand and internal elements of the heat exchanger;
- sheet steel for making the bottom of the upper chamber and the plug;
For the process of manufacturing a furnace using waste oil, you will need a gas cylinder with a capacity of 50 liters
- brake disk;
- fuel supply hose;
- clamps;
- half-inch valve;
- loops;
- half-inch oil supply pipe.
An empty gas cylinder is used to make the body. You need to unscrew the valve on it, after which you should leave it outside overnight to ventilate the remaining gas. A hole is drilled in the bottom of the product. To prevent the formation of a spark, the drill must be moistened with oil. Through the hole, the cylinder is filled with water, which is then drained, washing away the remaining gas.
Two openings are cut in the cylinder. The top one will be used for the combustion chamber, where the heat exchanger will be installed. The lower one acts as a burner with a tray. The upper part of the chamber is specially made large. If necessary, it can be filled with other fuel options in the form of firewood or pressed briquettes.
A stove made from a gas cylinder will be more economical and efficient than one made from other materials.
Next, the bottom for the upper compartment of the device is made from sheet metal 4 mm thick. A burner is made from a piece of pipe 200 mm long, as shown in the drawing of a waste oil stove. There are many holes made around the circumference of the product, which are necessary for air to enter the fuel. Next, sand the inside of the burner. This will eliminate the possibility of soot accumulating on the ends and uneven surfaces.
The furnace burner is exhausted from a gas cylinder and welded to the bottom of the upper chamber. If there are no mining reserves, wood can be laid on the formed shelf.
Making a tray for working off and installing a chimney for an oil stove with your own hands
According to the drawing of the stove, a cast iron automobile brake disc, which has good heat-resistant characteristics, is used to make a waste oil pan. A steel circle is welded in its lower part, which forms the bottom. At the top there is a lid through which air enters the oven.
A cast iron automobile brake disc is used to make the pan.
Helpful advice! It is better to make the opening wide. This will provide sufficient air draft so that the oil will flow into the pan.
The next stage in the manufacture of a stove using waste oil from a gas cylinder is to make a coupling from a 10 cm long pipe that connects the burner and the pan. Thanks to this element, servicing the stove will be much easier. You can remove the tray and clean the bottom of the burner. To ensure the supply of oil, a metal tube is inserted into the hole in the housing and secured by welding. An emergency valve is installed on the pipe.
The chimney structure is made of a pipe with a diameter of 100 mm. One end of it is welded to the hole in the central upper part of the body, and the other is brought out to the street.
Helpful advice! The chimney pipe through the wall must pass through a special fireproof glass.
By watching the video “Furnace using a gas cylinder”, you can familiarize yourself with the sequence of actions in the manufacture of the device.
Tips and instructions
Take the prepared cylinder. It is important that there are no seams. As the pressure increases, this is where the splitting will occur. The walls must be at least 1.5 centimeters. Thick walls will not allow the tank to warm up, since the oil boils at 300 degrees, and inside the chamber the temperature must be at least 600.
The gas must first be released. It is advisable to do this outside. There the etching will be much faster.
You need to cut off the top with a grinder. Make legs at the bottom. This is not necessary, but it will be more convenient to operate and assemble. They are made from corners or fittings. At the top, retreat ten centimeters and weld the hole for the hood.
For exhaust hood, it is better to take a thin chimney pipe with a diameter of ten centimeters. The length should be from 4 meters. We insert it into the hole and weld it hermetically. A hole is made in it to regulate the air supply - there will be a damper there. A furnace for a garage during its development requires active mixing of pyrolysis with oxygen. Therefore, it makes many holes ten centimeters from the top. At a height of one meter from the floor, we make a landing in the tube for a new pipe with a diameter of 8 millimeters. It is inserted parallel to the floor.
At the top of the tank you need to make a hole of eight centimeters. There will be an oil intake here. There you can also place a tray where you can heat food and water. To do this, you need to cut a rectangle out of steel and weld it.
Making a drip-type stove with your own hands: step-by-step instructions
- Drill a hole in the bottom of the tank to allow the gas to escape. The drill must be generously lubricated with coolant or oil to prevent sparks. You can use a hand drill.
- A do-it-yourself drip-type furnace is equipped with doors. Cut them through with a grinder.
- From rolled steel you need to cut a pancake with a hole in the middle.
- We install it in place between the doors.
- We prepare the pipe - drill holes for oxygen supply.
- The tube is inserted into the prepared pancake and brewed. The seam must be airtight and not allow air to pass through.
- Take a cut circle from a pancake and weld it onto a car brake disc. This is how we will make a coupling.
- We drill a hole in the sidewall above the thicket and weld a metal dropper pipe.
- It is better to install a faucet on a hose outside. It should be made of oil-resistant rubber.
- A residual pipe is installed on top of the cylinder - this will be the chimney.
Oil drip stoves are a little more difficult to assemble. The oil is supplied by a tap system through a hose, which makes it heavier in design.
About nitrogen oxides
Any nitrogen oxides are a serious danger to the human body. The medical industry uses the weakest of them - nitrous oxide, subject to strict dosage and constant supervision by an anesthesiologist. If you combine a large amount of nitrogen with oxygen, this will lead to irreparable consequences. Tanks with oxidizers for combat missiles contain nitrogen tetroxide N204, a rather caustic and poisonous “brother” of heptyl.
If we talk about oil stoves, then in this case it is important to consider the following points:
- When the temperature reaches 900°C, the volumes of emitted nitrogen oxides reach their maximum level.
- If the gas-air mixture contains excess oxygen, then at peak temperatures it begins to “capture” particles of the fuel composition, and the formed nitrogen oxides move along the smoke tract.
- At a temperature of 600°C, the activity of nitrogen oxides becomes higher than that of oxygen. Almost harmless nitrogen, carbon dioxide and water vapor come out of the stove.
- When the temperature decreases to 400°C, the oxides acquire the second stage of stability. They can no longer oxidize heavy organic substances.
If you have a garage, it means that you also have exhaust, so it’s just right to make a stove using exhaust - an economical fuel option