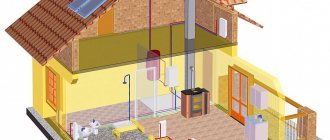
A brief excursion into history
Our ancestors noticed the heating effect of open fire when they lit fires in caves. Bonfires were replaced by partially enclosed hearths, and then by the first inefficient fireplaces, most of the heat from which went up the chimney.
The Russian stove, laid using channel technology, in contrast to the famous “blacksmithing”, is only 30-40% efficient
Over time, they came up with a kind of cap that traps hot gases inside the structure, and learned to separate the hot air into several streams. A turning point in technology occurred when I. S. Podgorodnikov, a well-known heating engineer in our country, took up the issue. He invented a “two-story hood,” which organized the exit of flue gases in a slightly different way. However, practice was not enough, and the idea was finally brought to life thanks to I.V. Kuznetsov.
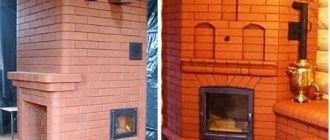
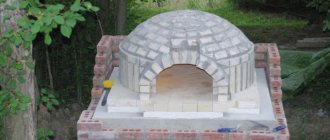
Option of a bell-type device for a wood-burning stove with an oven
Igor Viktorovich created a powerful theoretical basis for bell-type combustion, which he was able to successfully put into practice. Only thanks to his work did stove heating become truly effective. He has developed more than 150 different standards and collected dozens of standard solutions and schemes. The most advanced modifications became popular, hundreds of craftsmen adopted Kuznetsov’s bell-type furnaces. Let's try to figure out how “blacksmithing” works.
Basic general information
Throughout history, a large number of different models of brick kilns have been created. Among them, the lion's share consists of structures in the construction of which the bell-type principle is used. It is used to create massive stoves that can have a fireplace compartment and a bench. This construction principle is also used in the construction of compact structures. These structures are ideal for small houses.
One of the options for a miniature but effective device is the Kuznetsov furnace. The design got its name in honor of the famous stove maker. This inventor thoroughly refined the furnace design of the bell-type operating principle. Thanks to Igor Viktorovich Kuznetsov, this type of stove became popular in Russia and numerous other countries.
Operating principle of the bell structure
Previously, before Kuznetsov’s discoveries, heating was ducted, that is, hot air from the firebox rose up inside the device, heating its walls. Giving heat to the bricks, the gases cooled and, under the influence of draft, went into the pipe. Over time, due to uneven heating, cracks appeared and the masonry required repairs. The disadvantages of duct heating are rapid cooling and a large amount of soot.
The movement of gases, according to Kuznetsov’s theory, occurs freely. Hot air inside the structure is retained by two hoods, located either one above the other or side by side. There are options with holes in the middle of the domes. Both elements are connected through a so-called “dry seam” - free space necessary for the circulation of gases.
Gas flow diagram in a bell-type furnace
When the fuel burns, hot gases enter the first hood, which is connected directly to the firebox. Expanding, they cannot move upward and stop in a limited space, where they cool over time, or flow downward, reducing draft and delaying the combustion process. Thus, the temperature and combustion power are adjusted independently.
The second hood creates additional draft, as a result of which complete combustion of solid fuel occurs first, and the resulting heat is retained thanks to the pyrolysis gases accumulated under the roof. Due to the fact that hot air does not evaporate instantly, but circulates inside the device, the efficiency of the heat source reaches 93%. In addition, there is a noticeable saving in fuel (briquettes, firewood or coal), and soot deposition is reduced to a minimum.
Design features
Currently, there are more than 100 different types of structures. However, despite the variety of shapes and design solutions, the structure of all stoves is the same. Kuznetsov, inventing his stove, set the following priorities for himself: efficiency and high productivity. In order to achieve these indicators, the creator paid a special role to the location of the internal channels of the bell-type furnace.
The cap is a separate chamber where heated gas is retained, due to this, high efficiency is achieved, and much less fuel is consumed.
The standard version of the “caps” has two caps. The lower one is in direct contact with the combustion chamber, and the other cap is located at the top of the stove. The main function of the first is to separate gases into hot and cold streams. This is the main difference between a “blacksmith’s oven” and a channel furnace, where warm air comes out under the influence of draft.
In a bell-type furnace, the flow of heated air that comes out of the firebox is directed up the structure, under the first bell it lingers and accumulates heat for a long time.
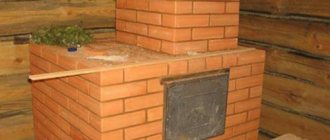
Stove for Kuznetsov’s bathhouse
The flow then moves through the passage into the second chamber, where it is also retained under the second hood, since the passage is at the base. As a result, before leaving through the chimney, hot air accumulates heat inside the stove for a long time. Thanks to this, the efficiency is very high - 90-95%, which is almost twice the productivity of a duct stove.
Another important component of the device invented by Kuznetsov is mechanical flow control. To do this, valves are installed in the unit, which, if necessary, can retain and change the direction of hot air.
Construction of “blacksmiths”: diagrams and procedures
Creating a “product” for the mass user, the author took care of the practical application of his research, creating a huge set of diagrams and drawings. For the precise construction of a great variety of modifications of bell-type furnaces, orders are used - step-by-step diagrams with images of each row of bricks.
Ordering a sauna stove
Unlike Russian stoves, “blacksmiths” are smaller in size and, accordingly, take up minimal space. The amount of brick is also reduced, due to the large amount of free internal space. Thanks to the optimal thickness of the walls, they heat up quickly, and what is especially valuable, they cool down quite slowly. If you carefully analyze the dome arrangements, you will see how much unfilled space there is inside the structure.
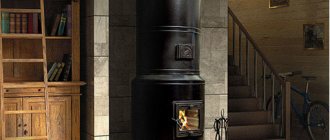
Multifunctional design of the Kuznetsov furnace
Part of the free space is occupied by caps, fixed in a horizontal or vertical order, not necessarily symmetrical. The size of the domes can be the same or different. The vertical arrangement is often used to save space in the room, especially if an oven or dryer is planned. Thanks to the variability of the installation of domes, it is possible to erect a structure of any shape, designed for a specific room or special conditions.
Ordering a heating stove
The space under the second hood is often used for mounting heat exchangers, hobs, bread ovens, etc. In projects designed for a bathhouse, a hot water tank or heater is installed in it.
If you correctly “read” the order drawn up by an experienced master, you can achieve amazing results. For example, to maintain room temperature in a house made of rounded logs in winter, you will need 2 fireboxes (morning and evening) with only 5-6 logs each; in the off-season, one firebox is enough.
Procedures for building a fireplace
Various modifications of bell furnaces
The followers of I. Kuznetsov created countless options suitable for independent construction, but each time they started from one of the standard projects. Let's look at some of them that can be used to improve a private home or cottage.
Heating structures for home
There are more than 25 standard schemes for constructing heating structures inside house structures, some of which perform only a heating function, but some options have useful additions in the form of a stove bench or oven.
Heating dome stoves
The place is chosen not near the wall, but in the center of the room, which entails a number of advantages:
- uniform and efficient heating of the room;
- lack of a cooling element (outer wall of the house);
- the possibility of free access for maintenance (for example, cleaning vaults);
- the ability to add built-in elements (hob, dryer, water heating circuit).
It should be noted the aesthetic perfection of bell-shaped structures: they occupy a minimum of space and look elegant, despite the presence of such details as a foundation. Modifications made “to the ceiling” have a short pipe (a characteristic feature of many “blacksmiths”) and slender outlines. The design possibilities are endless and depend solely on the taste and wishes of the homeowners.
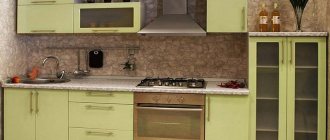
Cooking modifications for the kitchen
Turning a brick heating device into a cooking device is not so difficult - just add a metal stove with a couple of burners and slightly change the design of the base. However, full-fledged cooking structures include several additional horizontal surfaces (trays or drying racks), as well as an oven chamber.
Cooking "blacksmith" in the interior of a village house
In terms of the quality of prepared dishes, the dome device is not inferior to branded gas or electric equipment that city residents are accustomed to using. Among the standard designs there are those specially created for baking bread, which are called bread ones. For farmers, gardeners and inveterate gardeners, this is a real find: you can steam berries, dry fruits and mushrooms, and preserve vegetables according to old recipes.
Obviously, the cooking device is also a source of heat, so its more accurate name is heating and cooking. The best place for installation is a kitchen or a large hall that combines a kitchen area, a dining room, and sometimes a living room - in Russian national traditions.
Sauna stoves
To designate bath devices there is a special marking - BIC. Even externally finished “blacksmiths” compare favorably with other heaters. On the one hand, the material for manufacturing is very carefully selected, on the other hand, the installation of the dome does not interfere with the construction of neat and practical configurations. For example, bathhouse owners appreciated the rounded corners, which minimize injuries and burns.
Sauna stoves
By installing the stove in the right place, you can simultaneously heat and supply several rooms with hot water - a steam room, a shower room, a dressing room (or a rest room). Moreover, the parts of the structure opening into a particular room will perform various functions: create steam for the steam room, heat water for the wash room, and moderately heat the dressing room.
The sauna perfectly implements the principle of long-term heat preservation, characteristic of “blacksmiths”. Maintenance is kept to a minimum, as logs or briquettes only need to be added occasionally - all thanks to the dome design.
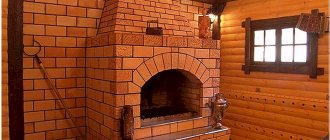
Fireplaces for decorating the living room
Kuznetsov's fireplaces, unlike most dome modifications, have an open design and a reduced efficiency index, but their heat transfer parameters are quite high. The cap prevents the rapid release of heat into the chimney, trapping hot gases in the upper part of the building. When using a conventional fireplace, at the end of the combustion process the room begins to cool; with bell-type heating, a comfortable microclimate remains in the room for a long time.
Construction of a fireplace according to Kuznetsov’s order
The possibilities to change the design and decorate the façade of the fireplace are endless. In addition to the usual shelf, you can build a number of functionally useful elements - small dryers for shoes or clothes with niches and hooks, and also line the outside with ceramic tiles or tiles. Interestingly, fireplaces are included in the design of some multifunctional structures.
Outdoor cooking solutions
Entire oven complexes have been developed specifically for outdoor cooking, which are distinguished by their functionality and ease of use. The simplest design is a brick mini-barbecue structure. It holds the heat for a long time and allows you to extend the cooking period.
Barbecue built according to Kuznetsov's drawings
Fans of summer kitchens, barbecues and grilled dishes will be pleased with the design diversity of outdoor stoves with layer-by-layer, pyrolysis, bottom and top combustion types. There are models that allow you to simultaneously fry, bake, and stew several dishes at once. Options for ordering bell-type stoves with an oven or grill can be found in the public domain or on the author’s official website.
Preparation before construction of the stove
After choosing a model of the furnace structure, the master carries out preparatory processes before starting installation of the heating structure. At this stage, a place for the construction of the stove is selected, and individual elements are purchased.
Cast iron parts for the stove Source glavspec.ru
The efficiency of a heating brick structure largely depends on the location of the structure. When choosing it, they are guided by existing fire safety requirements. If the walls of the house are built of wood, then the following rules are observed:
- The minimum distance from the stove to the wooden walls should be 10 cm.
- A heat-resistant basalt or asbestos layer is created between the wall of the building and the stove structure when the heating structure is built into a previously prepared niche.
- The minimum distance from the chimney to the floor beams and rafters should be 15 cm.
Preparatory work also includes the construction of a foundation for the furnace structure. The durability of the entire heating structure depends on its strength.
Important! The reinforced concrete base of the stove should not be monolithically connected to the foundation of the house. After all, the shrinkage of these two structures may differ, because unequal loads will act on them. When they are combined, it is possible that cracks will appear on the walls of the stove and the house due to mutual influence.
The stove foundation is not connected to the base of the house Source ad-cd.net
A bell-type heating structure is a dome stove. Regardless of the name, a building for heating premises can be built in a house that has long been put into operation. However, in this case, the floor is dismantled to construct a pit in which the foundation will be poured.
Important! The perimeter of a monolithic concrete foundation should be 0.5-0.8 cm larger than the base of the furnace.
Sometimes houses are built on a slab foundation. Therefore, the furnace structure also has to be built on the same foundation. To minimize the likelihood of deformation of structures, experts recommend building a lightweight stove. This is exactly what “Kuznetsovka” is.
On a note! It is recommended to bury the reinforced concrete base of the stove structure at least 30-50 cm into the soil.
Recommendations for self-construction
If you decide to build a stove according to one of Kuznetsov’s plans with your own hands, get ready for careful and scrupulous work. On the diagrams you will find a graphic representation of each row, but before starting laying you need to become familiar with the features of the technique, in particular:
- selection and pre-processing of bricks;
- purchase of metal parts (plates, dampers, doors, valves);
- determining the most suitable location;
- preparation of the base and foundation;
- possibility of installing a chimney, etc.
Fireclay refractory brick (Sh-5, ShB-8) is recognized as the best material for the internal masonry of “smiths”, and ceramics (M-150) for external decoration. To strengthen brick walls, metal elements (rebar, wire) are used. In order for the stove to function with maximum heat output, experienced craftsmen hone not only their skills, but also every brick - literally. They polish every detail, which is why projects completed by professionals look flawless.
Fireclay brick masonry
Having the author's order in hand, we recommend not to experiment, but to follow the designated order. Deviations from the diagram do not guarantee complete heat transfer.
Bricklaying
In a classic stove, the heating firebox is located at the bottom, so the structure warms up more efficiently. In addition, such a device leaves virtually no soot behind. To build a bell furnace with your own hands you will need:
- solid and fireclay bricks;
- grate;
- steel plate;
- drill with attachments;
- a mixture of clay and manure.
Brick laying is done on an absolutely clean foundation. Therefore, it is worth cleaning the floor in advance, and then laying heat-reflecting foil on it, which allows you to reflect the flow of heat that is directed downward, in which case the stove is protected from heat loss. The prepared foil should be slightly wider than the base. Once the design is ready, the edges of the paper can be cut off.
All further actions are carried out strictly according to the following scheme:
- In the first row, the brick is laid evenly; it is better to build the side walls using a spoon method, that is, move from right to left. As a result, there should be four bricks on the back and front sides, only two on the right, and three on the left.
- At the next level, a blower and a window are installed through which the single-bell stove can be cleaned. It should be noted that the window can be installed anywhere, the only condition is that it must be below the combustion chamber. The next row is laid similarly to this one.
- At this stage, it is necessary to reduce the hole where the combustion waste will fall. Its width should be approximately half a brick. They also make a partition that leads to the upper compartment; it should be located in the far corner from the firebox-oven.
- Work continues, but the edges of the discharge connector must be trimmed with fireclay bricks, and a grate must be installed on top. The next row is laid according to the same pattern.
- In the seventh row, you need to remove a chimney from the combustion pipe, the width of which is ½ brick, and it must go into the adjacent air compartment. The next level is laid out in the same way.
- Now you need to cover the firebox with solid brick, but the inside is lined with fireclay. In the 10th and 11th rows everything remains unchanged.
- At this level you need to lay out the sheathing, for this you need to take a fire-resistant brick, the masonry is carried out in ½ unit. The 13th row is laid according to the same pattern.
- At the next level, the movement of smoke is blocked using a steel plate, but bricks are used for the crossbar of the smoke collector. As a result, a single channel should be formed, which remained in the 4th row during laying.
The first level is considered complete, now you can begin the final work. This Kolpakov stove consists of 30 rows, although there can be fewer or more of them, the main thing is to maintain the order.