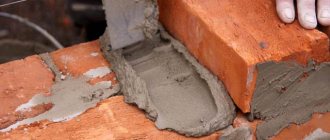
Installation of a ceiling-passage assembly requires certain skills and abilities from the performer. Home craftsmen with insufficient experience can make a number of serious mistakes. And what is typical is that most of them occur at the places where the chimney exits the wall or where it intersects with the roof.
It should be noted that this unit is very important and any mistake in its installation can lead to various undesirable consequences, including fire and fire.
Varieties
Chimney pipes can be classified into several types depending on their location:
- Indigenous - located at some distance from the stove and connected to it through a sleeve. This option is convenient due to the fact that the chimney can be connected to several stoves.
- Wall - in most cases they are built into the main wall, but in some cases they are run along it.
- Mounted - built over the stove.
Thus, its passage through the wall or ceiling will depend on exactly how the polyurethane foam pipe coming from the furnace is structured. But in most cases, preference is given to mounted chimneys.
Rules that should not be ignored
As noted above, chimney installation does not allow for negligence and must be carried out with full responsibility. To do this, it is worth considering a number of rules:
- Before installing a chimney, it is necessary to carefully plan its location so as not to damage the main components of the roof. In addition, there should be no more than 3 turns.
- The length of the horizontal section of the pipe coming from the furnace should not exceed 1 meter.
- When installing a metal pipe, it is necessary to provide a gap to flammable finishing elements (from 1.5 meters, no less).
- The chimney must be installed in such a way that its cut does not face the leeward side. Otherwise, the force of natural traction will be noticeably reduced.
- It must be possible to clean the pipe in the chimney duct. This is a very important condition.
As professionals note, single-walled polyurethane foam pipes must be additionally protected with thermal insulation material.
In this case, the outside heat-insulating layer must, in turn, be protected with a metal casing (made of galvanized steel). This measure will avoid fire and condensation. Which materials can be used will be discussed in the next section.
Using basalt wool
Basalt wool can be used as a heat insulator, but before purchasing you need to make sure that it can withstand high temperatures (more than 600 °C). Many experts tend to agree that this is not the best option. And there is a certain explanation for this.
The fact is that during the manufacture of this insulation, resins are used as a binder, which, when exposed to high temperatures, begin to release formaldehyde.
In addition, after attaching the ceiling-passage assembly, condensation sometimes forms in the chimney, and when moisture interacts with mineral wool, it loses its heat-protective properties. These qualities can be restored as moisture evaporates, but only partially.
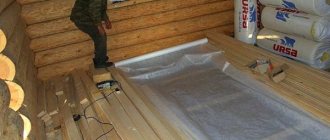
Types of ceiling penetrations
When crossing the ceiling, it is necessary to protect the “pie” materials from heat, and also somehow fix the pipe in a certain position. This task is accomplished by a ceiling cutout or, as it is also called, a “passage unit.”
The pass-through units are industrially manufactured. They are a box made of metal or mineralite, to which a stainless or galvanized steel plate is attached on one side. A hole is made in the middle of this assembly into which a sandwich is inserted. The plate on the side of the room closes the hole in the ceiling, decorating it. It also serves as a support for the heat insulator, which is used to fill the gap between the pipe and the floor beams for better thermal insulation.
This is a mineralite ceiling penetration. View from the attic
There is no disagreement regarding what material to use for the penetrations in the bathhouse: only stainless steel. The fact is that at temperatures that are typical for steam rooms, galvanization releases far from the most useful substances. Therefore, there is only one option: stainless steel.
Everything is installed simply. If the ceiling was made without taking into account the passage of the pipe, a square hole is cut in the right place (between the beams), which is 1-2 cm smaller than the size of the decorative panel. Beams and boards are covered with a layer of thermal insulation. If available, you can nail down strips of mineralite, basalt or asbestos cement cardboard (asbestos is harmful, so use it only as a last resort), just a strip of stone wool insulation. In some cases, padding of the insulation with metal strips is required (when it is needed, see below).
You can't do that - you had to cut a square hole. And the lining on the ceiling near the pipe is already charred...
When installing a pipe on a stove, the device is placed on a straight section that will cross the ceiling. The passage unit simply rises to the desired level. A strip of thermal insulation is placed under its edges that touch the ceiling boards, then everything is fixed with self-tapping screws. In many units, manufacturers even make perforations for self-tapping screws, so even this is not a problem.
The configuration of these products varies. Sometimes a metal cylinder is made around the hole for the pipe. The edges of the decorative plate protrude significantly beyond this cylinder. When installing a pass-through unit of this type, the hole is still cut in a square shape. A circle is also possible, but there must be a distance of at least 130 mm from the pipe to its edge if the pipe is insulated, and 250 mm if it is without insulation. With this option, please note: the size of the plate should be sufficient to mask the hole. In addition, with this form of passage through the ceiling, it is imperative to protect the wood of the ceiling not only with heat insulators, but also to cover it with strips of metal.
Pass-through units through the ceiling come in different configurations
There are passage units in which there is no cylinder around the pipe, but there are outer sides around the perimeter. They are made of metal, and can also be made of mineralite. If the sides are made of metal, the edges of the cutout in the ceiling must be lined with a heat insulator (for example, basalt cardboard or the same mineralite). If the sides are made of mineralite, then they themselves are a good heat insulator. So additional thermal insulation of the edges of the cutout is not necessary (but you can play it safe).
Sand
Until recently, sand was used in everyday life for these purposes. However, this option had a significant drawback due to the nature of the material - fine grain. Therefore, over the period of operation, sand spilled out through small cracks.
In this regard, the stove had to be periodically cleaned and the unit had to be filled again.
Other ways to avoid severe overheating
As some private property owners note, there is no point in thermally insulating the passageway. In their humble opinion, you can do without it. In addition, if the space is not filled with anything, this will prevent overheating and burning of a certain part of the chimney. And due to the ventilation created in this place, the pipe section will cool down noticeably faster.
In reality, this option for organizing a ceiling-passage assembly can be successfully challenged. The thing is that a hot pipe emits heat, which causes the nearby wood to dry out, which ultimately does not benefit the material. Fire can occur even at lower temperatures (+ 50°C). Therefore, it is necessary to take care of the necessary measures, for which you can resort to several methods:
- Installation of a water jacket on the chimney - the heated liquid can be used for heating. You just need to install a special tank and remove water from the pipes.
- You can simply install just one container where the water will be heated. You just need to make sure that it does not boil, and also periodically drain and add liquid.
Ultimately, the temperature in the chimney can be significantly reduced, as well as the risk of fire in building materials.
In addition to water, you can resort to air cooling of the ceiling-passage unit. To do this, you need to place another pipe on top of the chimney (so that one is in the other). And in their upper and lower parts you should put a grille for the passage of air flow.
Decorative metal fencing in Moscow
Options for interior finishing of chimneys
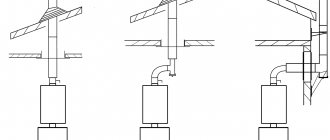
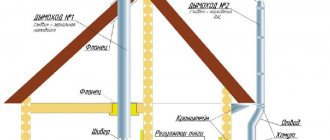
Often, all capital stoves, fireplaces and boilers are installed on the ground floor, and sometimes even in the basement of the building. Accordingly, the chimney will pass through 3 levels and we will have to finish each level:
- The sector from the stove to the interfloor ceiling or attic;
- Attic or second floor area;
- Transition through the roof and part of the structure located on the roof.
Options for a chimney in a two-story house.
Finishing the chimney above the stove
In this case, it all depends on what kind of heating unit you are dealing with. Brick stoves and fireplaces usually have the same brick chimney. Such structures rarely need additional decoration, since the brick itself already looks good.
But if second-rate brick was used to build the chimney or the finishing material does not suit your chosen design at all, then you have to choose between hanging heat-resistant panels, laying tiles and plaster.
It is not difficult to guess that the highest temperature of the flue gases is at the exit from the furnace. Therefore, I do not recommend installing thermal insulation and arranging some exotic decor on top of it. After all, you built the stove to keep it warm, but if you “wrap” it in thermal insulation, then all the heat will fly away.
Brick chimney above the fireplace.
The first tile you come across may not be suitable for cladding. The glaze on regular tiles will simply crack due to temperature. Since ancient times in Russia for finishing stoves and fireplaces
so-called tiles were used. Without going into the intricacies of technology, tiles are the same tiles, only heat-resistant.
But the price of highly artistic, beautiful tiles is, to put it mildly, frightening. A more affordable option would be clinker tile cladding. The range of clinker in stores is huge. Plus, all such material is heat-resistant.
In this case, we are interested in double-fired tiles. It is porous, which means it will not heat up as much. You can recognize it by its markings - the number 2 will appear on the tongue of the flame.
The stove is decorated with tiles.
Note!
I want to warn you right away - apart from coating a village stove with clay, there are no cheap finishing materials for stoves and fireplaces. We can only talk about medium and high prices.
I won’t talk for a long time about the technology of laying tiles, since it is the same everywhere. Primer for preparing a brick pipe, heat-resistant tile adhesive and grout are available in special departments.
First, the tiles will need to be soaked in water for 15 minutes. While it is wet, you dilute the tile adhesive according to the instructions on the package. Next, take a comb spatula and apply glue to the tile and the base, after which you glue the tile to the base.
Laying clinker tiles with heat-resistant construction adhesive.
The gaps between the tiles are maintained with plastic crosses. The next day, when the glue has set, you will need to pull out the plastic crosses and fill the gaps with grout. Usually the grout hardens within 2-3 days, after which you can heat the stove.
This is a general technology, so be sure to read the instructions on all packages; the preparation time for the compositions may vary greatly.
Another worthy finishing option is the use of hanging porcelain tile panels. The material is beautiful and durable, but expensive. Porcelain tiles have an ideal glossy surface, so many people unknowingly confuse these slabs with marble.
Hinged fastenings for porcelain stoneware panels.
To hang such slabs you will have to attach a metal frame to the structure. It is better to take special profiles for the frame, but if you do not find them, then install them the same as for drywall. To attach the frame to the pipe, you can use self-expanding metal anchors or special heat-resistant dowels.
The slabs are hung on special hooks. The porcelain tile itself can be whatever you like. This material is fired at a temperature of 1400ºC, so the chimney pipe certainly will not harm it.
Note!
When you install any hanging material on high-temperature surfaces, the panels should not be rigidly fastened. When heated, almost all materials expand and you need to leave a small damping gap, at least 3 - 4 mm.
Chimney and fireplace finished with porcelain stoneware.
Round ceramic or metal chimneys are also finished using a frame method. That is, first you install a frame around the pipe, and then you decorate the frame.
In addition to the above-mentioned metal frame made of UD and CD profiles, a ceramic version is available for round chimneys. In this case, such ceramic products are first wrapped in a heat-insulating cocoon, and then the ceramic sections are mounted. Such a pipe often no longer requires additional finishing.
Finishing the chimney on the second floor or in an adjacent room
It was not for nothing that I mentioned the adjacent room. Now many city residents, without waiting for mercy from utility services, install AGVs in their apartments. Naturally, everything is installed there by specialists, and the pipe is routed horizontally through the wall to the street.
Exiting a coaxial pipe through the wall.
Sometimes such a chimney passes through a loggia or balcony. And I am often asked how to finish a balcony with a pipe from a heating boiler, and what materials can be used for this.
So, the balcony can be decorated with any materials. There is no fire danger in this case. The fact is that for AGV and some other models of gas boilers, a coaxial chimney pipe is used.
This pipe has a double-circuit design:
- Exhaust gases exit through the internal circuit to the street;
- And through the external circuit, air enters the closed combustion chamber.
Thus, these units use air taken from the street to operate. For those who do not understand, I have placed a diagram below.
Diagram of a double-circuit coaxial pipe.
Accordingly, when such a coaxial pipe passes through a balcony or loggia, you can decorate it however you like. Since its outer part is metal and, more importantly, the top of this pipe is actually cold.
Usually coaxial pipes are simply painted. Sometimes a wooden or metal frame is built around them and this frame is already sheathed with some kind of interior finishing, for example, clapboard or plastic panels.
Finishing of the chimney on the second floor or in the attic is done only with the use of thermal insulation. In the first case, thermal insulation is needed so that you or someone in your household does not get burned on a hot chimney.
AGV with output to a coaxial pipe.
As for the unheated attic floor, if you do not insulate the chimney in this sector, condensation will settle on its inside. As a result, it will begin to constantly become overgrown with soot and actively deteriorate.
On a heated second floor without insulation, you can only leave a powerful brick pipe. Flue gases in this sector are no longer so hot. Plus, brickwork will be a good protection against overheating and it is impossible to get seriously burned on it. Typically, such pipes are simply tiled or plastered.
The new-fashioned metal sandwich pipe does not need finishing at all. This design is initially equipped with powerful thermal insulation, and its body is made of perfectly polished stainless steel.
Sandwich pipes for chimneys.
Note!
Only non-insulated ceramic and metal chimneys require mandatory finishing on the second floor. Brick and insulated sandwich pipes can be decorated as desired.
Typically, an open pipe on the second floor is enclosed in a cocoon of dense basalt wool, which covers it over the entire area, right up to the ceiling. Then the frame is constructed and the finishing is installed on it. Of course, this is much easier and faster.
But one of my friends did it more wisely. His method provides for both maximum heat transfer from a hot pipe and protection of people from accidental burns. Plus this design looks quite attractive.
Stone-lined chimney on the second floor.
A ceramic pipe was initially installed for the chimney; the design is durable and reliable, but it gets very hot. I didn’t want to lose precious heat on the second floor, so the man built a load-bearing frame made of metal profiles around the pipe.
The frame itself was made square and covered from the inside with high-density cotton basalt slabs, 50 mm thick. A gap of 50 mm was left between the thermal insulation and the chimney. But the heat-insulating cocoon was not made solid, but with two ventilation windows.
One window was made at floor level, and the second almost at ceiling level. Both top and bottom ventilation gaps ran horizontally along the entire perimeter of the structure
Chimney box covered with plasterboard on the second floor.
Everyone knows that warm air rises and to prevent the ceiling from burning from the rising currents, a layer of basalt wool was glued onto it and a stainless steel plate was fixed on top of it.
The outside of the metal frame was covered with fire-resistant plasterboard (GKLO) and puttied over the entire surface. At the same time, a person installed a decorative mesh on the upper and lower ventilation gaps along the entire perimeter of the plasterboard frame.
Diagram of the chimney box on the second floor.
There was an idea to additionally install small fans on the ventilation gaps, but after a month of operation we realized that everything works well without them.
At floor level, cool air is drawn into the lower ventilation gap. It heats up quickly from the chimney and exits through the top ventilation. The stove itself is built with high quality, so both floors are evenly heated in half an hour.
Fire-resistant drywall can be decorated with anything. After puttying, the easiest way is to cover the box with wallpaper or apply decorative plaster.
Original design of the chimney box.
If desired, the sheets can be covered with tiles; in this case, any will do, since thermal insulation is installed inside. Plus, the plasterboard box itself can be made with niches and this will already be an original design.
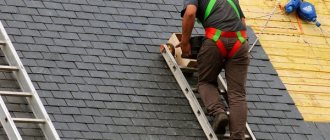
Installation of a chimney on the roof
Arranging a chimney on the roof and passing through the roof is perhaps the most difficult and important stage. If a pipe inside a building without finishing simply spoils the interior, and even if you are careless, you can get burned on it, then external finishing is, first of all, protecting the chimney from destruction and only then a beautiful decor.
Ceramic insulated frame for finishing round chimneys.
Pipe passage through the roof
The easiest way is to arrange the passage of a round insulated sandwich pipe through the roof. Here you can do without completely disassembling the roofing pie.
- I start this installation from the inside of the roof. If you are dealing with an equipped roof, then first the decorative covering on the ceiling is dismantled. There you will most likely find a vapor barrier membrane, followed by a layer of insulation and a windproof film. All this will need to be cut to the size of your pipe;
Cotton insulation for round chimneys.
Note!
When installing stoves, chimneys, boilers and other high-temperature equipment, all this equipment can only be insulated with basalt mineral wool. Its melting point starts at 900ºС, glass wool melts already at 450ºС. and insulation materials such as polystyrene foam, extruded polystyrene foam, polyurethane foam and penoizol are strictly prohibited; they emit carcinogens already at 70ºC.
- It is more convenient to cut a hole for a round pipe in the roofing while on the roof. But in order not to make a mistake, I drill several holes from below along the contour of the future pipe;
- Now the bottom flange ring is fastened with self-tapping screws onto the sheathing, on top of the vapor barrier;
Conical elastic flange.
- Further work will be carried out on the roof. Using the previously made designations, a hole is cut for the pipe, after which you can immediately install the sandwich pipe;
- To seal the joint between a round chimney and the roof covering, the industry uses special corrugated flanges made of soft polymer; they can withstand temperatures up to 270ºC.
The corrugation in them is made in the form of a cone. You only need to cut it in the right place so that the hole on the soft flange is slightly less than the diameter of the pipe;
Fastening the lower flange ring.
- Next, lubricate the flange with soap and pull it tightly on top of the pipe. The base of the flange is made of flexible metal, usually aluminum or copper. You will need to tap this metal ring with a rubber hammer so that it takes the shape of the roof;
- At the final stage, lubricate the joint with sealant and screw the curved flange to the roof with self-tapping screws.
Step-by-step technique for installing a soft flange on the roof.
Sometimes the pipes from the boiler and fireplace are discharged in one place, then the exit is arranged in a package, and this package is immediately decorated. The rectangular outer frame for such a package is most often made of wood. In this case, the wood is impregnated with fire retardants, although no one forbids assembling it from metal profiles.
The inside of the frame is sheathed with basalt thermal insulation. And for external cladding there are several options, I will talk about them a little later.
The passage through the roof of a brick pipe and a rectangular frame with a package of pipes is carried out in almost the same way. But it’s a little more difficult to seal a brick chimney, so I’ll tell you about it.
Wooden chimney lining box.
It is better to seal the brick pipe before installing the roofing. If such a coating is already in place, then this sector will have to be opened, otherwise a high-quality finish will not work.
To prevent water from leaking, you will need to install 2 aprons. The lower apron is considered the main one and is mounted under the roofing material on the sheathing. The top apron is installed on top of the roofing and is more responsible for the decor.
We start naturally with the lower apron. In most cases, it is made from galvanized sheet with a thickness of 0.5 - 0.7 mm. The entire structure consists of 4 sectors, corresponding to the number of planes of the pipe.
The lower part of the apron is placed on the roof sheathing; the width of this sector is about 300 mm. Then the sheet bends and rises along the pipe, here the width is 150 - 200 mm.
Assembling the lower apron from segments.
This is sufficient for wooden and metal frames. When it comes to brick pipes, the upper edge of the apron is bent towards the pipe at 90º by about another 10 mm.
- First, all parts of the apron are applied to the installation site and a line is marked along the perimeter of the pipe;
The edge of the lower apron, inserted into a groove on a brick chimney.
- Then, along this line, a groove with a depth of about 10 - 15 mm is cut with a grinder. This groove is immediately cleaned and washed with water;
- Now we fill the groove with heat-resistant sealant and immediately, before it hardens, install all 4 parts of the apron in their place. In this case, the upper bend on the apron goes into the groove filled with sealant;
- Ideally, all sectors of the apron should be soldered. But in practice, craftsmen usually join the planes overlapping, coat the joints with sealant and screw them to the base with self-tapping screws and press washers;
- There is one more important point: below the pipe along the roof slope, you will need to install a so-called tie - a wide galvanized sheet that is placed under the lower apron and lowered to the edge of the roof or into the nearest valley. The sheet is taken 50 cm wider than the pipe on each side; this is a kind of insurance in case of a roof leak near the pipe.
Sealing of the soft top apron.
Next, the roofing covering is installed and the outer apron is mounted on top of it. Nowadays such aprons are made from corrugated lead or aluminum sheet.
This corrugation is screwed to the pipe trim using self-tapping screws and press washers. And it bends around the roof using a rubber hammer. Sometimes flashings are made from rigid galvanized sheet, but they are more difficult to seal.
Options for lining the chimney on the roof
As I already said, the chimney sandwich pipe does not require any finishing. There you will only need to install a protective top deflector.
If you are arranging a wooden or metal frame for the pipe package, then there are 3 cladding options for it:
Finishing the chimney with corrugated sheets.
- The cheapest and easiest way is to sheathe a wooden frame with a package of pipes with corrugated sheets. Such sheets are simply simply attached to self-tapping screws with a press washer. Special fittings are produced for arranging the corners and top edge. Owners who have chosen metal tiles for their roofing often finish their chimneys with it, so the technology here is the same as when finishing with corrugated sheets;
- If there is a desire to plaster the frame under the chimney, then this frame is sheathed on top with asbestos-cement slabs and they are already plastered;
- I've even seen pipes lined with fiber cement siding. It looks beautiful, but fiber cement siding is heavy and needs an appropriate frame for it. Therefore, it is better to entrust such finishing to a professional.
Colored decorative plaster on the chimney.
Note!
Don't even think about lining your chimney with vinyl siding. Remember that you are dealing with a hot surface and the plastic may simply melt.
Lining a brick pipe with a corrugated sheet is even easier than a frame structure. You will need to attach several wooden blocks or metal profiles to it and screw the cladding on. By the way, it is advisable to lay basalt wool slabs between the lathing strips; outdoor temperature changes are especially harmful to structures.
In addition to facing with corrugated sheets, old brick pipes that have lost their appearance can be finished in two more ways: clinker tiles and plaster. In both cases the technology is approximately similar
Fastening insulation to a brick pipe.
Naturally, the surface will first need to be cleaned and primed. Since we are dealing with constant temperature changes, the pipe will need to be reinforced. In this case, it is better to choose galvanized metal mesh for reinforcement. We fasten the mesh with anchors or heat-resistant dowels.
For the rough layer, I mix a cement-sand mortar, only it is better to take expanded clay rather than ordinary sand. Expanded clay inclusions will act as insulation.
Chimney reinforcement with galvanized mesh.
You will need to try to level the rough layer well, and then think about what you can do best. You can lay tiles or apply a layer of finishing plaster. By the way, instead of clinker tiles, the chimney can be lined with natural stone, the technology is the same, only without plastic crosses.
| Flue gas temperature depending on the type of fuel | |
| Type of fuel | Temperature of gases in the chimney in ºС |
| Coal and coke | Up to 700 |
| Dry firewood | Up to 500 |
| Fuel oil | Up to 350 |
| Pellets (compressed sawdust granules) | Up to 300 |
| Natural and bottled gas | Up to 200 |
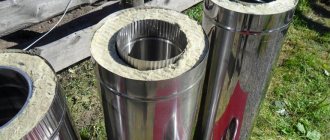
Metal knot
Today, sandwich type pipes are widely used. Essentially, these are two metal cylinders of different diameters inserted into one another.
But how to do everything? The work will be carried out as follows:
- First, you need to purchase a ready-made metal feedthrough, which is otherwise called a box due to the characteristic shape of the cube. It can also be made independently from galvanized iron, taking into account the diameter of the pipe and the thickness of the ceiling material. In this case, the diameter of the hole should be slightly smaller than the size of the chimney of the ceiling-passage unit.
- The next step is to prepare the pipe for installation. Due to the thinness of the metal, it is not able to isolate the heating chimney from combustible material. For this you can use basalt fiber with a foil surface. It is glued to the inner walls of the box, as well as to those parts that will come into contact with the ceiling.
- A place is marked on the ceiling, which is subsequently cut out with a jigsaw.
- Now you can install the box.
- A special metal panel (often made of stainless steel) with a hole cut in the middle should be fixed to the ceiling, and its diameter should correspond to the size of the circle in the box.
- At the final stage of arranging the ceiling-passage assembly, you should arrange a chimney on the floor of the second floor (if it is a house) or attic (whether it is a one-story house or a bathhouse). This is done using the same panel or metal sheet with a hole cut out in the middle.
- The location of the pipe must be calculated in such a way that the junction of its two parts does not fall on the internal cavity of the box, which is already located in the ceiling. It should be lower or higher.
As previously noted, instead of basalt fiber it is better to use other materials - sand (although also not the best option), clay, expanded clay.
The material will not only serve as insulation, but will also be a good heat insulator.
Step-by-step instructions: how to make polyurethane foam for a chimney with your own hands
To make a homemade structure for passing a pipe through the ceiling, you will need the following materials:
- tin for walls;
- stainless steel sheet for the bottom (bottom);
- mineralite for isolating cuttings from the ceiling;
- galvanized profile, which is used for installing drywall.
The above list can be changed at your discretion and desire. But let's start assembling:
- Make walls from tin. Instead of a bender, use boards. Secure the corners with rivets. The box is made according to the thickness of the ceiling, the width of the groove is calculated according to the standard, multiplying it by 2 and taking into account the diameter of the chimney.
- Cut strips of mineralite under the walls - they will separate the frame from the ceiling - and prepare spacers from a galvanized profile. They are needed during installation so that the box holds its shape.
- The bottom is made of stainless steel. Make a hole in the sheet with a small gap to easily remove the pipe. The sheet is mounted directly when installing the box in the ceiling.
The design from the example is suitable for the ceilings of one-story bathhouses and houses. For two-story buildings, the above list will have to be expanded - at least by an additional sheet of stainless steel for the lid.
Drywall box
In this case, the instructions for installing the ceiling-passage unit look the same as with a metal box, with the exception that other materials are used. The procedure itself looks like this:
- It is necessary to make a square hole in the ceiling. In this case, the distance from the walls of the ceiling to the surface of the pipe must be at least 200-250 mm.
- Using heat-resistant plasterboard, make a high box. It will cover the pipe from blocking.
- On the ceiling side, a metal sheet with a circle in the middle (in accordance with the diameter of the chimney) is also fixed to the hole made.
- A metal pipe is pushed through the sheet.
- In the interfloor ceiling, a heat insulator is laid around the entire perimeter and along the entire height of the box.
As noted earlier, when installing a ceiling-passage assembly, expanded clay and other materials can be used instead of mineral wool.
Carrying out penetration depending on different types of roofing
The roof penetration will vary depending on the shape of the chimney and the material that covers the roof. Thus, to install a sandwich pipe, installation of a heat-insulating box is not required, since the insulation here is laid during manufacture. To penetrate the roof of a brick or ceramic chimney, it is necessary to construct a thermal insulation box to protect the building from fire.
Elastic penetration for round pipe
The simplest but most universal penetration exists for a sandwich pipe. It is a rubber or silicone pyramid that is put on the pipe and fixed to the roof. Moreover, the smoothness of the roof covering in this case does not matter much - the elastic insulating apron is equally hermetically attached to the ribbed surface of the profile, wavy tiles, and soft ondulin. Manufacturers offer ready-made flexible penetrations for sandwich chimneys of any cross-section.
Installation of elastic penetration is carried out as follows:
- A hole is cut in the roof for the pipe outlet so that at least 38 cm remains from the pipe wall to the combustible roofing materials.
- A galvanized metal sheet with a hole for the chimney is fixed to the inside of the roof. The distance from the outer wall of the pipe to the edge of the sheet hole is at least 14 cm.
- Remove the pipe and secure it in the desired position.
- The elastic penetration pyramid is cut to a level corresponding to the diameter of the pipe and put it on the pipe through the top.
- The protective apron of the penetration is applied to the chimney passage, having previously coated the edges with fire-resistant sealant.
- A metal mounting ring (flange) with holes is placed on top and secured with self-tapping screws.
For roofs with a steep slope angle, manufacturers produce special elastic penetrations, where the slope of the pyramid and apron is more pronounced.
Note! The elastic penetration material is designed to withstand significant changes in external temperature and is resistant to sunlight and moisture.
Metal penetration for round pipe and smooth roof
A metal feedthrough for a round pipe can also be purchased ready-made. It is a metal cone, the upper hole of which corresponds to the diameter of the chimney pipe. When choosing a metal penetration, you need to know the angle of inclination of your roof.
We recommend that you read: Connecting a modern heating radiator to polypropylene pipes
Installation diagram for metal penetration:
- the hole in the roof and the inside of the protective structure are designed as for elastic penetration;
- a passage pipe is put on the chimney, the edges of the lower part are coated with fire-resistant sealant;
- secure the protection with self-tapping screws with rubber caps to seal the mounting holes.
Note! A steel passage pipe is used to design the chimney penetration only for smooth roofs.
Exiting the chimney to the street
If the outer walls of a house or bathhouse are made of brick or other non-combustible material, then bringing a chimney through them is not so difficult. To do this, a round through hole is made, and subsequently a metal sleeve is installed there.
But in the case when the opening is made perfectly round in exact accordance with the dimensions of the sandwich, you can do without this element. It will also be impossible to insert the sleeve if the chimney passes through the wall at an angle other than a straight one.
When installing a gas outlet pipe, one should not forget that its joints should not be located in the thickness of the ceiling. Existing gaps must be filled with the selected fireproof sealant. By and large, installation of a ceiling-passage assembly for a bathhouse or home comes down to installing a pipe in the wall and connecting it to a vertical chimney.
At the same time, if the house is built of wood or using frame technology, then you should be guided by the same rules as arranging a chimney through the ceiling. In other words, you should also make an opening here, but in the wall and install a ready-made box or make it yourself. Then fill the internal cavity with a heat insulator and cover both sides with metal sheets (made of galvanized iron).
What are the dangers of errors when installing penetrations through the roof?
There is an opinion that the efficiency and safety of an individual heating system depends on the design of the stove and the skill of the stove maker. Few people think that complete combustion of fuel depends more on the chimney and traction force. And only specialists know how important it is to install a high-quality passage through the roof.
When building a furnace, the main attention is paid to the temperature stability of the materials. But the fire-resistant brick of the chimney and the mineral insulation of the sandwich pipe are defenseless against systematic moisture.
Poor design of the pipe outlet to the roof entails serious consequences affecting the operation of the chimney. Violation of the standards for thermal insulation of pipes from flammable roofing materials and attic floors can lead to:
- to fire in places where the pipe and combustible materials of the house structure come into contact;
- to the formation of a large amount of condensate in the pipe, which will lead to its rapid destruction;
- to the formation of a thick soot deposit on the inner wall of the chimney and a decrease in its working clearance;
- to a decrease in stove draft and the formation of carbon monoxide, which is dangerous to human life.
Poor quality waterproofing of a roof penetration assembly threatens:
- penetration of atmospheric moisture into the attic, which provokes the formation of fungus and mold;
- getting the rafters wet leads to the initiation of wood rotting processes, no matter how well it is treated with an antiseptic;
- destruction of the brickwork of the chimney;
- increased corrosion of the metal pipe;
- by getting the thermal insulation (mineral wool) wet, after which this material becomes completely unusable and loses its thermal insulation properties.
We recommend that you read: Where to properly and safely hide heating pipes in a private house?
Note! Even minor flaws during the installation of a roof penetration of a chimney over a couple of years can cause an unexpected fire, destruction of the heating system, and carbon monoxide poisoning of residents.
A number of rules for fastening the passage
To correctly install a metal chimney to a wall, you must follow simple rules:
- For a pipe with a tee and a condensate drain in its lower part, it is best to use a special bracket.
- When installing sections one into another, the chimney should be secured to the wall using clamps every meter.
- It is necessary to ensure that the fastenings do not coincide with the joints of the sections.
- When going around the roof overhang, it is necessary to use elbows whose angle is only 30° or 45°.
If the installation of the drainage system has not yet been completed, then you should leave space for laying the gutter using fasteners of a suitable length.