What can be made from pine cones
Many people associate this material exclusively with crafts for children. With the same hedgehogs and bears that parents make every year for exhibitions in kindergarten and elementary school.
But, in fact, it is a universal material from which you can create amazingly beautiful interior decor elements. Atmospheric Christmas wreaths, baskets, decorations for the festive table and much more.
Photo gallery: DIY crafts from pine cones
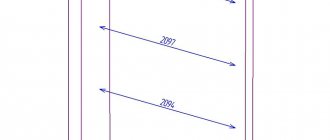
Now let’s look at examples of exactly what crafts from pine cones you can make with your children for kindergarten or school, as well as for autumn or winter home decor or as a gift. Why not make an owl, a fox, a spider, a bird, a flower pot or a bouquet?
Autumn crafts from pine cones
Autumn is an excellent time for crafts from various natural materials, although you can make something from pine cones at any time of the year, the main thing is to stock up on them in sufficient quantities, having visited a pine or spruce forest at least once. But if you’re going to make autumn crafts from pine cones, then do something on the same theme - using maple leaves, acorns and chestnuts. For example, you can make a beautiful wreath from leaves and cones, and more ideas are in the photo below.
Winter crafts from pine cones
In winter, from pine cones you can make various crafts for New Year's home decor - Christmas trees and snowmen, Christmas tree decorations, various animals, decorations for windows and the holiday table, wreaths on the door, garlands on the wall and fireplace and other little things that can be used to decorate the house for the New Year and Christmas or use as a homemade gift.
Crafts from pine cones for children 3-4 years old
With small children under 3-4 years old, it is better to make something simple out of pine cones that they can handle. For example, you can make various animals from cones and plasticine - an owl, a fox, a swan, a bear (from several cones - we already wrote above how to make one), a hare, a fish, a crocodile, a dinosaur and any other animals - that's what you can make together with your child.
Crafts from pine cones for grades 1, 2 and 3
With older children, those who study in grades 1-3, it is already possible to make some more complex crafts, using not only pine, spruce and cedar cones, but also other natural materials. This could be a snowman on skis, skiers in multi-colored jackets, a large craft Christmas tree or a bear made from several cones, as well as Santa Claus, elk, deer bird and other Christmas tree decorations.
Crafts from pine cones for the New Year
With New Year's crafts from pine cones, it's even easier - make what you can decorate your house with - a Christmas tree and a snowman, a team of Santa Claus's reindeer, decorations for the Christmas tree, windows, fireplace and walls for Christmas, things for decorating the holiday table and homemade gifts - this just a small part of what you can make.
You will find more ideas for New Year's crafts from pine cones in this article.
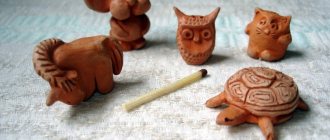
Crafts from cedar cones
If you managed to get large cedar cones, they can also be used for various crafts. Owls, squirrels, candlesticks and Christmas trees are just a small part of what might come to mind. By the way, you can use not whole cones, but their individual parts, for example, you can make a turtle from scales, or make a tree or a charming topiary from pine nuts.
Craft from 3 cones
Let's now see what can be made from 3 cones. Any triple craft - three snowmen, owls or Christmas trees of different sizes look more attractive than one. You can also make a fox - body, head and tail - here you have three cones.
Craft from 4, 5, 6, 7 and 8 cones
Complex crafts made from several cones are suitable for children from primary school. For example, you can make a Cheburashka from 6 cones, two deer or owls from 4 cones, a turkey from 5, a bear from 8 or 7, and a complex composition from several animals or other acting characters from as many as needed.
Crafts from pine cones and branches
You don’t have to limit yourself to pine cones; you can easily combine various natural materials in your crafts. For example, you can make birds on branches, a tree or a bouquet in a vase (you can decorate your house with it), a round or five-pointed wreath made of twigs, decorated with pine cones, and other crafts that you can come up with.
Related article: DIY New Year's crafts from pine cones (25 photos)
Crafts from cones and leaves
By adding maple and other leaves to the cones, you will get more original crafts, more voluminous and large-scale. For example, you can make a body out of cones, and wings for a swan, owl or any other bird out of leaves. Leaves can also be used on the roof of the house, bouquet decoration and other things.
Crafts from cones and chestnuts
You can also combine cones and chestnuts - here are a bunch of ideas for you to start with on what can be made from chestnuts.
And if combined with pine cones, you get various funny animals - hares and moose, wreaths and men, houses with figurines and much more.
Read more ideas about crafts made from chestnuts and acorns in this article.
Crafts from cones and acorns
Acorns can also be used for combined fall crafts with children. Skiers, men and women, various little people, houses with a vegetable garden, nests with birds and other ideas are just a small part of what can be made, and for inspiration, here are a few more photos of crafts from pine cones and acorns.
Christmas tree craft made from pine cones
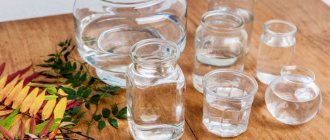
Now let's look at the most popular crafts from pine cones and how you can make them. Let's start with the Christmas tree. There are two options here. The first one is simple - we take a cone and insert it into a pot made of a thimble or some other small vessel - here you have a miniature Christmas tree. Balls for it can be made from beads, beads or plates, glued between the scales. And for greater similarity, you can paint it green and decorate it with tinsel.
Crafts from deer cones
You can also make a deer from pine cones. It is best to make the body from a large spruce cone, and the head from a small pine tree or an elongated acorn. For the tail and legs, use twigs or wire, and you can fasten it all with glue.
Craft from swan cones
Swan from cones is also made quite often in kindergarten, as it is a very simple craft. A pine or fir cone will become the body, we make the neck and head from white plasticine, and the wings from the same, from cotton wool, paper, cardboard or dried leaves.
Craft from bear cones
It is best to make a bear from several cones. Above in the article there is a step-by-step master class, and here we have collected a few more ideas, from simple to more complex crafts. The most popular idea is 6 cones: a head, a torso and 4 legs. You can also simply take one cone as a base, and mold the head and paws from plasticine.
Bird craft made from pine cones
You can make a wide variety of birds from pine cones. A mysterious owl, an elegant swan, a cute titmouse, a funny crow, a naturalistic snowman, and of course - a chicken and a rooster made of pine cones as a symbol of 2019 - are just a small part of the ideas that you can implement together with your child.
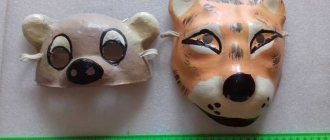
Craft from owl cones
And if we talk about birds, we can’t help but remember the owl, since it is best made from such natural materials as pine and fir cones. The main thing is to make large round bulging eyes out of paper or something else - just glue them to the bump on the side of the tail, add wings from feathers, paper or plasticine - and the craft is ready.
In the same way, you can make from pine, spruce and cedar cones and any other animals. It could be a fox or a hare, penguins and bullfinches, a hedgehog and a pig, a dog or cat, a horse or a sheep. In general, it all depends only on your imagination and how natural materials you have at hand.
Preparing cones for work
It is better to collect material in mid-autumn or spring. The autumn harvest is suitable for crafts from unopened cones. And by spring they are fully ripe, freed from seeds and acquire a permanent shape.
The main difficulty in the work is that they need to be properly prepared. Otherwise, the source material and the product itself may be severely deformed.
Drying
Even if the cones look dry and open, otherwise the craft may not be successful, before use they must be dried in one of the following ways:
- natural drying. You can use wicker baskets or lattice boxes as containers. It is important that the container is not airtight and does not create a greenhouse effect. Lay paper (newspaper) at the bottom of the container, and then lay the prepared material. Closed young pine fruits are dried in one layer. Already opened specimens can be stacked in 3 tiers. The box is installed in a well-ventilated and dry place for 2-3 weeks;
- in a frying pan. In an open cast-iron frying pan, lay out the cones (in one layer) and, gradually turning them, dry them until they are completely cooked;
- roasting in the oven. The prepared material is laid out in even layers on a baking sheet lined with foil. The oven is heated to 250 degrees and the prepared raw materials are placed in it for 40-50 minutes. The oven door should remain ajar.
Some craftsmen recommend drying pine cone crafts in the microwave. This is the fastest way to evaporate moisture. At maximum power, it will take only one minute to dry completely. Before placing in the microwave, the pine cones are placed close to each other on a plate lined with a paper towel. To avoid unpleasant situations, the process must be controlled.
Treatment
Before drying, it is necessary to carry out processing, the choice of which depends on the purpose of the collected material:
- to get closed cones, before drying, they are dipped in wood glue or PVA for 30 seconds;
- To give the workpieces an unusual shape, the cones need to be kept in boiling water until elastic, and then shaped and secured with electrical tape or rope.
It is also recommended to treat the collected material against insects before use. To do this, prepare a solution of 6% vinegar: 1 glass of vinegar for 1 glass of water. The workpieces are kept in this solution for about 30 minutes and then dried.
Pine cone decoration
What could be more interesting for a child than Christmas tree decorations made with his own hands? Moreover, they can be made in a matter of minutes. For crafts, decorative elements, fir branches, artificial greenery, lace, mini-gifts, beads, etc. are used. You will also need paint, twine and hot glue.
The entire decor is attached to the base of the cone, which must be painted or covered with glitter in advance. Most often, golden or white paint is chosen for Christmas tree decorations. Along with the decor, a piece of twine folded in a loop or an open paperclip is attached.
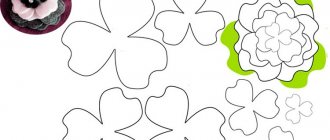
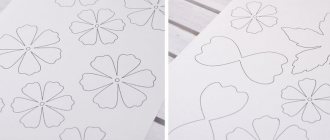
Unusual flowers from pine cones
Every child can please his mother or teacher with a bouquet of bright and unusual autumn flowers. To create a craft you will need: straight twigs or brushwood, acrylic paint, brushes, green foamiran or colored paper, hot glue.
Leaves made of foamiran or colored paper are attached to the branches using glue, and then covered with green paint. The cones are painted in different colors and attached to the branches with the wide end using hot glue. The bouquet is ready, all that remains is to put it in a vase.
Autumn bouquet of leaves and cones
This bouquet is easy to make. You can take any leaves, just pay attention to their color. After all, the beauty of the bouquet will depend on how variegated the leaves are.
- A stick is fixed to the wide part of the cone using green plasticine.
- The lump is colored. And sprinkled with glitter.
- The stick turns green.
- The bouquet is collected in a vase. Or, it can be tied with ribbon.
As options, I’ll show you 2 more ways to make “flowers” from a pine cone.
These flowers can and should be combined with tree leaves to get a beautiful bouquet. Learn how to paint pine cones here.
And here you will find various wreaths and topiaries made from leaves and cones.
Small tree made of pine cones
You can make a beautiful indoor Christmas tree in a few minutes. For this craft you will need: cardboard, glue, paint, beads for decoration.
The cardboard is rolled into a cone and covered with paint or glitter. Subsequently, the cone is covered in a circle with cones in a random order. The main thing is not to leave large gaps and ensure the symmetry of the cone. You can decorate the finished spruce according to your own taste.
Most often, such beauties are decorated with beads on a string or beads are glued directly to the scales.
Pike made of pine cones and plasticine
You will need: fir cone, brown, black and white plasticine, stack.
Master Class
- Make 3 pairs of fins and a tail from brown plasticine.
- Roll balls of black plasticine and attach them to the tail and a pair of fins, making them spotted.
- Make a pike's mouth out of brown plasticine, and make it slightly open using a stack.
- Roll balls of white and black plasticine for eyes.
- Assemble the pike this way: attach the mouth and balls as eyes, then the fins and tail.
The pike made from pine cones and plasticine is ready!
Garland of cones
Do you want to create a truly New Year's atmosphere in your apartment with decorations in the popular Scandinavian style? Then you can safely make crafts from pine cones in the form of a garland. For this you will need: white acrylic paint, glitter, twine, hot glue, two brushes.
The blanks are coated with white acrylic paint. If desired, you can dust them with sparkles or choose other colors that match the interior. After the paint has dried, melted hot glue is dripped onto the base of the cone and attached to the twine.
Reindeer made from fir cones
A very interesting idea is to make proud deer from fir cones. We make the body and neck from pine cones. We make the legs from twigs. We make the deer's head from an acorn. We connect the parts of the craft using a glue gun. We make the nose, eyes, horns and hooves from plasticine.
Reindeer made from fir cones
You can also connect the details of the craft using plasticine.
We fasten the neck and torso with plasticine
We attach the branches-legs, the head-acorn and branched horns.
Deer made of pine cones, branches and acorns
Watch the video on how to make deer from pine cones:
A very beautiful autumn deer is made from a pine cone, twigs and an acorn.
Deer made from pine cones, twigs and acorns
Snowflake made of cones
The easiest way to decorate for Christmas that always looks stylish. To make this craft you will need: hot glue and decorative materials. The cones are glued together in a circle at the base. Lace and a finished wooden snowflake are glued into the center of the resulting circle. You can decorate the finished snowflake with paint, glitter, etc.
Christmas wreath made of pine cones
Creating a Christmas wreath with your own hands is not difficult. To create a craft, just cut out a ring of the desired diameter from thick cardboard and decorate it with pine cones. Before starting work, you need to clearly think through the design, determine the color scheme and set of decorative elements.
To create a wreath, lace, bunches of rowan berries, spruce branches, ready-made floral preparations, etc. are often used. You can give the wreath a more delicate and homely look with the help of light dyeing or decorating with sparkles.
Ball of cones
The ball is based on a foam blank, but the problem is that it cannot be pasted over. The foam will simply shrink. Therefore, to decorate the ball you will need: pliers, hot glue, copper wire, decorative paint.
A small piece of wire is inserted into the base of the cone and the area is glued for strength. The remaining “tail” of the wire is twisted clockwise to form a spiral. Then the workpiece is screwed in and the procedure is continued until the foam is completely hidden. You can paint the ball both before starting work and after, in the finished product.
Lemur made of cones and plasticine
You will need: 2 fir cones of different sizes for the body and head, plasticine in gray, white, orange and dark blue, a stack.
Master Class
- Make ears from white and gray plasticine.
- Make a bang from gray plasticine and a drop-shaped blank from dark blue plasticine.
- Roll balls for the eyes: 2 large and small from dark blue plasticine and a medium-sized pair from orange plasticine.
- Mold the front and hind legs from gray plasticine, highlight the claw area with a stack.
- Make a tail from white plasticine and attach dark blue stripes to it horizontally.
- Assemble the lemur in this way: take a smaller cone, cover the lower part of the muzzle with dark blue plasticine, and the upper part with white. Attach the bangs, eyes and ears, form a neck from gray plasticine, then connect the cones. Attach the paws and striped tail.
The lemur made from cones and plasticine is ready!
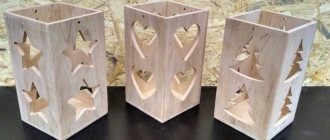
Decorative candlestick made of pine cones
A fairly simple craft to make that can create the atmosphere of a real Christmas miracle. To implement the project you will need: a wooden cut of the required diameter, lace, paint or artificial snow, glue, spruce branches for decoration.
The cones are glued with hot glue along the edge of the wooden base, covered with paint (preferably through a sprayer) or snow, sprinkled with glitter (optional) and tied with lace. Additionally, the structure can be decorated with rowan berries, spruce branches, etc.
Candlestick for floating candles
Small vertical candle holders for floating candles can be made in a couple of minutes. To do this, take small wooden cuts, pliers, glue and decorative elements that match the general style.
Apply glue from a gun to the base of the cone and glue it to the cut. Use pliers to remove the middle and insert a candle in a metal candlestick there. Decorate the finished candlestick at your discretion.
Tiered candle holder
Another option is to think over a whole composition in the form of an unusual candlestick. For example, the following algorithm is proposed:
- Prepare cones, candles, a wooden box, glue and tongs.
- From the first cone (the widest one), carefully remove several layers of petals, glue a candle onto the resulting base and fix the previously removed petals on it.
- I disassemble the second cone completely, and stick the removed elements in a checkerboard pattern onto the second candle.
- Glue the vertically standing cones together, making a round frame with a diameter of three centimeters.
- Place all the decorative parts of the composition on a wooden base, finishing the product with light tinting.
Read here: Felt crafts: a master class on creation techniques. Schemes, templates and patterns of beautiful crafts (90 photos)
Making topiary from pine cones
What the topiary will be like is determined by the chosen foam blank. In addition, before starting work, you need to stock up on: a ceramic pot, a stick of the required length, floral foam, floral pins, hot melt glue, and decorative materials. Progress:
- a stick is placed in the center of the ceramic pot and secured with glue;
- the rest of the space is filled with floral foam;
- put a foam piece on the free end of the stick;
- Pins are glued to the base of each cone, and then they are strung on polystyrene foam, placing them tightly together.
Floral foam in a pot can be covered with moss or covered with decorative stones. The trunk and crown are painted as desired.
Bee made of pine cones and plasticine
You will need: a fir cone, blue, yellow, white and black plasticine.
Master Class
- Make 4 wings from blue plasticine.
- Make 3 strips 5 cm long from yellow plasticine.
- Make horns and a mouth from black plasticine.
- Roll balls for eyes from white and black plasticine.
- Assemble the bee this way: attach stripes and wings, balls for eyes, then horns and mouth.
A bee made from a pine cone and plasticine is ready!
Basket of pine cones
A craft can be not only beautiful, but also useful. For example, a basket of pine cones assembled with wire and fishing line can be used as a fruit vase, and even carry small things in it. Such a basket will be especially in demand at the dacha. To make a durable basket you will need: pliers, scissors, fishing line, copper wire, needle. Progress:
- the cones are sorted, leaving the largest for the bottom, the smallest for the walls;
- the wire is passed between the scales and twisted;
- The next one is screwed as close as possible, trying to ensure that the scales cling in the form of a lock. Place the cone with the narrow side inward;
- the assembled chain is closed into a ring of the required size;
- the bottom ring will be small, the widest ring will be placed at the top;
- the twisted rows are connected to each other using fishing line and a needle, sewing the resulting blanks together.
After the base of the basket is assembled, a handle assembled according to the same principle is attached to it with wire. You can decorate the basket with lace, artificial leaves, flowers or berries.
The forest gives us enormous opportunities to express our creative potential. Just a little imagination, and unique things will begin to appear from scrap materials that you won’t be ashamed to keep for yourself or give to friends. In addition, children can be involved in all crafts with natural materials. After all, this activity brings joy to kids at every stage, from collecting material to the appearance of their first independent masterpieces.
Penguin made from pine cones and plasticine
You will need: a fir cone, black, orange and white plasticine, a stack.
Master Class
- Make 2 wings from black plasticine.
- Make a beak and paws from orange plasticine.
- Shape the paws using a stack.
- Roll a ball of black plasticine for the head.
- Roll balls for eyes from white and black plasticine.
- Assemble the penguin in this way: attach the head to the pine cone, then attach the eyes and beak to it, add wings and legs.
The penguin made from pine cones and plasticine is ready!