Buy laminate and underlay
omaric.ru Select laminate and underlay.
Buy the flooring in advance and leave it for 48 hours in the room where you plan to install it. The laminate will rest and its humidity will be equal to room temperature. It’s not worth purchasing two or three months in advance, since during repairs there will inevitably be wet processes and moisture, which laminate has no use for. The Lifehacker Telegram channel contains only the best texts about technology, relationships, sports, cinema and much more. Subscribe!
Our Pinterest contains only the best texts about relationships, sports, cinema, health and much more. Subscribe!
Purchase the underlay based on the area of the room, but the laminate - with a margin of 5-10% for trimming. With direct installation there is always less waste, with diagonal and complex shapes of rooms - more.
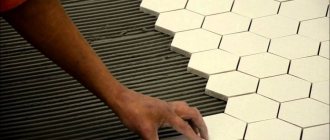
Prepare tools and materials
Not many tools are required to mark, trim and lay laminate flooring. Most devices are either readily available or inexpensive. In addition to tools, you will need some consumables. Here's the full list:
- five-meter tape measure;
- pencil;
- carpenter's square;
- compass;
- sharp knife;
- a hand saw with a fine tooth or a jigsaw, a circular saw;
- hammer or mallet;
- chisel;
- feather drills;
- drill or screwdriver;
- perforator;
- laminate staples;
- tamping block and wedges (can be replaced with pieces of laminate);
- laminate;
- substrate;
- vapor barriers (if necessary);
- plinth with fittings;
- transition thresholds;
- glue;
- scotch;
- masking tape.
Required set of tools
Before starting work, be sure to prepare your tools. It will be a shame if during the installation process you don’t have some little things at hand, and the work gets stuck.
Since the set of tools for different types of locks is slightly different, we will give the maximum list.
- Roulette. For construction work, metal tape is mainly used.
- Pencil. Special construction pencils allow you to draw a thick line. But you can also use regular soft one. To be on the safe side (if the pencil line is hard to see), you can prepare a marker of the most suitable color: so that the line is visible and you don’t have to wash off the markings later.
- Triangle or square. You should not use metal to avoid scratching the slats.
- A construction knife or jigsaw, better - a jigsaw, even better - a circular saw on a massive bed. The latter tool will especially help when working in large volumes, as well as for rooms with complex configurations.
- It is convenient to make small cuts with a hacksaw.
- A rubber mallet or mallet will be useful in fitting the panels.
- A tamping block (another name for such a device is a hammer) is necessary to work with the Lock lock.
- You can create holes for pipes using a drill with feather-type attachments.
- Hacksaw for metal.
We advise you to study - Linoleum. types and material. advantages and disadvantages. styling and features
- Level for the very first stage of work - assessing the floor surface.
- Double-sided or regular tape for gluing the underlay to the floor.
- Bracket for tightening panels into locks. In some cases, it is more convenient to do this with a small mount (for example, installation near walls).
- Spacer wedges that regulate the “wall-panel” gap (this gap is needed to compensate for the thermal expansion of the panels).
- Transparent sealant, if installation will be done with it.
- Special glue for laminate (if you plan to use it).
- Scissors for cutting the substrate.
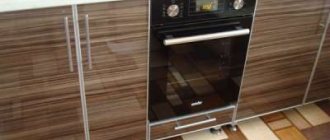
Prepare the base
rmnt.net
The subfloor for laying laminate must be perfectly flat. Manufacturers allow differences of no more than 2 mm per 1–2 m. Otherwise, the locks will wear out due to loads and the slats will gradually separate.
Egger Group YouTube channel
Requirements for differences relate to the general plane of the surface, and not the horizontal. If the floor is without bumps or holes, but has a slope in any direction, then this will not affect the quality of installation.
Wooden floor
- Check all boards for bends and creaks. If necessary, strengthen the floor with self-tapping screws and replace bad areas.
- Make sure that the base differences are within acceptable limits. If not, level the floor using a scraper or lay down a layer of plywood.
Concrete floor
- Clean off pieces of plaster and sagging on the screed.
- Check height differences. If they are more than 2 mm, level the surface by grinding, self-leveling floor or additional screed.
- Wait until the concrete is completely dry. It takes 28 days.
- Vacuum or sweep the floor thoroughly to remove all dust.
Linoleum
- Check the base differences. If they are within acceptable standards, the laminate can be laid directly on top of the linoleum. If not, it is better to completely dismantle the coating.
- When laying on linoleum, additional waterproofing is not required.
Leveling the floor
Laminate can be laid on almost any base, but observing the main condition - it must be level, let’s allow a height difference of no more than 4 mm per 2 m2 or up to 2 mm per 1 m of length.
Place it on a concrete screed
In addition to the fact that such a base must be smooth and clean, if a new screed is being made, you should wait for it to fully gain strength and, accordingly, dry. Therefore, before laying the laminate, an average of 4–6 weeks should pass, depending on the air temperature and humidity.
A common practice is to install a self-leveling floor, for example, when installing “warm floors” - in this case, the time period can be significantly reduced.
If the laminate is laid on a concrete base, you will need a regular polyethylene film, which will act as a vapor and waterproofing barrier (placed under the substrate). The necessary protection from moisture will be provided by proper flooring, ensuring that the sheets overlap each other by at least 20 cm, or by using adhesive tape for this, which will securely fix the connection.
It is not necessary to use film in all cases, but, in addition to the above, you absolutely cannot do without it when the room is located on the ground floor, there is a basement, especially a damp one, and also when repair work on laying flooring is carried out in a new building.
Laying theory, video instructions:
How to lay on a wooden floor?
The base can be either a new subfloor or an old wooden one that has already lost its aesthetic appeal.
Preparation in this case consists of several stages: in addition to the necessary leveling, a complete revision of the old base will be required for creaks, which indicate characteristic problems associated not only with wear, but also with the property of wood to dry out or, conversely, to gain moisture.
In this case, before laying laminate on a wooden floor , you can use the rule: if you cannot solve the problem with self-tapping screws or nails by simply nailing loose boards, then you should strengthen the base with plywood or OSB, and as an option, make a thin screed right on the wooden floor.
Leveling a wooden floor, video:
Although it is, of course, possible to completely re-lay an old wooden floor, this option is much more labor-intensive and, importantly, expensive. The error requirements are similar to the previous ones - no more than 2 mm per meter of length.
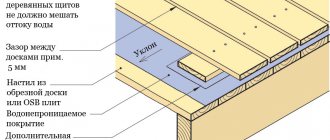
An option for laying laminate flooring on a wooden base is to install it directly along the joists with a subfloor. In this case, special attention - before laying a subfloor, for example, from plywood, you should take care of effective vapor and waterproofing. It should also be taken into account that plywood or other sheet material is subject to moisture resistance requirements.
This option is suitable for both a new house and an old one, in which the flooring and subfloor have become unusable - in this case, with reliable joists, such restoration is a quick and reliable way to create comfortable conditions in the house.
Watch the video on how to lay laminate flooring on a wooden floor:
On linoleum or parquet
During renovation work in a house or apartment, the question arises about changing the flooring. And since the old floor is often linoleum, many people wonder what to do: dismantle it or leave it.
Laying laminate on linoleum
If you choose the second option, linoleum can become an additional layer of heat and sound insulation, which is very important in a city apartment. In addition, the amount of work will be significantly reduced. But for this, the condition of the linoleum must meet certain parameters:
- there are no differences of more than 2 mm per meter;
- linoleum in normal, not decrepit condition and always without signs of deformation;
- linoleum does not have a very soft backing, which will not provide the necessary rigidity and, therefore, will lead to rapid wear and destruction of the new coating.
If the old parquet does not fit well into the new interior of the room, then, just like linoleum, it can be used as a base for laminate. You just need to choose the right thickness of the substrate, which, even if the floor is level and there are no creaks or sagging places, should be at least 5 mm, optimally 7–10 mm.
Do-it-yourself laminate installation from A to Z, video:
Determine the direction of the light
The lamellas are laid parallel to the rays of light / education-web.ru
For laminate with chamfers, the direction of installation depends only on your preferences and the designer’s ideas. A coating without chamfers looks better when the slats are positioned parallel to the rays of light from the window. So the joints between the boards are almost invisible.
At the same time, laying along a wall with windows allows you to visually expand the room and is quite often used in narrow corridors and hallways.
Select installation method
There are two options: straight and diagonal. In the first case, the planks are placed along one of the walls, in the second, installation starts from the corner of the room and is done diagonally at an angle of 45 degrees.
On the left is straight laying, on the right is diagonal / dekoriko.ru, italstroy.ru
The direct method is the most common. It's simpler and faster. The amount of trimming and waste is minimal - 3–5%. If you are laying laminate flooring for the first time, choose this method.
Diagonal laying is used less frequently. This option is much more complicated, but also looks more advantageous. Especially on open areas of the floor. There is more pruning and waste - 10–15%. Of course, it requires skill and patience, so choose the diagonal method only if you are confident in your abilities.
Types of laying schemes
Like any typesetting material, laminate can be laid in several ways and according to different patterns. In addition to the most common traditional or classic one, in which lamellas are laid in rows parallel to one of the walls of the room, the following types can also be used to implement design projects:
- diagonal;
- chess;
- brick,
a, depending on the direction of the light flux:
- parallel;
- perpendicular;
- diagonally.
Although, it should be taken into account that if you choose a perpendicular arrangement, the connecting seams will become noticeable, which, however, can sometimes serve as a design highlight, depending on the interior or the type of laminate itself. The only option for which the direction of the sun's rays does not matter is diagonal.
Installation of different types of thresholds, video:
But, regardless of the chosen laminate laying scheme, it is necessary to use the flooring “staggered”, that is, adherence to the rule of shifting the boards of the next row at a certain interval (on average, by 15–25 cm in relation to the previous one).
This principle solves not only aesthetic problems, but also contributes to the creation of a more durable and “monolithic” floor covering.
How to lay laminate flooring, video:
Which scheme is better to use?
The classic or traditional scheme is popular for many reasons:
- ease of installation;
- economical use of material;
- beautiful appearance, organic to many interior style solutions.
When installing, the following points must be taken into account:
- It is recommended to use the direction of the rows parallel to the light;
- installation begins from the lightest corner;
- after the last part of the row is laid, its remainder is necessarily the first element of the second row - thus, it is very easy to comply with the “staggering” principle;
- To create a durable structure, it is not recommended to use short pieces of laminate, the length of which is 30 cm or less - the exception is places under windows, radiators, near pipes, etc.
Brick and checkerboard patterns are very similar to each other, sometimes they are even considered one type. The main principle is to maintain an offset of each next row relative to the previous one by exactly half the length of the lamella.
Methods for laying laminate flooring in the video:
The diagonal scheme is a variant of the classic laying of laminate with parallel placement of rows relative to each other, but with a 45° location to the wall with a doorway or from the entrance. This scheme is organic for rooms of non-standard or irregular shapes, but it should be borne in mind that it will cost a little more, since there is almost 10% excess consumption of laminate compared to the traditional option.
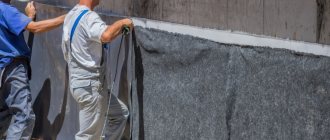
Install a vapor barrier
Since laminate is not 100% resistant to moisture, it is necessary to prevent it from getting into the slats. This is not relevant for a wooden base or linoleum, but when laying on concrete screeds, a vapor barrier must be installed.
Special membranes or ordinary polyethylene film with a thickness of 200 microns or more are used as an insulating layer. You can do without a vapor barrier if the substrate under the laminate has such a layer.
Film strips are laid overlapping / homemasters.ru
Lay the insulation with overlapping strips of 20 cm and connect the joints with tape. The canvases must be perpendicular to the direction of the substrate, and that, in turn, to the laminate. If the topcoat is laid from the front wall to the back, then the underlay is laid from left to right, and the vapor barrier is the same as the laminate.
Laying underlay and waterproofing
1. Before laying the laminate, the surface is covered with a waterproofing layer. For these purposes, polyethylene is often used, but you can use film waterproofing material. The film sheets are spread over the entire surface of the floor with an overlap of 20 cm on the walls. An overlap of up to 15 cm is provided between the sheets. The sheets are connected with adhesive tape, and a backing is laid on top of it.
I grew a waterproofing film. Photo - hgtv.com
2. Foamed polyethylene is used as a substrate. Its installation is similar to film. The backing sheets are spread overlapping and then glued together. When using polystyrene, the sheets are laid “staggered” and the joints are sealed with adhesive tape. The cork backing sheets are laid out, positioned end to end, and connected with adhesive tape.
Sealing the joints of the substrate. Photo - diynetwork.com
Install the backing
The sheets of backing are connected end-to-end and do not overlap each other / srbu.ru
Place a layer of backing on the base. Connect all sheets or strips end to end and secure with tape. There is no need to overlap, as this will create unwanted differences.
Next, when installing the laminate, be careful not to move the backing. To do this, you can lay it not on the entire surface of the floor, but in parts.
Step-by-step instructions for beginners
The first thing you need to know about and, most importantly, observe is the creation of a technological gap between the wall and the array with a width of 10–15 mm, the task of which is to ensure solidity when linear dimensions change due to temperature fluctuations and humidity changes.
During installation, the control function of the gap size is performed by wedges, which are installed immediately before installation and removed after installation. And immediately after this, all gaps are closed with skirting boards, for fastening which special clamps are used.
Operation of the floor, the installation of which was carried out using an adhesive composition, is possible only after it has completely dried, and with the help of locking connections - immediately after completion of the work. But for greater strength and durability of such a coating, it is recommended to let the coating sit for at least a day.
DIY laminate installation
The general procedure for laying laminate flooring is as follows:
- first, before leveling the floor under the laminate, a complete inspection of the base should be carried out;
- after – a thorough cleaning is carried out using the dry method, but using a vacuum cleaner;
- to protect the surface of the base, it is recommended to prime it; it is especially important to treat wooden floors with antiseptics and fire retardants;
- the next step is laying a polyethylene film that performs the functions of a hydro- and vapor barrier layer;
- after this, the underlay is laid with the obligatory 2–5 cm over the walls, which can immediately cover the entire floor surface in the room or partially. The second option is more rational and is recommended for use, especially if the work is carried out independently, since damage and contamination can be avoided;
- You can use regular tape to secure the strips of the backing together.
Installation process on video:
After all the preparatory work has been completed, you can immediately begin installing the floor covering, using the selected diagram, which it is advisable to do in a graphical representation:
- laying laminate, as a rule, begins with installing the first lamella from the corner of the room closest to the window;
- Wedges are immediately placed, the task of which is to control the size of the gap between the wall and the coating;
- then the first row is covered with solid laminate panels until the outermost one, which should be cut to the required size, and the remainder of it used for the next row.
The second row is laid according to the same principle:
- immediately after the first, cut-off part of the lamella, whole elements are laid down to the outermost one, which should also be trimmed;
- use the remainder of it for the next row as the first element, etc. until the end of the room.
To make roundings, the last row of the laminate is completely additional, since it is necessary to adjust the dimensions of the lamellas not only in length, but also in width. For this:
- each lamella must be measured individually and cut taking into account the required gap to the wall of 10–15 cm;
- an individual approach in this case is a necessity, since discrepancies that are often invisible to the eye will immediately become visible if this fact is not taken into account in advance;
- after completing the laying of the laminate, you can begin trimming the substrate, which protrudes more than 2 cm onto the wall, which will serve as a shock-absorbing element for the floor;
- Then you can begin installing the skirting boards, the installation feature of which is that they are not attached to the floor itself, but only to the wall using clamps.
Calculate the layout of the slats
bricoartdeco.com
Laminate planks must be at least 20–30 cm in length and at least 5 cm in width. To achieve this, you must first estimate how entire slats fit along the length and width of the room. And then cut the planks of the first row so that the last one is no narrower than 5 cm.
Egger Group YouTube channel
Don’t forget about the expansion joint around the perimeter of the room and take it into account in your calculations. The slats are trimmed so that there is a gap of 7–10 mm between them and the wall.
If the room is more than 8–10 m in length or width, manufacturers recommend installing dividing thresholds. The latter will isolate sections of the laminate from each other to reduce deformation from fluctuations in humidity and temperature. Think about where to place these joints so that they are less noticeable.
The same joints will be at the junctions of the boards with the tiles or laminate of other rooms. In this case, it is better to install dividing thresholds strictly under the door leaf. So, with the doors closed, the joints will not be visible from either one or the other room.
Lay the first row
vdomishke.ru
Installation of the first row is the most difficult and responsible. All subsequent ones will copy the first one, so it is important to lay it evenly along the wall. Otherwise, the pattern will unfold and the floor will look ugly.
YouTube channel Kronostar
- Inspect the laminate locks and remove small debris and dust from them.
- Cut the lock on the short side of the first board and place it on the floor. Insert the second one into it at a slight angle.
- Align the width of the slats exactly to avoid any “teeth” and lower the second board, clicking the lock into place.
- Place wedges at each wall to accommodate the expansion gap. They can be cut from pieces of laminate.
- Completely assemble the first strip in this way.
- Don’t cut the last lamella, but for now just lay it overlapping on top.
- Mark the length of the last plank, trim it and install it in the right place. Don’t forget: it should be no shorter than 20–30 cm.
How to cut laminate
- Place a wedge against the wall and place the board to be cut on top of the row in which it will lie.
- Mark with a pencil the distance to the front surface of the adjacent lamella.
- Draw a straight line using a square.
- Cut the board to the mark with a jigsaw, hacksaw or circular saw.
When using a jigsaw, consider the direction of the teeth. If they are oriented away from you, the laminate should be face up. If the teeth are facing you, turn the board face down. This way you will avoid chipping.
If you don't have a power tool, cut with a hacksaw or other fine-toothed saw. Do not apply much force so that the cut is neat and without chipping. To be on the safe side, you can stick masking tape along the line.
What to do if the wall is uneven
- Completely assemble one strip and move it close to the wall.
- Using a compass, find the place where the laminate is as far away from the wall as possible.
- Using a compass, mark this distance on the laminate along the entire length of the strip.
- Draw a line along the marks. It will completely copy all the irregularities of the wall.
- Cut out pieces on each laminate board, reassemble the row and install.
Part 2
In the first part of this review, we started talking about how you can lay laminate flooring alone and managed to lay three rows of laminate flooring. In the second part we will continue our story. Here we will touch on some of the nuances of this process: we will talk about how to lay laminate in the corners of a doorway and under a heating radiator, what needs to be done in cases where the lock is tight, and we will also demonstrate the advantages of this technology to all those who doubt it.
Laying rows of laminate
So, we continue to lay the laminate flooring. Let's start laying the next row. In this case, the edge of the board is inserted, and there is a small gap in the middle:
To prevent this gap from appearing here, you need to shake the piece of laminate with your hand:
You don't need to put in a lot of effort. That's it, the laminate is fastened.
Place the next piece.
If the board is raised, you can sink it by shaking it with your hands:
The laminate is recessed, there are no cracks, the locks are fastened. If you find it difficult to hammer in pieces of laminate by hand, you can do this: place a piece of laminate and tap it with a rubber mallet.
In our case, this is not required - the laminate fits in easily.
We usually make the backing end-to-end and glue it with tape. In this case, there is no need to do this - the backing is branded, here you need to take out this film and cover the next row with it:
What to do with tight locks
What should you do if the lock is tight? Usually tight locks are found on thicker laminates with a thickness of 10–12 mm.
It is difficult to insert such a board by hand. To do this, we use a piece of laminate, the lock of which fits into this edge of the board:
The length of the piece must be at least 20 cm so as not to break the edge. This is how we insert and nail it down:
Laying laminate flooring in the corner of a doorway
I would like to draw your attention to the following point. Here is the doorway:
The instructions for laying the laminate indicate: make a gap 10 mm wide from the wall:
This means that in the corner we will also have a gap 10 mm wide:
But we never do this and we don’t advise you, because the door casing usually does not have a thickness of 10 mm, it can be 8 mm, it can be 6 mm, and if it is semicircular, then its edge generally has a thickness of 2 mm. If you make a gap of 10 mm, and you have cash standing, you will get a gap here:
We always round this corner on the laminate a little, because if you cut it at an angle, you will get a hole. We make a gap of 3, maximum 4 mm from the area where the cash will be located:
Reliability of this technology
Next, we want to demonstrate the reliability of our technology to those who doubt it and believe that this can break the lock. Look, here the castle is absolutely intact, nothing is broken anywhere:
Also here, nothing has been sawed or filed, this is laminate from the package:
Insert and click this part:
Then we disassemble and check the locks:
Nothing broke off anywhere.
What to do if the battery is interfering
Now we’ll tell you what to do in cases where the battery interferes. Here the laminate may not fasten:
In this case, you need to push the bar in a sideways motion, as shown in the following figure:
This must be done very carefully so as not to break the lock. This is how the bar slides in and snaps into place.
How to insert the last row
A nail puller can be used for this operation. It presses the laminate in cases where the lock is tight and the planks are difficult to join.
We lay the last plank like this:
In order not to spoil the wallpaper, you can put something under the nail puller. We push the bar into place.
This is what the finished room looks like:
Now, using this technology, you can lay laminate flooring alone. Good luck!
Consider the drawing
bricoartdeco.com
Most types of laminate are produced with an arbitrary pattern, and it is unlikely that the lamellas will match one another. In fact, this is not necessary: this way the coating will look too artificial and will look like linoleum.
Some manufacturers have laminate with pattern selection. This is usually indicated on the packaging and in the instructions. To ensure the design matches, the boards must be used in order from one pack.
If you plan to lay the laminate flooring staggered, open three or four packages and take one lamella from each. This will make the drawing as arbitrary as possible.
Place the remaining rows
YouTube channel Kronostar
Continue laying subsequent rows in a similar manner. Collect the slats along the short side into one strip, and then install it in the previous row and snap it into place. With the remaining piece from trimming, in order to save money, you can start a new row.
stroy-podskazka.ru
Cut the lamellas of the last row to the desired width, assemble them into one strip and finish laying. You may need a Z-clip to snap them in place.
How to make a pipe joint
Egger Group YouTube channel
- Place a board and mark the center of the pipe.
- Using a square or tape measure, measure the distance from the wall to the center of the pipe.
- Mark the center of the hole for the pipe on the slats.
- Using a jigsaw or a feather drill, make a hole 8–10 mm larger than the diameter of the pipe.
- Cut out the piece of laminate that is interfering with installation, and after installation, glue the piece into place.
- The holes themselves can then be covered with plastic rosettes.
How to make a joint with a door frame
YouTube channel Kronostar
- Take a piece of laminate 15–20 cm wide, insert it into the lock and move it close to the door frame.
- Place masking tape over it.
- Place the hacksaw on a piece of wood and cut through the door frame. The protruding part goes all the way through, and the deep part is 5–7 mm.
- Use a chisel to chop off the cut pieces and check how the laminate fits.
Basic rules for laying laminate flooring
1. According to the laminate laying technology, the base material requires adaptation to the conditions of the room in which it will be installed. It is enough to leave it for several days in new conditions, it will get used to humidity, temperature and acquire the required shape and size.
Tools required for installation
2. In order for the installation process to proceed quickly, all necessary tools are prepared in advance.
Required:
- pencil;
- jigsaw or saw;
- roulette;
- hammer;
- wooden strip 15-20 cm long for fitting panels.
Using a jigsaw can make the cutting process much easier. The manual method of cutting laminate is quite labor-intensive and low-productivity.
Laying technology
3. After creating a solid base with a substrate, proceed to the actual laying of the laminate. They begin work from any corner that is most convenient. However, you should continue laying strictly from left to right. The only requirement that is taken into account is the direction of the light. The panels are installed along the rays of light, and the shadows at the joints of the panels become almost invisible.
The direction of the panels should be along the rays of light. Photo - cancork.com
4. Laminate has the ability to expand and contract in the event of changes in humidity or changes in operating conditions of the room. To avoid swelling of the surface when laying the material, provide a gap between the laminate and the wall of about 8-10 mm. Pegs specially provided for this purpose are inserted into the gap.
To set the gap, you can use special spacers. Photo - diynetwork.com
It is very important to correctly calculate the number of rows of laminate before starting installation. If the last row is less than 5 cm wide, cut the last and first rows so that their width is the same.
5. All panels of the first row are laid with the tenon facing the wall. And to ensure a tight fit, the spikes are pre-cut using a jigsaw. Along the edge of the first row along its entire length, spacer pegs are installed, the thickness of which is 8-10 mm. The ends of all panels of the first row are snapped into the locking connection along the narrow side. In this case, the tenon of the next panel is inserted into the groove of the previous one at a slight angle, and the panel is pressed to the floor.
Cutting a tenon using a jigsaw. Photo - diynetwork.com
- How and with what to cut laminate flooring - choosing a tool and the nuances of sawing laminated flooring
6. When laying the second row of panels, an offset of 25-30 cm should be provided. To do this, you need to cut off part of the panel, lay it against the wall with a narrow cut, take the whole panel and attach it to the one that was laid.
Laying the second row, offset. Photo - diynetwork.com
7. Laying subsequent rows is carried out by analogy with the first row. As soon as the second row is completed, it is moved towards the first, and the longitudinal locks are connected to each other. Final fixation is carried out using a block and a hammer.
8. To firmly secure the last panel in a row, use a clamp. To avoid distortions and protrusions at the joints, all panels of the row are fitted closely to each other.
We fix the last plank in the row, located from the wall, using milk and a clamp. Photo – creativehomedesigner.com
Laminate with locks and clicks and features of their installation
9. Several options for locking connections have been developed for laminate panels. Let's consider such locks as “click” and “lock”. In reality, they are both varieties of "tongue". The difference lies in the principles of fixation of laminate panels.
Panels with a “click” lock are initially connected at an angle, after which they are pressed to the floor and finished off with a hammer through a block. Panels with a “lock” lock are laid horizontally, and then finally finished using a block and a hammer.
The laminate locks on the left are “click” and on the right are “lock”. Photo - quick-step.co.uk
Video. How to lay laminate flooring with a click lock
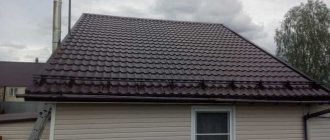
Install the thresholds
pol-exp.com
There are several types of thresholds. In addition to appearance, they differ only in the mounting option. Some are held on through dowels, others on hidden ones, and others have a special mortgage that is attached to the floor with screws and to the front part with a latch.
The nuances of installing one type of threshold or another are always indicated on the packaging. In general, the procedure is as follows:
- Measure the required length of the threshold and cut off the excess part.
- Distribute the fasteners evenly across the entire width of the opening.
- Drill holes using a hammer drill along the marks.
- Secure the threshold: all the way through, inserting screws into the groove or through the mortgage.
- If the fastener is not through, tap the threshold through a soft guide until it is completely seated.