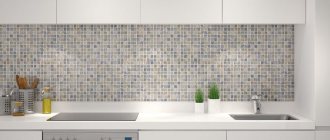
Studio kitchens have gained great popularity in the modern world, where, thanks to different floor coverings, it is possible to effectively zone the available space. Most often, tiles and laminate without a threshold are used - this combination of two practical materials looks beautiful and original, and does not cause any particular difficulties during installation. It is important to know what methods of combining them exist and to adhere to a certain technology for laying tiles and lamellas.
Tile and laminate - a beautiful combination in a modern design
Features of creating a transition from tile to laminate
They combine laminate and tiles both in houses and apartments. The connection point may be:
- in the area of the doorway;
- in the kitchen (for example, separating the work area and the dining area);
- in the area between the hallway and the hall;
- between the balcony and the living room;
- near the fireplace (for a beautiful design of the space).
In most cases, ceramics are used to create a practical and safe floor, and laminated boards are chosen because of their high decorative qualities; they perfectly imitate natural wood.
In the classic version, two different floor coverings are joined using a threshold under the door frame. But since such design solutions as separating one functional zone from another - zoning - are now in demand, it becomes difficult to beautifully arrange this conventional demarcation line. Here, one should take into account the harmony of this element with the rest of the interior, and freedom of movement in order to prevent injury to others.
The combination of ceramics and laminated boards looks original in any room
It is problematic to beautifully close the joint between ceramics and slats if the height of the floor coverings is different. This point becomes more complicated, for example, if the thickness of the tile varies between 8-10 mm, plus the volume of tile adhesive is added (it comes out to 12-14 mm), and the thickness of the durable lamella is only 8 mm. Even if a thick underlay is used, it is unlikely that the floor coverings will be equal.
Important! Due to differences in the joint between the ceramics and the decorative coating, particles of dust, dirt, and other debris often collect.
Only with the right approach, using a stretched screed, can you achieve a flat surface against the backdrop of a solid base under the floor covering.
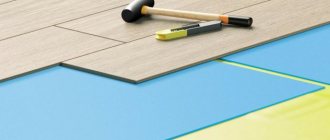
Another feature that should be taken into account when it comes to the junction of tiles and lamellas is the hygroscopicity of the laminated board. If the panels come into contact with moisture, their structure will become loose and they will simply swell. Therefore, the first thing you need to do is lay the tiles, wait until the adhesive dries, and only then start joining with the laminated board. To avoid unwanted consequences, use a sealant that reliably seals the “weak” areas of the lamellas.
Often, due to the physical and mechanical properties of the laminated board, it becomes problematic to fit it tightly to the tile. It instantly reacts to temperature changes in the room and humidity levels. As a result, the lamellas swell and become deformed. To prevent such an outcome, there must be a gap, free space that allows the lamellas to expand.
The seam between the ceramics and the laminate must be neat and fit into the interior
Advice! To ensure a neat line in the area where two different floor coverings join, it is better to use an electric jigsaw or grinder equipped with a diamond tile blade.
Types of transitions between tiles and laminate
The junction of tiles and laminate in a doorway or other chosen location can have almost any form of connection. Among the main types of design of two floor coverings are:
- Straight line. This joint is simple and versatile. It can be decorated with or without a threshold. The length of the line directly depends on the location, under the door or in the zoning area.
- Broken line. This option attracts with its expressiveness, where solid tiles are used without adjustment. Lay the laminated board around according to the existing line. It is very important to maintain precision in the cuts, which will take more time. The use of a threshold in this case is not appropriate; it will only ruin the entire structure. It is especially effective to use such a joint on a long section.
- A curved line. The figured joint between tiles and laminate is actively used by designers when delimiting the kitchen area and the living room. But to bring this idea to life, you will need a professional tool for working on stone and wood. No threshold will be required if the cuts are as precise as possible.
Photos of the transition of tiles to laminate are presented below.
Using thresholds
Making a joint between laminate and tile using thresholds makes sense in three cases. The first is when the joint is made under the door. In this case, the presence of a threshold is logical and “does not hurt the eyes.” The second option is if there is a difference in height between the two materials being joined. There is simply no other way out.
Don't you think that such a junction spoils the impression?
And the third case. When tiles are laid in the hallway near the front door, and then there is laminate. Even if their levels coincide, it is better to put a threshold here. It rises slightly above the finish and will trap sand and debris that inevitably gets carried in by shoes. This is the option when you can close your eyes to some aesthetic imperfection.
Types of thresholds for joining materials
There are the following thresholds that can be used to close the joint between laminate and tiles:
- Flexible PVC profile. Consists of a base and an overhead decorative strip. The base is attached to the floor at the seam, and the decorative strip is snapped into place. It comes in two types - for joints of materials of the same thickness (maximum difference 1 mm) and for connections with differences (the difference can be 8-9 mm).
Using a PVC profile to create a seam between tiles and laminate
How to arrange the transition of tiles to laminate
Aluminum thresholds are used on straight sections
It just seems like there are few options. There are all these thresholds in different sizes and colors, with different fixation systems. There are a lot of them in big stores.
Installation of flexible PVC profile
As already mentioned, a flexible PVC joining profile consists of a base and a decorative lining, which is held on it due to elastic force. It must be installed after the tiles have been laid, but before installing the laminate.
This is what the junction looks like in cross-section
First, a base is installed along the cut of the laid tile. It is attached to dowels or self-tapping screws. Choose fasteners with flat heads so that when screwed in, they hardly protrude and do not interfere with installing the trim.
The installation process is as follows:
- The base of the flexible PVC profile is laid along the edge of the tile. Its top edge should be flush with the finishing surface. If necessary, you can cut off a strip of backing under the laminate.
- The base is attached to the floor.
- If installation of dowels is required, the fastener installation points are marked, the profile is removed, holes are drilled, and plastic tabs are installed. After which you can screw the base.
When using self-tapping screws, pre-drilling may be required (depending on the type of base). The fastener installation step depends on the degree of curvature of the joint. The base of the connecting profile must exactly follow its outline.
When installing PVC tape you have to make serious efforts
Using a flexible PVC profile, the joint between laminate and tiles is easy to seal. Outwardly, of course, not everyone likes it, but the installation is simple.
How to join laminate and tiles without a threshold
There are several modern methods that make the joint between laminate and tile practical and original.
How to connect tiles and laminate flooring with grout
This method of designing a joint has a number of advantages, including: low cost, ease of execution and high decorativeness. The grout is suitable for processing complex (winding), shallow joints. For example, there are often flooring options where polygonal ceramic tiles are located on an area with another floor covering.
But not only does this method have advantages, the disadvantage is the high probability of damage to the seam during shrinkage of the building. This is due to the joint being too tight. To prevent cracking of the seam, it is necessary to provide an expansion gap under the baseboard.
Seam processing technology:
- Draw the markings of the future joint on the screed.
- Lay the tiles to the line, having previously adjusted them to size. After trimming, the edge of the tile must be trimmed using a grinder.
- Adjust the laminated board to size and apply silicone to the edge.
- Fill the resulting space approximately halfway with sealant.
- Place grout on top of the dried sealant and level it.
- Cover with clear varnish. This simple technique will extend the life of the seam.
Advice! For greater efficiency, it is recommended to fill the joint between the laminate and the tiles with epoxy grout or polymer grout for porcelain stoneware. As an option, grout for ceramic tiles is suitable.
What the joint between laminate and tiles without a threshold looks like can be seen in the photo.
How to join laminate and tile with sealant
It is still good to seal the gap between the laminate and the tiles with silicone or acrylic sealant, and the second option can be varnished after complete drying. The undeniable advantage of the sealant is its plasticity, due to which two different floor coverings can “walk”. Also, the shrinkage of the building does not affect the sealed seam in any way. The only caveat when using this product is that it is only suitable for a narrow joint, the width of which is up to 5 mm.
The algorithm for sealing the seam between tiles and laminate involves the following steps:
- Cover the edges of the floor covering in the seam area with masking tape (on both sides). This will greatly simplify the process of cleaning up the work done.
- Insert the tube with silicone sealant into a special gun. Fill free space.
- Remove excess product using a spatula. You can also carefully cut them off once they dry.
The time for complete drying of the sealant is 1-2 days. This technology is only relevant for floor coverings that are laid on an adhesive base or fixed with self-tapping screws.
How to close the joint between laminate and tiles with liquid cork
Liquid cork is a fairly popular mixture for decorating the space between the tiles and the decorative coating. It has established itself as a moisture-resistant mass with an interesting texture. A mixture is made from glue and cork chips. It should be used to process seams up to 7 mm wide; the shape can be absolutely any.
Sequence of work:
- Clean the space from particles of dust, debris and degrease.
- Fill the seam with liquid cork. In case of obvious differences in height, level the mass along the upper edge. To avoid having to scrub the floor covering after drying, it is recommended to use oil or masking tape.
- After a day, the seam should be sanded.
When using pressed cork, the laminated board has the opportunity to expand naturally due to its softness and elasticity. The seam turns out neat, but due to the high cost of liquid cork, it is not advisable to use it for shaped joints. In addition, there are restrictions in the choice of shades; when the building shrinks, it can be damaged. If the room area is from 25 sq. m, then the pressed cork is not able to compensate for the expansion of the lamellas.
How to make a transition between tile and laminate using a cork expansion joint
To create a border between two different floor coverings, a cork expansion joint is also used. This can be either a pressed strip or a whole sheet. Among its advantages it is worth noting:
- resistance to house shrinkage;
- sufficient softness of the material;
- aesthetics.
It is especially good to use a cork expansion joint for wide joints, the main thing is that both coatings are at the same level.
Instructions for working with the material:
- According to specific dimensions, you need to adjust the rail.
- Apply the adhesive to the entire width of the laminated board or tile. Place a layer of sealant at the bottom of the seam.
- Insert a cork expansion joint into the gap and treat it with an antiseptic and clear varnish.
Alternatively, the rail can be painted. But due to hygroscopicity, the color turns out to be very bright, which should be taken into account when tinting the material.
Installation methods
Let's take a closer look at the installation features of each option.
Cutting tiles and laminate
When the seams between two materials are straight, there are no problems with their fitting, but it is difficult to trim the curved areas. To do this, you will need to make a template from available material (cardboard, polystyrene foam, etc.), using which to mark the future joint.
- A curved cut on laminate is made using a manual or electric jigsaw.
- The tiles can be cut to fit the curves of any shape using a grinder with a diamond tile disc, or manually with a jigsaw/hacksaw with a diamond string. You can also drill as many holes as possible along the cut line and break off the excess with wire cutters.
Installation of flexible PVC profile
Installation instructions for flexible PVC profile
- After laying the tiles and laminate, there should be a gap, the thickness of which will allow you to install the fastening profile and leave a temperature gap of 5 mm next to the laminate.
- Using a hammer drill, we drill holes for dowels in the expansion joint. If you have a heated floor running through the seam, then liquid nails can be used for installation, but it is better to exclude such cases at the design stage.
- We cut off the required length of the profile using a knife/hacksaw/jigsaw.
- We screw the fastening profile to the base with self-tapping screws.
- Before laying the decorative flexible profile, you need to soften it. To do this, place it in warm water (50-70 degrees) for 15-20 minutes.
- The decorative nozzle is inserted into the mounting profile and snaps into place.
Installation of flexible metal profile
- Before starting work, calculate the thickness of the tiles and laminate, taking into account the adhesive and backing - they must match.
- We manually give the required bend to the profile.
- Cut the required length using a grinder or a hacksaw.
- The profile has special claws for attaching it to the floor, so it is best to install it simultaneously with laying the tiles. The foot will be pressed against the tile with glue, and on the other side the backing and laminate will simply be inserted.
The profile is held in place by pressing with the tiles
Installation of aluminum threshold
A regular threshold with holes is installed as follows:
- Cut the threshold to the width of the doorway.
- Mark the drilling points at the joint.
- Drill holes, insert dowels and secure the threshold with self-tapping screws on top.
- To screw in self-tapping screws, use a screwdriver or screwdriver with minimal torque, otherwise the threshold will bend.
An important nuance: the measurement is taken taking into account the platband, and not just between the two extreme points of the box. Then the threshold is trimmed to fit the trim to avoid gaps.
If the threshold has hidden fastenings:
- The holes are marked on the base.
- A self-tapping screw with a dowel is inserted into the groove on the underside of the threshold.
- Holes are made in the floor.
- The threshold with the dowels on is inserted into the holes and hammered to the end. To avoid damaging it, strike it through a block pad.
Instructions for installing a threshold with hidden fastening at the junction of laminate and tiles
To remove the backlash, take a larger dowel and file the head
- Mark the outline of the sill on the flooring to ensure it is glued evenly in the center of the joint.
- Remove the protective film from the self-adhesive base and stick it on.
Advice from professionals
To achieve the desired result when using two different floor coverings, you need to adhere to the following recommendations:
- Ceramic tiles and laminated boards must be in the same plane. In this case, it is worth taking into account both the thickness of the tile composition and the size of the substrate used.
- First you should draw a line, then apply ceramics and lamellas to see the final result.
- First you need to lay the ceramics, and then adjust the laminated board under it.
- It is better to make a figured cut using a grinder. But you should use a tile cutter for an arcuate cut, and an electric jigsaw for a curved one.