<
>
The kitchen is the room where residents spend the most time. They not only cook food there, but also host dinner parties, receive guests, and simply relax over meals with family. It is very important that the kitchen always remains neat and cozy.
To maintain cleanliness, special finishing options are used for working and adjacent surfaces, one of which is the kitchen apron.
Kitchen apron – what is it? Functions
The section of the wall between the upper and floor elements of the headset is constantly exposed to aggressive influences - temperature changes, splashes of water, oil and grease.
A kitchen apron is a structure made of special panels designed to protect the part of the wall located above the work area from dirt and damage.
In addition to being protective, it also performs a decorative function - with its help you can diversify the interior of your kitchen unit, making even the most ordinary set of furniture bright and stylish.
Apron styles for the kitchen
Many housewives decide to sew aprons with their own hands. The savings in this matter are relative. Home aprons are inexpensive. The main question is interest in the matter, the desire to fantasize, to let your creative streak manifest itself. There is absolutely no need to spend money if there is a suitable thing in the house that has long been unnecessary, which you don’t mind tearing up and sewing a new beautiful apron. When it turns out that there is nothing suitable in the house, they buy the necessary material. Fortunately, the costs are small.
The main thing is to choose a style.
It is practical to have several different aprons in your home. It's expensive to use one. We need a replacement option in case the first one gets dirty. In a friendly family there will be aprons or aprons for the husband and children. A similar thing may be needed in the kitchen, when working in the garden at the dacha, in the garage when repairing a car.
You can purchase it at any store or sew it yourself.
Many girls love to help their mothers cook or come up with their own dishes. They want comfy baby aprons or cute aprons. Boys are interested in tinkering in the garage with their dads. They need to make matching aprons in men's style.
An apron made by yourself will become the most practical thing, as it will be made taking into account all your features.
There are many styles of male and female aprons for home craftswomen to choose from. They can make them for their loved ones so that they are protected from clean clothes getting dirty and quickly wearing out.
It is customary to keep several aprons in the house.
What types of aprons are there for the kitchen? Some aprons are sewn without a top, with fastening at the waist. They are called aprons. Other models have a bib with an additional fastening on the neck. For the first sewing, it is better to choose a simple style with ties at the waist. For experienced needlewomen, it is not difficult to make aprons with various color combinations and finishing with additional details.
There are many styles of women's and men's aprons that perfectly protect clean clothes from dirt, dust, and wear.
When creating an apron, remember that it should not only be good and comfortable, but also beautiful.
On the belt
Sewing a model that is tied at the waist is the easiest option. To do this, just use a rectangular pattern. Less material will be needed per child, and the work will go faster. The apron and belt are prepared separately. The main part is often decorated with ruffles for beauty. A large pocket is sewn in the middle. It will be useful for placing various necessary items in it. You can make two pockets on both sides. The belt is sewn so that the free parts of the ribbons on both sides are the same in length.
The length is measured so that the belt can be conveniently tied into a bow.
With bib
The model with a bib has more advantages. Most importantly, it is able to protect not only the bottom, but also the top of the main clothing. These types of protection are used in different areas. A similar apron can be seen on a hairdresser, on a hotel maid, and on technical staff. At home, these types are the most attractive for work.
The apron can be attached to the waist or neck, covering the chest.
The advantages of such an apron
- He looks great. When properly designed, it suits both men and women.
- Several additional pockets for storing tools can be sewn onto the bib.
- Women often make a heart-shaped bib. This design is considered a very fashionable kitchen accessory. For such a bib, a heart pattern is prepared. The finished part is trimmed with frills as an additional decoration.
If you have enough aprons, you can sew one to give as a gift to a loved one.
Types of production formats for wall panels for kitchen splashbacks
Depending on the format, the apron for the kitchen set can be presented:
- panels (sheets);
- tiles;
- slats.
An apron made of panels can be:
- solid - represented by one large sheet of material, occupying an area of 1.5 to 3 sq.m.;
- prefabricated - consisting of several large panels. Their number varies from 2 to 6.
This is the most expensive, but at the same time convenient and easy-to-use option - due to the small number of seams or their complete absence, such aprons are easy to care for.
The tiled structure consists of small pieces of a square (less often rectangular) shape with a side length ranging from 20-60 cm. This is the most popular option for arranging an apron.
It is practical - if the panel is deformed, it is enough to replace only the damaged tiles.
A slatted apron is a product made of narrow slats from 12 to 50 cm wide, interconnected and attached to a special base. The main advantage of rack structures is their low cost.
Before choosing an apron for your kitchen set, you need to clarify what size it will be.
Typically, the width of the protective panel is from 0.6 to 4 m, and the height is from 40 to 100 cm. The thickness of the coating varies from 4 to 10 mm.
It is desirable that the height of the apron be equal to the distance between the floor and upper cabinets of the headset.
Instructions on how to sew an apron for the kitchen
You can sew an apron with your own hands in a couple of hours if you strictly follow the instructions for making it. Below are kitchen aprons with and without patterns that you can make at home.
Aprons
Aprons with appliques for children
Housewives who have children especially like to decorate products with appliqués. As a basis, use a straight-cut apron in light shades so that the pattern stands out. Thermal decals can be purchased at large clothing stores or online. Patchwork pieces of fabric are also suitable for decoration.
For boys, choose images of building elements, ships, airplanes, tanks. For children's aprons for girls - pictures with bows, butterflies, animals. Aprons with Japanese flowers such as sakura and chrysanthemum look especially delicate.
Note! With children, you can organize separate lessons on decorating aprons with appliqués.
Aprons in a gentle “shabby chic” style
These are light, elegant aprons of a simple cut with lace trim and flowers. They are made from cotton or linen fabrics. Pastel shades are more common in the style. Pink or blue colors are used for accents.
To create a product in the “shabby chic” style, you need to sew a straight-cut apron using a pattern and decorate it with satin stitch, beads, ruffles, and lace.
You might be interested in this: Beautiful patterns for wrap skirts: sew it yourself
Shabby chic style product
Aprons made from old jeans
Old jeans are used to sew the product. The front part of the top of the trousers without side seams is cut out. The back of the trousers is ripped open. A bib is cut out from a part with a pocket (the pocket should be in the center).
The lower part of the part is increased by 1.5 cm for the seam. Make a bias tape 3 cm wide and cover the open sections of the chest. If desired, sew a matching applique onto the pocket. The finished parts are sewn together. Ties made from strips are sewn onto the belt and onto the upper part.
Denim product
Elegant aprons for the holidays
Festive apron models are the most favorite. They are usually made for a special occasion or as a gift. Typically, holiday aprons are made from cotton or linen fabric. For decoration, use lace, guipure ribbons and bows.
Festive style
Step-by-step instructions on how to sew a festive apron:
- Fold the fabric in half, right side inward. Measure half the circumference in the corner. Draw a smooth line.
- Place marks from the line at a distance of 45 cm, connect with a smooth line.
- Round the bottom corners of the hem.
- Finish the hem with lace.
- Cut a rectangle 35 cm long and 25 cm wide. Round off the side cuts by cutting inwards. Trim three sides with lace.
- Cut two strips 1.5 meters long and 5 cm wide. Connect both parts of the belt with the bottom of the product and the bib.
- Ties. Cut out two strips 50–60 cm long and 9 cm wide. Attach the sewn straps to the top of the product.
Apron from a men's shirt
Making an apron from an old men's shirt is easy. If a man's shirt is large, several aprons will come out of it. The ribbon can be made from sleeves.
Man's shirt product
The manufacturing process takes place in 7 stages:
- Lay the shirt out on the table.
- Place a dot on the shoulder seam, 3 cm away from the point where the shoulder seam meets the neckline.
- Place the next point on the side seam, 7–10 cm from the lower point of the armhole.
- Connect all the dots.
- Cut the pattern along the side seams along the drawn lines and behind the collar, leaving a margin of 2 cm.
- Finish all edges with bias tape or hem stitch.
Non-staining aprons made of polyethylene
Polyethylene aprons are convenient for cleaning. They are durable and protected from chemicals. In the kitchen they will come in handy when cleaning the refrigerator, stove, and microwave. Aprons are made from polyethylene using the same method as models made from fabric.
Polyethylene apron
Sewing a kitchen apron is a simple process that will take no more than 3-4 hours. But as a result, the housewife will receive not only a means of protection against any contamination, but also a stylish accessory. It complements the outfit and fits effectively into the overall design of the kitchen.
Types of materials for the production of kitchen aprons
The performance and external qualities of a kitchen apron depend on the material from which it is made. It could be:
- plastic;
- ceramics;
- glass;
- natural or artificial stone;
- tree;
- metal;
- Chipboard or MDF.
Plastic panels for kitchen apron
Plastic kitchen panels are made from solid polyvinyl chloride. They have a hollow honeycomb structure, which provides additional heat and sound insulation.
The advantages of this material include:
- ease of installation and maintenance;
- a light weight;
- affordable price;
- durability.
However, plastic is vulnerable to mechanical stress, is resistant to abrasive detergents and caustic chemicals, and can also melt if overheated.
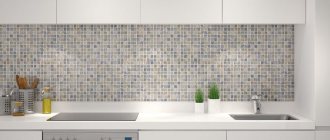
Kitchen apron made of ceramic tiles
Ceramic tiles or mosaics are one of the most popular design options for kitchen backsplashes. It has become widespread due to its favorable combination of high quality and affordable cost.
The advantages of ceramic coating include:
- durability;
- external attractiveness;
- resistance to moisture and mechanical stress.
The only difficulty is that to install such tiles you will need a special stable putty.
Glass Kitchen Wall Panels
Glass protective panels are called skinali. They have the following advantages:
- resistant to scratches and impacts;
- have a perfectly smooth surface on which dirt does not accumulate;
- easy to clean;
- provide the headset with a stylish appearance.
High-quality glass is not cheap, and not all types can withstand temperature changes. Therefore, such a design should be chosen with particular care.
Stone kitchen apron
A stone apron looks much more refined and aristocratic than a ceramic tile coating and at the same time has high characteristics:
- not afraid of temperature changes;
- not susceptible to the formation of fungus and mold;
- easy to restore - the damaged surface can simply be sanded.
Natural stone panels are very expensive and heavy, so most often they are replaced with more affordable, but no less practical and attractive slabs made of artificial material. This can be decorative concrete, porcelain stoneware and various types of composites (mixtures of natural stone filler and polyester resins).
Wooden apron for kitchen set
Wood is the most expensive material used for the production of kitchen aprons. Fine maple, cedar, alder or oak are coated with special wax, which protects the panel from swelling and deformation.
Despite the fact that a wooden apron looks elegant, it is rarely used in the kitchen due to its high cost.
Metal kitchen apron
The metal apron is durable, not subject to any aggressive influences, but has only two textures - glossy and matte. It is ideal for minimalist or high-tech kitchens. Unfortunately, it will not look entirely appropriate in other styles.
Kitchen wall panels made of chipboard and MDF
Chipboard or MDF are materials made from wood shavings. Simply put, wood processing waste.
Chipboard uses toxic synthetic substances for gluing, so it is not environmentally friendly and does not have high performance characteristics.
Natural resins are used in the production of MDF, which makes it a safe and reliable material.
Kitchen panels made of chipboard are laminated and look attractive, but cannot boast of strength and are not resistant to high temperatures and water.
Products made from MDF, on the contrary, are durable and can be used even in conditions of high humidity, but are more expensive.
Choosing fabric for sewing an apron
Before you start sewing the product, you need to decide on the fabric. Among the many characteristics of textiles, material types are the most important. It depends on them how practical, convenient and durable the product will be. There are 3 main types of fabric used for manufacturing:
- Blended fabrics that combine synthetic and natural fibers. Aprons made from such materials are durable. The downside is that they quickly lose their original color and fade during washing.
Mixed fabrics
- Natural fabrics such as silk, cotton, wool, linen - products have an excellent appearance and high wear resistance. They wrinkle easily and take a long time to dry.
- Synthetic materials are hypoallergenic, inexpensive and durable. The materials become electrified and do not allow air to pass through well. As a result, a person often becomes hot in a product made of synthetic fabric.
You might be interested in How to corrugate fabric yourself: what does corrugation mean?
Synthetic materials
Aprons for chefs in cafes or restaurants are a separate case. This element of the uniform must be comfortable and safe and meet established requirements. Therefore, aprons for chefs are made from high-quality calico with a mixture of polyester. Main characteristics of this material:
- resistance to wear and washing powders;
- environmental cleanliness;
- low cost;
- high density, strength;
- ease of care and ironing.
The most suitable fabric for cutting a professional apron contains 30% cotton threads, 70% polyester. This option is more expensive than calico, but it also has more advantages. The optimal combination ensures resistance to deformation and hygiene. A prerequisite is a special impregnation that protects against the effects of hot steam, fat, and boiling water.
Professional chef apron
Home wear items are not subject to such strict requirements as professional uniforms. And what fabric to choose for an apron, a woman can decide for herself, guided by her own preferences.
Here are the most popular modern options that are well suited for creating a home apron:
- “Diagonal” – cotton fabric with a small addition of synthetics. Special weaving of threads gives an interesting texture with a rough surface. It has elasticity and high density. Pros: thermoregulation, strength, resistance to deformation, pleasant to the touch.
Diagonal
- Linen is an impractical fabric because it absorbs dirt well, can shrink after washing, and requires careful ironing. It has more decorative value - it is difficult to compete with it in terms of aesthetics. It perfectly complements the interior in the Provence, Modern, and Country styles. An apron made of this material is suitable as a decoration for a hospitable hostess during a holiday or as a gift. The stores offer a wide range of fabric colors with and without prints, at an affordable price.
Linen
- Synthetic is a fabric that is inexpensive, easy to wash, and dries quickly. A housewife may have several items made from this material in her arsenal for every day. It is only important to choose high-quality synthetics that will not fade or pill after the first wash.
- Teflon-coated material is viscose, cotton, calico or synthetics, the surface of which is coated with a polymer layer. As a result of processing, the material is waterproof, does not absorb dirt, and reflects heat. An item made from such material can be safely machine washed on any mode. The downside is that it is sold only in specialized fabric stores, and the cost is relatively high.
Teflon coated material
Please note! When choosing brightly colored fabric, you must ensure that it does not stain clothes and skin under the influence of high temperatures.
Quite often, needlewomen use old clothes to sew products - denim, leather goods, bathrobes. Thus, you can spend your time interestingly and usefully, save money and create an exclusive item.
Methods for attaching kitchen panels to the wall
The installation of an apron directly depends on its type. In any case, it is advisable to first prepare the surface to which the structure will be attached - level it using a special primer and treat it with an antifungal compound.
If you use kitchen panels or a solid structure, they can be installed in three ways:
- using screws is the simplest method. To hide the caps, use caps that match the color of the apron;
- for hanging fasteners - flat metal clamps. They allow you to smooth out the joints between sheets;
- using liquid nails or glue is the best way if you need to achieve the absence of visible fasteners.
If ceramic tiles are laid as an apron, installation will take longer. It includes the following steps:
- first mark the markings - the upper and lower levels of the apron;
- a primer is applied, and a flat wooden block is installed along the lower edge;
- prepare the glue. There is no need to dilute the entire mixture at once - while the first layer of tile is being laid, it may have time to harden and become unusable;
- attach the first layer of tiles, and then all subsequent ones. To create even seams, special crosses are used;
- After a day, you can clean the apron from the seams, remove the crosses and apply a topcoat of waterproof grout.
When carrying out all work, it is necessary to control the evenness of the lines using a building level.
Apron for work
The apron pattern for a technology lesson in 5th grade is very simple. How to build the main part is shown in the drawing below. The belt ties and straps need to be made according to your own measurements.
To sew an apron for a schoolchild you need to prepare:
- fabric 0.6 by 0.6 m;
- bias tape to match the color of the main fabric - 3 m;
- Velcro tape for the belt;
- threads, sewing tools.
Description of tailoring
Mark the details on the fabric. An example of the layout is shown in the following figure. In addition to the apron, it also shows details of arm ruffles and scarves.
We cut out all the details (except for the belt and straps) without seam allowances, since we will process the cuts with bias tape.
We process the sections of the main part with bias tape.
We cut out the blank for the belt with an allowance of 1 cm in width. Fold the strip in half with the wrong side inward, and sew along three sides. Turn it inside out and iron it. Fold the free edge allowances inward. The dimensions of the finished belt are 2.5 by 16 cm. We fix the belt on the main part with pins and attach it. Sew Velcro tape onto both parts of the belt.
On the pocket blank, turn the top cut 5 mm to the wrong side and stitch. Then we make another turn at 25 mm, stitch along the edge of the fold.
The remaining sections of the pocket should be finished with bias tape. Place the pocket on the main piece, baste or secure with pins. Machine stitch the pocket. Make triangular tacks at the corners. Sew a dividing seam in the center of the pocket.
Finally, remove the basting threads and iron the product.
How to choose an apron for your kitchen set
Since the panels for the kitchen set carry an aesthetic load, their design should not only be attractive, but also suitable for the rest of the kitchen interior.
First of all, the color of the apron is selected:
- white is a universal color that will suit almost any headset. It not only creates an atmosphere of cleanliness and freshness, but is also very practical - soap stains and water marks are not visible on it;
- beige shades can also be used in any kitchen where there are warm colors;
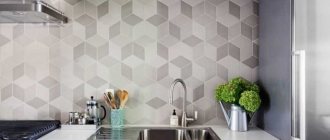
- mirror and glossy textures are ideal for small spaces - they allow you to visually expand the room;
- dark aprons are used to create stylish, unusual interiors. They set off light-colored sets well;
- bright panels or tiles (mosaics) in contrasting colors can dilute a monochromatic kitchen set, adding color to it. The main thing is not to overdo it with details, so as not to overload the space and not make the interior “screaming”.
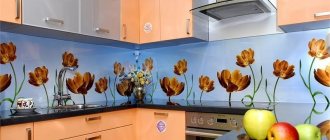
It is not necessary for kitchen panels to be monochromatic. Modern technologies make it possible to apply any images on them - from unobtrusive patterns and ornaments to unique designs, for example, still lifes of fruits or flowers.
Clinker tiles are also popular - creating a brick-like texture. Moreover, the type of masonry can be either fresh or aged.
How to choose the right color?
The dark apron area is considered the most impractical, since dirt is most visible there. For a kitchen in neutral colors, a bright apron or covering with colorful patterns is suitable.
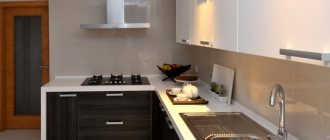
The photo shows a backsplash with matte orange tiles in the kitchen interior.
A kitchen space in a romantic classic or Provencal style will be perfectly complemented by a light apron finish, which will merge with the furniture and create a delicate and sophisticated atmosphere in the room. Natural beige, gray or light brown colors look beautiful.
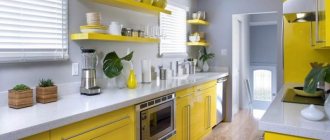
To create an original interior image, choose a rich pink or red design that fills the kitchen with warmth. A blue, light blue or turquoise coating will significantly refresh the space, green and emerald cladding will create a calm atmosphere, and yellow and orange materials will bring a sunny mood to the room.
The photo shows a bright kitchen with a blue apron.
Kitchen baseboard - why is it needed, what is its role
A kitchen apron plinth is a narrow strip that covers the space between the countertop and the panel. It prevents moisture and dirt from entering the gap. In addition, the plinth helps to hide flaws in the geometry of the walls and serves as a decorative element that gives the interior a complete look.
Depending on the material of manufacture, skirting boards can be:
- plastic. They are easy to install due to their softness, are not afraid of water and are not expensive. But they can become deformed at high temperatures;
- aluminum - these durable structures have an almost unlimited service life. They are heat-resistant, can withstand cleaning with abrasive agents and have electrical insulating properties.
According to the cross-section shape, skirting boards come in two types:
- triangular - with sharp corners and a smooth outer side;
- in the form of a “boot” - an elongated plinth, the upper edge of which is not a straight line, but a soft semi-oval.
If the baseboard does not come with the furniture, it is best to purchase a structure in the form of a base into which you can insert a strip of any material, including the same as the tabletop.
Step-by-step instructions taking into account the model
The main types and styles of aprons for the kitchen are based on a pattern with a cut-off bib. Depending on which model is selected, the sewing technology may differ. The general stage in this case is transferring the pattern onto the fabric. To do this, you can take tracing paper; it is easiest to transfer the drawing onto it. The parts are fixed with pins on the fabric so that it is convenient to mark the edges with special chalk, soap or pencil, and make seam allowances - 1.5–2 cm from the edge. The last step is to cut out all the details.
Simple apron without bib
This is the most common model and can be easily mastered by a beginner in sewing. To start work you need cut out parts. If a pocket is provided, it must be sewn to the main part of the product.
How to sew an apron step by step:
- Finish the edge of the product. This can be done using edging tape or simply folding the fabric.
- Then we sew the belt: it is applied right side to the top edge of the apron. The part can be basted or secured with needles. The seam is made at a distance of 1 cm from the edge.
- Next, the belt is folded in half with a 1 cm fold along the free side. It is advisable to sweep it away to make stitching easier.
- The width is also folded inward by 1 cm. The seam is made with an indentation of 0.1 cm from the edge.
Before sewing on a pocket, you need to consider the convenience and feasibility of its location. A simple apron is ready.
From the square
This is also an easy model to sew, as it does not require special skills or pattern making. To work, you will need a square of fabric, which will serve as the main part of the entire apron, and another additional piece of material to make ties and decorate the chest part. If desired, such an apron can be made with functional or decorative pockets.
How to sew a beautiful apron from a square step by step:
- The fabric is placed with one of the corners up - this will be the upper part of the apron.
- The corner is tucked towards the waist, then either cut off or decorated with a triangle of another material. In the second option: cut out a part of the required size with an increase of 1–1.5 cm on each side. The hem is made so that it is on the inside, the seam is made along the front side or along the overlay line, as an option - with an indentation of 0.1 cm.
- The remaining edges of the apron are treated with bias tape or the fabric is simply folded in half by 0.5–1 cm.
- Next, make the ties. They require two rectangles of fabric, 30 cm long and 6–7 cm wide. The parts need to be prepared, stitched, folded in half with a 1 cm fold on each side. The seam is made along the outside with an indentation of 0.1 cm from the edge. The upper strap is made in the same way, with its length equal to the width of the upper part of the bib + 6 cm.
The made ties are attached to the apron 6–8 cm above the corners, the place of fixation is marked during fitting. The square apron is ready, all that remains is to decorate it as desired.
Prepare product details
Place the square with one of the corners up, sew on a triangle in a contrasting color
Finish the edges of the main fabric
Sew decorative rectangles on the bottom sides
Sew top strap
Make a pocket and attach it to the apron
Sew ties
From a man's shirt
This is a very simple model, you can sew it even without experience. For work you will need a large men's shirt. When wondering how to sew an apron from a shirt, you can consider several options. The easiest one is to use the front part of the product. Instead of a strap, the apron will have a collar, and the main part will protrude in front of the shirt. Here you can do without a pattern, simply cutting off “everything unnecessary.”
How to sew an apron for the kitchen with your own hands:
- Unstitch the seam connecting the front and back of the shirt.
- Remove sleeves.
- Mark the waistline when trying on. Draw two lines from it to the collar of the shirt.
- Trim them along the contour.
- Finish the edges with bias tape. You can also make ties from it.
The only drawback of this apron is the buttons. On the one hand, they perform a decorative function and make the apron stylish, on the other hand, they can be very annoying when hand washing the product.
Unstitch the seam connecting the front and back of the shirt
Cut off the sleeves
Determine the waist line, make marks from it to the shirt collar
Trim along the contour
Process the edges
Cut ties from the sleeve and sew to the apron
Add decor
Festive in the form of a gingerbread man
This very unusual apron can also be sewn without a pattern: just draw the outline of the character on the fabric. To do this, you need to round the chest piece so as to give it the shape of a gingerbread man, the arms are placed at the waist - strings are attached to them, the legs are also made from the bottom of the apron. Actions step by step:
- The edge of the product is treated with edging tape, and ties are made from it.
- The top strap can be adjustable. In this case, you will need to cut out a rectangle: width - 7 cm, length can be arbitrary (about 20 cm). You also need another smaller part to secure the rings that fix the size.
- The short element is folded in half and sewn to one of the edges of the chest part of the product. Long - simply sewn to the other edge. “Gingerbread” is ready.
To make the gingerbread man look more realistic, you can additionally attach button eyes and embroider a smile.
Shabby chic style
Shabby chic refers to the use of cute and elegant things. Aprons in this style are distinguished by a delicate, slightly faded color scheme. Lace, floral prints and pastel colors are ideal for them. To make a product in this style, you will need the most common apron pattern and decorative elements. Main stages:
- Adjust the pattern to your measurements.
- Attach it to the fabric, pin it with pins.
- Cut the fabric along the edge.
- Hem around the entire perimeter.
- Sew ready-made translucent ruffles or lace along the hem.
There can be as many frills as you like, it all depends on the imagination of the craftswoman. You can also use textile soft pink flowers in a vintage style as decoration.
Cut out two top pieces
Prepare three ruffles, sew on the top parts
Connect the parts, decorate with buttons
Sew ties on the sides
Take a plain fabric and hem it around the perimeter
Prepare frills
Sew ruffles onto the apron
Make ties
Connect the top to the bottom
Ready product
Men's with leather inserts
Such aprons can be seen in small coffee shops or cafes where men work behind the bar. A distinctive feature of the products is leather inserts. They can be used as top straps or apron straps, as ties and as pocket material. The model is simple and laconic, often based on a one-piece apron with a bib. To make it you will need nappa leather (can be replaced with artificial leather). How to sew a men's apron step by step:
- To begin, cut out the main piece from the fabric - 68 x 35 cm.
- Cut out leather elements for large and small pockets (56 x 20 and 15 x 12 cm).
- Prepare 4 ties measuring 90 cm x 5 mm. They can be fabric or leather.
- Cut out all the details without allowances.
- Place the small pocket on top of the large one and stitch it, stitching the resulting structure to the apron.
- Attach the ties.
Sewing a man's apron is not much different from the process of making a product for a woman. The only differences will be in the decor: for the stronger sex it should be brutal and laconic, for example, in the form of rivets or buckles.
Children's
An apron for a child can be sewn according to the same principle as for an adult. Of course, it is necessary to take measurements, according to which you can then construct a regular apron pattern. Children love everything bright and cheerful, so many craftswomen sew aprons from ready-made colored towels with interesting designs.
Making a children's kitchen apron is very simple, you will need:
- Cut a rectangle 45–60 cm wide (the length is calculated according to the child’s height), taking into account the allowance.
- Fold it in half lengthwise.
- In place of the top part, make a semicircular cutout approximately 10 cm wide.
- Finish the edges of the resulting workpiece with bias tape.
- Sew on the straps. The apron is ready.
Additionally, you can attach a decorative pocket. If the apron is intended for a girl, it can be decorated with lush frills.
Cut a rectangle of the required size Fold in half lengthwise, make a semicircular cutout for the apron
Attach a decorative pocket
Process the edges
Sew straps
From old jeans
Denim aprons are usually made from a one-piece pattern using universal sizes. In order to cut a one-piece model, you will need jeans for a large man, from which you can cut a decent piece of fabric.
Sequence of steps on how to sew an apron for the kitchen with your own hands:
- Prepare the main part (length - 70 cm, width of the lower part - 50 cm, upper part - 30 cm).
- Carefully process all edges.
- Next, we sew the apron in the same way as the previous models: connect the parts and, if desired, sew on a pocket.
If you only have small pieces of old jeans, you can make an apron pattern with a cut-off bib - this will make it easier to arrange the pieces.
Prepare the main part
Finish edges Sew pockets
School
Aprons for school celebrations are sewn according to a pattern with a cut-off bib made of guipure or white cotton. Products can be decorated with lace, a small gather at the bottom or folds.
How to make an apron yourself:
- Cut out the top and bottom panels.
- Prepare straps and frills.
- Cut out the part for the belt: its length should be equal to half the waist circumference + approximately 5–10 cm on both sides for gathering.
- Finish the edges of the bottom pattern.
- Sew the top and bottom parts, while you can gather the fabric a little.
- Sew straps to the bib.
This is the lightest and simplest model of a school apron. If desired, you can take a more complex pattern, for example, with crossed straps.
Cut out the main panels
Prepare straps and frills
Cut out the belt piece Finish the edges Sew the straps to the bib Connect the top and bottom parts
Ready apron
Photos of wall panels for kitchen aprons in the interior
<
>
An apron for the kitchen set together with a plinth will greatly facilitate the housewife’s work in caring for the kitchen and will help diversify the interior. A wide selection of textures and colors will allow you to realize any design ideas.