Who invented cold porcelain?
The history of cold porcelain originates in ancient China. Masters of that time created works of art according to a recipe that Danes and Russian craftsmen later began to use.
Mention of the use of cold porcelain in Russia dates back to the beginning of the 19th century, when Pyotr Ulyanovich Ivanov, master of the imperial porcelain factory, began to produce the finest porcelain flowers using a special recipe to decorate perfume bottles, mirrors and vases intended for the emperor’s family.
General recommendations
The following tips will help you prepare high-quality pasta with the ideal consistency:
- the use of aluminum cookware for cooking is not recommended; enamel or glass cookware is considered more suitable;
- To ensure strength and flexibility, formalin is added to the mixture; gloves should be used when handling it;
- Do not leave the finished product in the cold; at low temperatures, cold porcelain becomes very fragile;
- the mixture cannot be stored in the refrigerator;
- high-quality kneading will prevent the formation of cracks during drying;
Recommended for you:
How to develop photoresist with baking soda at home
- during the sculpting process, it is necessary to lubricate your hands with cream, this will help prevent the mixture from sticking;
- cold porcelain can be painted already during the cooking process, but only with food coloring;
- You can avoid the appearance of mold during storage by applying any type of cosmetic oil to the paste.
The recommendations given will help make the modeling process comfortable, and the product more durable and durable.
There are many options for sculpting techniques using cold porcelain. There are recipes of different complexity and composition, adapted for a wide variety of consumers. This material allows both professionals and very young sculptors to realize their ideas.
Cold porcelain is used in the manufacture of dolls, figurines, and interior items. It makes beautiful flower arrangements that are surprisingly life-like. The final result and appearance of the product depends only on the artist’s imagination.
Recommended for you:
How to use baking soda and citric acid for fishing
What is good material for crafts?
Cold porcelain (crafts for beginners, step-by-step diagrams with descriptions are given later in the article) is a plastic mass with a smooth, uniform texture that hardens when it dries.
Ceramic products made from cold porcelain do not require heat treatment; they can be painted with varnish or paint.
To make the composition you need the most affordable materials that can be bought in any store. The modeling mass has the best ratio between the price of ingredients and the quality of the resulting crafts.
Plastic porcelain is completely non-toxic and safe for children's creativity.
Working with it does not require special knowledge and skills. The art of making porcelain products is learned experimentally from simple to complex.
How to color the resulting mass
Cold porcelain made at home requires staining. To add color to the mass, food coloring, pigments and acrylic paints are used. The first two coloring substances are used when cooking porcelain, adding them to the composition along with the main components. In this case, you will need to prepare several balls of porcelain mass to give each one a different color. Acrylic paints are used when the product is dry and just needs to be painted. This option is a little more convenient, more practical and takes less time.
- Filet mignon - recipes with photos. How to marinate and cook filet mignon, degrees of doneness of beef steak
- Spring rolls - step-by-step recipes with photos
- Chicks on hands
What can you mold?
Porcelain crafts are distinguished by their beauty and grace. Plastic mass can be used in various fields.
The most popular products made using the modeling technique are:
- costume jewelry (pendants, earrings, bracelets);
- hair decorations (hairpins, elastic bands with decor, headbands);
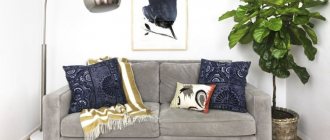
- interior items (decorative flowerpots, boxes, vases, lamps);
- cartoon characters, figures of animals, insects, people;
- gift souvenirs;
- decorative decorations for vases, mugs, flower pots and wall panels;
Master class for beginners on making the mass with your own hands
Cold porcelain (it is recommended to make crafts for beginners from a simple mixture without heat treatment) has several variations of recipes. They differ in ingredients and method of preparation.
Recipes without heat treatment
Recipes for preparing modeling mass are divided into 2 types: with and without heat treatment.
At the same time, the finished mixture does not differ in consistency and quality.
To prepare the mass classically, you will need to do the following:
- Mix 4 tbsp. l. any starch with 2 tbsp. l. vegetable oil and add 5 drops of glycerin.
- Pour a little soda into this mixture (at the tip of a teaspoon) and 4 tbsp. l. PVA glue.
- Mix the mixture very thoroughly. You can stir with a spoon first. When the mass thickens, begin to knead it with your hands.
- Before modeling, roll the “dough” into a ball, grease it with rich cream and put it in a plastic bag for 3-4 hours.
Recipes with heat treatment
Heat treatment when creating a plastic mass involves the use of heat on a stove or in a microwave oven.
The simplest and most accessible recipe consists of only 3 components:
- baking soda - 1 part;
- starch - 1 part;
- water - 1 part.
Cooking method:
- The listed ingredients should be poured into a frying pan with high edges and mixed thoroughly.
- Then, start heating the mixture over low heat, stirring constantly.
- When a lump forms, you need to thoroughly knead it with your hands for 2-3 minutes.
The resulting composition has a homogeneous dense consistency. The mass turns out to be plastic, but not stretchy. It is well suited for sculpting figures.
The other option is more complex, but products made from this mass are elastic even when dried.
Required ingredients:
- starch;
- PVA glue;
- baby skin care oil;
- lemon juice (wine vinegar);
- oily skin cream.
To make cold porcelain you need to do the following:
- Mix the ingredients in the following quantities: 1 tbsp. starch and PVA glue, 2 tbsp. baby oil and lemon juice.
- Place the mixture in the microwave for 25 seconds. and mix well again.
- Repeat heating 2 more times.
- Next, knead the mixture for at least 5 minutes. using your hands.
- Treat the resulting mass with rich cream, wrap it in plastic and put it in the refrigerator.
- Use cold porcelain no earlier than after 3 hours.
How to whiten plastic porcelain?
The whiteness of porcelain directly depends on the color of the ingredients.
If the mass turns out yellow or beige, it can be bleached using the following method:
- Knead the mixture according to the classic recipe with cooking in the microwave (2 tablespoons each of starch and PVA glue, 1 teaspoon each of glycerin and lemon juice, 1/4 teaspoon each of paraffin, Vaseline and baby body oil).
- Add 1 tsp to the ingredients. oxygen laundry bleach powder or a spoonful of liquid product.
- Cover the mixture with polyethylene and leave for 2-3 hours to bleach.
- Cook the mixture in short intervals (5-6 seconds each) with constant stirring until the mixture thickens.
How to correct cooking errors?
If it happens that during cooking the mass overheats and becomes crumbly, or vice versa, the porcelain is not dense enough, you can use the following recommendations:
- If, when preparing a classic recipe, the dough turns out to be very liquid, you need to add a little starch.
- Many masters categorically advise against diluting the mixture with water. If the mass is crumbly, it is recommended to add PVA glue.
- To ensure that the modeling mass is plastic and retains its elasticity even after drying, paraffin should be added to the composition.
Coloring
Cold porcelain (crafts for beginners do not require special skills to make) can be either colorless or colored. Depending on the type of product and the intensity of the color of the craft, various painting techniques are used.
You can mix the pigment directly into the plastic mass, or you can paint the finished product after drying.
The table shows the main methods of tinting the modeling mass:
| Application method | Dyes |
| Surface tinting of the finished product |
|
| Coloring the modeling mass (mixing pigment into a plastic composition) |
|
Drying finished products
Compliance with drying rules is the key to success and obtaining a beautiful product. Depending on the size and thickness of the craft, different drying times may be required.
Do not forget that some elements are quite thin (flower petals, leaves) and in order to maintain their shape they must be placed on the base at a certain angle and with the desired bend. Thus, it is convenient to dry rose buds in the cells of egg trays, and to give graceful curves to the leaves and petals, they can be laid out on the spread of a book, previously covered with foil.
The average drying time for cold porcelain crafts is 24 hours at room temperature. At the same time, for uniform drying, the products must be turned over.
To speed up the drying process, you can use the following method: heat the oven, turn it off and place porcelain crafts inside.
Composition options and recipes
There are several recipes for making cold porcelain using sodium bicarbonate or baking soda. Below is the simplest version of the components that are likely to be found in any kitchen.
- It is necessary to prepare the ingredients for the mixture: baking soda, starch and water. The ingredients are taken in equal proportions; for a small figurine you will need one hundred grams of each. Corn starch is recommended, since the use of potato starch can make the surface of the finished work rough and porous.
- All ingredients are mixed until smooth. It is better to carry out this process in enamel dishes suitable for heating on the stove.
- The mixture must be heated over low heat. When heating, stir the mixture continuously to avoid the appearance of lumps. The finished substance forms a thick paste that is easily separated from the walls of the container. At this stage, the stove must be turned off.
- The paste is laid out on a cotton napkin and cools to a tolerable temperature. The mixture is then kneaded by hand in the same way as dough.
Recommended for you:
Processing and washing an oak barrel with soda: how to do it and why
After kneading, a plasticine-like mass is obtained. It should be homogeneous and easily take the desired shape. Initially, cold porcelain is white; pigments are added during the sculpting process. It is possible to paint the finished figurine with acrylic paints.
There is an alternative method for preparing cold porcelain. Its main difference will be the absence of cooking. The manufacturing method is quite simple and consists of several stages.
- First of all, you need to prepare the ingredients. The ingredients for no-cook cold porcelain include: baking soda, wallpaper paste, petroleum jelly, dish detergent and water. An important condition will be the content of modified starch in the wallpaper glue.
- In the prepared container, glue and soda are mixed in equal proportions, then cold water is added. Water should be added gradually, adjusting the viscosity and texture of the mixture. The result should be a mass with a consistency similar to plasticine.
- Then you need to add a few drops of Vaseline oil to the mixture. The resulting mixture is kneaded by hand until smooth.
- Two or three drops of dishwashing detergent will help remove the stickiness of the material.
Expert opinion
Did you know?
The finished paste has a bright white color and a good level of plasticity. It is easy to roll out to a translucent state without the risk of cracking.
Modeling tools
For modeling, you need to prepare a workplace with good lighting, cover it with film or a special mat for creativity. It should be taken into account that the modeling compound absorbs any dirt very well, so the work must be done with clean hands. If necessary, it is recommended to periodically wipe your hands with wet wipes.
To work with cold porcelain, you will need special tools, as well as auxiliary materials:
- Rolling pin for rolling out large layers of porcelain;
- Stacks of different shapes for rolling, cutting, creating corrugated edges, holes and textures on the surface of workpieces.
- Scissors (large and small).
- Tweezers with different tips.
- Wire cutters.
- Wire for creating flower stems and other structures.
- PVA glue for assembling products.
- Dyes for tinting the mass.
Beautiful crafts made from cold porcelain. Step-by-step description of the sculpting process
Cold porcelain has an undoubted advantage: when it dries, it becomes hard. Therefore, even children and novice craftsmen can make crafts that will serve as original gifts for friends and family.
Flowers
A simple master class on making spring crocuses will appeal to both beginners and experienced craftsmen.
To work, you need to prepare a mass for modeling and paint it in 3 colors: purple, yellow and green. You will also need forms for cutting out petals (you can make your own from a tin can) and wire for making stems.
To create flowers you need:
- Roll out the porcelain mixture on a flat surface into a layer 2 mm thick.
- Using a mold, cut out the petals (you will need to make 6 petals for each flower).
- To give the petals a pattern, you need to press them against a textured surface or special molds.
- Place the molded petals on plastic spoons to dry.
- Make stamens and pistils from the yellow mass. For pestles, cut a thin layer into small triangles. Cut one edge of the triangle with thin scissors and then twist it into a tube. For each flower, make 3 pistils and 3 stamens.
- Wrap the wire for the stems with electrical tape. Attach all the elements of the flower to the stem (pistils and stamens in the center, petals in 2 rows around).
- Make the stems and receptacle from green porcelain.
- To dry, hang the flowers with the buds down.
- Make long leaves from a green plastic mass.
- Place the finished flowers in a vase or collect them in a bouquet.
You can make other flowers in the same way. The difference lies in the shape, size and number of petals.
Cold porcelain crafts are available for beginners
Lush lilac inflorescences made from lilac porcelain look very natural. To create them you will need scissors, tweezers and wire.
To make a flower, you need to roll a small ball, form a shape in the form of a drop and use scissors to cut the thick part into 4 segments. You can shape the petals using tweezers. To create unopened buds, a drop from the mass only needs to be lightly pressed with the blades of scissors.
Flowers need to be collected on a ready-made base by putting each flower on a wire.
Bijouterie
Cold porcelain (crafts for beginners may have simpler patterns) is a very plastic material that can be modeled. You can combine any colors in your creativity, which is suitable for creating bright jewelry.
A bracelet with pink pearls and small peach blossoms will look incredibly delicate. To make it you will need to make about 30 flowers from porcelain. The basis for the bracelet can be any old bracelet with a chain base.
Assembly order:
- On the pin you need to sequentially put a pink mother-of-pearl bead and a porcelain flower.
- Using pliers, bend the free edge of the pin into a ring.
- Make similar pendants without flowers from beads of different sizes.
- Assemble the bracelet, alternately attaching pendants with flowers and beads to the chain.
A pendant and earrings made in the same style from small rose buds surrounded by delicate greenery will complement an elegant look or serve as a gift for a significant event.
A voluminous ring in the shape of a lush peony can become a bright accent for an evening look.
To create it, you need to buy a ready-made base for the ring and make a flower from cold porcelain according to the following description:
- For the base, you need to put a small ball made of plastic mass on a toothpick.
- Next, you need to make the petals and sequentially attach them with glue to the central ball.
- The petals are made from small pieces of cold porcelain. First you need to roll the ball, then use a stack to roll it out on your palm.
- Without peeling the petal from your palm, make small notches along the outer edges with a stack and lightly roll it out again.
- Place the petal on your index finger and use a stack with a ball at the end to give it a curved shape.
- The petals need to be strengthened sequentially in a circle, each time increasing their size.
- The flower must be dried and then glued to the blank for the ring.
Basketry
For a spring bouquet, you can make a wicker basket. This is a simple craft suitable for beginners.
To make this craft you will need to take the “dough” of the desired color. You can make a brown basket, or you can make an unusual pink or blue one. The manufacturing scheme boils down to weaving a basket from strands rolled up into a plastic mass.
Assembly sequence:
- For the base, you can take a small glass jar or other container.
- 13 pieces of strands with a diameter of about 2-3 mm need to be laid out in a circle and their ends glued together in the center of the bottom of the jar.
- Glue a circle of cold porcelain in the middle, which will serve as the bottom of the basket.
- After drying, remove the workpiece from the base and braid the rods in a circle.
- The top of the basket around the circumference can be closed with two rods twisted together.
- It is recommended to make the handle from wire wrapped with plastic tape.
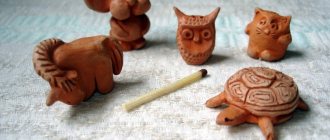
Figures
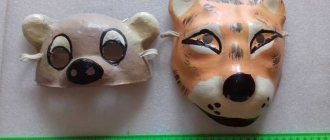
Both children and adults will enjoy sculpting figures from plastic mass. Making them is no different from modeling them from plasticine, but the result will please you in that they can then be used as toys.
In the same style you can make various interior and garden figures, souvenirs, key rings and children's toys. Figures made from plastic dough can be either simple or very complex, with many elements that can be equated to works of art.
Various materials can be used to decorate cold porcelain products. This can include beads, beads, glass crystals, textile and metal elements.
New Year's crafts
The most popular type of New Year's crafts are Christmas tree decorations. Making them from cold porcelain mass is very simple. To do this, you need to cut out figures from a layer of rolled out mass, make holes for hanging, dry and paint.
To create New Year's figures you need to use your imagination. The easiest way is to buy ready-made molds and cut out blanks using them. You can also use improvised means to create themed decorations.
So, simple balls with snowflakes can be cut out using a simple glass, and an openwork pattern can be made using a knitted or plastic napkin, which must first be pressed onto the dough layer using a rolling pin. Holes for ties can be easily made using cocktail straws. After drying, the relief pattern can be tinted with silver or gold paint.
To make decorations in the form of Christmas trees, just use a knife to cut triangles from the rolled out mass, use a fork to make something like pine needles and paint the toys green.
A snowman can be made from 2 circles of different diameters, glued to each other with a slight overlap. The junction of the circles should be covered with a scarf, which is made of a bright-colored strip with fringe along the edges. A fringe-like appearance is created by making cuts with a knife or scissors. The nose, eyes and mouth are also made from a mass of different colors.
Russian bear made from tires
Waste tires are used to make large garden decorations. These can be colored borders and hedges, flower beds, animal figures. The bear from the Russian fairy tale is the most popular craft made from tires. It looks great next to wooden buildings.
We will need:
- 3 small tires and one larger;
- metal pipe for support;
- thick rubber mat;
- linoleum;
- plywood;
- self-tapping screws;
- brown oil paint in two or three shades;
- glue moment “Liquid nails”;
- cutting tool.
How to make a garden tire bear:
- We form the body: we place two tires vertically on a piece of metal pipe. The upper small tire is the head, the lower one is the torso.
- The lower legs from the remaining tires can also be attached to the body using metal pins.
- From a thick rubber mat we cut out the front paws and round ears. We fasten all parts with liquid nails.
- We make a beautiful face and belly from plywood: we cut off round pieces and attach them to the tire with self-tapping screws. We glue linoleum on top of the plywood.
- All that remains is to paint the bear with paints, preferably in two layers. It is more convenient to paint the ears, paws and body from tires in advance, and create the pattern on the face and belly on the finished frame.
- Give the Russian bear a birch staff and a birch bark box for its paws. Fill the tire legs with soil, pebbles or vegetation.
Advice Using the same principle, you can create a snowman to decorate your winter garden.
Decoration of dishes
Porcelain mass is unstable to temperature changes, so it is not used for making dishes. But a decorative mug decorated with a floral arrangement can become an enviable piece of kitchen furniture.
To create a designer cup you will need:
- Bright rose buds, forget-me-nots, leaves made from mass.
- The base is made of green porcelain, on which the composition will be attached.
- Glue (for strength, you can use E6000 glue).
The order of assembly of elements consists of the following steps:
- On the cup you need to stick a base in the form of a green porcelain stain.
- Large flowers should be strengthened in the center.
- The perimeter of the spot must be filled with green foliage.
- Between large inflorescences, you need to strengthen smaller flowers and unopened buds.
- The upper part of the composition can be decorated with a bouquet of blue forget-me-nots with a bright yellow center.
As a gift, you can give a tea set decorated with scarlet poppies and bright greenery. Fans of feasts will appreciate salt shakers, sugar bowls and other kitchen utensils decorated with floral arrangements.
Decoration of photo frames
A photo frame has always been an appropriate gift for any occasion. A stylish craft made with your own hands can become an independent element of a designer interior or simply serve as an item for storing family memories.
Photo frame design options:
- Photo frame in a nautical style, decorated with shells and starfish, made in white and blue tones.
- Children's photo frame with cute figures of cartoon characters and baby items (baby bottles, pacifiers, rattles).
- A stylish interior accessory with large inflorescences of roses, peonies, lilies and hydrangeas.
The availability of ingredients and ease of manufacture makes cold porcelain mass a leader in the arts and crafts. Modeling methods are available to children and craftsmen just starting their creative activity.
Author: Maria Andryukova