Principle of operation
People who have their own workshops, garages, houses, install potbelly stoves. This is a device that first appeared in the 1917 revolution. They named it because of the high consumption of fuel for the firebox, but the advantage is that the stove is unpretentious.
A potbelly stove made from disks has an advantageous design; it is simple and also has a low price.
The main disadvantages include low efficiency - only 15-20%. Insufficiently thick metal walls conduct heat poorly, and the device quickly cools down during processing. This happens because the main volume of heat produced by the stove evaporates into the chimney - that is, it heats the street.
Heat exchanger
To increase efficiency, you can try to increase the area of the heat-conducting surface. For this purpose, a heat exchanger is needed. It is mounted in a place where heat is concentrated to a greater extent, significantly increasing efficiency.
The heat exchanger for the building is a device for indirectly heating water. The essence of the operation is that the liquid circulates in a confined space due to the convention. Water warms up under the influence of heat.
Hot layers rise and are replaced by cooler ones. Mixing water against the background of heat is called circulation. Heated water or other coolant, rising, transfers heat to the water. The stove becomes a heat exchanger as it creates heat.
Working a potbelly stove in your home
The main functions of the device are:
- The heat exchanger becomes an additional heating circuit. As it runs, the fuel burns out and at the same time warms up the walls of the firebox. In this case, when interacting with air, hot bricks give off their heat, which evaporates through the flue.
- Thanks to the device, the air transfers excess heat to the liquid, thereby increasing efficiency, receiving an increased coefficient for each unit of fuel at the output.
- In accordance with its purpose, the device allows you to heat water for showers and heating fluids.
Choosing the right material
It is best to use a stainless steel heat exchanger . Even when exposed to high temperatures, the physical characteristics of the metal remain stable. This is why welds seem quite strong, and when exposed to oxygen they form a protective film. It withstands acidic environments. Speaking about the use of zinc, when temperatures reach 200 degrees, it evaporates.
At 500 degrees, the vapor content in the air reaches critical levels. At the same time, if there is galvanization, there is no need to worry. True, the maximum temperature should not reach above 200 degrees. Galvanized material can be used, as it promotes enhanced mixing of air flowing around the device. This kind of heat exchanger is not suitable for constant maintenance, but to warm an attic or bathhouse, this is the best option.
This element can be installed easily and simply. It can be installed on a simple potbelly stove; its façade is faced with brick, just like the stove itself.
If you lay the material on edge, the structure will not be shaky.
Types of devices
Among air types, the classic model for self-assembly is a tubular heat exchanger. But there are also a large number of other types. They remain relevant for chimneys of long-burning stoves, small-sized potbelly stoves, and stoves undergoing mining. Their heat converted from combustion energy is called dry heat. Pipes can be welded to the firebox horizontally and vertically. Vertical localization is many times more effective because the air flows better through the channels. The material is usually steel.
Another type of heat exchanger is a pipe that wraps around the firebox. For proper heat transfer, 2-3 curls are required. They move apart a little, increasing the heating area. The performance corresponds to the difference in the level of inlet and air supply. The draft corresponds to the temperature difference, so the hole for the fence is often exposed to the street.
Coil
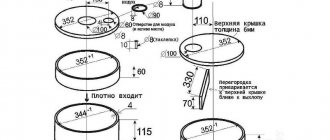
Partitions in the housing are also a type of heat exchanger. The characteristic labyrinth is constructed from vertical metal plates. The optimal thickness of each part is 6-8 mm. The inlet and outlet openings of the air duct are formed opposite each other, and a cover is welded on top to seal the housing.
Partitions in the housing
The next option is pipes that pass through the firebox. The structure is constructed already at the stage of assembling a home-made device, before welding the walls. The channels are located parallel at the same distance. The cross-section of the pipes is not less than 50 mm.
Pipes through the firebox
In vertical channels, air moves more actively, therefore increasing productivity. Less commonly, horizontal channels or partitions are appropriate. Any described scheme is suitable for design, provided you have welding skills.
Methods to increase efficiency
There are several ways to increase the efficiency of a potbelly stove in the garage and stop freezing. They are complex in varying degrees: from a sandbox to an updated design. All of them are produced without serious financial costs, and improvised means are used for their implementation. Let's consider each method for increasing the efficiency of a potbelly stove separately.
https://youtube.com/watch?v=SNKEQmQMxl4
Changing the chimney
The efficiency of a potbelly stove is directly affected by the shape of the chimney. To ensure that heat transfer does not suffer, the pipe design must meet certain parameters.
The pipe must be vertical. Angles with an inclination of no more than 45 degrees are allowed. If conditions force you to insert 90-degree angles, then you should try to use them as little as possible.
Angle 90, replace with 45
Make the chimney higher
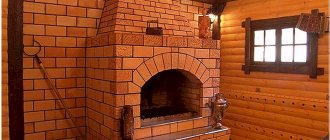
Brick screen around the stove
The brickwork around the device allows you to retain heat and protect yourself and others from contact with hot metal. Properly placed masonry increases heat transfer by about a quarter. When the potbelly stove is heated, the brickwork heats up. After the fuel burns, it will continue to share the collected heat. Experts advise laying bricks not close to each other, but 30 centimeters from the walls of the firebox.
To lay out the screen, you will need a couple of dozen heat-resistant bricks:
- the screen is laid out on clay mortar;
- the first row is laid out according to the intended markings;
- in the second row, ventilation gaps are made the size of half a brick;
- the brick is laid out in accordance with a pre-designed shape and size for the opening;
- A steel strip is attached to the last row for additional fixation.
Improving heat transfer using fuel
A metal stove is heated in different ways: from wood to sawdust with small debris. To improve heat transfer in a potbelly stove, compressed sawdust, briquetted industrial waste and coal are used.
- Compressed sawdust burns out much more slowly - one load is enough for many hours of smoldering.
- Briquettes are made from wood shavings and waste. The pressed composition allows them to smolder for a long time, because they cannot flare up. Briquettes smolder evenly and for a long time, increasing the heat transfer of the potbelly stove.
Sawdust briquettes
It is also worth assessing the traction force. This can be done by looking at the color of the flame. If there is not enough air, the flame turns red and dark stripes appear; if there is too much oxygen, the flames become bright white. The draft, and with it the efficiency of the stove, is normal when the flame is golden-orange. For better traction, you can blow the potbelly stove using a conventional fan.
Sandbox
If you have no desire at all to re-equip your stove, add anything to it, or experiment with different types of fuel, there is the simplest and most economical method. A box is placed on the potbelly stove, in which two buckets of sand are placed.
Place 2 of these buckets in a box on top of the stove.
Redesign of the structure
Steel corners welded on the sides strengthen the device itself and increase the temperature of the furnace. Metal side screens are also screwed on for these purposes.
Craftsmen attach sheets of iron 6 centimeters from the walls of the firebox. This is done so that the heat energy is transferred using convection, due to which air moves between the installed plates and the body of the potbelly stove.
Install protective metal screens
To prevent the heat energy from disappearing so quickly, you can use a metal cassette. It is a cylindrical object welded from a sheet of steel. It is called a cassette because it is inserted into the combustion chamber. A little firewood is loaded into the cassette, turned over and placed in the potbelly stove so that the firewood itself gradually falls onto the heated coals and ignites. While the wood already in the firebox is burning, the remaining wood in the cassette is dried and lights up after the first layers.
Using additional coolant
The stoves are complemented with water tanks and so-called water jackets in order to use them as an additional coolant and save energy.
The water jacket is designed as follows. A U-shaped tank in which water is heated is mounted in the housing. Two pipes branch off from the tank: for supply and processing. The tank itself is fed by tapping into the pipeline.
Which material to choose
Using classical technology, the coil is constructed from a pipe. Its length and diameter are set depending on the required heat transfer. The exact operating efficiency depends on the thermal conductivity of the materials. Usually pipes are taken from:
Steel
- copper – thermal conductivity coefficient 380;
- steel – 50;
- metal-plastic – 0.3.
Do-it-yourself copper heat exchanger for a potbelly stove
With the same heat transfer rates and the same transverse size of pipes, the length of metal-plastic pipes is 11 times longer, and that of steel is seven times longer than copper. For this reason, annealed copper pipes are chosen for the coil. They are plastic, so they easily take the required shape with the help of deflection. It is also easy to connect a fitting to such a pipe using a thread.
Options for making devices yourself
When selecting, the main role is played by the price of the heat exchanger. The design will depend on the material. Another important nuance is manufacturing capabilities.
You also need to understand where the stove will be placed. It is important to take into account the purpose of operation - heating and cooking, for heating a bathhouse, a house. Each type has differences.
For heating a private home
The main thing is to correctly calculate the area that needs to be heated, also clarify whether hot water is required, and calculate how many units of fuel will be consumed per season. The results of the calculations are the selection of the most suitable and affordable materials for the budget.
For a bathhouse you will need a comprehensive option. The main goal is to warm up the water, two rooms at once - a dressing room with a steam room, and sometimes a shower. It is recommended to use a heating coil for stove heating and water heating. Additional heating will improve the quality of the steam.
For the bath
For the home, the functional requirements for the device must be taken into account. The final choice will depend on this. Usually in villages they try to make universal heating and cooking structures; they install the most commonly used heat exchangers, simple ones that solve at least three problems - heating, cooking, water heating.
For garage
The garage is the easiest place to choose, here heating the liquid carrier is an optional function, the main thing is heating the room. These conditions will make the choice easier. Various homemade heat exchangers made from scrap materials are suitable - car radiators, cast iron batteries, etc.
Heat exchanger from a cylinder
To use already exhaust gases for additional coolant in the heat exchanger, you need to slow down the exit of smoke by creating a barrier in the chimney. For construction you will need three empty gas cylinders, sheet metal and scrap metal. The sequence is:
- Build a firebox from a cylinder - cut out the top so that the diameter of the hatch reaches 200-250 mm.
- Mark a rectangle measuring 50 by 20 cm on the wall, apply a mesh with cells 30 by 40 mm. Make holes in the crosshairs.
From a cylinder
- Build an ash pan slightly larger than the area with the holes. It must have a lid. This is a collection for ash. Supports are welded to the wall at the corners.
- At a distance of 4 cm from the bottom of the cylinder, at the rear wall of the firebox, a hole is first marked, then a hole 3 cm smaller than the cylinder itself is cut.
- It is better to make the door for the firebox from the head of the second cylinder, cutting a hole in the center of it. A piece of pipe with a diameter of 7.6 cm, equipped with an adjustable damper, is attached to the hole. The mobility of the sash is supported by hinges and locks of inventory drawers.
Balloon frame design
- Construction of a heat exchanger from the second cylinder. Make 3 bulkheads from 4-5 mm metal so that they cover the internal size of the cylinder. They cannot fit around the edges of the hole according to the diameter of the chimney pipe and for a margin of another 2 cm.
- Cut off the bottom of the cylinder, cut it in the shape of a fit on the firebox at an angle of 90 degrees.
- Cutting a hole for the chimney in the valve part.
- Installation of the bulkhead - holes in a checkerboard pattern.
- Installation of the heat exchanger, scalding, welding of the pipe.
Making a potbelly stove with a water circuit with your own hands
To make a potbelly stove yourself, you will need skills in working with metal products and the ability to use a welding machine.
Determination of furnace parameters
- When it is intended to use large firewood, the loading hole in the combustion zone is made 40x40 cm in size. If small pieces of wood or coal become fuel elements, then the acceptable hole parameters are 20x20 cm.
A small stove can be heated with large wood if the combustion chamber and loading hole are made of appropriate sizes
When welding metal plates onto the walls of a potbelly stove, the area of the heat-transmitting surface increases
If the stove is lined with brick, it will retain heat longer and release heat better
Video: project of a stove-stove with a water circuit
Required materials and tools
The oven shape can be:
- round;
- square;
- rectangular.
In the first case, a pipe or metal barrel is used. Its minimum diameter is 30 cm, and the wall thickness is 5 mm. For rectangular and square ovens, sheet metal is used. For the chimney, a pipe with a minimum diameter of 10 cm and a thickness of 1 mm is used. A smaller thickness is needed here because the temperature of the gases removed from the furnace is much lower than in the combustion compartment.
To make a round potbelly stove, you can use an old gas cylinder
To work you will need the following set of tools:
- Welding machine. The minimum current is 200 A.
- Hammer.
- Hard metal brush.
- Grinder with a circle diameter of 12.5 cm.
- Pliers.
Making a potbelly stove
Before marking, welding and installation, you must change into a work uniform to avoid burns or abrasions. Next, let's get to work:
- Before cutting, it is important to determine the thickness of the walls of the intended potbelly stove. If you intend to use sheet metal, then first the bottom of the planned furnace is fastened to all its walls except the front. The bottom is set at a minimum height of 25–30 cm. This reduces the chance of heating the floor.
All walls except the front are sequentially welded to the bottom
Instead of slits in the bottom of the combustion chamber, you can cut a rectangular hole and place the finished grate in it
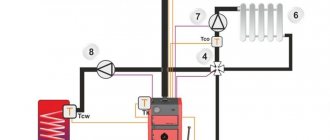
Installation of the water circuit
Typically, the composition of the water circuit is as follows:
- Expansion tank.
- Pipes.
- Heat exchanger.
- Radiators.
The water, having increased its temperature in the heat exchanger, flows through the pipes to the radiators. There it cools down, and the sweat is again sent to the heat exchanger.
Sequence of installation of the water circuit:
- Installation of radiators.
- Connecting pipes leading from the stove to the radiators. At the exit and entrance areas, fittings for adjustment are installed.
The simplest option for shut-off valves at the radiator inlet and outlet is a ball valve
Photo gallery: heat exchanger manufacturing options
Video: wood-burning stove with water cooling
Economizer Fehringer
The device is used to improve efficiency. It works by extracting heat from the chimney. It has 4 pipes, 60 mm each, with spiral-shaped swirlers.
The passing gases from the smoke swirl, resulting in maximum heat release. The device is made of black steel. It is designed for the entire period of operation of the stove. It allows you to quickly warm up the steam room.
Feringer is valued by bath lovers as one of the best models. They are produced in different versions, but in two main categories:
- Steam - the heater is closed, creating a steam room atmosphere - temperature up to 50-70 degrees, humidity reaches 40-75%.
With closed heater
- Golden ratio - the heater is open, suitable for saunas, where at a temperature of 80 degrees, low humidity is needed - 10-15%.
With an open heater
Since 2011, the company has developed a new line - Lamel. It has a natural stone cladding and small innovations in the design that allow you to confidently heat log steam rooms.
Lamella
The system for securing the decorative stone of the stoves is unique - a holder is installed on the cut plates of the stone. Its hooks are fixed in a groove. The design is simple, at the same time very effective, installation work is simple, it will take no more than 1 hour.
Air convector
There is not always enough finance to purchase a ready-made heat exchanger. In principle, it is not difficult to make a heat exchanger for a heating furnace. For this, copper and aluminum are used; if desired, you can completely do without welding. With proper preparation and accurate calculations, the budget is significantly saved.
First, a location is selected, parameters are calculated, and you need to decide what material to choose to make the heat exchanger. You can build a structure from an old cast iron radiator, a radiator from a car. The main thing is to take into account the conductivity of heat. It is also important to think over a set of tools, prepare everything in advance, each detail makes installation much easier.
Assembly must begin with drawing up a drawing taking into account the dimensions. If the stove is weak, a disproportionately large heat exchanger will do harm. When using copper for the coil, its length is maximum 3 m. The speed of heating depends on the length of the pipe and the number of curls. It is important to remember that distortions reduce the life of the equipment.
Air convector equipment
To twist the pipes into a spiral, a template is required. This is any available part in the shape of a cylinder. Its diameter must fit into the size of the firebox.
The sequence of actions is as follows:
- bend the pipe, wind it around the workpiece to form a spiral;
- keep the dimensions to fit the coil;
- the average design power of the heat exchanger is 1 kW per 10 m2.
Features of operating a stove with a water jacket
- It is advisable to install a temperature and pressure sensor in the hydraulic system.
- It is necessary to regulate the draft in the grate and in the chimney.
- The water circuit in both types of heat exchangers must be equipped with an expansion tank.
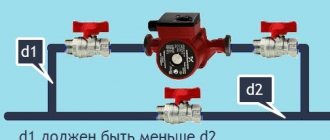
- A main-type water system requires a circulation pump installed on the return line, i.e., on the lower tube.
- A device with a capacitive tank requires a circulation pump if the diameter of the outlets is less than 75 mm.
- It is necessary to provide a place for draining water.
- You cannot heat the stove without water - the heat exchanger may burn out.
- After use, the water must be drained.
The temperature change in the heat exchanger occurs due to the combustion rate of the furnace. The heat turns into radiation, the water heats up in the chimney, and after another half an hour in the pipes. The system is inertial due to the high heat capacity of water, so a large supply of fuel is needed.
A potbelly stove is a flammable structure; it is necessary to start and place a fire extinguisher and a hook nearby.
Oven cleaning and repair
With regular use, the chimney needs to be cleaned. The appearance of a 2-3 mm layer of soot reduces draft and reduces heat transfer. You can disassemble the chimney and clean it with a brush, but this is labor-intensive and not always possible. If the potbelly stove is used daily, then you should clean the chimney with fire:
- Once a week, heat the stove with aspen wood. Aspen has a high combustion temperature, which burns soot in the chimney. Add a little at a time after the main ignition;
- After lighting the fire, add well-dried potato peelings along with the firewood. One filling requires approximately half a bucket. It is enough to do this once or twice a week and the chimney will be clean of soot. This method will not work if the chimney is already overgrown with a 1–2 cm layer of soot; in this case, cleaning will only soften the soot, and you will have to remove it from the walls of the pipe with a brush or a metal scraper;
Burning potato peelings along with firewood protects the chimney from the formation of soot deposits
- use special firewood or pellets that are added to the firebox during combustion. The most famous remedy is “chimney sweep log”. It is burned along with firewood approximately once every six months. It is best to place it on hot coals left after heating the stove. A distinctive feature of this product is that it continues to act for two weeks after use, gradually softening the soot on the pipe walls.
The log burns in the stove in about 1.5 hours and then acts for two weeks, softening and removing soot from the walls of the chimney
The main measures for furnace repair are:
- Pipe repair. The chimney pipe is the weakest point of a potbelly stove. If it burns out, it needs to be changed.
- Heat exchanger repair. The main heat exchanger can be removed by unsoldering it from the furnace body. But the capacitive circuit will have to be welded again in a few years.
- Elimination of defects in the furnace body. If a wall or back surface burns through, a metal patch is usually welded onto the area. The cracks can be sealed with scraps of metal rods.
All operations are quite simple and understandable, so servicing the potbelly stove will not cause any big problems.
Video: potbelly stove for the garage and chimney cleaning
The stove invented by Benjamin Franklin has been serving us for the third hundred years. It is still easy to manufacture and unpretentious to operate. A potbelly stove with a water jacket is not only about heating and cooking. This is hot water in the house, garden, garage, warehouse or construction site. New technologies have made this stove relevant today.
(0 votes, average: 0 out of 5)
Installation
It is most convenient to install the heat exchanger at the masonry stage. This helps to build it more correctly with strict adherence to dimensions and gaps. This makes it much easier to fit the given dimensions. After installing the heat exchanger on the stove foundation, it is covered with bricks. This is easier than disassembling the existing structure, although this approach is not excluded.
To increase operating time, you need to pay attention to the following nuances:
- do not fix pipes with metal fasteners;
- do not fill the system with too cold water, otherwise strong condensation will form;
- observe the ratio of the sizes of the furnace and heat exchanger, the difference should not be large;
- use seals with good fire resistance;
- compliance with fire safety measures.
These simple settings will help prevent the occurrence of situations dangerous to the life and health of people, increase service time, and remember safety.