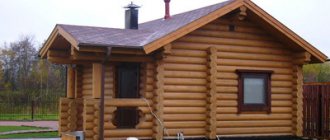
For most bathhouses, the ideal roof option is a simple lean-to structure.
A pitched roof for a bathhouse is the simplest and cheapest option.
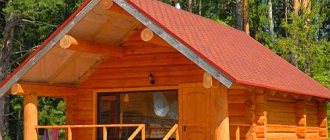
If the roof area does not exceed 15 m2, then installing such a roof is simple and inexpensive. This is the most budget option. As the roof area increases, the cost increases significantly due to the additional supports and beams that are used in this case.
Option for installing a larger pitched roof
When calculating the roof area, do not forget to add the length of the overhangs.
When calculating the roof area, do not forget about the overhangs
When building a bathhouse roof, it is important to choose the right slope angle. It depends on the region and the amount of precipitation characteristic of that area. If the zone is steppe and there is little precipitation, the slope of the roof may be small, about 8-20°. For regions with significant precipitation, this value is much higher: 30-45°. In this case, the roof will be quite steep, which will facilitate the timely melting of snow.
The type of roofing material plays a fairly large role when choosing the angle of inclination:
- When using corrugated sheeting, it can be from 8 to 20 degrees.
- For metal tiles - at least 25°.
- When using roofing felt, the slope can be tilted minimally by only 5°.
The roof slope is created due to the difference in the height of the walls. Once its value has been selected, it is necessary to make one of the walls higher enough to provide the required angle.
An equally important role in the construction of the roof is played by the correctly selected type of thermal insulation. The thermal insulation of the roof depends on the intended use of the bathhouse. If you plan to steam all year round, you need to install an attic floor and then insulate it. If we are talking about a summer bath, then the roof will simultaneously serve as a ceiling. In this case, only the slope is insulated. This option is the cheapest, but using such a bathhouse in the cold season is difficult due to the rapid loss of heat: you have to spend a lot of firewood to maintain the temperature.
Basic principles of designing a bath of this type
A pitched roof for a bathhouse is guaranteed to set the tone for the entire structure as a whole. In what cases should you pay attention to this particular model of a bath structure:
- The future bathhouse has small geometric dimensions. At one time we talked about very simple and miniature structures, such as a 3x2 m bathhouse. It is quite obvious that the construction of a full-fledged gable roof will increase the budget of the planned construction by an order of magnitude. And such compact structures are designed for maximum economy.
- The region in which construction is planned has a number of characteristic climatic features: mild winters with little snowfall, but strong winds throughout the calendar year.
- The future owner does not plan to use the attic space for economic purposes, and certainly will not equip the attic space there.
- The peculiarities of the site on which construction will take place do not allow the construction of a structure with a high, full roof. It is possible that the removal of atmospheric precipitation is rational only in one direction. Those who doubt the correctness of such actions, under certain circumstances, can be referred to the requirements of SNiP and this article.
- In the end, the owner of the site plans to carry out construction independently, without involving third-party specialists. And let’s be honest, a lean-to bathhouse is the best option for people without much experience in construction work.
Important! It is worth noting the fact that not all types of roofing materials are rational to use on roofs of more complex structures than pitched roofs for a bathhouse.
The direct relationship between the angle of inclination of the slope and the type of material used is worth mentioning separately, and for clarity, we will display the information in the form of a table:
| Type of roofing material used | Rational angle of inclination of the roof slope, in degrees |
| Roll materials, including roofing felt based on modified bitumen | 2,5 — 21 |
| Bitumen roofs, incl. liquid type | 3 — 12 |
| Profiled, folded metal sheets: with arranging a substrate without one | 3 - 30 or more 6 - 30 or more |
| Mineral sheets based on cement binder and fiber reinforcement | 5 – 30 or more |
| Metal tiles | 12 – 30 or more |
| Bituminous shingles | 15 – 30 or more |
| Regular profile ceramic tiles | 22 – 30 and more |
| High profile ceramic tiles | 25 or more |
Attention! When arranging a substrate of proper quality, the steepness of the slope for ceramic tiles of regular and high profile can be reduced by 2 - 3 degrees.
From the table above, we can conclude that roofs of this type can be: flat, with a slope not exceeding 3 degrees, low-slope - with a slope level of up to 30 degrees, and steep - in which this figure is more than 30 degrees.
Obviously, the higher the snow load in your region, the greater the slope should be given to the slope. However, it must be remembered that the steeper and higher the roof, then its structure must be given more massive reinforcing elements to withstand the wind load in the horizontal projection.
A word from Experienced! In domestic realities, the most common slope angle that a single-pitched bathhouse roof receives is rarely below 8 degrees and even less often exceeds 32 degrees.
Owner reviews
The article would not be complete and not very correct if I had not collected for you reviews from the owners of these roofs. I have been sent letters more than once with questions and advice about this roof, and I have put them together for you. I opted for a gable roof because I wanted to organize a full-fledged attic space.
Leave your review in the comments and we will add it to the table!
Read and analyze, and the choice is yours.
| User name or nickname | For or against | Opinion |
| Stanislav Kravchuk | Against | I chose a gable roof for my bathhouse. If you do it, it will be a thorough one, but with a pitched roof there are only problems, it’s on a barn. |
| Cherie | Against | I generally don’t understand people who build pitched roofs for their bathhouses. Well, for starters, it’s not at all beautiful, and secondly, it’s not safe. I have several acquaintances with such roofs, I know what I’m talking about. |
| Anton | Behind | You just need to do it normally, then the pitched roof copes with its functions perfectly. But the fact that the gable is more practical and convenient is yes. |
| Evgeniya | Behind | Any roof will do, as long as snow does not accumulate on it. |
| Alexander | Pros and cons | The optimal solution for small buildings, such as a barn or bathhouse, or as an extension to a house. In all other cases, I would choose a gable roof! |
| Foreman | Behind | An excellent roof option, but there are several features. If the roof slope is less than 14 degrees, then corrugated sheeting should be laid; if the slope is more than 15 degrees, then metal tiles can be laid. If the slope is less than 15 degrees, then water will collect in the grooves of the metal tile, and subsequently dirt and mud. |
We evaluate the design
If you are finally convinced that your bathhouse will be crowned with a pitched roof, then undoubtedly it is worth taking into account a number of other features that confirm the old truism: “There are no trifles in construction.”
By strength
We have already mentioned that bathhouse roofs of this particular type are easy to construct, require significantly less building materials for their arrangement, and as a result, they place significantly less load on the load-bearing walls and, through them, on the foundation. Taking into account the fact that bathhouses of small dimensions are designed for such roofs, it is quite reasonable to assume that the foundation can be designed to be simpler and less material- and labor-intensive.
Installation of roofing material
Roofing material must be laid from the lowest point of the roof. To ensure tightness, be sure to maintain the required overlap and use appropriate fasteners. It is also necessary to lay a layer of waterproofing material under the roofing material.
Roll roofing materials are mounted on a continuous sheathing in at least 3 layers (they need to be glued together).
Installation of a soft roof begins from the lowest point. First, a layer of glassine or roofing felt is glued onto a solid sheathing using heated mastic so that the sheets overlap by at least 10-12 cm (they are nailed with special nails for roofing felt). The next step is to glue the rolled roofing material using the same mastic. Carefully remove all air bubbles. At the lowest point, the material is inserted 15-20 cm beyond the edge of the roof and nailed to the bottom of the sheathing.
For more information on how to make roll roofing, read the article “Roll roofing: materials, installation technology.” The installation of a metal tile roof is described in the article “Metal tile roof: design and installation.”
The installation of the roof is certainly a very important stage of construction. Everything must be done carefully and carefully, observing all the necessary allowances and overlaps.
You might be interested in reading “Do-it-yourself rafter system for a gable roof.”
We build it ourselves
In this section we consider the questions of how to make a pitched roof for a bathhouse in their practical aspect.
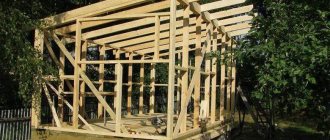
Rafter set
First you need to decide on the type of rafter system:
- The layered type is relevant for structures that are not prone to intensive shrinkage of load-bearing structures, primarily walls. We have already touched on the topic of the insidiousness of shrinkage and how to deal with it. In this case, the lower ends of the rafter legs rest on the floor beams, the upper ends on an elevated wall or a fundamental vertical post, the height of which actually sets the angle of the slope;
- The hanging type involves careful preliminary calculation and assembly of the structure on the ground, after which it is installed on the upper perimeter.
When using in the construction of a log house insufficiently dry timber, which is prone to shrinkage, it is necessary to provide sliding elements in the design of the rafters. They can be presented in the form of axes, hinges, sliders and must ensure the mobility of the connection at one of the mounting points of the rafter set, provided that the rigid connection of the leg with the power plate is maintained.
In most cases, the board with a cross-section of 150×50 mm used in the rafter set rarely has a length exceeding 6000 mm. Therefore, to cover a more extended space, the element must be spliced using overlay plates and hardware from several. Obviously, at such a length the leg must be radically strengthened with intermediate supports, which ensure fastening of the rafter legs with the upper part - in the purlin, and the lower part - in the load-bearing horizontal beam - the beam.
It is worth noting that, regarding the roofs of the structure under consideration, we are told SP 31-105, namely clause 8.2.2.3: “The rafters and beams of the attic floor must rest directly on the wooden structures of the external walls. The length of the outer support platform of beams and rafters must be at least 38 mm. The rafters in the supporting areas must be given a certain shape to ensure level support areas.”
A do-it-yourself roof for a single-pitched bathhouse is built mainly over bathhouses, the dimensions of which in plan rarely exceed 6x6 m, so it is enough to support the purlin with one rafter leg. And those purlins, the length of which does not exceed 3250 mm on low-slope roofs and 4500 mm on steeply sloped roofs, can only be supported on the Mauerlat.
Mauerlat is a beam of sufficient cross-section, usually from 50×50 mm or more, which takes on a significant part of the weight and accompanying load of the roof and evenly distributes it along the perimeter of the load-bearing walls. In bathhouses built from logs or timber, its role is played by the upper crown of the load-bearing set of the log house. Special grooves are selected in the Mauerlat - beds for the rafter legs, which should have a depth of about ½ from the body of the Mauerlat and they are laid at a certain distance from each other - a step that in our case ranges from 600 - 700 mm.
Selecting the angle of inclination
One of the first tasks that arises when designing a roof is choosing the angle of inclination. This is an important stage, since the stability of the entire structure will depend on it. The angle may depend on the latitude of a particular area, the amount of precipitation, and also on the chosen flooring. In the case when in winter there is a small amount of precipitation and the area is well blown by winds, then the angle can be in the range from 8 to 20°. Even if snow falls, air currents will quickly knock most of it off the roof. If there are forests nearby, and the layer of snow in winter can reach a meter, then it is better to make the angle more than 30°. In this case, the snow cover will not linger on the roof and will not create additional pressure on the rafter system and walls.
The roofing material that will be selected for laying on a pitched roof has its own permissible angle standards for installation. For example, if you decide to use corrugated sheeting, then it should preferably be more than 12°. If it is a metal tile, then the angle should be from 25°. If you want to lay slate on a pitched roof, you will need to maintain an angle of 30°. Recently, soft tiles for sauna roofs have become especially popular. For it it will be necessary to maintain an angle of 12°.
Operating Lessons
A pitched roof is in many ways a compromise. For example, if you make an entrance to the dressing room from a high part and place a full-fledged window there to maximize the use of natural light, you will certainly encounter the problem that the chimney will be in a low part of the roof and its maintenance will be somewhat difficult. In addition, there will be no objective possibility of using the roof overhang to create some kind of veranda.
To avoid this problem, you can try to place the entrance to the bathhouse from the end wall, because in this case the change in ceiling heights can be smoothed out in some way. But then the urgent question arises of raising the walls to a greater height in order to fit into the requirements of building codes regarding the distance from the stove to the ceiling, the rational placement of shelves in a vertical projection, smoke ducts and other important factors. In addition, you should not neglect the location of the bathhouse relative to the cardinal directions, for optimal illumination and removal of atmospheric moisture from the roof and at the same time from the adjacent neighboring area.
Shed roof projects and drawings
We present you bathhouse projects with a schematic drawing. We invite you to choose the ideal option for you.
Project of a bathhouse with a veranda under one roof 6 by 4 meters
The best option for a small bathhouse with an attached veranda
Bathhouse project 5 by 5 meters
Square bath project
Bathhouse project 3 by 4 meters
Compact sauna with everything you need
Types of arrangement
There are different ways to improve the green mass on the roof.
Extensive roofing
In this case, the vegetation should be very low-growing, no more than 6 cm in height. Plants are selected that are drought-resistant and soil-covering.
Green roof - in this case, only green roll turf is laid.
Intensive roofing
Most often, such a covering is installed on flat roofs, where there is its own exit to it.
Here special rows are set up that have special paths. All this makes the rest comfortable, since a person is among bushes and sometimes even trees.
Additional elements of the rafter system
Additional elements of a pitched roof are racks or jibs, as well as a beam. They can be used not only in cases where it is necessary to increase the size of the rafters of a pitched roof. Some people choose this option because it has an additional margin of safety. In addition, it becomes possible to save on the thickness of the rafter legs. The process of assembling such a pitched roof structure will be a little more complicated, but the end result will be lighter in weight, so it will put less pressure on the walls.
About the general principles of color selection
House designs presented on numerous construction sites are in most cases made in neutral shades. This is done so that the colors do not distract from the details of the project, allowing you to more fully appreciate the design. The choice of colors for the facade and roof goes to the owner; it will be successful if you follow the simple rules that guide professional designers.
Before settling on a particular color scheme, you should decide whether you want to highlight your home, emphasizing its advantages, or, conversely, make it invisible, built into the environment. The solution to this question will tell you which direction to move in. The first option will require rich colors and bold combinations, while the second will require a harmony of natural shades.
For fans of extravagant solutions
When choosing colors for a country house, it is important to remember some features that are inherent in all colors, albeit to varying degrees. All of them have the following properties:
- Burnout
. The more saturated and bright the color, the more noticeable it is. The champion in terms of burnout speed is black; brown, red and lilac roofing will be exposed to the sun to a lesser extent. The best durability is demonstrated by the gray color, which only slightly changes the shade. A white roof is also not ideal; elegant at first, over time it will inevitably turn yellow, and not evenly, but in spots. - Heat absorption
. We remember from a school physics course: the lighter the surface, the more it reflects light, and the darker the coating, the more it absorbs solar energy. Therefore, the further north the house is located, the more practical the choice of dark materials and colors for its facade and roof becomes.
Bright colors become lighter over time
- Accentuation
. Paints can change the external impression of a building. Light shades visually enlarge the object, dark shades make it smaller, but also give clarity to the details. Caution is needed when using several bright colors - this is usually a good solution for a house of a simple shape with a minimum of architectural details.
To simplify the task, it is convenient to approach the selection of a suitable color scheme in one of the following ways:
- Choice of shades of the same color
. A common and almost win-win option. One color is divided into successive shades: for the roof, facade walls and smaller details. Buildings made in green, sand or brown tones look harmonious; more boldly - in red or blue.
Selecting shades of the same color
- Choice of contrasting colors
. The appearance of such a building will be bright and memorable. The color scheme is based on two maximum contrasting colors, for example, chocolate brown for the roof material and pale yellow or beige for the facade. Sometimes, to enhance the effect, facade details (doors, trim, plinth) are also painted to match the roof.
Choice of contrasting shades
- Combination with white color
. A universal option, given that white harmonizes perfectly with both pale and rich shades.
The combination with white is also contrasting
- Combinations of several colors
. A three-color combination is specified: brown – beige – olive or gray – pink – white. They are complemented by a suitable secondary tone, which is supposed to be used for finishing. With the right selection, even a black facade of a house, complemented by a light roof, will look harmonious and stylish.
Combination of several colors
Selection of rafter system
After the slope angle of the pitched roof has been chosen, it is necessary to decide how the slope will be carried out. The simplest option for a pitched roof is to build walls of various sizes. One of them must be higher than the other so much as to provide the required angle of inclination of the pitched roof. This option is the cheapest. There is no need for additional elements. The ends of the walls will serve as supports. There is no need to design the attic space. In the second case, the required roof slope angle can be achieved through a complicated rafter system. It involves the construction of trusses in the shape of a triangle with an obtuse angle. This roof looks much better, but it will also require more material. To put it simply, it will look like a gable with one shortened slope. The advantage is the possibility of rational use of the shortened slope. It can accommodate windows for natural light or ventilation outlets.
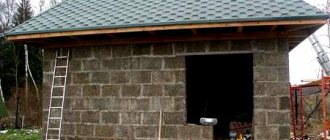
Technological process of construction
Some preparatory work is required before construction. For example, choosing a site is a rather serious issue. It's all about the pitched roof, and to prevent it from being torn off by strong gusts of wind, you need to determine the position of the future bathhouse. To find the correct configuration, it is necessary to thoroughly study the wind rose. This drawing will tell you which direction is best to turn the building. If it allows you to attach the bathhouse to something else, then it is better to do so. This way you will not only give the roof stable support, but also save square meters of your site.
Wooden elements involved in construction must be treated with antiseptics, and the places where they come into contact with other material must be isolated. As a rule, cheap rolled material is used for this - roofing felt.
Using the construction technology I proposed, more than one frame bathhouse with a pitched roof was built. All these structures have stood the test of time and received a worthy assessment. During the entire operational period, there were no complaints from the developers, and if the roof began to leak, it was only due to poor-quality installation work or materials.
Therefore, if you want to create for yourself not a temporary structure, but a durable bathhouse, then follow all the steps with appropriate responsibility.
Any bathhouse project with a pitched roof is built similarly to the technology described below.
- As mentioned earlier, the slope is created by increasing the height of one of the walls. If you don’t know which one to make higher, then think about where you want the precipitation to flow. Although this method is one of the most expensive, it is at the same time very simple. Rafter legs laid on the roof do not need to be spliced, therefore, the strength of the entire structure increases, and this is an important factor in the construction of a pitched roof
- A waterproofing layer must be laid along the upper perimeter of the walls. Next, a support beam - Mauerlat - is laid in this place. Its fastening can be done in several ways. For one of them you will need an additional element - a reinforced concrete belt. Its structures include embedded elements protruding outward. It is on them that the Mauerlat is mounted. As I already said, fastening the support beam can be done in many ways, here everything will depend on the material of the walls. Having clarified this nuance, you can address these questions to the relevant specialists
- For ease of installation work, it is necessary to create a rafter template. This will make your work on preparing these elements much easier. The calculation of rafter legs is made on the basis of 1 piece per 50-80 centimeters of the width of the building. Calculations carried out before the start of construction can determine the parameters. The installation of these parts is made using nails, screws or metal plates
- The sheathing boards should be perfectly perpendicular to the rafters. As a rule, a pitched roof has a continuous sheathing, but even this must have some clearance to ensure proper ventilation.
- At the next stage, a vapor barrier layer is laid. It is attached using a construction stapler. For this layer it is best to use polyethylene
- If necessary, a full roofing pie is laid on the roof. After the waterproofing layer, the counter-lattice is installed
- Next comes the installation of the roofing. When choosing it, you should take into account that it should be light and as smooth as possible. For a bath, ondulin or metal products are best suited
A bathhouse is a building in which it will always be much warmer than outside. It is worth understanding that under such conditions, condensate will appear in a very large volume.
To protect the material from rotting, create high-quality ventilation, and you will preserve your structure for many years.