When the walls have already been erected and one or another roofing system has been installed - trussed or without trusses, the turn of the ceiling comes.
And for those who would like to make a ceiling in a bathhouse with their own hands, we have prepared a step-by-step guide that describes step by step all the upcoming work. However, it must be preceded by some theory, because there are options from which you will have to choose one. Although... it’s hard to imagine a person deciding how to hang the ceiling in a bathhouse when the walls have already been erected. All this is planned at the project stage . And when the entire box with the roof is already there, then it either has or does not have ceiling beams.
Below we will not focus too much on exactly how these ceiling beams are placed and fastened; just watch the videos below. And we will assume that their presence is an initial given when installing a ceiling in a certain type of bathhouse.
Bathroom ceiling height
In order for bath procedures to be enjoyable, you should adhere to certain accepted standards in terms of choosing the height of the interior spaces. In addition, the service life of the bath itself depends on the height of the ceilings.
The determining factor here is the ease of use of the steam room by people of different heights. For example, in order to climb onto the top shelf and not bury your head in the ceiling, you will need a free space of at least 110 cm, and it is better to have a small headroom so as not to get injured when visiting the steam room. In addition, if you like to steam with a broom, you need to take into account the free space that allows you to freely operate this bath accessory. Thus, it turns out that the minimum ceiling height in a Russian log bath should be at least 220-240 cm.
The figure below shows the rationale for choosing this height:
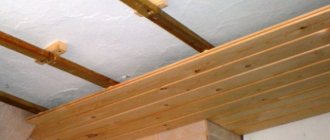
How to sheathe with clapboard correctly
The interior decoration of a steam room always begins from the ceiling; for this purpose, the sheathing is prepared. You need to secure the wooden planks from the front door to clamps. The last plank is nailed with a nail without a head.
The clamps perfectly secure the material and do not spoil the appearance of the skin. Particular attention must be paid to the installation of the first board. All subsequent elements must be located strictly perpendicular to the walls of the steam room.
After the lining is fixed to the ceiling, it can be additionally treated with a water-repellent compound. The ceiling covering in a bathhouse must be reliable enough to withstand not only the internal lining, but also the insulation. The basic requirements for installing a ceiling in a steam room include:
- The fasteners must have a zinc coating;
- The boards must be fastened tightly to each other.
- To care for the surface, do not use hard brushes or abrasive mixtures.
What should the ceiling be like?
Features of the microclimate largely determine the requirements for the ceiling of the bathhouse. The heat generated during bathing procedures, high air humidity, hot steam rising upward - all this should be taken into account during construction. The main requirements for the ceiling are:
- ability to retain heat well;
- resistance to elevated temperature and humidity;
- sufficient strength;
- aesthetic appearance.
If the ceiling does not retain heat well, then most of it will simply go nowhere. In other words, you will heat the air surrounding the bathhouse. To avoid this, the ceiling is made as energy efficient as possible using thermal insulation and waterproofing materials to ensure its normal operation.
The strength of the ceiling is necessary in order to hold the insulation layer, which can have a significant mass, without deformation.
You should also take care of the beautiful appearance of the ceiling. After all, the overall impression of the bath procedures will depend on this. After all, it is much more pleasant to take a steam bath yourself or invite relatives and friends to the bathhouse if the interior looks aesthetically pleasing, which is called “pleasant to the eye.”
General arrangement of the bath ceiling
Of course, the bath ceiling is small in area and is always quite simple in design. But when constructing it, you need to remember several essential requirements.
- Strength. Attic living spaces are extremely rarely placed above the bathhouse; More often than not, it happens that the sauna attic is planned to be used as a storage space for sauna accessories or garden tools. But even if the attic of the bathhouse is not intended to be used in this way, it must be strong, capable of supporting its own considerable weight, the weight of a person when insulating or repairing floors and roofs, and the weight of insulation, which is often not so light.
- Thermal insulation. Since heat rises, it is through the ceiling that it will be easiest to escape - if the ceiling is built without following the rules of thermal insulation or is not provided with it later. And by heating the bathhouse, you will heat the street, and will never reach the optimal temperature for health.
- Resistant to aggressive influences. It's clear that you've built a good ceiling. If it is not resistant enough to the influence of hot steam, it will not last long. As a rule, ceilings in bathhouses are made from various lumber. Therefore, it is necessary to take preventive measures during construction: carefully treat all structures with impregnations against rotting, moisture, and fire.
- Ventilation. You have made excellent vapor, hydro and thermal insulation. But the bathhouse operates in an inconsistent mode, it sometimes heats up very much, but then cools down very much. Therefore, if the insulation is not installed correctly, parts of the ceiling will experience thermal deformation, and condensation will fall out and accumulate inside the ceiling wood, which, even with good impregnation, will contribute to rotting. Therefore, the insulation must be laid so as not to interfere with the air exchange of the ceiling with the atmosphere. Attic doors and so-called “dormer” windows serve the same purpose.
- Beauty. It's always a pleasure to take a steam bath in a beautiful bathhouse. In addition, this best characterizes the owners. And even if your bathhouse does not have designer delights, the high-quality and professional execution of all bathhouse details, including the ceiling, commands respect.
A beautiful hand-made bath ceiling commands respect
Let's consider all types of such ceilings.
What material is best to make a ceiling in a log bath?
Another important issue when constructing a ceiling is the choice of material. As mentioned above, the strength, durability and aesthetic appeal of the room will depend on the material. The ceiling material should easily withstand high temperatures and not rot under the influence of humidity. Due to the high temperatures in the steam room, the use of synthetic materials is excluded, since many of them emit toxic polyphenols and other harmful substances when heated. Therefore, you should consider constructing a ceiling only from environmentally friendly natural materials, the best of which is deciduous wood - larch, linden, aspen, alder.
It is not advisable to make a ceiling from coniferous trees because of their high resin content. When heated, the resin becomes liquid and drips downwards, causing serious burns if it comes into contact with the skin.
To prevent the wood from rotting, before starting to construct the ceiling, all wooden elements should be thoroughly treated with an antiseptic and fire retardant. The antiseptic will prevent wood borers from eating the wood and protect it from the spread of rot and mold. and a fire retardant will help to significantly reduce the risk of fire in wooden structures.
Step-by-step instructions for installing a false ceiling
Before you start work, you need to decide on the height of the ceiling. It is believed that for comfortable soaring its height in the final finish should be at least 2.2 m.
In this case, the following features must be taken into account:
- In the first two years, a log house can shrink by up to 10-15% of its height;
- the thickness of the rough ceiling is 30-50 mm;
- a ventilation gap of 50 mm is required between the rough ceiling and the finished cladding;
- The thickness of the skin is 10-20 mm.
To ensure the required height of the finished ceiling, the floor beams must be located at a height of at least 2.5 m during the construction of the bathhouse.
Floor arrangement
- Floor beams in classic bathhouse construction are made from the same type of log from which the log house is laid. They are laid along the short side of the log house in increments of 1-1.5 m. The logs are cut off on both sides for the convenience of filing the rough ceiling and attic floor.
- The mats are prepared from the log: they are marked and sawn to size, the upper and lower planes are trimmed to 1/8 of the diameter.
- In the logs of the upper crown - the comb and mats - grooves are selected for connection "in the fat tail". This type of connection is generally similar to the “bowl” connection, but is characterized by increased wind protection and less airflow due to additional spikes.
- After adjustment, the mats are laid in place with caulk, moss, tow or inter-crown insulation. Mauerlats are laid on top of the last crown, on which the rafter system is then mounted.
Floor arrangement
Filing the rough ceiling
- The rough ceiling is made from edged or tongue-and-groove pine boards in such a way as to ensure a minimum of gaps and cracks. When using an edged board, it is recommended to select a quarter in it for better joining. The thickness of the board for the washing compartment is 25-30 mm, for the steam room - 40-50 mm.
- The board is hemmed to the matrices from below. To ensure a tight fit of the boards, logs are cut off to the crowns of the log house.
- The bars are nailed to the resulting plane in such a way as to align them with the top and bottom of the mats. The ends of the subfloor boards are nailed to them, and subsequently the attic floor.
- The rough ceiling is nailed to the mats from below, tightly joining the boards. The first board is laid close to the frame, having previously cut off a tenon or a selected quarter. They fasten the boards with nails to each matrix so that it does not move away or warp; use two galvanized nails for each intersection. You can use galvanized screws by first drilling small-diameter holes in the boards. The length of the nails should be 2-3 times the thickness of the board; usually 80-90 mm long fasteners are used.
- Each subsequent board is inserted with a tenon into the groove of the previous one and knocked with a hammer through the block until the lock is completely connected.
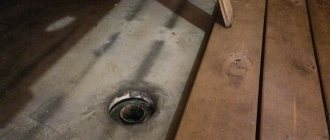
- If a stove is installed in the bathhouse, the chimney of which passes through the ceilings, it is necessary to prepare an opening for the chimney at the stage of laying the subfloor. The mats at the location of the opening are cut off in the same way as the logs of the upper crown, and bars or boards are nailed to them, between which additional floors are mounted according to the size of the pipe penetration box.
Rough ceiling
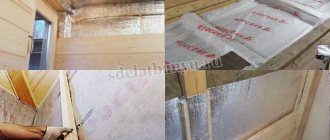
Vapor barrier
The purpose of the ceiling vapor barrier is to prevent steam from the steam room and washing compartment from entering the insulation layer. Considering the high humidity in these rooms, vapor barrier must be done in compliance with all the rules, without skimping on it.
When heating a bathhouse, the ceiling can heat up to a temperature of 60-100 degrees, so vapor barrier is performed only with heat-resistant materials.
Clay vapor barrier
The traditional method of vapor barrier is coating cracks and joints with a clay-sand mortar, which is also used for laying stoves. Its vapor barrier properties are not inferior to modern materials.
Make a solution like this:
- fine-grained dry quarry sand is sifted through a sieve to remove debris, stones, and organic matter;
- fatty oven clay is soaked in water for three days, after which the resulting solution of semi-liquid consistency is rubbed through a sieve;
- scraps and remnants of basalt or mineral fiber insulation are crushed by hand, it imparts plasticity to the solution;
- mix these components in equal parts to a paste-like mass with a construction mixer, adding water if necessary.
The resulting composition is used to coat the junctions of the subfloor with the log house and pipe penetration.
Clay vapor barrier
They also cover the subfloor from the attic side, the thickness of the vapor barrier layer is at least 5 cm.
Drying such a vapor barrier usually takes at least a week. This method is environmentally friendly and has been tested for years, but is not very convenient, and therefore is not particularly popular with modern developers - they prefer to make vapor barriers with modern materials.
Vapor barrier films
In this case, the adhesion of the subfloor boards to the log house is caulked with tow or inter-crown insulation. For vapor barrier, use any heat-resistant and vapor-proof rolled material, for example, foil or insulating film.
It is laid on top of the subfloor with an overlap of at least 10 cm on the mats, grabbing their edges with a stapler or small nails through thin wooden planks.
Prices for rolled vapor barrier
roll vapor barrier
Vapor barrier film
You can completely cover the matrices from above. In this case, pieces of material are placed with an overlap of at least 10 cm, gluing the joints with metallized or aluminum tape.
Ceiling insulation
An important stage is the thermal insulation of the bath ceiling. It, like vapor barrier, can be done using both natural materials and modern insulation materials. The purpose of thermal insulation is to save firewood and time for lighting the bath, as well as maintaining a high temperature in the steam room for a long time.
To calculate the thickness of thermal insulation, there are many methods that take into account the thermal conductivity of the material, the temperature difference between inside and outside the room and other factors. However, this calculation is complicated, so developers usually use ready-made solutions based on experience in operating baths.
Table. Thermal insulation thickness for the bathhouse ceiling.
| Insulation material | Thickness for an unheated attic | Thickness when installing an attic in the attic |
| Peat, black soil, slag, clay with sawdust | 25-30 cm | 20-25 cm |
| Expanded clay | 20-25 cm | 10-15 cm |
| Mineral and basalt mats in the form of mats and slabs | 10-15 cm | 5-10 cm |
Natural insulation materials
As can be seen from the table, natural insulation materials are effective only if their layer is thick enough. Therefore, when constructing an attic floor above the steam room, it is better to use modern materials.
These include clay mixed with sawdust or straw cuttings, peat or black soil, and expanded clay.
Natural insulation materials
Advantages of using natural materials:
- are not afraid of steam and moisture - they absorb and gradually evaporate it without loss of insulating properties;
- environmentally friendly;
- cheap or even available for free.
Minuses:
- low thermal insulation properties;
- backfilling with a thick layer is required;
- large mass and load on the ceiling.
These materials are usually used in combination with clay vapor barrier. They are poured directly on top of the dried layer of clay putty between the matrices to their top level.
If the attic is used as a technical room, you can not cover the insulation with anything; it is not afraid of getting wet even in the event of roof leaks. When installing an attic floor, a subfloor is laid on top of the insulation and finishing is done.
Modern insulation materials
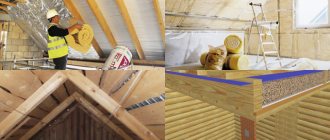
A more convenient and modern way is to thermally insulate the bathhouse ceiling using mineral and basalt wool. It is available in the form of rolls or mats of different densities and thicknesses. The thermal conductivity of the insulation and its ability to retain its shape depend on the density.
To insulate horizontal surfaces, you can use mats with a density of 30 kg/m³. Special insulation materials are produced for baths, one side of which has a foil surface - they additionally reflect infrared radiation. Such mats or slabs are laid with the shiny side down.
Modern thermal insulation materials
Cut the mats to size using a sharp knife or scissors. You can also use shredded scraps of material. They fill the entire space between the matrices, observing the recommended layer thickness. If slabs are used, they are laid in a checkerboard pattern, overlapping the joints of the previous row.
Mineral and basalt wool must be covered with a layer of vapor-permeable waterproofing. Even when wet once, the fibers stick together, the cotton wool settles and ceases to retain heat.
Video - Choosing insulation for a bath
Waterproofing insulation
It is laid on top of insulation under the subfloor of an attic room or as the top layer of a ceiling pie in a non-residential attic. As waterproofing, it is better to use modern non-woven membranes with one-way vapor permeability - they release moisture vapor from the insulation, but do not allow water to penetrate into the insulation from the outside.
Membranes on the modern market are presented in a huge assortment, their characteristics are similar, so you can choose any one that suits its price and properties. Spread the waterproofing over the insulation and mats with an overlap on the mauerlats and top logs of the log house, placing the film with the pattern facing up.
The strips are joined with an overlap of at least 10 cm. The waterproofing is attached to the mats using a stapler, and strips of construction tape are glued over the attachment point. The joints are also insulated with tape.
Waterproofing scheme
Arranging the attic subfloor
The floor in the attic is made if you plan to use it as a room for drying and storing brooms or as a summer room. For the subfloor, use an edged board with a thickness of 25-40 mm of softwood. It is nailed onto the matrices using nails, 2 nails for each intersection.
A mandatory gap is left along all walls for ventilation of the insulation; its width is 2-2.5 cm. Any finishing coating, for example, laminate, can be laid on top of the subfloor. In this case, the ventilation gap must also be observed. For a technical attic, a subfloor is sufficient.
Rough attic
Ceiling design
As a rule, in log baths the ceiling is made of boards, which are hemmed to the beams or laid on them. A board 40 mm thick is sufficient. Its strength is quite sufficient to support its own weight and the weight of the insulation. A layer of insulation is placed on top of the boards, which conserves heat, preventing it from escaping outside. And to prevent the insulation from getting wet, it is protected on both sides with a layer of waterproofing.
In general, a diagram of the installation of a flat ceiling can be seen in the video below:
Near the stove
It’s clear how to cover the ceiling with clapboard in a bathhouse, but what about the space near the chimney? The decoration near the bathhouse stove on the ceiling should differ from the main one. Wooden lining is not suitable for finishing it, because it is susceptible to burning. The place where the pipe comes into contact with the ceiling must be additionally protected with non-flammable material and covered with a metal apron. How to cover the ceiling in a bathhouse? The following can be used as protective fibrous material:
- Basalt or stone wool;
- Asbestos is a fire-resistant material in sheets;
- Minerite is a non-combustible slab that is produced specifically for insulating stoves.
On the outside of the ceiling, the outlet of the chimney must also be insulated with non-combustible material, regardless of the thermal insulation material.
How to insulate the ceiling?
Ceiling insulation is one of the most important stages of its construction. It is the quality of the insulation that plays a significant role in creating the necessary microclimate that allows you to enjoy bathing procedures. In order to retain heat in the bathhouse, you can use both traditional folk materials and modern effective types of insulation. If you have access to a sufficient amount of sawdust, then you can cover the ceiling with a layer of sawdust and lay a layer of clay on top, as our distant ancestors did. This method of insulation is quite effective. But its big disadvantage is the flammability of sawdust and high hygroscopicity (the ability to absorb moisture).
If the steam or waterproofing is damaged, the sawdust will absorb wet steam and soon rot may appear in the layer of such insulation, which will be very difficult to get rid of.
Modern mineral materials produced in the form of rolls and slabs are much more reliable. They are non-flammable, made of stone or glass, being a completely harmless environmentally friendly material with a high coefficient of heat transfer resistance, which allows for excellent heat retention in the room. Mineral (basalt) wool has the following advantages:
- Light weight, which reduces the load on building structures.
- Does not support the spread of mold and mildew.
- It is not eaten by wood borers and other harmful insects.
- Does not burn and does not support combustion.
The only disadvantage of mineral wool is its ability to absorb moisture. Therefore, care should be taken to install reliable vapor and waterproofing. Another material quite often used in the construction of ceilings in bathhouses is expanded clay. This is a lightweight porous material obtained by firing clay or slate in special drum kilns. The advantages of expanded clay include:
- high mechanical strength;
- high resistance to heat transfer, providing high thermal insulation properties;
- frost resistance;
- incombustibility and fire resistance;
- chemical inertness, environmental friendliness;
- durability.
You should not make the thermal insulation of a bathhouse from polystyrene foam. Despite its high thermal insulation characteristics, this material cannot be used in a bathhouse due to the release of harmful substances when heated. In addition, polystyrene foam is flammable and can cause a fire.
Finishing
Since we briefly mentioned above the different options for finishing the ceiling in a bathhouse, we will correct this by talking about long-popular or recently fashionable solutions for this finishing.
How to hem, what to sheathe with
Let's start with the fact that there is an option when no finishing is carried out at all. You immediately lay or hem the sanded boards and nothing else underneath. The option is normal if everything else is done efficiently.
In general, it’s worth talking about three more options - tongue and groove boards, lining and unedged boards.
Tongue and tongue boards are expensive, usually used for floors, provide good grip through a tongue and groove joint that does not allow water to pass through, and look just great. But it all comes down to price; after all, this is not the most budget option.
Lining is the most common method of covering floors, long chosen by bathhouse owners. It is advisable to attach the lining to the ceiling in a bathhouse using lathing - slats packed onto the previous layer of boards in order to create a ventilation gap between them and the lining. In this case, the necessary ventilation is provided, which dries out those water vapors that inevitably penetrate through the thin profiled boards, which are the lining.
The ceiling in the bathhouse is lined with clapboard
Unedged boards are a fashionable solution today for bathhouses built in ethnic style. The principle is simple - take an unedged board, clean it, polish it, but the edge remains uneven, even often its unevenness is artificially enhanced with the help of a tool. The result is something that looks authentic to the ethnic style.
Since the edges of the boards are uneven, it will not be possible to ensure a fit. Hence the decision to hem such boards in two layers with a shift that covers the joints of the previous layer. Accordingly, below you see beautiful uneven edges, between which you can see a narrow strip of the layer above.
How to fasten the lining
For those who would like to learn more about lining installation technology , we recommend that you read our article on steam room cladding.
What to make a ceiling vapor barrier from?
A vapor barrier is needed to prevent hot, damp steam from the steam room from penetrating into the insulation layer. In the simplest case, ordinary polyethylene film can be used as a vapor barrier, used to cover greenhouses and greenhouses. The only disadvantage of polyethylene is its complete impermeability to moisture. If condensation falls on the inside of the film from the insulation side, and the insulation on top is also covered with an impenetrable polyethylene film, it will have nowhere to go - it will not be able to freely evaporate from the insulation. To avoid this, you can use modern membrane materials that allow the insulation to “breathe”, allowing moisture to pass in one direction (out of the insulation) and not allowing it to pass in the other (inside the insulation).
To understand the difference between vapor barrier and waterproofing, we recommend watching this video:
As you can see, from the room side the insulation is protected by a vapor barrier, which prevents moisture vapor from penetrating into the insulation. And from the attic side, the insulation is covered with waterproofing - a membrane material that does not allow drops of water to pass through, but freely allows wet steam to pass through, allowing the insulation to dry out. Among the modern types of vapor barrier, we can recommend Izospan (membrane), Thermofol (metalized fiberglass), Megaflex (foil on kraft paper), Yutafol.
The joints of the vapor barrier sheets are carefully sealed with special tape, and the vapor barrier itself is stapled to the floor beams.
Kinds
The ceilings are divided into ceilings of baths with an attic and without an attic; ceilings corresponding to the type of material from which the bathhouse is made; ceilings that differ in their own design.
Ceilings in bathhouses with and without attic
They differ mainly in the design of the roof, but not in the method of vapor and heat insulation.
- The ceiling without an attic is done completely, including insulation, before installing the roof sheathing and laying the roof. It can be of any design, but for the convenience of further repairs, it is advisable to make it hemmed and install the insulation from below. But more often a flat ceiling is used.
Scheme of an attic-free building with a small air space.
In some cases, the ceiling is not made at all, but the inside of the roof itself is insulated.Ceiling without attic with insulation on the inside of the roof
- The ceiling of a bathhouse with an attic can be of any design and method of insulation. A bathhouse with an attic is always preferable in terms of its qualities than without an attic. Air is the best thermal insulator, better than any of the most advanced and modern substances. And the larger the layer of air, the better it retains heat in your bath.
Different types of bathhouse ceiling with an attic allow for different methods of insulation
Different ceilings - for baths made of different materials
There is no strict gradation here either. The only thing that needs to be mentioned is the required quality of the ceiling for a frame bath. Unlike bathhouses made of aerated concrete blocks, timber or logs, the frame structure is lightweight and can withstand less load. Therefore, the ceiling for such a bath should be made of light materials and with light insulation. Neither expanded clay, nor sawdust with cement, nor clay are suitable here. Only light basalt wool. And covering the ceiling with insulation is also most often done from below - so as not to load the structure while being on the ceiling.
Insulation of the ceiling in a frame bath is made with lightweight materials
Classification of ceilings according to their design
Ceilings are divided into so-called panel ceilings (assembled like a kit), suspended ceilings, and floor ceilings.
false ceiling
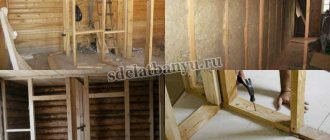
The basis of the false ceiling is the attic floor beams. All other parts are attached to these beams.
In the ceiling, beams must have a sufficient cross-section and be strengthened with a design step
Let's take a look at the drawing of such a ceiling.
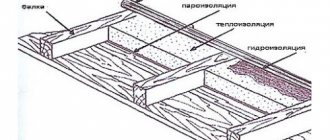
- Wall. Traditionally, bathhouse walls are made of timber, or it is a log house. But here something monolithic is drawn for ease of perception.
- Floor beams. Even before the ceiling is built, the beams must be in place - their strengthening can also be different: from inserting their ends into a block or log wall to fastening them to a mauerlat. The places where the beams are attached must also be thermally insulated.
- Ceiling boards. In this picture they are also decorative boards for the filing. But often this is not the case. A rough hem is made with an edged board, which is then completely sewn up with beautiful lining.
- A layer of hydro- and at the same time vapor barrier. It is best to use modern membrane materials with a foil layer for this. The membrane should face this layer downwards, towards the bath - it will reflect not only steam, but also heat, and thereby reduce its losses.
- Thermal insulator. In the picture these are basalt wool mats. Although in this case any insulation can be used, we will dwell on this later.
- A diffuse vapor barrier membrane that prevents moisture from the attic from penetrating into the ceiling, but does not interfere with air exchange so that boards and beams “breathe,” releasing accumulated moisture into the atmosphere.
- Attic plank floor.
The false ceiling is a “sandwich” of many ingredients
Pros. A false ceiling provides the necessary strength for any attic structure. This will be especially necessary if a full-fledged room is planned in the attic. Such a ceiling can be used in a room of any size; it is not limited in any way - provided that beams of sufficient design cross-section are spaced at a pitch determined by the design. Moreover, such a ceiling, if necessary, becomes a normal floor for an attic-type room or a warm attic space.
Minuses. Serious difficulties in construction and high consumption of wood.
Flat ceiling
This ceiling is made of boards laid on the walls. It is only suitable for small rooms and is completely unsuitable for walking on. Therefore, the attic space is most often either non-residential or absent altogether.
The ceiling in the toy bathhouse looks like a real one
Let's look at the floor ceiling diagram.
In the case of a flat ceiling, thick boards act as ceiling beams
- Walls. The distance between the main walls should be no more than two and a half meters. And anyway, you can’t walk on such a ceiling, so your attic will definitely not be habitable.
- Thick boards (at least five centimeters thick) act as floor beams. The beams are laid on a wall or mauerlat with a depth of at least five centimeters. It’s good if it’s a high-quality, well-planed board, and it can be laid without gaps. Then they will immediately become a finishing coating. But if the thermal insulation turns out to be insufficient, you can always attach a foil insulator like isover with a stapler to the boards from below, strengthen it all with thin slats with a certain pitch, and then sew up the ceiling with clapboard along them a second time.
- Vapor and waterproofing are exactly the same as in other structures.
- Insulation. Here, the insulation can also be of any kind, but in the case of bulk or cement insulation, you need to fill the boards of the floor ceiling with bars (position 5 in the figure) with some increments so that the insulation is poured evenly. Often for such a ceiling, self-lined film bags filled with expanded clay, polyurethane foam balls, sawdust, and pine needles are used.
- Bars for optimizing bulk insulation (if bulk insulation is used).
- Diffusion membrane. But here it is not necessary, since the attic is often non-residential.
A flat ceiling is much easier to implement, but has disadvantages
The insulation also does not fit into the parallel recesses between the beams. It can simply be laid overlapping and not covered with anything. In addition, there is no need to cover it with boards on top. Firstly, this will make the structure heavier, and secondly, no one will walk in such an attic anyway: the boards of the flooring structure will not support a person.
In a simple sauna house, the roof is corrugated without insulation, and the mineral wool is not covered with a membrane and boards
If you carefully make a flat ceiling, its visual qualities will not differ from the most beautiful false ceiling, and it is much easier to install.
A beautiful and neat floor ceiling will not be inferior to more complex analogues
Pros. Simple to implement, economical in terms of lumber and insulation.
Minuses. Suitable only for small spaces, eliminates the use of an attic, and requires expensive thick boards.
Construction of a deck structure (video)
Ceiling - panel constructor
This ceiling is a mix between the structural features of suspended and decked ceilings. Ceiling blocks in the form of panels are assembled at the bottom, and not at the top of the walls, along with insulation. Then they raise the walls and the finished ceiling is assembled there. Each panel is made from two beams. The beam is usually taken with a section of five by ten centimeters (so that the thickness of the panel is sufficient for laying thermal insulation and the beam, which acts as a floor beam, does not bend), and it is advisable to make the distance between the beams about 50 centimeters. Edged boards 60 centimeters long are sewn onto a pair of beams - 10 centimeters longer than the distance between the beams, each board with two screws to prevent diagonal movement of the panel.
This type of installation for a panel-type ceiling is carried out on the ground.
When the panel is assembled, a water vapor barrier is applied to it on the back side with a stapler, which does not extend onto the beam (see arrow in the figure). We will justify the need for this approach in more detail later.
We attach the vapor-waterproofing film to the panel with a stapler
If you are going to use lightweight thermal insulation such as basalt wool, and you have enough labor to lift the not very light panels assembled to the top of the walls, then you can immediately lay insulation in the resulting trough so as not to have to do this upstairs. After this, we temporarily stuff oblique thin slats so that during the lifting process the trough does not move and it does not lose its rectangularity.
We stuff temporary slats onto the finished panel with insulation to avoid deformation
- The insulation mats should be slightly larger than the “trough”.
- We fill the temporary slats diagonally.
We lift the panels onto the wall. Mounting may vary. The top of a wooden wall, a sawn groove on a wooden wall, a beam mounted on an indoor wall or a mauerlat on an aerated concrete wall. But in all cases, the junction with the wall must be prepared. Felted jute tape placed under the panels is perfect for this. The “troughs” are laid closely, the 10-centimeter space between the beams is also “shot” with steam and waterproofing using a stapler and filled with thermal insulation - for example, the same basalt wool. Then a membrane is spread across all the panels, the panels are tied together with long boards at an equal distance from each other. Between these boards the area is covered with the same short board that we stuffed onto the panel beams. This will be the floor for the attic. From below, if you wish, you can sheathe the panel ceiling with clapboard in the same way as in the previous case.
Final assembly and insulation of the panel ceiling
Pros. A lot of leftovers—short boards—are used for such a ceiling. Convenient assembly and insulation, because everything is done on the ground. Suitable for steam rooms of any size and any attic design - residential or non-residential.
Minuses. A large amount of painstaking work. Difficulty lifting the panels up. The need to install the ceiling before creating the rafter system.
Types of bath ceilings (photo gallery)
On this ceiling the lining is laid figuratively
Lining in two shades for floor and ceiling
The ceiling is made of unedged boards
False ceiling on a wall made of aerated blocks with emphasis on a channel
We are preparing a panel of two beams
Panel after stuffing oblique strips
Rustic ceiling with false beams
Another figured ceiling
Large professional sauna
Which ceiling is better - flat or suspended?
As mentioned above, most often the ceilings are laid or hemmed. The suspended ceiling consists of a lining or edged planed board, which is nailed (hemmed) from below to beams running in increments of 0.5-1 m. A vapor barrier is spread over the boards, insulation is laid, the whole thing is covered with waterproofing on top and can be covered with another clapboard flooring. Also, a false ceiling can be made using the method shown in this video:
Floor ceilings are often made in small baths with a span between walls of no more than 2-2.5 m. It consists of boards laid at their ends on the walls of the log house. There may be no ceiling beams at all. You can watch the construction of a deck ceiling in a log house in this video: The load-bearing capacity of a deck ceiling is significantly lower. For its construction, it requires fairly thick boards, a small distance between the walls, and is installed less often than hemming. We also recommend reading: How to make a chimney pipe pass through the ceiling to avoid mistakes in cutting. *** As you can see, you can make a ceiling in a log house with your own hands even without prior experience in performing this type of work, if you follow the recommendations given above. As they say, it is not the gods who burn the pots. Good luck with your work and enjoy your steam!
See also:
Ceiling vapor barrier
How to insulate a bathhouse ceiling?
Eurolining ceiling
How to make a pipe pass through the ceiling of a bathhouse?
How to make a ceiling in a bathhouse?
Installation
Now we get to the step-by-step instructions. However, it is worth noting that no instruction will be complete enough to reveal all the nuances of the work ahead, so it remains advisable that the builder have at least basic experience with tools and construction in general.
Construction instructions, installation step by step
Grazing
Take all necessary measurements. If you are working in a log house, draw a line along the level where the deck boards will lie. If you have walls made of a different material, check the horizontality of the mauerlat or strapping beam. If it deviates from the horizontal, prepare the necessary tabs.
Boards can be very different - edged, unedged, tongue and groove. But whatever they are, they need to be cut taking into account the approach to the wall of at least 5 cm (more is possible).
In the ceiling crown , as we said above, you need to cut out a “shelf” on which the boards will lie. To do this, you can use an ax or chainsaw. “Shelves” are cut out on two opposite walls only.
on the mauerlat in the same way, only there is no need to make a ledge.
Fastening can be done with self-tapping screws or nails.
Then bars or boards placed on the end are laid out on top - all this across the length of the flooring board. From below they are attached through and through with self-tapping screws. This is a necessary measure to ensure that the boards do not “play” in the future.
Next, we cut and lay the vapor barrier, securing it to the base with a stapler.
We lay the selected insulation on the vapor barrier.
We cover everything with waterproofing ( some do not cover it ).
From below , we adhere to the chosen design solution - either we leave the existing one as a finished ceiling, or we fill unedged boards with a shift, or we make a sheathing and cover everything with clapboard.
In the steam room, of course, some owners will stuff the bottom with foil, put the sheathing on top of it and cover it with clapboard. This is done to reflect infrared radiation back into the steam room.
Hemmed
As agreed, we believe that we already have the ceiling beams. We take measurements and set the horizontal lines exactly to the level on the wall. We stretch the construction threads.
the cranial beams in accordance with the horizontal lines (this is one of the options, there are others). The skull beam provides a ledge on which the boards will rest between the beams.
We cut the boards and lay them in the transverse direction of the beams on the skull beam. Secure with self-tapping screws or nails.
On top, without covering the beams, we lay a vapor barrier. This means that the upper section of the beam remains open, the vapor barrier fills only the formed “containers”. This is necessary so that the wood of the beam can release moisture.
We lay insulation on the vapor barrier secured with a stapler .
We cover it with waterproofing (vapor barrier does not breathe, but hydro - breathes, releases steam from the insulation).
On top of the beams, either a subfloor or a laid.
The bottom trim remains. Here too it depends only on the design decision. See a similar point on the floor ceiling above.
In the steam room: a step-by-step guide
You will find a step-by-step guide on how to make a steam room ceiling in a bathhouse with your own hands on this page.
Bathhouse ceiling interior decoration
With the help of interior decoration, flaws in the rough ceiling are hidden and the bathhouse is given design and beauty . It should be immediately noted that a well-fitted rough ceiling can be used without cladding, but most developers prefer to finish the ceiling at the same time as cladding the walls.
Prices for lining
lining
Ceiling paneling
For ceiling cladding, linings made of hardwood are most often used: aspen, linden or alder. It has a light aroma of wood, which allows you to create a unique aroma in the bath. The lining is chosen from categories A or B - they do not have knots, through holes, or other defects.
50x50 or 40x60 mm bars are attached to the rough ceiling on top of the mats using 120 mm nails. For better vapor barrier, the rough ceiling is additionally sheathed with foil vapor barrier, securing it over the boards and timber with a stapler. The joints are taped with aluminum tape.
Sealing joints with aluminum tape
The lining is attached to the bars using finishing nails or galvanized screws. A ventilation gap is left from the edge of the walls, which is covered with a plinth after covering the walls. Through this gap, the space between the sheathing and the rough ceiling is ventilated, which allows you to extend the service life of the lining.
Fastening the lining
To prevent the cladding board from changing color and darkening from moisture, it is recommended to treat it with 1-2 layers of varnish or impregnation for baths and saunas. Bath compositions are made on a water basis, so they do not form a film, and the wood breathes. You can also use flaxseed oil.
A properly installed ceiling in a bathhouse will last at least 20 years without the need for replacement. Moisture does not remain in it, condensation quickly evaporates thanks to the maintained ventilation gap. Experts recommend inspecting the ceiling once every six months in order to promptly notice a violation of the vapor barrier layer, darkening and rotting of the wood and carry out timely repairs. In this case, the bathhouse will give you health and good mood for many years.
Method No. 3: Panel ceiling
Assembly diagram of a panel ceiling section
In the diagram:
- A - section bars;
- B - sheathing made of planed boards;
- B - points for fixing the sheathing using nails.
This is the most complex and least common version of clapboard cladding, which is used very rarely. Its main difference is that it is assembled from panels made in advance on the ground, similar to troughs. Otherwise, it also goes through all the insulation processes.
Is it possible to line the inside of a bathhouse with plywood?
Plywood for interior wall decoration saves the builder in many situations where a durable but flexible material is needed. Some use it as a beautiful decorative material, while others see it as environmentally friendly and cheap.
We invite you to familiarize yourself with Vapor barrier for steam rooms in bathhouses
Advantages
Whatever the surface of the wall inside the house, plywood can easily replace many finishing materials. Without various decorative finishing coatings, the wall inside the house becomes smooth and beautiful even without wallpaper, which is clearly visible in the photo. In this case, the material can be treated with stain or paint during finishing after the plywood has been installed on the walls.
Plywood for finishing
Cheap plywood
The main advantages are:
- Heat and sound insulation.
- Low cost.
- Lightweight structures made from this material.
- Flexibility combined with high strength.
- There is no need to be a professional in the field of finishing work.
- The ability to change the design of the room with virtually no restrictions.
- Health safety.
In addition, the texture of the sheet may vary, which allows you to line the walls with plywood in different rooms.
Product types
Plywood sheets are made by gluing veneer and therefore may vary, as can be seen in the photo. Main types:
- construction;
- waterproof;
- laminated plywood.
The first of the presented options is used when covering rooms with your own hands, where the appearance of the walls of the house is unimportant. Cladding walls with plywood has the main advantage over other options - low cost. Typically, such sheets are used when decorating utility rooms with your own hands.
The laminated look is ideal for decorating living rooms, because the variety of its shades allows the material to be used in many rooms, even without additional decoration of the walls of the house.
If we divide plywood according to the type of wood from which it is made, we should highlight the following:
- Coniferous wood material is distinguished by the presence of natural resin in its fibers, which protects the integrity of the product from destruction. Due to this, it is characterized by a long operational period.
- Deciduous. Most often made from birch.
- Combined, made from various types of wood to improve performance.
When choosing plywood, it is worth inspecting it for even small cracks.
Before covering the walls with plywood, you need to determine the optimal mounting option, because there are various types of surfaces. If the inside of the room is lined with brick, then the installation method will differ from leveling a wooden house with this material. After watching the video it will be easier to decide.
The method is quite common among builders, as it is reliable and easy to implement. Covering walls with plywood in a wooden house will require wooden slats and small nails with small heads that will be almost invisible on the surface. The length should be no less than two and a half thicknesses of the plywood sheet.
The slats for fastening are placed taking into account the load that will act on the material. If you need to sheathe the floor, then the optimal distance for the sheathing elements is 40 cm, which will ensure the rigidity of the structure. In this case, the thickness of plywood for walls can be about 9 mm, if it is needed for leveling.
The interval between nails is selected from ten to thirty centimeters: closer at the edges, further in the middle. In this case, you can glue the joints of plywood sheets, having previously cleaned them and made the surface smooth.
Sheathing walls under plywood, in this case, involves cutting out holes for screws. In this case, in the facing material they must coincide with the diameter of the screw. And the hole in the rail should be half as large.
This method is often used when covering metal surfaces with your own hands. The choice of screws should be made with the expectation that they will not damage the plywood or use additional washers. The material is secured with bolts in the same way. In this case, you cannot screw in the fastening element too much, otherwise the surface may be pressed through and crack.
Typically this method is used when installing unlined materials on walls. Any wood glue will do. And indoors it is better to use colorless PVA, which does not interfere with the appearance of the material. Fastening to metal surfaces occurs thanks to epoxy glue.
It is not recommended to glue laminated plywood. But if this is done, then before installation the surface is cleaned with sandpaper.
Installation technology
Main stages:
- frame installation;
- placing insulation in it;
- material fastening;
- selection and use of finishing material.
Decorating walls with plywood begins with cleaning the surface if there are old finishing materials on it. Alignment is not necessary at all, since after the construction of the frame they will not be noticeable. Sheets should be selected based on the height of the room, so that during installation you do not attach plywood in small pieces and the rest are not long enough.
Before sheathing the surface, all slats are treated with an antiseptic. First, two bars are attached (next to the floor and ceiling), on which the rest are then installed. The distance between the slats should be approximately 45 cm.
If the wall is made of brick, concrete or a similar material, then metal hangers are first made for the slats, secured with dowels. If necessary, insulation and waterproofing material are laid between the bars, and only then the sheets are installed.
We invite you to familiarize yourself with a DIY steam gun for a bath
Sheathing is the most important event, after the actual construction, when building a bathhouse. Here you should pay special attention to the materials with which you are going to cover the bathhouse, as well as special processing compounds that will preserve the appearance of the steam room for a long time.
A log, concrete, frame or brick bathhouse in any case requires hydro-, heat- and vapor barrier, as well as internal lining. Traditionally, wooden lining is chosen. It has an aesthetic appearance, is safe for health, and is easy to install and operate. But the modern construction market offers other solutions.
- 1 Steam room finishing
- 2 Bathroom trim
- 3 Arrangement of the rest room
Steam room finishing
As a rule, if the budget is sufficient, the steam room is lined with solid wood - aspen, linden, oak or cedar lining. To save money, you can use pine materials, but in this case you need to check the boards for the absence of “resin pockets”.
What to use besides lining? A cheaper option is cladding with edged or unedged linden, aspen and birch boards. The tree must be prepared for installation: remove the bark, sand the surface and open it with water-based varnish or special biocides.
How to inexpensively cover the inside of a bathhouse? For a brick building, you can use planed boards; it is more affordable, does not require lengthy preparation for installation, and provides greater thermal insulation. The thickness of the material is 1.5 times greater than standard lining.
Foil, parchment, jute, cotton wool, and foamed foil polypropylene are used as thermal insulation materials. The area near the stove is tiled.
The ceiling, in addition to the lining, can be finished with tempered frosted glass. A backlight is installed in it. The result is a rather non-standard, but modern steam room.
Heat-resistant tiles are laid on the floor. Clinker can withstand high temperatures, has an anti-slip coating and is completely safe. But, if you want maximum comfort, it is better to choose wooden flooring; alder, ash, birch or poplar are quite suitable.
What material you should not choose for cladding is plastic, plywood, OSB, chipboard and any sawdust-based derivatives. Even with moisture-resistant coatings, when heated, the resin and synthetics that form the basis of the binder will begin to evaporate. And this is already potentially dangerous for the body. The same applies to pine and spruce boards; they cannot be used in the steam room.
Bathroom trim
What material is suitable for tiling a bathroom or sink - tiles or porcelain stoneware. Unlike wood, ceramics will not require constant treatment with moisture-protective and bactericidal agents.
Glass-magnesite boards are no less popular. This is a durable, moisture-resistant, non-flammable, non-toxic material that is not susceptible to the development of fungus or mold.
In addition to tiles, you can lay moisture-resistant laminate or panels based on composite plastic on the floor. But tiles will be more practical and durable. Wooden shields are placed on top of it to prevent slipping. What interior to create in the washing room in the photo below.
The main thing here is not practicality, but comfort, a relaxing atmosphere, and ergonomic design. The most affordable way is to sheathe the room with pine boards.
They do not rot, dry quickly, and look beautiful. Based on the durability of the material, it is better to choose boards made from Scandinavian pine.
A pleasant light pink shade will eventually become covered with an original patina and will give the room even more coziness.
Budget materials for a relaxation room also include laminated, polyvinyl chloride MDF panels, quartz vinyl tiles, fiberglass wallpaper, decorative plaster, tiles with a stone, brick or wood pattern. In general, everything will depend on the imagination of the owners and the style in which the room is intended to be decorated.
Floor ceilings on a supporting frame made of slats
They occur extremely rarely, most often during the conversion of existing small premises into baths. They greatly simplify and speed up the work; attic spaces cannot be used. Making such ceilings is easy. First, you need to use a hydraulic level to measure the height of the ceilings on the walls of the room and mark horizontal lines according to the level.
It is better to lay the boards on the short side of the room; any edged material can be used. The length of the boards cannot exceed 2÷2.5 meters; additional noticeable loads on the ceiling are prohibited. The floorboards are laid on wooden slats, firmly fixed with nails or self-tapping screws on the walls of the bathhouse. In order to eliminate the possibility of cracking of the slats before fixing, it is recommended to drill holes in them, the diameter of the holes is slightly smaller than the diameter of the screw or nail. The distance between the holes is within 25÷30 centimeters.
Floor ceilings on a supporting frame made of slats
To improve the appearance of the slats, they can be processed with a shaped cutter, but the resulting profile should not significantly reduce the strength of the material. The boards are fastened one by one from the side of the room; it is necessary to ensure that the screws for fixing the boards do not fall into the places where the slats are attached to the wall of the bathhouse.
Option for decorative floor ceiling