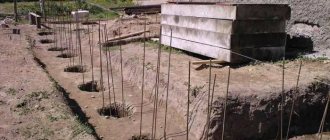
The roof of the bathhouse is erected at the final stage of construction, but the shape and design of the roof are determined in advance.
It should be noted that building a roof is a rather labor-intensive process, so you need to properly prepare for this work. The durability of the building depends on how well these works are performed.
In this article we will cover the following points:
Helpful information:
- Choosing a foundation for a log house
- Do-it-yourself barrel sauna: construction nuances
- Interior options for a wooden bathhouse
- Frame bathhouse: pros and cons, construction nuances
- Brick stoves for a bath: everything you need to know
- Glass apron for the kitchen: selection and installation
- What determines the choice of roof design?
- Which roof construction technology should you choose?
- What types of roof are the best?
- Is roof sheathing required for a bathhouse?
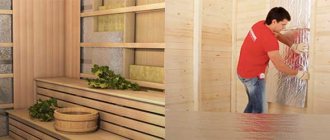
- How to insulate a roof?
- Is the insulation design of walls and roof the same?
- What determines the choice of roof design?
As you know, a roof is needed to withstand rain, snow, and other natural influences. The roof covering can be made from various materials. Each of them has its own installation technology and a certain angle of inclination. Therefore, before you start building a roof, you need to clearly determine what it will be made of.
The design of the roof and its features will primarily depend on various factors:
- Wall material
- Room dimensions
- Nature of the area
- Type of foundation
If you plan to build a bathhouse separately, then it would be most optimal to make a gable roof. For a bathhouse that is attached to another building, a pitched roof is suitable. If the area where the bathhouse is being built is characterized by a large amount of precipitation, then it is recommended to make the roof slope 45 degrees. For areas with strong winds, a flat roof is suitable.
Bathhouses have roofs with and without an attic. If the bathhouse will be used not only in the summer, but also in the winter, then it is better to make a roof with an attic so that the heat escapes as little as possible. The attic can also be used for drying things and storing bath accessories. You can even place a recreation room in the attic. Such buildings are also called bathhouses with an attic.
Attic structures are well suited for summer cottages. The advantage of such roofs is that they can be made flat and used to place a container of water or dry vegetables.
Roofing materials for baths: choosing the best
The bathhouse is a rather complex structure with a lot of features and nuances in its structure. In order for the bathhouse to function well and not malfunction, you need to put a lot of effort into the process of its construction.
So, even at the design stage, one of the most important questions arises - how to cover the roof of the bathhouse?
The modern market offers the consumer a lot of different roofing options for bathhouses: soft and hard, roll and sheet, for every taste and color. It’s quite easy to make a mistake here, since each manufacturer claims that its material is the safest, most durable and of the highest quality.
In order to soberly evaluate all the advantages and disadvantages of each coating, we will analyze them in order and choose the best one.
Next, we’ll find out which roof is best for a bathhouse.
How to make and install rafters
If the bathhouse design assumes the presence of an internal load-bearing partition, then a layered rafter structure is used. It consists of a mauerlat, vertical posts, a ridge girder and rafters. On standard buildings with load-bearing external walls, a more complex hanging system is used, like making rafters for a bathhouse.
How to properly install rafters on a bathhouse with your own hands:
- The load-bearing walls along the upper end are formed with a support beam and a beam. To secure them, you will need long metal studs or anchor bolts.
- Installing racks on top of the bed. To give them a vertical position during installation, special supports are used.
- Laying on ridge girder posts. During this procedure, you need to constantly check the building level.
- Installation of rafters. The installation step is 60-120 cm, which makes laying the insulation more convenient. To fix the rafters, nails, staples, metal plates or sliders are used.
Before placing the rafters on the bathhouse, it is more convenient to assemble the trusses on the ground. After this, the finished structure is lifted and installed on the Mauerlat.
Main selection criteria
Before you evaluate the quality of the main roofing materials, you need to decide which types are suitable specifically for your bathhouse. The assessment must be based on the following factors:
- Amount of precipitation in the construction area;
- The type of roof structure, as well as its angle of inclination;
- The material with which the remaining roofs on the site are covered.
For the most part, the design of the roof of the bathhouse is not complicated and is either single-pitch or gable. It is better to entrust more complex structures to professionals, since without certain skills it is almost impossible to complete the roof of a complex roof.
Important! To cover the roof with a rigid roof, sheathing must be installed. In turn, rolled soft roofing should be laid in a continuous layer on boards or plywood sheets.
When choosing the type of structure for a bathhouse roof, you must be guided by the following criteria:
- If the bathhouse is separate, it is better to install a roof with two slopes. If the bathhouse is an extension - with one. The angle of inclination should not exceed 65 degrees and be at least 45;
- For a bathhouse with an area of more than 12 m2, a gable roof is suitable, for smaller ones - a single-slope one;
- If precipitation in the construction area is heavy, then the roof must be at least 45 degrees, otherwise precipitation will accumulate on the roof, which can lead to damage to the roof;
- If strong winds prevail in the construction area, then the angle of inclination should be less than 40 degrees. This way, the wind will not affect the roof as much.
We mount the Mauerlat
Due to the significant weight of the roof structure, it is not recommended to install rafters directly on load-bearing walls. To evenly distribute the load and prevent deformation of the supports, before placing the rafters on the bathhouse, the upper part of the box is equipped with a Mauerlat. This name applies to a strong, even beam having a cross-section of 100x100 mm or 150x150 mm. It is installed on top of the frame to soften the load on the walls from the rafters.
Installation of the Mauerlat includes the following steps:
- Sawing the support beam into small sections, according to the number of roof slopes. The length of the Mauerlat is taken as the length of the bathhouse.
- An antiseptic liquid of deep penetration is used to impregnate the Mauerlat. To achieve a positive effect, it is advisable to apply the impregnation in two layers.
- The place where the Mauerlat is laid is the top row of load-bearing walls. Metal studs or anchor bolts are used for fixation. The attachment points must be positioned so that they fall into the space between the rafters, since in this case it will be much more convenient to attach the rafters to the bathhouse.
- After installing the Mauerlat, the assembly of the rafter roof structure begins.
In cases where the bathhouse is made in the form of a log house, the role of the mauerlat is performed by the upper crowns, for fixing which metal brackets are used. On complex and heavy roofs it is impossible to do without a Mauerlat.
Types of roof structures for baths
Let's look at the types of roofs that are most often used in bathhouse construction:
- Shed roof;
- Gable roof.
A lean-to structure is installed if the bathhouse is an extension to a residential or any other premises. The relatively low cost is the main advantage of this type of structure.
Also, a small roof area allows you to significantly save on covering materials.
Gable roofs are used if the bathhouse is a separate building.
The abundance of materials for gable structures allows you to use your imagination and choose the appropriate type of roof based on color and appearance.
Deciding on the roof structure
The bathhouse must have a roof that reliably retains heat inside the room. This is achieved by reducing the area of the log house, then its heating takes an order of magnitude less time and fuel. The room is additionally insulated, which also reduces heat leakage to the outside.
The location of thermal insulation is a criterion for the classification of the roofing structure:
- Cold . This type of roofing involves insulating not the slopes, but the floor in the attic. This room turns out to be cold, so it is mainly used as a pantry. To insulate the floor, fill-in thermal insulation is usually used, which is capable of not releasing heat from inside the heated bath.
- Warm . Here the insulation is laid between the rafter slopes. The cost of a warm roof for a log bathhouse is much more expensive, and it takes more time to arrange it compared to a lean-to roof. However, the attic space turns out to be warm, which makes it possible to place a recreation room there. The space between the rafters is usually equipped with mineral insulation in the form of slabs or mats.
According to experienced builders, it is better to use cold roofs on bathhouses because of their ability to retain heat well inside the bathhouse. As a result, it takes much less time to warm up the bath.
Metal tiles are strong and aesthetically beautiful
This type of roofing is a cheaper prototype of expensive ceramic tiles. In some cases, it is almost impossible to distinguish them.
Attention! Tiles are a time-tested material, because they were used for roofing houses by the ancient Romans and Greeks several thousand years ago!
The composition of metal tiles is quite complex: steel sheet with galvanized and polymer coating, as well as a primer and aluminum coating.
A protective varnish is applied on top of all layers. The weight of the finished sheet is relatively small - approximately 4-5 kg per 1 m2.
Advantages:
- Quick and easy installation;
- Ability to withstand temperature changes;
- Durability – able to withstand heavy loads and impacts;
- Relatively small mass;
- Hassle-free loading and transportation;
- Durability – service life varies from 25 to 50 years;
- Variety of colors and shades.
Flaws:
- High thermal conductivity;
- Low sound insulation;
- High price;
- Corrodes.
A rather interesting variety of this type is composite metal tiles. Instead of a polymer coating, the protective function here is performed by stone chips.
Metal roofing is quite popular, but it is not the most suitable option for a bathhouse.
Profiled sheet - an inexpensive analogue of metal tiles
The composition of the corrugated sheet is similar to metal tiles: it also consists of galvanized steel sheet. Each side of the corrugated sheet is coated with either a zinc layer or an aluminum-zinc layer.
Corrugated sheets are mostly used to cover the roofs of sheds, garages and other outbuildings.
Advantages:
- The corrugated sheet is quite easy to install;
- High strength of the material;
- Service life reaches 50 years;
- Low cost.
Flaws:
- Low sound insulation;
- Low thermal insulation;
- Susceptibility to corrosion.
Of course, roofing a roof with corrugated sheets has a number of advantages, but it cannot be said unequivocally that it is best suited for a bathhouse.
Corrugated sheet
These are profiled sheets with high transverse rigidity. They are made of galvanized steel.
Advantages:
The advantages of roofing corrugated sheets include ease of installation, tightness, non-flammability, attractive appearance and a wide range of colors. The material is inexpensive and lasts for a long period.
Flaws:
Despite the significant advantages, it cannot be said that corrugated sheeting is best suited for the roof of a bathhouse. It is characterized by low noise and heat insulation. In the presence of mechanical damage, the outer coating is damaged. Therefore, metal rusts when exposed to moisture.
Ondulin – is resistant to moisture and environmentally friendly
Ondulin, as a material for roofing, is attractive due to its natural composition, as well as a fairly reasonable price.
Ondulin consists of cellulose fibers impregnated with bitumen and polymer substances.
The weight of the sheets does not exceed 7 kg, height – 2 m, width – 1 m.
Ondulin is ideal for roofs of complex structures, as it bends easily and without problems.
This material is widely used in the construction and roofing of bathhouses, garages and sheds.
Advantages:
- Easy installation;
- Resistance to moisture;
- Ondulin is an environmentally friendly material;
- Service life exceeds 40 years;
- Ability to withstand temperature changes;
- High strength;
- High noise insulation;
- Reasonable price.
Flaws:
- Flammability. Ondulin is incapable of spontaneous combustion, but it supports combustion well;
- Gradual loss of color.
Ondulin is best suited for the roof of a bathhouse, as it can make it beautiful and as durable as possible.
Calculation of the amount of material
First of all, you need to calculate the roof area.
To calculate the area of the roof slope, the Pythagorean theorem is used
Let's take the parameters from the example we have already considered as a basis. Let's assume that we want to make a roof from corrugated sheets with an overhang of 200 mm relative to the boundaries of the house. Then:
- Dimension A will be equal to 4/2+0.2=2.2 m (the width of the bath is 4 meters).
- The height from the ceiling to the ridge is determined by the angle of inclination of the roof: H=A∙tg(30o)=2.2/√3=1.3 m.
- The length of the slope is calculated using the well-known Pythagorean theorem: C=√A2+B2=√2.72+1.32=3.0 m.
- The area of one slope is calculated using the formula S slope = C∙D = 5.2∙3.0 = 15.6 m2.
- The total roof area is equal to S=S slope∙2=31.2 m2.
Next, you should calculate the area of the canopy above the entrance, if it is provided for in the project. Usually it is made 0.9 m wide and 1.7 m long. Let’s also take into account the overhang of 0.2 m: S canopy = 1.7∙0.9 + 1.7∙0.2 = 1.9 m2. Then the total surface area under the roofing will be 33.1 m2.
With a standard sheet size of 2x1.1 m (the useful width is indicated after deducting the allowances left for overlapping sheets), 33.1/(2∙1.1)=15.04 sheets will be needed to cover the roof. Rounding up, we get the required need for roofing material: 16 sheets measuring 2x1.1 m. It is better to buy with a reserve of 2-3 sheets in order to provide for possible losses and errors when cutting the material.
For further calculations you will need a roof plan.
To calculate the material required for the manufacture of rafters, a plan for their location on the roof is drawn up
Determine the number of rafter legs:
- for the main roof you need to prepare 19 bars measuring 140x40x2810 mm, the total volume of the board will be 0.3 m3;
- for a canopy over the door you need 4 bars measuring 140x40x1700 mm, total volume - 0.04 m3.
In total, 0.34 m3 will be required for the rafters.
You also need to prepare 2 wind boards measuring 140x30x5800 mm. Their total volume is 0.05 m3. In addition, you will need rough timber with a volume of 0.15 m3:
- 4 slats measuring 40x50x900 mm;
- 4 bars measuring 40x50x6200 mm;
- 8 slats measuring 40x50x5800 mm.
The amount of waterproofing material corresponds to the roof area - 33.1 m2.
Required Tools
To build a structure, you need to prepare the following tools:
- metal scissors;
- electric jigsaw;
- screwdrivers;
- axe;
- hammer;
- spanners;
- building level;
- roulette;
- meter;
- plumb line;
- corner;
- construction cord;
- pencil.
It is also recommended to make a marking strip from a 5 cm wide block.
Slate is strong and durable, but contains asbestos
Slate is widely used in the construction of buildings for various purposes, including baths.
It is very popular because, relative to other representatives of roofing materials, it is very cheap.
Slate consists of approximately 80-85 percent cement and 15-20 percent asbestos.
Slate is mainly used to cover industrial premises, as well as sheds and toilets. Very rarely used to cover private houses.
Advantages:
- Slate is not flammable and does not respond to high temperatures;
- Not subject to corrosion;
- Service life – more than 40 years;
- Soundproof;
- Easy to install.
Flaws:
- Asbestos, which is the main component of slate, is dangerous to the human body;
- Fragility;
- Heavy weight;
- Over time it becomes covered with moss.
Let's look inside: bathhouse layout for a narrow area
Having climbed onto the porch and opened the doors, we find ourselves in a small vestibule. From here you can go to the hall, and turn left to the bathhouse complex. There is a changing room, a washing room and two bath rooms. When ordering our team to design a bathhouse for a narrow area, the clients expressed the wish that, in addition to the usual hot steam room, they would have the opportunity to enjoy healing water procedures at a moderate temperature. We met their request and complemented the traditional Russian steam room with a delicate Turkish hammam.
Leaving the bath complex and passing through the hall, you can get into a spacious relaxation room. The kitchen and dining room will be located in the same room. By the way, directly behind the wall there is a comfortable, warm bathroom.
The barbecue terrace deserves a special description. This is the highlight of our long narrow bathhouse, a room filled with light, space and air, first of all, due to the continuous glazing of the facade wall, and secondly, due to well-organized artificial lighting.
On this terrace, securely sheltered from wind and precipitation, the owners of the site will be able to organize warm family gatherings and noisy friendly feasts for a large company. Delicacies cooked in a brick oven over real wood will give such picnics a special atmosphere. And you won’t have to get firewood in a distant forest - next to the porch, under a wide canopy, we have provided a place for a woodshed.
You can get to the terrace both from the street, through a glass door, and from the lounge-kitchen.
When studying designs of modern bathhouses from photos and descriptions, you should always pay attention not only to external attractiveness, but also to practicality and functionality, as well as how well the structure harmonizes with the site and other objects located on it, and how organically it fits into the surrounding landscape. In the project presented today, in our opinion, the architects and designers managed to combine all of the above as successfully as possible, adding a little of their own quite appropriate creativity and professional imagination.
Views from different sides (photos below)
If you liked the project, mark it on social networks.
Also see similar articles:
Bathhouse with hammam, brick bathhouse project
Small bathhouse project
Bathhouse with swimming pool
Chief architect of the project Ryabkov Sergey Sergeevich
Head of the design department
Tags: Baths, bathhouse projects
Tweet
Pin It
Flexible tiles - a type of soft roofing
Important! Flexible tiles, which no longer surprise anyone, appeared more than a hundred years ago in America.
Flexible tiles consist of fiberglass coated with bitumen and stone chips, which gives the tiles color, volume and resistance to ultraviolet radiation.
The fabric has a self-adhesive surface on the reverse side.
This type of roofing is ideal for complex roof structures due to its flexibility and softness.
Advantages:
- Service life can exceed 70 years;
- Good sound insulation;
- Aesthetic beauty;
- Does not corrode;
- Low price.
Flaws:
- Becomes brittle when exposed to low temperatures;
- Flammability;
- Melts under high temperatures.
Hard surface installation process
Let us examine in more detail the process of installing a rigid roof using the example of a slate roof. The slope of the sheathing under the slate should be at least 27 degrees, preferably more.
The distance between the beams should be approximately 1 m. Slate sheets are attached directly to the sheathing using nails specially designed for this purpose, which do not corrode.
Small rubber washers are placed under nails about 10 cm long.
The slate is laid staggered depending on the flatness of the slope. Next, all the cracks are coated with mastic with a layer of 5 mm.
Scheme and calculation of the roof based on the area of the bathhouse
As an example, we will consider a bathhouse measuring 4x5 m. The structure is being built in the Moscow region and is made of timber. The top row is used as a mauerlat. The roof will be a gable hanging roof, without laying out insulation material. The angle of inclination of the slopes is 30o, the height at the ridge is 6 meters.
Before constructing the rafters, you will need to perform a calculation to determine the slope and characteristics of the roof parts.
Types of loads acting on the roof
The roofing system is affected by the following loads:
- Constant - the weight of the frame and roof covering. The weight of the covering will depend on the selected roofing material.
- Periodic - loads from snow and wind, as well as the weight of builders performing work.
- Unforeseen - earthquake, hurricane and others. Such loads are not taken into account in most regions due to the low probability of their occurrence.
In the process of calculating the thickness and width of the rafters, it is necessary to take into account the sum of the maximum values of possible loads. To correctly perform the calculation, you need to understand the loads that act on each node separately.
The dimensions of the rafters are selected based on the nature and intensity of the loads in each node of the roof structure
The lower part of the rafters is attached to the Mauerlat. The unit will absorb vertical loads from snow and the weight of the roof itself. Spans under load bend.
Each point on the roof has its own loads, which are calculated using certain formulas
Snow load calculation
The snow load on a rafter leg is calculated using the formula S=Sg∙μ, where S is the snow load, Sg is the specific gravity of the snow cover in a given region, μ is a correction factor, the value of which depends on the angle of inclination of the roof:
- less than 25o - μ=1.0;
- from 25 to 60o - μ=0.7;
- more than 60o - μ=0, i.e. snow loads on such steep roofs can be ignored.
The Sg value is taken from a special table. For the Moscow region Sg=180 kgf/m2. Therefore, for our example, the value of the snow load is S=180∙0.7=126 kgf/m2.
Table: specific snow load depending on region
| Region No. | 1 | 2 | 3 | 4 | 5 | 6 | 7 | 8 |
| Sg, kgf/m2 | 80 | 120 | 180 | 230 | 320 | 400 | 480 | 560 |
The region number is determined by the snow load distribution map issued by Roshydromet.
Each region of our country is assigned a number depending on the average intensity of snow load
Wind load calculation
The wind load is calculated in a similar way: W=Wo∙k, where W is the snow load, Wo is a standard indicator, which is determined from the table for each specific region, k is a correction factor, the value of which depends on the type of terrain and the height of the building. For areas such as urban areas or forests, the values of this coefficient are as follows:
- with a house height of less than 5 meters - k=0.5;
- from 5 to 10 meters - k=0.65;
- more than 20 meters - k=0.85.
For the Moscow region Wo=23 kgf/m2. The value of the wind load for the bathhouse we are considering is W=23∙0.65=14.95 kgf/m2.
Table: specific wind load depending on the region
| Region No. | 1a | 1 | 2 | 3 | 4 | 5 | 6 | 7 |
| Wo, kgf/m2 | 17 | 23 | 30 | 38 | 48 | 60 | 73 | 85 |
The region number is determined by a special map, also compiled by the Hydrometeorological Center.
According to wind load parameters, each region also has its own number
For Moscow and the region, the roof parameters have already been calculated using the above formulas. Therefore, to select rafter sizes, you can use a ready-made table.
Table: dimensions of rafter legs depending on the pitch between the rafters (for the Moscow region)
| Spacing between rafters, cm | Rafter length, m | ||||||
| 3,0 | 3,5 | 4,0 | 4,5 | 5,0 | 5,5 | 6,0 | |
| 215 | 100x150 | 100x175 | 100x200 | 100x200 | 100x250 | 100x250 | – |
| 175 | 75x150 | 75x200 | 75x200 | 100x200 | 100x200 | 100x200 | 100x250 |
| 140 | 75x125 | 75x175 | 75x200 | 75x200 | 75x200 | 100x200 | 100x200 |
| 110 | 75x150 | 75x150 | 75x175 | 75x175 | 75x200 | 75x200 | 100x200 |
| 90 | 50x150 | 50x175 | 50x200 | 75x175 | 75x175 | 75x250 | 75x200 |
| 60 | 40x150 | 40x175 | 50x150 | 50x150 | 50x175 | 50x200 | 50x200 |
If there are difficulties in carrying out calculations on your own, then it is recommended to take the dimensions of the rafter system on similar buildings that were erected earlier.
When calculating the roof, you need to adhere to the following recommendations:
- For a detached building, it is recommended to make 2 slopes. The optimal tilt angle is 50–65°.
- A gable roof is suitable for a building with an area of more than 12 m2. For smaller spaces, you can use a shed roof.
- For regions with high wind gusts, the slope should be at least 40°.
The process of installing a soft roof
As an example of a soft roof, let's take a relatively inexpensive material called roofing felt. Roofing felt rolls are a dense carpet with a layer of waterproofing.
First of all, a ridge is installed on the wooden flooring, then a layer of bedding is laid out on the flooring. Glue it with hot mastic.
Important! Under no circumstances should you lift mastic onto the roof with full buckets! Also, when working with mastic, you must use protective gloves and boots!
The underlying layer is applied across the ridge in separate strips. It is attached to the ridge with nails.
Next, hot mastic is again applied to the bedding layer, on top of which the roofing material is directly attached. It is laid out in the same way as the underlying layer - overlapping across the ridge.
Next, the layer of roofing material needs to be smoothed out to avoid the appearance of bubbles.
At the place of descent, the roofing material is folded under the sheathing and secured with the same nails.
Frame structure - what needs to be installed on the bathhouse
The basis of the roof structure is the rafter frame. It is on this that the roofing covering is mounted, the weight of which is evenly distributed between the load-bearing elements of the building. In addition, the rafter frame is where the waterproofing protection is installed.
The frame includes the following elements:
- Mauerlat . With the help of this support beam, weight distribution and softening of the load on the walls of the rafter legs is achieved. For its manufacture, pine beams with a square cross-section are used, on top of which rafters are installed.
- Racks . We are talking about vertical supporting elements that perform a supporting function for the ridge girder or the center of the rafter leg. Only layered rafter systems are equipped with these parts.
- Rafters . Before making rafters for a bathhouse from boards, a 50x150 mm or 100x150 mm board is first prepared. One end is placed edgewise on the mauerlat, and the other rests against the surface of the second paired leg or ridge girder.
- Struts . We are talking about supporting frame elements that occupy an angular position in relation to the rafters. This protects the legs from sagging due to their own weight.
- Puffs . They are used for tightening rafter legs together in pairs to compensate for the bursting load directed at load-bearing walls.
conclusions
Based on the above advantages and disadvantages, certain conclusions can be drawn:
- Each of the presented materials, one way or another, is suitable for roofing single-pitch or gable roofs. There are differences only in the slope angle. For example, for most sheet materials the slope angle is equal to 12 degrees, and for piece materials - 20. The exception is soft tiles, the slope angle of which is from 12 to 90 degrees;
- The most expensive material is considered to be natural roofing – ceramic tiles. Metal tiles are slightly inferior to them;
- Budget options include corrugated sheeting and ondulin. Quite high quality materials and also economical. In cases where staying within budget is the most important thing, these materials are perfect;
- During the installation process, the easiest way is to lay soft tiles, since it takes less time and even a non-professional can handle it;
- Ondulin is the most environmentally friendly. Corrugated sheeting comes next, but slate is in last place, since the asbestos content makes it unsafe for the human body.
Having analyzed the prices and types of roofing materials, we draw conclusions: they can all find application in one segment or another.
There is no clear answer to the question of what is the best way to cover the roof of a bathhouse, since each material has its own characteristics.
However, the most important thing remains that, regardless of the material chosen, its quality must fully meet that declared by the manufacturer.
Now you know what is the best way to cover the roof of a bathhouse.
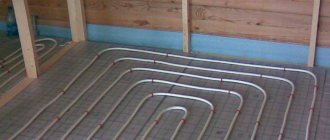
How is the bathhouse arranged?
The construction of a bathhouse roof is complex, since it consists not only of roofing material, but also of a well-thought-out rafter design. A rafter system is a combination of trusses that are arranged in a certain order. Both sheathing equipment and the selection of the correct materials for installation are required. Special nests are cut into the walls of the building; they are needed to ensure that the floor beams are positioned horizontally. The trusses are fastened with self-tapping screws.
It is also important to think about how the pipe will be installed into the bathhouse through the roof; for this you need to think about where the stove, chimney and pipe will be located. It is not easy to remove and seal a pipe on the roof of a bathhouse, since many nuances need to be taken into account. In general, a bathhouse-chimney-roof is a whole system in which everything must be provided. When leading the pipe from the stove through the roof, you need to think about where this can be done. The pipe must not be routed through the valley or near the skylights. A smart solution is to lead the chimney through the ridge of the roof, however, this can lead to a violation of its integrity, which is not very profitable. The second option is to exit the pipe next to the ridge.