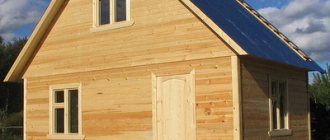
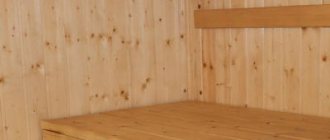
Cladding walls with clapboard is widely used for interior decoration of loggias and country houses. Wood allows the walls to breathe. Decorating a country house using this material will give you a feeling of calm and comfort. Proper cladding will allow you to make the interior of your home more comfortable.
Installation of eurolining with your own hands, fastening of the sheathing, width and thickness, painting
If you want to make your own cladding with eurolining, installing it will not be difficult, because the planks made according to a single standard can be easily connected to each other and secured to guide rails. However, you need to be careful when purchasing material. Some sellers and manufacturers are trying to offer completely different products under the guise of eurolining.
Not every processed lath with a tongue and groove can be called eurolining, the dimensions of which are: thickness - 12.5 mm, board width with a groove 96 mm, without a groove - 88. The width of the groove 8 mm eliminates the formation of cracks when the wood dries. The length of the slats is 2; 2.2; 2.4; 2.5; 2.7; 3; 4; and 6m. These dimensions are obtained by processing wood using appropriate equipment. If you come across other sizes, you can be sure that such boards were made on outdated equipment, often restored after being written off.
No less interesting is the question of how much eurolining costs. The price of the material depends on several factors: the type of wood from which the board is made, class and length. On average, 1 m2 of class A will cost 7-8 dollars, class B about 6 dollars, and class C from 4.25 to 4.75. At the same time, a longer lining will cost a little more than a short one.
Eurolining is installed on pre-installed wooden guide rails or bars. The connection of the planks is carried out according to the tongue-and-groove pattern and is additionally fixed with small nails. Installation begins with the surface farthest from the entrance. First, all surfaces are covered, after which the joints are sealed with decorative corners and baseboards.
Types of lining
Experts distinguish between several types of lining, depending on what the board is made of.
- The plastic board is made from polyvinyl chloride mass, which affects its functional features:
- long period of operation;
- moisture resistance;
- tolerance of various temperature conditions (from -50 degrees to +50 degrees);
- variety of colors.
But experts also note a small drawback of this type of finishing material: low mechanical strength.
- The wooden board is made entirely from wooden edged boards and is classified according to the profile: “Standard”, “Calm”, “Europrofile”, “American”.
For this type of lining, wood is used from species such as pine, spruce, linden, alder, the properties of which affect the characteristics of the finishing material. - MDF lining, or medium-density fiberboard, is made by pressing wood chips, which makes this type of building material different:
- environmental friendliness;
- hypoallergenic;
- light weight;
- Possibility of styling like marble, stone, granite,
etc.
Do-it-yourself finishing inside the house can be done from any of the named types of lining.
Finishing loggias with eurolining photo of balconies covered with boards made of linden, aspen, larch, cedar
The use of the material is quite wide. In the city, wood paneling can be found on a balcony or loggia, in the hallway, and in the kitchen. Eurolining is also used for finishing rooms. Wood is used more often for finishing country houses. Eurolining for a bathhouse is often used, and a material made from wood that does not rot, such as larch or aspen, is used.
Due to its properties, eurolining aspen is used for exterior finishing, for example, for a balcony or loggia. Aspen cladding can also be found in the bathroom. Of course, in conditions of high humidity, other types of wood can be used, but larch and especially cedar are less common due to their higher cost.
Euro linden lining is well suited for interior decoration. Soft and delicate linden wood will add light and warmth to the room. More “budget” materials are also used for interior decoration: spruce and pine. But lower cost does not mean poor quality finish. Each material has its own characteristics and it takes skill to discover and show its beauty. Pine wood has wonderful shades of yellow from soft lemon to golden red.
The use of euro-lining made of spruce will add a pink and reddish tint to the interior. It should be remembered that both pine and spruce contain a large amount of resin, which is released when heated. It is for this reason that it is not recommended to use spruce and pine for finishing steam rooms in baths and saunas. And when decorating balconies facing the sunny side, you need to monitor the condition of the wood and promptly remove protruding pine.
We calculate the amount of material
To calculate the required number of linings, you need to know what the dimensions of this cladding material are. In accordance with GOST, the standard width of one board should be up to 15 cm, length - 600 cm, and thickness - from 1.2 cm to 2.5 cm.
Panels with a thickness of less than 1.6 cm are used for interior finishing, and lining with a thickness of 1.8 cm or more is used for exterior work. If you know the dimensions of the boards, you will be able to determine their square footage. Let’s say the width of the lining is 9.5 cm and the length is 600 cm. In this case, the total area of one panel will be 0.57 m².
9 m²: 0.52 m² = 17.3
This means you will need at least 18 panels. But remember that during installation the width of each board will be slightly less than the total - this is explained by the nuances of the tongue-and-groove fastening of the material.
ceiling panels
How to make a frame
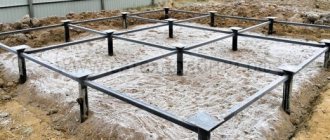
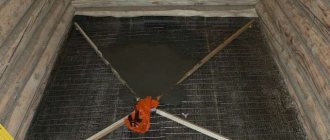
Smooth bars are ideal for making a load-bearing frame. To make the structure more reliable, the bars must be fixed at the edges. This must be done in accordance with the readings of the plumb lines and level. The markings on the wall are made in such a way that the sheathing elements are separated by the same distance. You need to know the approximate size of the bars: 1.5x3 cm, you can take 2x4 cm.
Installation diagram of the lining.
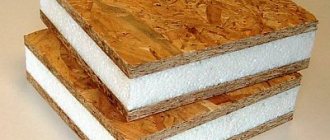
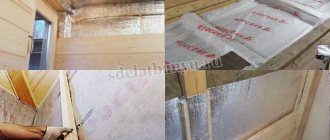
As for the insulation, the first thing you need to do is lay a waterproofing film so that the lining of the room is protected from moisture. The film should be applied with the smooth side to the insulation, and the rough side should be applied to the lining. The film and foil are overlapped by 5-10 cm; mineral wool can be used as insulation, but polystyrene foam should not be used for internal insulation.
If the walls in the room are smooth, it is permissible to use slats with a thickness of 1 to 1.5 cm; they can be fixed to the wall using nails or screws. For greater reliability, waterproof putty can be applied to the wall.
If the wall does not have the highest quality surface, then you need to use bars that are larger in cross-section, this way you can lay insulating material between the frame elements. The bars are fixed with screws or bolts; for this you need to use a screwdriver. As for the choice of fasteners, it all depends on the type of walls - brick, wood or monolith.
Features of clapboard cladding
As for the distance between the bars, it can be from 40 to 50 cm.
Whatever the covering, you should always make sure that the boards fit as tightly as possible to the wall. It is recommended to install the lining from the ceiling, and then begin sheathing the walls. Metal staples and screws are useful for installation.
The planks can be attached in several ways:
- With nails.
- Clips that are mounted near the groove.
- You can use a lining that has an internal latch.
Types of lining fastening.
If you are going to work with a hammer drill, then there should be no voids in the walls. If there are any, then you need to drive a wooden plug into them, then insert a screw or nail.
When covering walls, difficulties may arise near switches and sockets. Here you need to do this: turn off the electricity, carefully disassemble the socket body, attach a piece of lining to it, mark the place for the cut, cut out a hole with a jigsaw, attach the lining, then re-fix the socket and carefully mount the cover. Lamps and switches must be fixed directly to the casing. If you need to fix some interior details on the lining, you can do this using screws.
https://youtube.com/watch?v=eH7LWNMJZ78
Useful tips
- If you use stain, you can easily change the color of the lining. The material is painted with a brush; glossy varnishes should be abandoned, but semi-matte varnishes are perfect. After the layer of varnish has been applied, it should be rubbed with sandpaper (you must choose fine-grained sandpaper), after which an additional 1-2 layers are applied.
- If the lining is wooden, then before installation it should be treated with fungicidal agents.
- The lining can be given an attractive shine that resembles gold, for this it should be treated with wax, and you can also impregnate it with warm drying oil.
- The wood can be bleached if desired. To do this, take 1 part of a 20% ammonia solution and mix it with 10 parts of a 20% hydrogen peroxide solution. This mixture should be applied to the boards, and it should be washed off after 5-7 minutes.
- If there is any damage on the lining (for example, cracks), they can be easily removed with wood varnish and glue. You can also use special putties.
Thus, you can easily cover a room with clapboard. You just need to be careful and attentive, work with high-quality materials, take your time, then everything will definitely work out. The work can be done with your own hands, and the room will look perfect.
Selecting a fixation option
Immediately determine the method of fixation. After all, paneling can be done using different methods:
- Pass-through option. This is the simplest solution that does not require much effort. It consists in the fact that the screws are screwed directly through the front part. This technology assumes that markings will be made so that the fasteners are in one line. Holes are also pre-drilled to prevent the wood from cracking. The screws are screwed in so that the cap is completely sunk. This can be easily achieved if you pre-drill out the space for the head with a larger drill bit. The resulting holes are closed with special plastic plugs or puttied. Naturally, this option greatly violates the aesthetic appeal.
Through installation of lining - You can also trim a room with clapboard using decorative nails. Their caps are made to match the color of the material. It is important to take into account that they must be hammered in very carefully, as the cap can easily be damaged.
- An excellent option are nails without a head (secret). They are driven exclusively at an angle of 80 degrees. This makes it possible to hide those places that have been damaged.
- You can attach it to staples, but this requires a professional stapler. This method is well suited when elements begin to be laid from top to bottom.
On a note! The manual staple driving tools that are sold everywhere do not do the job required. The fastening turns out to be unreliable.
- Claypers are used to cover a room with clapboard when the material is at its thinnest. This is a great option that makes the mount invisible. True, you will have to put in a lot more effort.
Installing the lining on clamps allows you to make the fastenings invisible.
The necessary fasteners are selected based on the specific situation. Currently, clamps are becoming increasingly popular.
Advantages
Lining has many advantages:
- low thermal conductivity;
- good air exchange;
- easy care;
- service life – 30 years;
- installation is simple and fast;
- UV resistant.
If you use plastic material (PVC panels) to cover the walls, the room will be visually much more spacious. In addition, electrical wiring can be hidden under the board, which is aesthetically reflected in a modern home.
Wooden lining has different lengths from 1.5 to 6 meters. Thanks to this, anyone can easily select the right material, while using it sparingly.
In order to cover the walls with boards, you can use simple tools that a good owner always has available.
Lining in the steam room: vertically or horizontally
There are two ways to solve the problem of how to line a bathhouse with clapboard quickly and efficiently:
- With horizontal planks;
- With vertical slats.
With the horizontal method, the lining is installed parallel to the floor surface. In a vertical position - perpendicular to the floor.
The horizontal position more effectively protects the lining from water penetration. This ensures good ventilation of the space between the wall and the panels.
The choice of method affects the technology of work and the final cost of repairs. For lining the inside of a bathhouse, they prefer the horizontal method. In this case, the wooden panels are installed with the tenon facing up.
We invite you to familiarize yourself with Projects of two-story baths made of foam blocks
Paint for lining
Staining radically changes the color of the wood, but the coloring must be repeated at least twice. Various compositions are used.
Oil paints are well absorbed and very resistant to moisture. Usually used for external work. It is recommended to give preference to light colors, since lamellas painted dark quickly lose their brightness.
- Acrylate ones are more durable, but create a vapor-proof film, so they are also not used for interior decoration.
- Acrylate scuba tanks are the most popular option. The water-based composition is easily absorbed into the top layer of wood and does not create an impermeable film. The lining painted with aqualac does not need protective varnishing. The photo shows lamellas painted white.
Design solutions
The surface of a wall covered with wooden slats does not seem attractive to everyone, while the quality of wooden lining is much higher than that of plastic. Painted slats successfully solve these difficulties. But when choosing a color, you should take into account not only personal preference, but also other considerations. The walls and ceiling make up the majority of the room, so obviously their color will be the base color. This means that the rest of the color scheme depends on the shade of the painted lamella. Therefore, you need to approach your choice responsibly.
- White is a universal color that visually increases the size of a room and “brightens” it. Despite its neutrality, white-painted lining does not fit well with warm tones, and therefore further decoration and furniture should be kept in cold tones. The photo shows the interior of a room lined with white clapboard.
- Golden and beige also expand the perspective and visually raise the ceiling. Refers to a neutral range, allowing combination with almost any color, but only cold tones. When choosing or dyeing yourself, you should achieve a complete absence of reddishness.
Red-red color – the wood has a bright warm color, very vibrant and rich. However, the choice of appropriate shades for the interior is quite limited: orange, red, brown, possibly green, but always in warm colors. This palette is extremely demanding. The photo shows a design in the “autumn” style with painted slats.
Features of caring for lining
If you use wooden lining for the ceiling, be sure to take additional measures. So, to extend the life of wood, treat it with special solutions that prevent rotting, the development of mold and mildew. These include impregnations and primer mixtures. When choosing a product, look at the color - it should be the same as the color of the final result.
Caring for wooden lining
To maintain the original appearance of the coating, wipe off dust as often as possible. If the contamination has started, and a soft damp cloth can no longer cope, then use special treatment products, which are available in a wide range.
Tips for decorating the inside of a house with clapboard, how to do it yourself
If the room inside the house has high air humidity, then the finishing should be done with plastic lining.
When installing wooden sheathing, it must be treated with special primers, which will avoid damage in the event of moisture accumulation.
Each joint between elements must be treated with a sealant, especially indoors in a house with high humidity.
For plastic boards, use construction adhesive or liquid nails. Remember that an air cushion is needed between the wall surface and the wooden board. To hide the ends in the finishing, you can adapt decorative elements with your own hands (for example, external and internal wooden corners).
If you are not confident in your abilities and a positive end result, seek help from qualified builders who will help you carry out all the necessary finishing work inside the house.
Interior decoration of the bath
Interior decoration of a bathhouse with clapboards
A bathhouse is usually built from pine logs. Coniferous wood is not suitable for interior decoration of the steam room. When it heats up, it releases resin. With a small amount, the aroma of the Christmas tree calms and puts you in the mood for relaxation. The sauna creates an atmosphere of strong smell and heavy air. It is better to line the walls in the steam room with alder, which emits a healing aroma, or birch. The peculiarity of the bathhouse lining is the use of wooden nails. The metal has high thermal conductivity and will leave burns on the body upon contact.
Material and tools for work
First of all, you need to buy unedged boards about 3 m long, their width should be about 100 mm, and their thickness should be at least 20 mm. You can choose any type of tree, the main thing is that it does not have mechanical damage, knots or rot. Oak, linden, cherry or pine are suitable for this. Before work, check that the wooden lining is well impregnated with special antiseptic compounds.
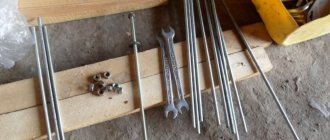
Required tool:
Tools for working with lining.
- milling machine or surface planer;
- color pencil;
- ruler;
- set of cutters;
- mounting stapler;
- mineral wool;
- wood screws;
- perforator;
- nails;
- plumb and level;
- waterproofing film;
- hammer;
- polyurethane foam (slightly expanding);
- wooden planks with a section of 4x5 cm.
Work procedure
Wooden lining can be used to decorate living rooms of almost any design style, either completely or partially, see fig. In the latter case, lining can be an effective means of zoning a room, top left in Fig.
Living rooms decorated with clapboard
The walls are finished with clapboards in the following order:
- Preparing the building: if the walls are porous or cold (they conduct heat well) - insulation and waterproofing from the outside. Possibly also external decorative cladding. Neglecting this point will bring all efforts to create beauty inside to nothing;
- Choice of material – wood species, profile and width of the lining boards;
- Choice of cladding scheme: horizontal, vertical, diagonal, shaped;
- Preparation of the internal base surface - leveling, vapor/water insulation;
- Installation of sheathing under the cladding;
- Wall covering with clapboard, using standard or simplified technology. In terms of strength and decorative qualities of the cladding, they are equivalent, the differences are different, see below;
- Applying a protective coating to the casing;
- Installation of sockets, lamps and other devices built into the wall;
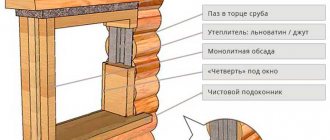
- Applying skirting boards to expansion gaps, corners of window slopes and door quarters.
What determines the price
The cost of such material as eurolining depends on many factors. This includes the size of the board, the type of wood from which it is made (pine, linden, etc.), and the quality of the board itself. Therefore, when you need eurolining, buying it will not be a problem, but the price may be different.
Of course, you can buy non-standard lining, for example, a length or width different from the established one, its price will be lower, or a class C board, with holes for knots. In this case, the price will also be lower. Knot holes are sealed with either wooden plugs or foam.
| Thickness x Width x Length | Grade | Price per m2, rubles |
| 12.5 x 96 x 2000 – 4000 mm | A | 250 |
| 12.5 x 96 x 6000 mm | A | 230 |
| 12.5 x 96 x 2000 – 6000 mm | B | 220 |
| 12.5 x 96 x 2000 – 6000 mm | C | 160 |
| 12.5 x 96 x 2000 – 6000 mm | Extra (glued) | 455 |
| 12.5 x 96 x 2000 – 6000 mm | Extra (solid) | 660 |
| 12.5 x 96 x 2000 – 6000 mm | Calm | 240 |
| 12.5 x 120 x 2000 – 6000 mm | Calm | 260 |
| 12.5 x 140 x 2000 – 6000 mm | Calm | 250 |
Technology of clapboard façade cladding
In addition to the lining itself, additional materials will be required:
- Metal profile or timber for forming the sheathing;
- Insulation to retain heat. It is advisable to use sheet mineral wool;
- Self-tapping screws on which the sheathing will be attached;
- Clamps used for installing lining;
- Vapor barrier providing ventilation of the facade;
- Waterproofing.
Tools you will need:
- Hacksaw (for metal or regular), depending on what material is chosen for the sheathing;
- Screwdriver;
- Jigsaw for cutting lining. If you don’t have one, you can get by with a hacksaw;
- A construction stapler that is used to fasten waterproofing material.
Tape measure - an important measuring tool
The technology of cladding a façade includes the following steps:
- Formation of vapor barrier;
- Fastening the frame;
- Laying thermal insulation;
- Fastening waterproofing to the sheathing;
- Formation of the second frame;
- Installation of lining on the facade.
Formation of vapor barrier
The purpose of the vapor barrier is to ensure ventilation of the façade. It can be polyethylene film, roofing felt or aluminum foil. To ensure ventilation, the vapor barrier material is attached to a pre-formed sheathing of 25 mm wide slats. After the vapor barrier layer is fixed to the slats, it is necessary to make small holes at the bottom and top between the slats. With their help, ventilation will be carried out.
Laying thermal insulation
Thermal insulation is placed on the facade, taking into account some features:
- Mineral wool slabs must be laid in such a way that there are no gaps between them;
- It is necessary to lay two layers of mineral wool;
- The slabs are laid offset. That is, the joint of the slabs of the lower layer should be closed by the middle of the slab forming the top layer.
Mineral wool slabs have sufficient elasticity that they can be held between boards without fastening.
Securing waterproofing
The waterproofing film is fixed on top of the heat-insulating material. It is capable of letting steam through, but retains water. The film is secured with staples to the frame boards. It is advisable to lay the film overlapping, gluing it with tape. The waterproofing film has a smooth and rough side. The rough side should be facing the lining, and the smooth side should be facing the insulation.
Formation of the second frame
The slats of the second frame are attached to the slats of the first, perpendicular to them. To do this, take slats 0.5 mm wide and 2–3 cm thick. The presence of a second lathing is necessary to provide additional ventilation and removal of moisture that forms on the film in the form of condensation.
An empty space is formed at the bottom, which must be covered with a metal mesh. Otherwise, there will be rodents in the wall, which will be very difficult to remove.
Material processing
After purchasing the required number of products and fasteners, the question immediately arises: how to properly cover the walls with clapboard? But this is not a priority task. You need to know that the material needs pre-processing, because no actions other than manufacturing are performed in production. Therefore, the following manipulations are performed:
- Coniferous wood types require complete degreasing. All resin stains are removed. The boards are washed well with acetone (a 25% solution is required). Next, wipe thoroughly with rags previously soaked in water. After all actions, the products are dried.
- To obtain the same surface shade, each fragment is treated with a pre-prepared mixture. It consists of hydrogen peroxide and acid (oxalic). The solution is prepared based on the type of wood.
- All damage, even minor ones, are repaired with putty. It is better to choose a mixture for wood. You can buy it at the store or prepare it yourself.
- If it is necessary to change the shade, then use stain or other special impregnations that preserve the texture of the wood.
Processing the lining allows you to extend its service life and change the color of the material.
Of course, you can find products that will be pre-treated, but their cost will be significantly yours.
On a note! Pre-treatment cannot be skipped. This would be a gross violation of the technology of covering surfaces with clapboards.
Installation technology
Finishing material can be installed in a hidden or open way.
The first stage of finishing consists of thoroughly treating the material with antiseptic agents. Next, it is better to dry the material. The difference between eurolining and lining is that the tenon size is not 4-5 mm, but 8-9 mm. This makes it possible to more securely join the boards. The photo shows the most common installation methods.
- The most popular method is to fasten the boards with self-tapping screws. You can start installation from both the ceiling and the floor. In the locations of the tenons, drilling is carried out to the size of the screws to a depth of 10 mm. When decorating a house with your own hands, you need to stock up on a screwdriver or screwdriver. With their help, self-tapping screws are screwed into the boards, after which the caps are cut off and the surface is sanded.
- Another way to decorate with eurolining inside a house is by concealed fastening with nails. The cladding starts from the top. A hammer is used as a tool for screwing in nails. A prerequisite is the use of galvanized thin nails.
- The next method is to install the boards with hidden fastenings using staples. The facing material is installed to the sheathing one by one, and fastening is carried out using a stapler. The peculiarity of this method is that the tenon of the next board can easily fit into the groove. So that the tenon of the bottom board can fit freely, the staples need to be recessed into the wood.
The hidden fastening with dowels looks perfect. You need to start laying with your own hands from the bottom:
- Using self-tapping screws installed in the upper tenon, the first board is secured.
- The boards are stacked on top of each other, thereby hiding the screws or staples.
- The screws on the first and last boards are ground.
All of the above methods are suitable for horizontal cladding. It must be remembered that the installation of boards is carried out with the tenon facing up. Throughout the installation, the horizontal position should be monitored using a level. The last board is fastened with nails at a distance of 1 cm from the floor. The gap is closed with a plinth.
Vertical cladding
Vertical installation should begin from the corners of the wall. Just as in the previous method, clamps are installed on the back of the board, which are attached to the sheathing. Corner boards are fixed with nails. It is recommended to cut off the nail heads with side cutters. If the ceiling is covered with eurolining, you need to take care of joining the boards. For this you can use decorative slats. The joints are made in one line.
Second option: use the entire board without any residue. In this case, the joints are made with seams staggered. The material is installed from the window towards the opposite wall. This will help avoid shadows appearing between the panels. Experts recommend leaving small gaps at the top and bottom for free air access.
Preparatory work
Preparation for the installation of lining can be considered the production of wooden sheathing, which is designed to level the walls and create space for air circulation. In addition, this installation method allows you to hide a variety of communications, thereby significantly increasing the decorative effect of the wall covering. For example, you can throw wires or polypropylene pipes.
The pitch between the slats is determined by the size of the room, but should not be more than one meter. It is best to make a distance of 50-60 centimeters. All these bars must be aligned in one vertical plane for the walls and horizontally for the ceiling. All this is controlled by level and plumb. It will be much better if you treat the bars twice with an antiseptic. Fungus and mold in this case are not scary.
If finishing with wooden lining takes place in a steam room where the walls are lined with foil, then the thickness of the bars should be 20-25 mm. This air gap between the foil and the lining is an ideal insulation. The sheathing must be fastened here carefully so as not to damage the foil layer. In the rest room or in the dressing room, you can use bars 50 mm thick. The resulting gap between the wall and the lining can be insulated with heat-insulating materials.
All window and door openings around the entire perimeter are sheathed with bars in the common plane of the frame. This is done to more rigidly fasten the edges of the lining.
Well, the frame has been assembled, now we proceed directly to the installation of the wooden lining.
Shalevka manufacturing technology
Before you start making a shalevka, you need to decide what tools you have available. The most important thing is to choose a machine for the job, which should be large in size and have excellent power.
You shouldn’t pay attention to cheap machines, of course, a good machine will cost you 15 thousand, but this money will pay off quickly, and you will be left with an excellent mechanism with which you will do more than one useful thing. When purchasing a machine, be sure to choose the right methods for cooling the engine, as it heats up quickly
Ideally, for this reason, it is better to work on two machines, renting one. Proven in practice: the machine heats up faster than a person gets tired.
You shouldn’t strain yourself and choose a multifunctional machine, the main thing is that it saws and joints. The presence of aluminum parts has a bad effect on the appearance of the shalevka, since stripes from this metal remain on it.
The choice of material must also be approached with calculation. It is better to make the lining according to the size of the unedged board you have. Experienced craftsmen warn that you should not tackle a two-meter-long panel on your own - it is very difficult, and it is not profitable.
You can see how to make lining on the Internet, where you can choose a photo of the machine, the material, and see the stages of work.
Dimensions
Installation methods
Each subsequent lining board is inserted into the groove of the previous one, and a galvanized clamp is placed on the inner lip of the groove.
Assembling lining on the wall with your own hands is not difficult; it really resembles assembling a construction set (a board with a tenon is inserted into the groove of the previous one).
Let's make a convenient utility tool with our own hands. Let's take a piece of wood and cut a groove from it. With the help of such a device we will trim and join board after board. Insert the scrap into the lining, gently press it with your hand, and you’re done.
You can lightly tap on top to eliminate inconsistencies, but you need to do this very carefully so as not to split the board
Attaching to the sheathing varies in methods. If design is not that important, you can use nails with small heads.
The chaotic arrangement of these hats is not so striking. This is appropriate to do in those rooms where design does not play any role. The advantages of such a material as lining: sheathing can be done using a stapler, decorative nails, clamps, and self-tapping screws. One of the most common sheathing methods is to drive a screw into the groove of the board at a 45-degree angle, recessing the head.
After installation is complete, you can attach skirting boards for beauty.
When joining the next panel, the cap will be hidden.
The use of a stapler depends on the cross-section of the finishing board: the smaller it is, the more effective this method is. It is also better to drive the staples at an angle, making the fasteners invisible. When deciding to use clamps, keep in mind that they are not able to withstand a lot of weight, so the fastening should in no case occupy a large working surface.
Once you understand the finishing technology, choose the installation method and properly prepare the wood, sheathing the surface will be quite simple.
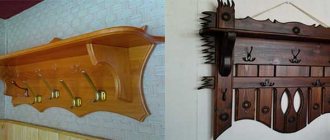
Decorative elements such as baseboards will help complete the interior.
Decorating your home with your own hands is a fun activity.
The paneling will look very cozy, be it in a nursery, living room, pantry or kitchen. Natural, eco-friendly material is appropriate everywhere: from walls to ceiling.
Construction and renovation
Basically, lining is divided into two types:
A – lining of a traditional “European” profile (tongue and groove), and B – “American” profile (overlapping). American is convenient for external cladding. It has a wider and thicker overlap, which better prevents flowing water from penetrating inside, but it is more difficult to join along the length due to the fastening features. The joining of the ends outside the fastening to the posts (sheathing) will not be so strong.
The European profile, on the contrary, can be built up almost anywhere by tightly compressing the ends of the joint boards in the grooves with the lower and upper boards. This allows you to use the material more efficiently, reducing the remaining trim to a minimum.
In our country, “European” type lining is widespread, and American type is less common.
Using eurolining as an example, we will look at the various subtleties and possible pitfalls of working with this material. In fact, the handling of such varieties as Imitation timber, Blockhouse, will be similar.
Selection of lining in the store.
Eurolining is usually sold in plastic packages of various lengths and is divided into three categories A, B, C. There is also a fourth category, “extra”. The difference in cost between the first three categories is negligible. Extra costs an order of magnitude more.
However, in practice, the manufacturer’s subjective factor prevails when sorting, and you must be prepared for the fact that having bought category A lining, you will find that it is roughly and often unevenly trimmed, its surface is rough, and the exact dimensions and number of knots do not correspond to the declared standard. This is normal, in fact, you are buying a “pig in a poke.” These defects can be explained by the level of conscientiousness of a particular work shift, the degree of sharpening of the cutting element in the equipment and many other factors. Very often, on the front side (if it is outward) of the first lining in the pack, the inscriptions from the label are clearly imprinted:
In fact, you bought 10% less lining - you can’t put such a board in a visible place!
In fact, specimens that are completely impossible to put into action are extremely rare.
More serious defects can be detected through the packaging if it is transparent. These are chips along the grooves and longitudinal cracks at the ends. They are usually clearly visible. Such packages should be set aside. It is also important to pay attention to the conditions in which the lining is stored, whether it has gotten wet in the rain. If you have a lot to buy, then it makes sense to make a “test purchase” and then take everything from one batch if the quality is good.
In my practice, there have been cases when, for example, one company’s category A at the beginning of summer was much better than that of its closest competitors, and at the end of summer, vice versa. It’s like with food, it’s either rotten or not very good or good - you look at it when you buy it. The brand and the manufacturer don’t rule here!
In addition to dividing the lining according to the quality of workmanship and wood defects, the lining differs in the type of wood itself. Standard lining is made from pine and spruce, and it is advisable to treat it with antiseptics. Lining made from aspen and linden is in demand for finishing paired rooms. It is even externally distinguished by a small number of knots and an even texture; it is much more expensive. Even more expensive is lining made from larch and other rare wood species.
Calculation of lining needs.
very roughly estimate the need for lining by the area to be sheathed, adjusted for scraps.
In reality, things are somewhat more complicated. It is necessary to take into account the actual dimensions of the planes that are to be sheathed, and combine this with the standard dimensions of the lining that is commercially available. By spending a little time on this, you can save a lot by reducing losses from scraps.
Let me give you an example.
Suppose you need to cover a wall 312 cm wide. Standard lining, 300 cm long, will be short. The next available size on the market is 400 cm. There are also 200, 210 and 270 cm. What and how much to buy? As one of the options for patterning a wall, we can offer the following diagram:
We buy 210 cm lining, based on the fact that we will still have to trim it to 209 cm, cut it in half, with trim to 103 cm. In total, we will have two rows covered with three boards. Two whole and one in half. For a run of ten rows (90cm), we need 15 boards or one and a half packs. In this case, the net waste for (subsequent heating of the stove) will be 5 cm by 420 cm, or a little more than 1%. True, depending on the number of rows in the remainder, a trim of 103-105 cm and an “extra” board may be necessary. But such single excesses can easily be added when covering the next wall or room.
When determining the need for lining and its dimensions for each wall, it is important to consider the sequence in which these walls should be This sequence is determined by the convenience of corner fastenings, depending on the individual characteristics of each specific corner. Here's an example:
In option A, when the wall W is sheathed first, and then N, it will be much more convenient for you to hammer in nails than in option B. All such cases must be thought out and taken into account in advance.
It is important to immediately decide which wall, and in what sequence, to begin covering correctly. It may happen that you will have to beat the room in the sequence of walls: 3-1-4-2 clockwise and nothing else, and the dimensions for each wall can differ up to 2 times the thickness of the lining.
Checking the base for the lining.
The basis to which the lining is nailed in a frame house is usually the racks of the frame itself. In most other cases, the basis will be a special sheathing. Already when installing the racks, this must be taken into account, especially if the frame and cladding will be made by different teams of builders. This shouldn't happen:
Practical advice on nailing lining.
Hammering nails...
The most common method of attaching lining is with special finishing nails. They come in different lengths. The longer the finish nail, the more likely it is to bend when driven. Therefore, it is not advisable to buy finishing nails longer than 50 mm. They bend easily and always at the wrong time.
If you need to strengthen the structure of a house using lining, then in some cases it makes sense to use ordinary galvanized nails of the same size with a head in key areas rather than long finishing nails.
Nail thin finishing nails correctly with a regular hammer (not a lightweight version), using short blows with a small swing amplitude. The swing is wrist! The hammer should be held in the middle of the handle. The combination of a relatively heavy hammer along with a short swing allows you to drive a nail much more accurately than using a light hammer, where you will inevitably try to increase the amplitude and force of the swing and miss out on the accuracy of the blow. The most important thing when driving finishing nails is to achieve consistently identical, monotonous strikes. The hammer grip is something like this:
If you feel that the nail has rested on a knot, then in most cases the knot will “break through” if you increase the frequency of impacts and reduce their amplitude. The more monotonous the hammer blows, the less likely it is to bend the nail.
The vector of the applied blow must go strictly along the nail being driven. If you break this rule, the nail will immediately begin to bend. If you notice this in a timely manner, the nail can be straightened by changing the direction of the blows:
As the nail straightens, the direction of the blows also changes. After several attempts, this technique easily becomes automatic. The finishing nails are thin and soft; in addition, they are not sharpened “in the center”, but simply cut into the rod diagonally. That's why they tend to bend all the time.
Dark spots - marks from hammer blows - also look very untidy If, before the final two or three blows of the hammer, you wipe its working surface at least on your pants, then there will be no stains. You can wipe the hammer on a board (pad).
In order to press the lining closer to each other, it is “knocked out”. So as not to spoil the work board. For padding, it is convenient to use an unusable piece of lining:
Also, you should not completely nail the lining the first time. Usually it is “finished off” when the next board is fitted on top (or below) and pre-fixed. If something goes wrong, you can return the situation back without loss of quality.
In recent years, clamps have become popular - special clips that work according to the following scheme:
First, the standard lining A , the clamps are inserted into the groove, pressed and finally screwed (you can use nails, but the meaning of the principle of disassembly of the structure itself is lost). Then board B and the operations are repeated. The clamps are selected to match the thickness of the lining.
The clamps allow you to work cleanly. Of course, this beauty costs more. I would not say that laying the lining on clamps is more difficult and takes longer. But I don’t use them myself for the following reasons:
Clippers are more expensive than finishing nails. Finishing nails do not spoil the appearance of the nailed lining at all; they are lost among the texture of the wood and knots. Finishing nails make the structure stronger: clamps use only a third of the total thickness of the board, then judge for yourself. Using the finishing nails, you can always later clarify where the racks are located under the sheathing if you need to hang a heavy shelf on the wall or something else for that matter.
And one more nuance. For the first time I saw how my neighbors' builders laid the lining in the room horizontally on clamps. I was surprised why their lining is turned upside down with the groove up and the tenon down? Moisture will accumulate. It turned out that laying the boards in a way that is convenient and natural for them - from the bottom up with clamps - is almost impossible. Correctly laying the lining can only be done by moving from the ceiling to the floor. Similarly, for a right-handed person, it will be very inconvenient to pull the wall from left to right.
Are we working by level or what?
When the walls and ceiling are perfect rectangles and the floor is perfectly horizontal, you can work by level. In real conditions, a wooden house on a light foundation rarely has similar characteristics. Minor errors may always occur. Therefore, before you start covering, you should carefully check the geometry of the wall and decide how you will monitor the correct fastening of the boards. I will give an example when, working strictly according to the level, having reached the ceiling, you can see the following picture:
In the first case (A), the forcing was driven from bottom to top, strictly according to the level, and upon reaching the top, they discovered that the ceiling had a slight slope. As a result, we only emphasized the curvature of the room. In the second case, we controlled the situation and reduced the difference millimeter by millimeter. As a result, an error of a couple of centimeters is not visually visible and the room seems to be of the correct shape.
In a situation where the plane does not have the shape of a regular rectangle, the base of which ideally coincides with the horizon line, the level will only get in the way. It is safer to use a regular staff with marked marks, or a meter-long (or better yet, a little longer) building level.
In this case, you work in a “local” coordinate system and strive to always focus on it and correspond to it. Control measurements for making amendments can be made through a row, two, from the floor, from the ceiling, or even from a control board that has already been correctly nailed.
Horizontal or vertical?
How to nail the lining horizontally or vertically? In practice this is already predetermined. And this is the most decisive factor.
It is stupid to make additional lathing in a frame house specifically to nail the lining vertically (of course, if you did not plan additional insulation). The horizontal arrangement of the lining inside and outside is the most reasonable solution for a frame house, based on the design features of the euro-lining itself. Possible options for timber and log houses.
In addition to the purely aesthetic preference of the owner, the following arguments can be made in favor of vertical or horizontal placement of the lining. The vertical arrangement gives the feeling of greater wall height, which can be advantageously used for interior spaces. That's a plus. But being in such a projection relative to the windows, the shadows at the joints turn out to be more contrasting - this is a minus that disappears under artificial lighting.
The penetration of moisture inside, especially over time, when the structure dries out, is more noticeable with vertically positioned boards. With external cladding, the need for a ventilation gap is more important in this case. In this position, the horizontal arrangement is somewhat advantageous.
The accumulation of moisture both outside and inside in a vertically located lining is much more uneven within the same board. This occurs both for the outer cladding, when drying out after rain, and for the inner cladding (the temperature difference between the floor and the ceiling is an uneven thermal effect).
Bottom up or top down?
Should I nail the paneling from bottom to top or top to bottom? By and large, this is not important. A matter of taste.
For most people, it is more convenient to sheathe the wall from the bottom up. This makes it easier to knock out boards and more convenient to do all operations. You can do the job alone, and even handle long boards with ease.
But there is a slight subtlety here. I will demonstrate it with a simple example:
Sheathing the gable from the inside under the roof. If you start from the top (option A), then there will be no problems. If you are upholstering from below, then it will not be easy to install the last board in place, unless you create a triangle from several boards as a whole (option B).
In this situation, working from the bottom up, you will have to constantly solve the problem of inserting a larger groove of the upper board onto the tenon of the lower board, which is shorter.
The “excessive” dimensions of the lining turn out to be much larger than it seems at first glance. This factor must be taken into account when cutting such planes that have a tapering cone. Otherwise there will be unsightly gaps.
To accurately mark the angle at which the lining should be trimmed when it rests on an inclined plane of a ceiling or wall, a very simple and precise technique is used:
Take a small piece of clapboard (B) and insert it into the groove of the board close to the bevel. Then another board (A) is taken and pressed against the sloping wall (ceiling) overlapping board B. A line is drawn. The exact template for the specific angle is ready. At the same time, do not forget to make allowances for the increase in size by recessing the lining into the groove during the final cut.
Any complex cutouts are marked in the same way. Mark and saw the imaginary end of the future large board using a small scrap as an example.
Attach the resulting trim to the place, and if you are satisfied with everything, you can make cuts in the finishing board using the existing template.
{jcomments on}
American lining
American lining
In cross-section it has a beveled quadrangle. The resulting structure is quite heavy, so it is installed only on the frame. Externally, the appearance of overlapping boards is created. American lining is installed in horizontal rows. Installation can be done from top to bottom or bottom to top. The main thing is that the thin edge of the lamella is at the top to prevent moisture from entering the lock. Softline literally translates from English as “soft line”. Just like the Shtil lining, it has rounded bevels. A distinctive feature is the presence of a wider tenon, due to which a distance is formed between the slats. In this way, Softline is similar to eurolining. The types Taiga, Land House, Volna and Finka have become less popular. They all differ from each other in profile cross-section.
Advantages and disadvantages
Probably the most important advantage of this building material is that its installation is quite simple and this work can be easily done with your own hands. You just need to carefully study all the nuances of the upcoming event, after which you can safely begin covering your house with clapboards.
If we consider each type of this building material separately, then we need to pay attention to the quality of the plastic product, such as the variety of colors. In addition, walls dressed in this outfit are quite easy to clean
However, significant disadvantages of this type of material are its instability to mechanical damage and low level of environmental friendliness. If you decide to decorate your bedroom or children's room with clapboard, this criterion cannot be ignored.
This photo shows building materials made of spruce and pine. These types of wood are used with low humidity.
Here you can see the walls, the cladding of which is made of linden and alder. This type of material can be used at a humidity of 100%.
This photo shows a house whose facade is covered with larch clapboard. It is suitable for use at 100% humidity.
Checking purchased panels
So, you have chosen the type and color of the lining, and calculated its quantity. We purchased it and delivered it home. What to do next? Now you need to lay out the panels on some flat surface and carefully examine them. The fact is that sellers often put several low-quality copies inside the package. But it’s better to check this point directly in the store.
How to dry clapboard and other lumber
Next, you need to pay attention to drying the lining (this only applies to wooden panels). Products made from MDF and PVC do not require this procedure. Drying is necessary to ensure that the boards do not become deformed. The procedure should last at least 14 days, but longer is possible. This rule should never be neglected.
Production process
At the beginning of production, you need to properly prepare the raw materials by making jointed blanks from untreated boards. You need to remove one side panel for now; to do this, mark a mark with a pencil, boldly draw a line on the side on the future lining and saw along the mark. Instead of a ruler, any long element with smooth edges will do, which is often a ready-made sample of shalevka (photo).
If this is your first time sawing, then these instructions are for you:
- We place the wooden part on the machine table, aiming to cut along the outlined line.
- We rest our torso on the end of the board. Pushing the future panel is done not with the hands, but with the body.
- Ideally, it is better to work together. One will serve the board, the other will receive it. Working together, you can monitor the entire cutting process: one watches the exit of the board so that it is located exactly in the grooves of the machine, the other looks after the material that moves directly during planing.
- So, following all safety rules, we saw off a certain number of boards on one side. It’s better to have more, because you won’t have to reconfigure the machine often. The main thing is not to get too carried away, as monotonous work can cause injuries.
Homemade machine
- When jointing with millimeter precision in width, you won’t get much, but you can achieve the same size by counting the number of passes along the cutter. It is difficult to repeat the same width of the board the next day, but experts advise leaving a piece of the finished part, using it for re-installing the ruler tomorrow.
- After our boards are sawn off on one side, we proceed to processing the second side. You will have to reconfigure the machine, setting the ruler to the required width. Using a ruler we will saw off the second side of the board.
- When sawing, scraps remain that will be used for connecting slats.
- After the boards have been processed on both sides, preparations begin for jointing the material. We reconfigure the mechanisms of the jointing machine - leveling long surfaces of wooden blanks.
- As before, we process and plan the board on one side for now. Sometimes the board may curl up - feel free to get rid of it, good material will not come out of such a sample.
The final stage
The final stage is the grooves in our boards. You can make the whole process easier by using a milling tool or a small sawing circle. We set the elements of the ruler, the planned depth of the groove, lowering or raising the table. And we begin to make grooves on each side of our board. After this processing, we will get a groove along the edge into which we will fasten each subsequent part of the shalevka.
As soon as our wonderful lining is ready, we begin processing the waste, making slats out of them with our own hands, which are simply sawn.
We can safely say that without special equipment it is not possible to make shalevka with your own hands. So, if you want to start producing shalevka yourself, learn to operate a machine.
The lining is laid unevenly
When laying, for fear of chipping the groove, in many cases slight distortions of the planks are left. This should not be done. The lining is laid as evenly as possible. Otherwise, the distortion will become more and more, and in the end everything will be laid unevenly.
If the boards are already laid skewed, then it’s worth looking for the one with which it started. Next, you need to remove all the lining laid after the uneven board. Then you need to place the board flat and attach everything again.
How to cut boards
Diagram of incorrect placement of the board on the sawing machine.
The workpiece is placed on the work table of the machine, and the disk must be positioned so that it strictly follows the marked line. During operation, it will no longer be possible to move the board, so all fastenings should be provided immediately. When the workpiece is positioned correctly on the work surface, you need to start cutting, but you can’t rush if you don’t have enough experience in such work. The cut must be carried out strictly along the marked line. During operation, you must ensure that the saw blade does not get caught in the wood, as this can lead to its breakage.
First, the workpieces are sawn off on one side only. The more of them are prepared, the faster the work will be organized in the future.
Care must be taken when cutting to avoid injury. Boards are processed on both sides
The entire mass of boards is processed in the same way.
Scheme of jointing boards.
They will be needed in the future for the installation of sheathing during the installation of the lining. This will avoid the financial costs of purchasing such material.
When all the workpieces are there, you need to reinstall the machine yourself to perform jointing. It will be possible to work only in one direction. The number of passes on the work table and the pressure applied should be the same throughout the entire jointing process. This is the only way to obtain the same thickness for the entire product. If this simple condition is not met, then fastening the boards during sheathing will be difficult, and the coating itself will turn out to be extremely unattractive.
When the boards are processed on all sides, you can make locking grooves. Wooden lining can have grooves of different shapes and depths, so even before starting work, you should consider the shape and dimensions of the grooves, and take into account exactly how the processing work will be carried out. To make grooves, you can use a saw wheel or a milling cutter. In this case, the circle must be placed with a slight distortion. In order for the grooves to be the same, the workpiece must constantly touch the ruler. Then all the holes will be symmetrical and even, installation will be simple. The depth must be carefully adjusted and it is recommended to constantly check the resulting dimensions so that the machine can be readjusted if necessary.
The last stage of manufacturing is not mandatory, but it allows you to give the board an aesthetic appearance. To do this, you can remove small chamfers from both sides; after installation, the surface will turn out beautiful and stylish. After the board is ready, it can be treated with special antiseptic agents. To ensure a smooth decorative surface, the finished boards must be sanded.
Lining is a material that has become widespread today in finishing premises for various purposes. This is a board processed in a special way; it is attached to the sheathing using staples, nails or clamps. It is quite possible to make such a lining with your own hands, but you must immediately be patient, since this work will take a lot of time.
Uneven sheathing
The boards are attached to the sheathing, that is, the supporting frame.
If the surface of the frame is uneven, the lining will also not attach smoothly. There will be distortions. If the surface of the frame is uneven, you should level it by checking it with a laser level.
The laths are leveled using bars that are placed under them.
The laths must be at the same certain distance from one another. The space between the battens is made by calculating the expected load. The distance is made such that the frame is even.
Brief technology
Installation of the board is very simple.
Even an inexperienced person can manipulate this material. An important point is the preparatory work. They include cleaning the surface from dirt and dust.
If the level of the walls varies greatly, you can slightly level the surface.
The next step is to install the sheathing. Both wooden beams and metal profiles are suitable for this. Using lathing, you can level out slight slopes of the wall. The lining will also help hide the unsightly appearance.
Finishing with clapboard inside the house requires the presence of an assistant. You can't do it alone. Attached with clamps. It is secured to each other by placing it in a groove.
Video - interior upholstery of a house (with insulation inside):
General recommendations
There are two main options for covering the surface with clapboard: adhesive and frame. The first requires a perfectly flat plane. Therefore, the preferred method is the construction of a sheathing. In addition, it allows you to create additional space for insulating the room.
The construction of the frame provides additional opportunities for insulating the room
To attach the lining to the wall you will need:
- Tool. In this case, you need to prepare: a drill with various attachments, a level (plumb bob), a hammer, pliers, an electric jigsaw or a hand saw.
- Slats for the frame. A solid wooden beam with a cross-section of 30*60 mm is ideal for this purpose. The substrates are immediately prepared. They are used to level racks.
On a note! If the surface has a significant slope, then setting up a wooden beam will be a rather complicated procedure. In this case, a metal profile is used.
- Fasteners: self-tapping screws, dowels, nails, clamps; if required, additional elements for the frame (suspensions).
You should know that before covering with clapboard, even if the frame method is used, preliminary preparation of the surface is required. The procedure is simple; the old decorative layer is removed, and all defects are well covered. Additionally, priming is carried out.