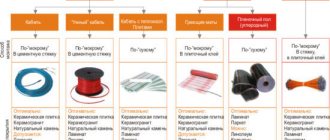
How to check a heated floor with a multimeter
How to check a heated floor with a multimeter? The photo and video below show a step-by-step check of a heated floor. We will also tell you how to “ring” an electric heated floor without a multimeter.
When purchasing electric heated floors (heated floors under tiles, heated floors in a screed), remember that the floor (heating cable, heating mat or thin heating cable) is connected to the network only after installation and the screed or tile adhesive has completely dried.
Infrared heated floors can be turned on immediately after installation.
It should be noted that complete hardening and drying of the cement-sand screed occurs within four weeks.
It is necessary to check the serviceability of purchased products at several stages.
How does a reflectometer work?
The reflectometer sends an electrical pulse into the cable connected to it. The pulse travels along the cable to the fault location, where it is reflected back to the reflectometer. In this case, the device measures the time it took for the pulse to reach the fault and return. The time value is converted into distance readings, which are displayed on the reflectometer display.
Setting up the reflectometer
To correctly recalculate the time it takes for a pulse to travel to the fault and back, and to increase the accuracy in measuring the distance to the fault, it is necessary to set the propagation coefficient corresponding to the type of heating cable that is to be diagnosed. For this:
- Completely turn off the power supply to the thermostat of the “Warm Floor” system and disconnect the heating system from it.
- Press the power button on the TS-90 OTDR; if using a Sidekick analyzer, switch the analyzer mode switch to the TDR position.
- Go to “Setup” mode
- Use the up/down keys to select the desired cable from the list.
- Connect the supplied alligator clips to the meter following the color coding indicated (black to black, red to red).
If the characteristics of the “Warm Floor” system cable are unknown, you can determine them yourself, for which you will need a similar cable of known length. For this:
- Attach one of the reflectometer test leads to one of the cores of a similar heating cable of known length.
- Attach another test cord to the metal sheath of the heating cable (the cable should not be connected anywhere)
- Adjust the propagation coefficient NVP so that the cable length displayed by the reflectometer matches the actual cable length.
If the device manual does not contain a cable with this distribution coefficient, you need to write it down. This will be useful in the future for diagnosing similar cables.
What does high power consumption mean?
If a comparison of values shows a high power consumption, this indicates that there are short circuits resulting from a violation of the integrity of the wire insulation. In this case, part of the floor will heat up very much, while the other will not work. In this mode, the entire system will not work for a long time, and a lot of electricity will be consumed, which, of course, is uneconomical.
Power of electric mats This problem can only be solved if it is possible to remove the finishing coating. If the cable was laid under a screed, this will not be possible.
Measuring resistance with a multimeter
When ceramic tiles are chosen as the floor covering, until the screed and tile adhesive are completely dry, the heating cable of the system must not be connected to the network. To make sure the device is working, you need to use a special device - check the heated floor with a multimeter:
- The device is set to resistance measurement mode and the limit is set to 2000 Ohms. Make sure you set up the multimeter correctly. To do this, you need to short-circuit its probes - zero should appear on the screen.
- Find the heating cable and measure the resistance between its cores. The result was 409 ohms.
- Compare the result obtained with the data specified in the device passport. It should be taken into account that the resistance of a heated floor may depend on the ambient temperature and cable length. The permissible error is considered to be a difference in measurements of 10-15%. In this case, the user manual indicates a resistance of 360 ohms. The difference between the measurement and the value written in the document was 14%, which is considered acceptable.
- The resistance of the insulating material is measured. Switch the multimeter to 2000 kOhm mode, and ring each cable core. The instrument readings should tend to unity, which confirms that there are no violations of the integrity of the heating element braid.
It is advisable to carry out a trial check at all stages of working with heated floors. When purchased in a store together with a sales consultant, then after installing the system, pouring the screed and laying ceramic tiles.
Breakdown options
If there is unevenness or lack of heating in the electric floor heating system, there are not many reasons for the breakdown.
Don’t panic, if during installation all the parameters for proper installation were followed, then most likely it won’t be difficult to get rid of the problem.
It is necessary to check the power supply to the system, the serviceability of the sensor and the integrity of the load cable system.
The simplest reasons for the lack of heating are failures in the settings or a breakdown of the thermostat.
| № | Possible reasons | What to do |
| 1 | No electricity in the network | Make sure the thermostat is working properly: the indicator light should be on |
| 2 | Settings are lost or changed | Check and restore settings |
| 3 | No mains voltage | Measure the voltage in the network by disconnecting the thermostat and connecting the device to terminals L and N; the value should be 220 V. |
Detecting a heated floor malfunction using an example
Since a heated floor must be connected through a thermostat with a remote temperature sensor, we will consider the connection diagram using the example of a thermostat for a heated floor RTC 85.26.
- We disconnect the voltage supplied to the thermostat from the network.
- We gain access to the rear panel of the thermostat.
We already know that the heating cable (cable floor) or heating film (infrared film floor) is a load and is connected to contacts No. 3 (N-zero) and No. 4 (L-phase load). — we measure the resistance, it must correspond to that stated in the passport *.
* If you have lost your passport, then you can calculate the resistance value using the formula R=U/P, knowing the voltage value is 220 Volts and the power, for example it is 1.2 kW, we find the resistance R=U*U/P=220*220/1200 =40.3 Ohm.
If you do not know the power of a heated floor, you can calculate its approximate value. Room area (m2) multiplied by 150W/m2).
For example: toilet room 6 m2 *150 W/m2 =900 W. Hence the resistance is 220/900 = 53.7 Ohms
In the case of using infrared film heated floors, you can check the resistance of each individual heating element. To do this, disconnect the wires (see connection diagram) and take resistance measurements. Compare the readings with the calculated values.
Note
- if the instrument reading is zero, this means that a short circuit has occurred in the system, more often it is a short circuit of the wires due to overheating (the cross-section is incorrectly calculated).
- if the instrument reading is infinity, then this means that a break (burnout) of the heating element has occurred in the system, most often in the coupling.
If the resistance measurements correspond to the data specified in the passport, then you can breathe a sigh of relief - the heating elements of the heated floor are in good working order!
This means the reason is in the thermostat, you will agree that checking and replacing it is much easier and cheaper, but this is discussed in a separate article, checking the functionality of the thermostat.
** heated floor, no matter what it is, cable, film, Chinese or according to the passport “made in Denmark”, but in fact in China - is a load.
The second way to check the performance of a heated floor
If you are far from electricians (i.e. you are strong in the field of philology or other sciences no less valuable to humanity) and did not understand anything from what you read, then you can check the serviceability of heated floors in a simple old-fashioned way: checking the functionality of a heated floor by connecting a heating element directly to the 220V voltage, bypassing the thermostat.
- Turn off the electricity (turn off the machine on the distribution panel)
- We connect the electric wire coming to contact No. 1 with the wire connected to contact No. 3, and the electric wire coming to contact No. 2 with the wire connected to contact No. 4. This means that we connected the heated floor directly to the panel, bypassing the thermostat.
We turn on the machine on the control panel for 30-40 minutes and wait for the floor to heat up. If the floor becomes warm, that's good. The heated floor works. This means the thermostat is faulty, but if even when connecting the heated floor directly, bypassing the thermostat, it does not heat up, then you need to look for the place where the wire burned out.
Attention. If you connected the heated floor directly and when you turn on the electricity, the machine knocks out, then there may be a short circuit or a malfunction of the machine, check the resistance of the heated floor, it should not go to zero.
Did you manage? FINE! you can go and receive a reward from your beloved.
If you can’t cope and have questions, it’s also not a problem, look at the QUESTION-ANSWER section or call the numbers listed on the website, we’ll figure it out together.
Where do leaks come from in the heating system?
The most common cause of leaks in metal pipes is corrosion. Steel, even treated with special coatings, rusts. Only the speed of the process differs. It depends on the operating conditions of each specific system.
Heating pipe rupture
Metal is affected by temperature changes, moisture, and water hammer. Impurities in the coolant may contain aggressive chemicals and abrasives that accelerate corrosion. The places where system elements rust most quickly begin to leak. As a rule, these are connections, joints, seams.
Polymer materials do not rust, but this does not mean that they do not leak. Sooner or later, metal-plastic pipes may leak. Most often this happens if they are chosen incorrectly. Some home owners save money and buy cold water pipes. This is a big mistake, because... leads to deformations and breakthroughs in the system.
Homeowners who choose low-quality products for heating often suffer. Cheap polymer pipes swell, burst, and leak. If this happens, you have to replace the damaged sections. Imaginary savings result in additional costs of money, effort and nerves.
Metal-plastic pipes, which are specially designed for heating systems, are least at risk of leaks. They are designed to withstand high coolant temperatures, do not deform and can last for several decades.
Metal-plastic pipe repair
How to check a heated floor: measuring the resistance of the heating cable and insulation
- font size decrease font size increase font size
- 1
- 2
- 3
- 4
- 5
As you know, the heating cable must not be turned on until the heated floor is installed and, moreover, until the screed or tile adhesive has completely dried. How to check the cable after purchasing, installing and laying the cable? After all, it is better to carry out such a check at all stages of arranging a heated floor, incl. in the store (resistance is usually measured and recorded by the seller), after installation, and also after grouting and laying tiles. It’s very simple - just measure the resistance of the heating cores, compare them with the certified values and check the cable insulation resistance.
For measurements we need a regular multimeter (pictured above). If you don’t have such a device on your household yet, we recommend purchasing it, because with its help you can not only check the heated floor, but also check the resistance of household wires, battery charge, etc.
So, let's switch the device to resistance measurement mode and set the limit to 2000 Ohms (see photo). If we connected everything correctly, it should show zero if we short-circuit the multimeter probes.
Let's take our heating cable or mat out of the box and measure the resistance between its cores - see photo.
For our mat the resistance value was 409 ohms. We compare it with the passport value specified in the user manual for the mat. The values may differ within 10-15%, because... The resistance depends, for example, on temperature, and the length of the cable may vary slightly from instance to instance. The certified value for our mat is 360 Ohm, the difference with the measured one was 14%, which is within the tolerance.
Now let's check the insulation resistance , to do this we measure the resistance between each core and the insulation. Let's switch the multimeter to 2000 kOhm mode. The value obtained on the screen should tend to unity, which will confirm the absence of damage to the insulation and braiding of the heating cable, although, generally speaking, it is better to carry out such a measurement with a specialized megohmmeter.
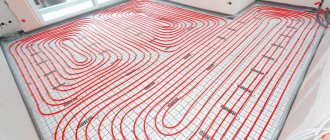
Cable designs and placement
According to the principle of operation, the cable can be:
- self-regulating;
- resistive.
Heated floor cable diagram.
The self-regulating cable in operating mode changes its resistance with temperature changes. The resistance value of a resistive cable does not depend on temperature. If the cable installation work is carried out in compliance with all requirements and recommendations, then the cable will not be damaged by temperature. The main requirement for cable laying is maintaining a certain length. If the cable turns out to be long during installation, it must not be shortened, as this will cause a change in current characteristics and heating, which will lead to destruction of the insulation. In practice, 2 types of heating cables are most often used:
- single two-wire;
- 2 single-core with parallel arrangement.
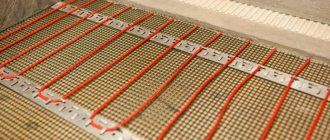
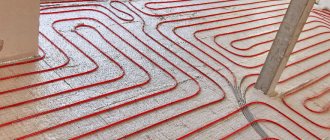
A single two-core cable is a mesh of wire, plugged on one side. Mount such a cable in a concrete screed. The selection of the mesh is carried out strictly according to the area of the room, free of plumbing and furniture, since it cannot be cut.
The parallel arrangement of 2 separate cable cores is also mounted in a screed, but differs from the previous cable in that its length can be changed without fear of insulation.
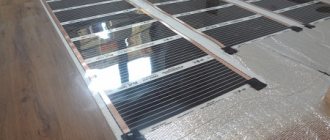
A film floor based on infrared heating differs from cable structures in that it is a chain of active resistances. The advantage of film is its small thickness and the possibility of use with almost all floor coverings. It is allowed to change the area of the film, but only according to special markings.
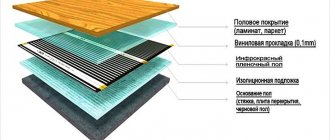
Basic working elements of a heated floor
To identify the cause of a heated floor malfunction, you need to know the main components of the system that can affect its operation. So, in general, an electric heated floor system consists of:
- thermostat,
- temperature sensor,
- and directly the heating element itself, which can be a heating cable, a heating mat (a cable fixed on a grid with a certain pitch), or an infrared film.
The functioning of the floor occurs as follows: a current passes through the heating element, after which heat is emitted. Temperature data is sensed by a special sensor, transmitting the received readings to the thermostat.
The job of the thermostat is to control and maintain the temperature: the desired temperature is set manually, and the thermostat activates/deactivates the heated floor system to establish the desired temperature. In order to check the serviceability of each of the elements of the overall underfloor heating system, there are a number of actions.
The first step is to determine the performance of the heated floor
The operation of a heated floor may be disrupted due to a malfunction in the heating element itself. To check its operation, you need to connect the floor to the network without a thermostat. After connecting, you need to wait a while and check whether all areas of the heated floor are heated. If the floor heats up evenly and no malfunctions are detected, it means that the floor heating thermostat or its sensor is not working.
Note! When a heated floor system operates from the network without a thermostat, heating is carried out at full power, and this significantly increases energy consumption, while heating must be kept under constant control - turn it on/off manually.
How to check the thermostat of a heated floor?
Checking the underfloor heating thermostat involves carrying out a series of simple sequential steps that will help identify the cause of the problem.
First, check if all the wires are located correctly. To do this, focus on their placement diagram.
Secondly, we check the voltage on the contacts. Set the thermostat to the minimum temperature setting, apply a voltage of 220V to the device, and use a special device (multimeter) to check the voltage values on contact No. 1 and contact No. 2. The voltage at these contacts should be the same as at the input, that is, 220V.
Thirdly, we check the serviceability of the relay and temperature sensor. We move the toggle switch to the “on” position, set the regulator to the maximum temperature value, and apply voltage (220V) to contacts No. 3 and No. 4. When carrying out all these actions, listen carefully: if clicks are constantly heard at this time, then the thermostat for the heated floor has broken down. But if there is no voltage on these contacts, then this indicates a breakdown of the temperature sensor. If you have a programmable thermostat, then information about sensor failure will be displayed on the display automatically.
Debugg
How to replace a heated floor sensor
If the results of testing the “warm floor” system showed that the cause of the malfunction is the temperature sensor, then it can be replaced with a new one, but only if the design of the thermostat itself allows this. But keep in mind that you need to purchase a sensor of the same type and with the same resistance as the previous one. Such a replacement will not hurt your pocket, since prices for temperature sensors range up to 600 rubles. If you need help in choosing the appropriate sensor for your thermostat, you can seek advice from our company’s specialists at the contacts indicated in the header of the site. Consultation is free.
How to replace a heated floor thermostat
If the cause of the malfunction lies in the fact that the floor heating thermostat has stopped working, then the best option is to purchase a new device.
The underfloor heating thermostat can be replaced with the universal models Terneo ST and Terneo Pro. These models are combined with various devices and heating systems and can operate according to established time modes, due to which you can significantly save on energy consumption.
You can also consider other models of thermostats from our Thermoregulators catalogue.
If you have difficulty choosing a thermostat model or don’t know which temperature sensor is suitable to replace a faulty one, our store’s specialists can always help you. To get professional free advice from our managers on all issues related to the “warm floor” system and its components, call us at the numbers indicated in the header of the site, write by e-mail, or contact an online consultant.
Functionality check upon purchase and after installation
The first check is carried out when purchasing the system. You need to ask the seller to demonstrate the operation of the device. If the attached documentation indicates the resistance values of the mats, it is advisable to check their actual values with a multimeter or tester. You can also check the insulation resistance. This can be done using a multimeter in high resistance mode, or a megohmmeter.
After installing the heating elements, before laying the tiles and before pouring the screed, you need to connect the electric heated floor to the power supply and observe its operation for a while in different modes. You should make sure that the thermostat, temperature sensor are working properly and that the heating cable is intact. With a working system, all sections of the cable should be heated evenly, the temperature of the heating elements should change in accordance with the setting of the thermostat.
If there is such a possibility, it is most convenient to check the uniformity of heating of the elements with a thermal imager, on the screen of which you can see whether each section of the floor is working or not. This device produces an image that is created by infrared rays, as shown in the photo below:
At this stage, if any malfunction is detected during testing, it is better not to look for the cause and not try to eliminate it. You need to take advantage of the warranty and replace the system.
Let's sum it up
A heated floor sensor is a device that, depending on the temperature of the coating, changes the degree of its heating. The main element of most such devices is a thermistor, which independently changes the resistance. This happens when the temperature rises or falls. The sensors are connected to the floor regulator. The wires leading to the device are placed in a special groove made in the wall. They are placed in solid corrugation. This makes it easier to replace a broken temperature sensor. Installation on a wall surface is also possible. Before installation or in case of incorrect operation, the device is checked with a multimeter. If its resistance differs from the nameplate, the device is changed. For more serious faults, call a specialist.
How to identify problems
The thermostat has an electronic display that shows the voltage; to check how it works, you need to:
- dismantle the device;
- use a multimeter to measure the voltage, setting the maximum floor temperature - the sensors should show 220 V;
- then the relay knob needs to be turned in the opposite direction - set the minimum temperature - the sensors should show no voltage.
Measuring the resistance of electric underfloor heating cables
Thus, you can check whether the relay and the thermostat itself are working.
To determine the health of the heating cable, it is necessary to measure its resistance. This is done using a multimeter as follows:
Calculation of laying heated floors
- the resistance value must be divided by the voltage - 220 V - you get the amount of current that passes through the system;
- the current value must be multiplied by the voltage (220V) - the power of the electric floor is obtained, which should not deviate from that declared by the manufacturer (specified in the system passport) by 5%.
If there are deviations, they indicate a malfunction of the heating elements.
Thermostat diagnostics
The thermostat is also checked using a multimeter. To make sure that this is the cause of the malfunction, you need to turn off the floor heating element itself. Next, the floor heating level regulator is turned to maximum. After this, the terminals without wires are diagnosed with a conventional multimeter. According to all the rules, in this case the relay is activated and the device shows the voltage level. When the regulator is set to the minimum heating level, the relay will turn off and the voltage will disappear.
Troubleshooting underfloor heating using the ringing method
You can ring the heated floor with a multimeter. To do this, you need to set it to the sound signal mode, which starts next to the scale of the built-in ohmmeter. As soon as the probes of the device touch each other, the specialist hears a sound.
This signal means a closed circuit. If the probe touches the conductors of heated floors, the sound becomes an intermittent buzzer.
The absence of sound indicates a faulty core, its tear. As soon as the floor ringing work is completed, the procedure is repeated with a temperature sensor. If the test results differ from those indicated in the passport, then the sensor is faulty and the system cannot fully operate.
Professionals with experience in installing heated floors strongly recommend not to skimp on materials and equipment, so as not to troubleshoot one of the structural elements.