Connecting an electric heated floor
Connection diagram for an electric heated floor
They are pieces of a heating cable of a fixed length, equipped with an installation wire for connecting to the network through a thermostat.
Such cables cannot be cut unless otherwise permitted by the manufacturer in the instructions.
Cable systems are laid in a layer of screed or in a layer of tile adhesive.
The power of the cable heated floor is selected based on the area that needs to be heated.
To do this, use the following relationships:
- At least 110-120 W/m², if the cable system is used as an additional one together with another heating system (for example, together with radiators).
- At least 150-160 W/m², if the cable will be used as the main heating system. In our climate, using heated floors as the main heating is risky due to the fact that they give off less heat than, for example, radiators. You might just start freezing in winter. In addition, if you use a cable as the main heating, then the cable laying area should be at least 70% of the heated area.
- To heat a loggia or winter garden, it is also worth taking at least 160 W/m². This is due to large heat losses through windows.
Cable system installation
As mentioned earlier, the cable can be laid either in a layer of tile adhesive or in a layer of screed.
Installation begins with preparing the surface, which must be cleaned, leveled and primed.
Heated floors can only be laid on a dry surface, that is, the screed and soil must remain “drying” for at least 21 days.
Installation in a screed and in a layer of glue is different, so we will consider these methods separately.
Film heated floor in a frame house. Typical user mistakes
Infrared heated floors in a frame-type private house are an indispensable system. Such heating will allow you to save significantly if you approach the installation process and further operation competently and professionally. Few people imagine how the installation and maintenance of heating should ideally proceed.
It's worth considering common mistakes to know how to avoid them:
- Selection of the heating element over the entire area. It is necessary to carry out calculations taking into account those places where the film will not be installed. Otherwise, you can stay in a cold house;
- Connecting the cable to the network if the screed or adhesive solution has not dried. Can have fatal consequences;
- You cannot walk in hard shoes on the film floor. There is a risk of damaging it;
- Do not leave “air pockets” around the warm part of the system. An error is made when installing an infrared floor in tile adhesive.
When installing a structure in a wooden house, you should be extremely careful, and the heating will work properly.
Helpful1Not Helpful
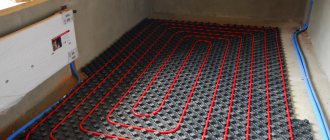
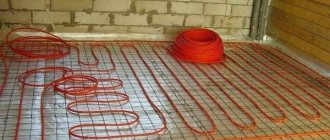
Laying electric heated floors in a screed
Scheme of laying a heated floor cable in a screed.
Installation of a heated floor in a screed is carried out in several stages:
- Laying thermal insulation on the base.
- Filling the thermal insulation with the first layer of screed 1-2 cm thick.
- Laying the heating cable in loops and installing a thermostat with a sensor to control the heated floor.
- Check for damage and system functionality.
- Filling the top layer of screed with a thickness of 3-5 cm.
A metal mounting tape is used to secure the cable to the tie.
The cable is attached to the tape in the places where the loops bend, that is, along the edges of the heated area, without sharp bends or tension.
Between the edges, pieces of mounting tape are laid in increments of 0.5 meters.
Laying is done in such a way that the installation cable is located close to the junction box.
After laying the cable on the floor, its resistance is checked, the results of which are recorded in the warranty card.
Resistance determines the integrity of the cable insulation.
The resistance parameters at which the cable is considered serviceable are indicated in the instruction manual.
It is also necessary to install a thermostat with a temperature sensor. This is done according to the following algorithm:
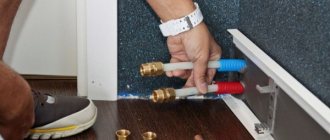
Installing the thermostat and connecting the cable
Connecting an electric floor heating thermostat
- Niches are made in the wall for installing a junction box and a thermostat, plus grooves for laying a temperature sensor and installation cable.
- To install the temperature sensor, a special corrugated tube is placed in the groove, one end of which is plugged, and the other is connected to the thermostat. The tube must extend from the wall at a distance of at least 60 cm, in addition, it must be laid between the cable loops. This is necessary for the temperature sensor to work correctly. The bend radius of the corrugated tube must be such that the sensor can be easily removed from it if it breaks.
- After all these manipulations, the groove along with the tube is filled with screed.
- The installation cable is connected to the network through a thermostat. The connection diagram is indicated in the passport. The groove also needs to be covered.
Step-by-step preparation of the base
Thermal insulation depends on the location of the room. If there is a heated room below, then sheet polystyrene foam 2 cm - 5 cm thick is suitable as a heat insulator. For a balcony or veranda you need an insulator 10 cm thick.
The underfloor heating is installed sequentially:
- dismantling the old floor covering involves cleaning the screed, thoroughly removing dust and all kinds of dirt;
- a layer of waterproofing is laid out in the form of a polyethylene film (you can use another material). The film must be placed on the walls to a height of 1 cm - 1.2 cm;
- A damper tape is attached to the wall around the perimeter of the base to compensate for expansion when heated. Excess insulating material and tape are cut off. Thermal insulation is installed to save thermal energy.
We recommend: How to install damper tape for underfloor heating?
A reinforcing mesh is placed on top of the insulation. To avoid the need for additional reinforcement, a plasticizer and microfiber are added to the screed solution.
Installation of electric heated floors under tiles
Laying an electric heated floor in a layer of adhesive
It is possible to install a cable floor heating system in a layer of tile adhesive.
The sequence of actions here will be as follows:
- The installation of a thermostat and distribution box is being prepared. That is, niches and grooves are made for the cables.
- The distribution box and corrugated hose for the temperature sensor are being installed. The end of the corrugated hose is tightly plugged to prevent tile adhesive from getting into it. After which it is necessary to check whether the sensor is removed from the hose, after which the groove is filled with a screed, and the place where the end of the hose is located is marked with a marker. This must be done so that the sensor does not accidentally end up “covered” by the cable.
- Re-clean the floor surface of debris. Then attach pieces of mounting tape to the floor to which the cable will be attached. The pieces of mounting tape are placed in the same way as when laying in a screed.
- Next, carefully attach the cable to the mounting tape. We do this in such a way that it is possible to connect the installation wire in the junction box. Do not forget that the temperature sensor must be placed between the cable loops when laid.
- We check the cable for resistance damage. Resistance parameters are described in the user manual.
- We connect the cable and thermostat. After this, we supply power for a short time and check the functionality.
- We lay a layer of tile adhesive 5-8 mm thick. and seal the grooves for the cables. We are waiting for the glue to dry.
- We lay the tiles on a new layer of glue. We are waiting for the glue to dry and you can use the heated floor.
Heating mat for heated floors
Heating mat for underfloor heating is a device
that consists of a heating cable that is attached to a mesh. They are sold in the form of rolls.
No mounting tape is required to secure the mat to the floor, making floor installation easier and faster.
In addition, you can make a warm floor over the old tiles.
The mats are installed directly into a layer of tile adhesive, the thickness of which should not exceed 5 mm.
Installation of heating mat
Installation of the heating mat is carried out in the same way as installation of a cable in a layer of tile adhesive (see above).
The thermostat is installed in the same way.
Types of heated floors
Before you make a warm floor with your own hands, you need to understand what types of heating systems there are and which ones are more suitable for a particular home.
The main advantages of heated floors:
- uniform heating of the room;
- comfort;
- complete autonomy.
The heat generated by these floors is effectively used to heat rooms. How to choose a heated floor for your home? There are different types of heated floors, so you can only determine which one is best by knowing all their pros and cons. Some of them are heated with hot water (water), while others are heated with electricity (electric). The latter are divided into 3 types:
- core;
- cable type;
- film
All floors have their advantages and disadvantages. So the advantages of water heated floors include:
- lack of air conversion, creating a more comfortable atmosphere in the house;
- relatively low heater temperature;
- absence of damp corners, which prevents the formation of fungus;
- normal indoor air humidity;
- ease of cleaning;
- self-regulation of heat transfer when temperature changes;
- efficiency, allowing you to reduce heating costs by 20–30%;
- lack of heating radiators;
- long service life (up to 50 years).
The only disadvantage of water floors is that they cannot be used in an apartment building from a central heating system and their installation in such buildings requires permission from the housing and communal services.
The advantages of electric heated floors include the same properties as water ones, but in addition they also have the ability to repair local faults and install without special equipment and permits.
Do-it-yourself warm floor
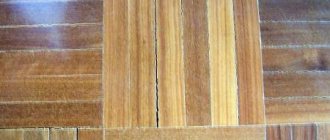
Many people wonder whether laminate flooring is suitable for underfloor heating? What materials are used for flooring? The disadvantages of such heating systems include:
- Limitation in choosing the type of flooring. This means that its heat transfer coefficient should not exceed 0.15 W/m2K. The following are suitable for decorative covering of such a floor: tiles, self-leveling floors, granite, marble, linoleum, laminate, carpet, which have a permitting marking. Thus, a heated floor under a carpet or under a carpet can only be installed in compliance with the above requirements.
- The need to raise the floor by 6–10 cm.
- Heating inertia for 3–5 hours.
- The use of furniture made of natural wood, since products made of MDF, chipboard, plastic, when constantly heated, can emit substances harmful to humans.
- Quite high financial costs for electricity when installing electric floors.
Taking into account all the above advantages and disadvantages of heated floors, it is preferable to install them in small rooms: in the bathroom, corridor, toilet, kitchen, bedroom, on an insulated balcony. Most often, craftsmen lay heated floors under the tiles. This is due to the good heat-conducting characteristics of ceramics. Water floors are more suitable for heating rooms around the clock.
Warm floors are divided into 2 types:
- Comfortable, slightly warming screed, guaranteeing a pleasant feeling when walking. Along with them, other heating systems are also used.
- Heating, when in addition to creating comfortable conditions they provide full heating.
For apartments in multi-storey buildings it is better to use electric heated floors, and in private houses - water. A warm water floor rarely produces a power density of more than 100 W/m2, so such heating should be used in well-insulated buildings.
It is better to entrust the calculation of a water heated floor or electrical system to specialists, since not everyone will be able to calculate all the necessary indicators in accordance with sanitary standards. Anyone can calculate how much a heated floor costs on their own using an online calculator.
Infrared film heated floor
Infrared film heated floor characteristics
This type of heated floors can be laid in a layer of tile adhesive, under laminate or under linoleum.
These floors are produced in the form of rolls, which can be cut into sections of the desired length.
Heating is carried out using infrared radiation.
This type of electric heated floor is the easiest to install, which distinguishes it from the cables and mats described above.
Installation of infrared film heated floor
How to lay infrared film heated floors
As mentioned above, infrared film heated floors can be installed under tiles, decorative stone, parquet or laminate.
To install such a warm floor, the following requirements exist:
- Level the floor surface to avoid film creases.
- It is necessary to make a groove for the temperature sensor and place it in the corrugation. If the film is laid under the tile, then the end of the corrugation must be hermetically sealed. Without this, it will not be possible to replace the sensor in the event of a breakdown.
- Using a crown of the appropriate diameter is necessary.
- When laying under laminate or parquet, foil thermal insulation made of foamed polyethylene must be laid under the film.
- The maximum length of a section of a heated floor should not exceed 7-8 meters.
- The heated film floor must be laid with a distance of 10 cm from the furniture standing on the floor. To do this, the installation site must be pre-marked.
- It is advisable to place strips of film along the long wall of the room. This will help reduce the number of streaks.
The inclusion and operation of such floors is no different from those described above.
Disadvantages of the system
In any business, with all the positive aspects, there are some disadvantages. Installation of heated floors is also not without its drawbacks:
- firstly, the cost of raw materials is high;
- secondly, electric heating is not suitable for parquet or floorboards due to the high temperature generated by the electric cable. Under the influence of heat, wood deforms;
- thirdly, an electromagnetic field is created around the electric cable.
Errors made during installation cause the risk of electric shock.
At the end of the work, you need to check the functioning of your device. You can identify flaws by turning on the heating system at full power and wait a while.
If no unpleasant odors appear or sparks sparkle, then testing shows a successful result. This means it’s time to start arranging the floor covering.
- Related Posts
- What materials are suitable for waterproofing underfloor heating?
- What is the difference between Unimat heated floor models?
- How to make a dry heated floor?
- How is carbon heated flooring installed?
- How to lay heated flooring under laminate on a wooden floor?
- What should be the height of the heated floor?
Safety requirements for electric heated floors
- It is prohibited to shorten the length of the heating part yourself.
- It is prohibited to use one section of heated floors for rooms with different types of coverage. In this case, each room should have a separate section with its own thermostat.
- As screed and tile adhesive, you can only use mixtures that are recommended for use with heated floors.
- It is forbidden to open heat-shrinkable sleeves at the junction of the heating and installation parts of heated floors
- It is prohibited to cover the installation areas of heating sections with carpets and place furniture without legs on them. This will impair heat dissipation from the cable and may cause a malfunction.
These requirements are most universal for different manufacturers of heating cables and mats.
For safe operation, be sure to read the instructions that come with the kit.