Advantages of a ventilated inspection pit
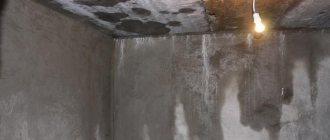
Despite the small dimensions of the inspection compartment, its constant drying and ventilation is very important. Moisture from the car often gets into it, therefore, condensation accumulates, destroying the walls. Because of this, the pit gradually reaches a state that is unsuitable for repair work.
Proper organization of ventilation will give positive results:
- Will bring the temperature back to normal.
- Normalizes the humidity level, which will have a good effect on the condition of the car, tools, and metal surfaces of the garage. In addition, dampness can create the preconditions for a short circuit in the electrical wiring of the pit lighting line.
- It will eliminate conditions favorable for the appearance of fungus, which can destroy even concrete and brick elements of both the room in general and the inspection pit in particular.
- It will prevent the accumulation of harmful fumes from fuel, paints and varnishes, machine oil, and technical fluids. This is important because Having reached a certain concentration, they can cause fire and poisoning.
From a pit in which ventilation is not provided, air saturated with moisture and various fumes will enter the room. This will have a negative impact on the health of the motorist.
The lack of air flow in the inspection compartment will lead to the fact that the car body will have to be overhauled in 2-3 years
Since the car enthusiast sometimes spends a lot of time in the inspection department, the air in it must be regularly updated.
Features of garage air exchange
Let's figure out why ventilation is needed in the garage and directly in the inspection pit. The fact is that only a ventilation system can effectively remove excess moisture from the garage. Sometimes even the presence of high-quality waterproofing does not eliminate dampness. This is especially noticeable in the cold season: with high humidity in winter, the car drives into a room with snow stuck to the wheel treads, which subsequently thaws and leads to the formation of dampness in the garage.
If the garage is equipped with a ventilation system, then excess moisture along with the air currents will be carried out into the exhaust pipe. Failure to use it leads to many problems that will not have the best effect on the condition and operation of the vehicle. The garage structure will be exposed to fungus and mold - staying in such conditions is unsafe not only for equipment (intensification of corrosion processes), but also for humans (the appearance of acute and chronic diseases).
Some car enthusiasts mistakenly believe that to safely park a vehicle, it is enough to ensure that the garage is dry, since the car is not standing in a hole, but above it. But, following the principle of communicating vessels, the moisture accumulating in the pit will spread throughout the garage.
In addition, it is necessary to monitor the condition of the pit so that puddles of chemicals with harmful fumes do not form in it. Long-term exposure to such an environment is fraught with health problems.
The most common air exchange system is natural ventilation. According to this scheme, air circulation is ensured by the difference in temperature indoors and outdoors. The popularity of the technique is due to the ease of installation. However, it has a significant drawback: in the summer, the temperature difference is weakly expressed, sometimes it can be even cooler in the garage than outside. All this can lead to a lack of ventilation.
Natural ventilation
To equip garages, it is better to use a combined system that involves installing a mechanical fan. Maximum efficiency is achieved through the use of a two-channel circuit. This ensures a constant flow of fresh air. And also, along with excess moisture from the garage and inspection pit, exhaust gases and chemical fumes will be removed.
In order to ensure proper and efficient operation, the ventilation of the inspection pit must be properly designed. First you need to determine the location of the holes for the air ducts (basement, walls, foundation)
It is important to consider the following factors:
- garage area;
- room height;
- number of vehicles.
If you hire professional craftsmen, they will be able to install the correct combined air exchange system. However, you can do it yourself
It is only important to decide on the route of air flow and the method of laying pipes (aboveground or underground)
Forced ventilation
It is worth considering that the efficiency of air exchange largely depends on the diameter of the inlet and outlet openings and the pipes used. It is advisable not to set them at random, but to make all the calculations in advance (especially since the formula is not at all complicated). For natural air exchange, it is necessary to use 15 mm of pipe diameter for each meter of the room.
With a mono-duct mechanical system, the total area of the duct openings must be at least 0.3% of the garage area.
As mentioned above, lack of ventilation has a negative impact on the garage building, the vehicle and the person. To effectively protect against harmful factors, it is necessary to take into account some features of the ventilation device in the garage:
- to ensure sufficient draft in the exhaust pipe, the hole for it is made at the highest point;
- a pipe of maximum height is used, and the distance from the exhaust pipe to the air entry point into the supply pipe must be more than 3 m;
- the outlet pipe must be protected from moisture getting inside - a special fungus is used for this;
- It is advisable to take into account the most frequent wind direction in order to position the hood in accordance with it.
The designs of some supply systems require the presence of a hole, which is made at the bottom of the garage door and is protected by a grille.
Air exchange directly in the garage
A mandatory structural element of the garage is an inspection pit or basement. Therefore, when constructing and equipping a facility, you need to think about ventilation not only for above-ground buildings, but also for the space that will be deepened into the ground.
And if the ventilation of the garage itself is quite easy to arrange, then creating an effective air circulation system for an inspection pit or basement will be more difficult. For an above-ground building, a simple natural supply and exhaust air exchange system is sufficient. Such ventilation is mounted using ventilation pipes, which are located at different heights. The supply line is located below and the exhaust line above. Due to the difference in temperature indoors and outdoors, a pressure imbalance will be created, which will contribute to the movement of air masses. Additional elements for such ventilation will be grilles, deflectors and plugs.
The gratings will protect the room from rodents and insects entering through the channel. They serve as a simple filter against contaminants. A deflector installed on the hood pipe will increase the movement of air flow. Plugs are needed to block the inflow or outflow of air.
To improve the microclimate parameters of the garage, natural ventilation can be supplemented with forced ventilation. To do this, it is necessary to install fans that will allow artificial air injection (supply or exhaust) if such a need arises.
Features of the ventilation system in the garage
Typically, car enthusiasts choose natural ventilation.
With such a system, the temperature difference between the outside and inside of the garage space ensures air circulation. Ventilation is often done on your own. But in the summer it will not work well, since in the warm season there is practically no temperature difference, and sometimes it is even cooler inside than outside. A combined system is more effective, in which air removal is optimized through the use of a mechanical fan.
Forced ventilation has maximum efficiency. A two-channel system is already needed here, since mechanical devices provide air inflow and outflow. But a constant flow of fresh air from the street is guaranteed, as well as a timely outflow of air from the inspection hole along with excess moisture, chemical evaporations and exhaust gases.
Procedure: what is important to consider
Let us dwell on the basic principles of operation when arranging ventilation for an inspection pit in a garage.
It is extremely important to correctly draw up a diagram of the entire ventilation system. The holes are precisely indicated: in the foundation, wall, base, where the air ducts will then be placed. The following facts must be taken into account in the project.
- Room area.
- Garage height.
- Number of cars.
Of course, professional craftsmen will definitely do the job correctly. But ordinary garage workers also often provide quite effective, reliable ventilation of the inspection pit. It is important to take into account the placement of pipes, underground or above ground, and try to create the optimal route for air flows.
You can also look at the arrangement diagram of the supply and exhaust ventilation system.
Optimal diameter of ventilation pipes
It turns out that a lot depends on the diameter of the pipes and ventilation holes. It’s better not to take arbitrary values, but to calculate everything exactly. When natural ventilation is provided in the garage pit, the calculation can be carried out as follows: for every meter of garage area there should be 15 mm of pipe diameter.
When single-channel mechanical ventilation is done, the total area of the ventilation openings should be equal to 0.3% of the area of the garage space.
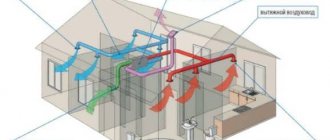
How to make ventilation in a garage with your own hands: 52 photos and useful diagrams
If your garage does not have a well-functioning ventilation system, you will have to forget about real comfort: the constant presence of harmful impurities in the air, coupled with the unhealthy smell of dampness, will reduce the pleasure of even the most spectacular and modern decoration to zero. That's why normalizing air flow is one of your main responsibilities. We’ll talk about how to do ventilation in a garage with high quality and in accordance with all the rules with your own hands. For clarity, there is a detailed process flow chart, diagrams and numerous photos that will help keep everything under control.
Do-it-yourself ventilation of the garage, vegetable and inspection pits: diagram, photo
When building a private house, you must immediately worry about installing garage ventilation, inspection pits and vegetable pits. And even if you have a regular garage for a car, make sure that there is ventilation in the room.
Common garage and pit layout
Ventilation in the garage is a must, this way you will protect your car from condensation and corrosion. Even if the garage is not heated, you should worry about installing ventilation. Usually, ventilating a garage with your own hands will not be difficult, as it is quite simple to do. Most often, car owners choose natural ventilation, which depends on the temperature difference; such garage ventilation is easy to do with your own hands.
Anyone who is doing everything for the first time and has never encountered such a design can look at a photo of the ventilation in the garage. There are also other methods, such as combined and mechanical.
A combined system combines natural air exchange and a fan (this can be seen in the photo of ventilation in the garage), and a mechanical one or two-channel system with special inflow and outflow settings.
The garage ventilation diagram is shown on the website, so you can easily understand how everything works. This garage ventilation diagram very clearly shows how air exchange occurs.
Types of ventilation for inspection pit
When installing ventilation in the inspection pit, as in other cases, they proceed from the laws of aerodynamics. Therefore, there are three options - natural, forced ventilation, and combined. The first method, due to the successful match between price and quality, is preferred by many car enthusiasts.
Air masses circulate due to the difference in pressure of air flows with different temperatures. At the same time, fresh air jets squeeze out the warm exhaust air. The circulation becomes more intense if the pressure drop, and therefore the thrust, increases.
During warm periods, natural ventilation does not work well. This is explained by a slight discrepancy between the air temperatures outside and inside. This circumstance makes us think about installing forced ventilation, although natural ventilation is often sufficient to dry such a small compartment.
SNiP number 21-01-99 stipulates that the air masses in the room must be renewed every hour. When the vehicle is brought into working condition, the indicator increases 4 times
Considering that for a garage the requirements for air exchange are increased, it is necessary to provide for the possibility of increasing the amount of supply air. Maximum efficiency can be achieved using a forced two-channel ventilation system.
In this way, both the optimal influx of fresh air masses through mechanical devices and the timely removal of contaminated ones will be ensured.
How to ensure ventilation of the inspection pit
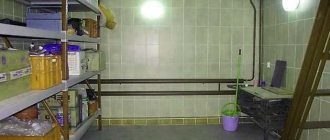
The presence of an inspection hole in the garage is an advantage for car owners, but with constant use, it is necessary to provide it with adequate ventilation. The correct microclimate in the inspection pit will help to qualitatively preserve metal tools and technical fluids in it. For a pit, natural exhaust equipment will be quite sufficient without installing fans in the exhaust duct. Supply and exhaust pipes are installed in opposite corners of the pit at a level of 10 cm from the top edge. The air ducts are equipped with steel grilles to protect against debris and small rodents.
Advice! In winter, it is recommended to cover the inspection hole with wooden boards to avoid increased condensation accumulation.
You should not neglect the ventilation system, both in the garage and in the cellar or inspection pit, otherwise this can lead to very unpleasant consequences. Also install a chimney if you use a stove. Each garage owner must take care of proper air exchange inside the building, having calculated in advance the required volume of air supply. This is the only way to ensure safe operation of the garage and vegetable cellar.
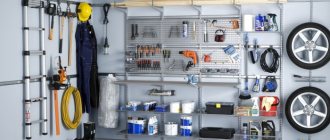
Every person who undertakes the construction of his own garage tries to ensure that its construction meets all needs. And very often, the requirements for a garage are not limited only to a place where you can park a car, but also a workshop for minor repairs and a utility room in the form of a cellar.
What can a lack of ventilation cause?
According to the requirements of SNiP, the ventilation of a vehicle storage room must ensure an air supply of at least 180 cubic meters per hour.
If there is insufficient ventilation, the following may occur:
- Dampness in the room.
The main purpose of ventilation in a garage is to remove excess moisture. In winter, the car enters the garage with a large amount of excess ballast, which can be: dirt, ice and snow. In a sealed room, all this “baggage” thaws, and the room is filled with moist vapor.
- Body corrosion.
Ventilation is designed to remove excess moisture; its operation allows you to quickly dry the outside of the car. In the absence of air flow, the car will be constantly exposed to water vapor, which in 2-3 years will lead to a major overhaul of the body.
- Negative impact on the entire structure of the structure.
The garage ventilation device protects the frame of the building itself from the negative effects of moisture. With prolonged exposure, water acts aggressively and destroys the material from which the garage is constructed.
- A large amount of exhaust gases are collected.
The outflow of air allows you to remove toxic exhaust gases, gasoline vapors and other chemical compounds from the garage.
Why do you need ventilation in the garage?
Experienced car enthusiasts will say without hesitation that ventilation in the garage is a must. Irrefutable proof of their correctness is the consequences of the influence of dampness on the metal:
- The appearance and further spread of fungus on the wooden parts of the garage;
- Spoilage of food stored in the basement;
- Destruction of electronics and metal from exposure to moisture.
If there is no ventilation in the garage, then toxic substances accumulate in the air, which can cause illness . According to standards, a complete replacement of the internal air volume of a garage should occur 6–10 times per day. And the supply of fresh air is 180 cubic meters for one hour.
What the ventilation system should do:
- Remove moisture from the garage that penetrates inside, draining from a driven car.
- Remove vapors and gases from the premises that may harm human health.
- After driving in snow or rain, dry the surface of the car.
- Prevent metal corrosion, as well as the development of fungus on room walls and wood products.
- Dry out the basement.
Rules and regulations
When installing ventilation in the garage, remember that there are SNiP standards that must be adhered to - otherwise the likelihood of getting a fine is higher than ever.
Study them carefully in section SNiP 21-02*99. Note that fresh air must be supplied in a volume of at least 180 liters per hour and the entire internal volume of the garage must be updated at least 6 times during the day.
Which one to choose for DIY installation?
The main criterion by which the type of ventilation is selected for a particular cellar under the garage is the area of the room.
- Owners of small garages (up to 50 square meters) who agree to periodically inspect and clean pipes can limit themselves to a natural ventilation system.
- If the basement is located under a large garage intended for parking large trucks and buses, it must be equipped with forced ventilation that provides air exchange using additional fans or other mechanical blowers.
The principle of constructing garage ventilation
In the usual “classic” version, the garage structure usually consists of:
- The garage itself
- Inspection pit (can sometimes serve as a cellar at the same time)
- Cellar for domestic needs
All of them, as a rule, are located below each other. Since all rooms communicate with each other, there is usually only one ventilation for the entire garage, consisting of an exhaust and air intake pipe. If you do not want to have wet walls and puddles on the floor, then it is important to take this issue seriously.
Usually the system is made without an additional fan in the pipe, which expels or forces air flows, but in some cases it can be installed.
Ventilation design and diagram
The easiest way to arrange ventilation for a garage with a pit and a basement is to make small holes in the wall of the building. They must be covered with a grill to protect them from the penetration of rodents and other animals. Such a system requires practically no financial and time costs. However, it is ineffective, especially for spaces below ground level.
A standard supply and exhaust system for an above-ground garage will not be able to provide the necessary conditions for a pit and cellar.
The most effective method is supply and exhaust ventilation of an autonomous type, which is done in addition to the existing air exchange for an above-ground building.
Scheme of natural type supply and exhaust ventilation for a basement or garage inspection pit:
- The supply and exhaust pipes should be located in opposite corners.
- The supply pipe should end at a level of 20-30 cm from the floor.
- The exhaust pipe is placed as close to the ceiling as possible (for the inspection hole to the cover).
- It is recommended to install the pipes as horizontally as possible.
- The outer end of the exhaust pipe must rise above the top point of the garage roof at a distance of at least 50 cm.
- The upper end of the inflow pipe is placed 5-15 cm above ground level. In winter, it is important to ensure that the inlet opening is clear of snow. Increasing the height is not recommended, as this reduces the circulation power.
- To increase the efficiency of air circulation, deflectors are installed on the pipes. In any case, the pipes must be protected from precipitation and dirt with a cap.
- The inflow pipe is complemented by a grille to protect against insects, rodents and other animals.
- Plugs can be provided on pipes in the room to limit or stop circulation if necessary.
- In areas with cold winters, pipes must be insulated to prevent freezing.
Calculation of air exchange system parameters
According to the documents regulating the garage ventilation system (SNiP 41-01-2003), at least 180-200 cubic liters of air must be supplied to such a building of standard size - for one car, with an inspection pit or basement - every 60 minutes.
To create an effective and useful ventilation system, it is necessary to make accurate calculations of several key parameters:
- Diameter of ventilation ducts (pipes).
- Channel laying length.
- The method of laying channels is external or internal.
- The need for insulation of channels and structural elements.
- Required fan power (if the system is forced).
When simply determining the diameter of pipes, the following ratio is used - for every square meter of room area you need 15 mm of diameter.
Video: effective ventilation device
It is worth watching and good instructions in video format. Here we are talking about installing a ventilation system for a garage cellar. The principle of organizing ventilation in the inspection pit will be similar.
It is very important to choose the best option so that good air exchange is constantly maintained. Many garage workers note that it is best to make a combined ventilation system: it is more reliable, more efficient and attractive due to its versatility. With it, a decent result is guaranteed at any time of the year.
Installation of inspection pit ventilation
Before installing the air exchange system, the following preparatory measures are carried out:
- development of a project and diagram with precise markings and dimensional characteristics;
- calculation of the quantity of necessary materials, purchase of items in the required quantity;
- preparation of tools and premises for work (clearing the work space from foreign objects).
Materials required for arranging the ventilation structure for “recessed” garage spaces:
- Plastic pipes with a diameter from 50 to 160 mm. The length is determined based on the height of the room and the distance to the exit point to the outside.
- Fittings - couplings, contours, elbows, plug.
- Fastening materials (clamps, screws, dowel-nails, etc.).
- Lattice.
- Deflector.
- Plugs or other devices for blocking pipes.
The sequence of actions when installing ventilation in a pit or basement:
- The places where holes need to be made are marked in the floor, walls and ceiling (depending on the planned locations on the diagram). Using a hammer drill, holes are made at these points. It is important to carefully calculate the dimensions so that the holes allow pipes of the selected diameter to be pulled through them. At the same time, the holes should not be too large, as this will complicate their subsequent accurate sealing and increase the consumption of materials.
- Pipes of the supply and exhaust lines are laid sequentially and secured with fastening materials. Here it is important to observe the dimensional parameters of the pipe location, which will allow you to create the desired draft.
- After laying the pipes, additional elements (grids, deflectors) are installed.
- The functionality of the system is checked.
- The joints between pipes and walls (ceiling, floor) are sealed. If necessary, open sections of pipes are insulated.
If you plan to install a fan, you should understand that the forced system must maintain natural ventilation capabilities.
A fan is a device that can break or turn off if there is no electricity. When switched off, a limited amount of air can pass through it.
In this case, you will need to use natural intake. In this regard, it is necessary to lay two ventilation lines in parallel or to provide the possibility of air passage at the fan installation site (the hole is made of a larger diameter or branched using fittings). This problem is not critical, since the fan can simply be removed.
Loading…
Organization of ventilation in the garage
To install a hood in a garage with your own hands, first of all, you need to properly prepare the pipes for the inflow and outflow of air. When arranging a garage system, it is possible to use metal, plastic or asbestos pipes. It is important to choose the right pipe diameter - at least 120-150 mm is recommended, depending on the size of the garage. For a standard room of 10 sq.m., 150 mm pipes will be sufficient. In addition to the channels you will need:
- Steel gratings;
- Exhaust fan;
- Bulgarian;
- Composition for sealing seams and joints;
- Hammer.
Stages of work
- First you need to arrange a homemade hood for natural air circulation;
- A calculation is made for the diameter of the exhaust and supply pipes. Holes are drilled for installing channels at a pre-marked level. The supply openings are usually located 15 cm from the base, and the exhaust openings are 10-15 cm below the ceiling. The exhaust pipe must be installed above the roof level to a height of at least 50 cm. The higher the pipe, the better for the exhaust - the system will work much more efficiently ;
- The gaps between the pipe and the wall are filled with sealant. A metal grill must be installed on the outer pipe to protect it from debris, birds and small animals. To prevent precipitation from getting inside the pipe, a small dome is installed;
- After completing the installation of a natural circulation system, the exhaust ducts are equipped with a fan. The supply channels will work naturally.
Advice! In order not to spoil the wall, supply holes can be made in the gate. In this case, the holes must be closed with a metal grill. The size of the supply opening should be 2-3 times larger than the exhaust opening.
Installing a deflector will help speed up the process of removing contaminated environments. If it is present, the pressure in the pipe decreases, which promotes faster removal of air. To protect the deflector from the formation of condensation, it is covered with thermal insulation.
Common mistakes
Although the installation process is quite simple, many people make mistakes, as a result of which the ventilation structure malfunctions, does not fully cope with condensate removal, or does not work at all. The most common errors occur, as a rule, at the installation stage:
- Using a simple hole in the wall instead of a channel. This decision can be especially harmful if the cellar contains vegetables: there is no guarantee that the air will ventilate from the room, and not, on the contrary, enter it, and if this happens in winter, the food will freeze and it will be impossible to eat it. The equipped channels must have a certain cross-section and elevation angle.
- If the ventilation system in the basement in the garage is made according to a natural pattern, it would be a mistake to install the pipes horizontally: in this case, the draft practically disappears, resuming only with external air movements. If it still seems advisable to install pipes in this direction, it is necessary to place them with a slight angle of inclination (up to 10-12 degrees). A completely horizontal design will only work if it is equipped with a forced air distillation device.
- If the outlet is too low, the thrust is greatly reduced. For this reason, it is recommended to install the pipe above the roof of the garage.
We organize ventilation of the garage cellar
As an example, let's take a 6 m long garage with a separate 2 x 3 m basement and an inspection pit. It is important to observe one condition here: the air of the garage and ditch should not penetrate inside the vegetable storage, as suggested by the diagrams of some online resources.
Recommendation. Lay separate ventilation ducts into the cellar that are not connected to other rooms.
How to properly vent a basement hood in a garage:
- Through the ceiling, lead 2 vertical air ducts into the underground storage - supply and exhaust.
- Lower the inflow pipe to a height of 10-20 cm above the floor, and bring the other end outside along the shortest path.
- The exhaust duct starts under the ceiling of the cellar, passes through the car box in transit and rises above the roof (height 1.5-2 m).
It is not allowed to place the overflow pipe from the inspection pit into the vegetable cellar; only fresh air must be supplied there
Advice. Be sure to insulate the transit section of the vertical pipe crossing the garage space. Otherwise, the heated and humid basement air will begin to release condensation from contact with the cold walls. You will not achieve the desired result - the removed moisture will drain back into the storage.
Install the air ducts from the same gray plastic pipes with rubber sealing rings in the sockets. An alternative option is asbestos cement, but it is more difficult to install due to its considerable weight and the lack of factory fittings.
The supply air duct is brought into the basement in two ways:
- pass the ventilation duct through the basement floor into the box, turn it with your knee and go out through the wall (height 200-500 mm from ground level);
- immediately go through the basement wall, turn upward and vertically bring the pipe out into the street through the blind area.
This is what the movement of air flows in the box and cellar looks like (top view)
The second option will be cheaper if you install the air duct during the construction process, when there is no blind area around the building. In a finished garage, it is better to implement the first method - carefully drill through the wall with the ceiling and install the supply ventilation duct with your own hands.
Do not forget to insulate the upper section that intersects the box, otherwise it will “sweat” from the outside. For an example of arranging complex garage ventilation, see the video:
Air exchange in the inspection hole
The ditch intended for inspecting the underbody of the car needs to be ventilated. The reason is moisture penetrating from the ground through brick or concrete walls, plus water flowing from the car. If the top of the pit is not covered with boards, the scheme described above will do; you won’t have to modify anything:
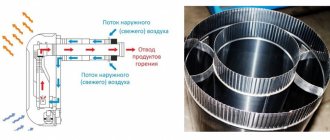
- Due to its greater density and weight, the cold flow tends to sink down, displacing warm air masses. Some of the air from the supply holes moves to the bottom of the ditch.
- Mixing with the internal air, the influx heats up and becomes lighter. It is pushed upward by the next portion of the cold air mixture.
- Once in the range of the hood, the air is carried away by the draft of the vertical channel and is discharged outside. The principle of operation of ventilation is illustrated in the diagram below.
The pit is successfully ventilated if it is not covered with boards
In practice, a different situation is more often observed: the pit is covered with boards, moisture is not removed from there and condensation falls on the inside of the boards. The wood is rotting, the iron corners of the ditch frame are being worn away by corrosion.
The correct solution to the problem is to lay an underground air duct of the required diameter under the screed, leading from the pit to the street. There are 2 options for ventilation in the pit:
- the pipe is connected to the supply wall opening and lowered to a height of 15-20 cm from the bottom of the ditch;
- a separate exhaust air duct is laid from a hole under the floor and rises vertically to the roof.
Installing a supply pipe into the hole is the most affordable way to arrange ventilation
In the first case, we supply fresh air directly into the ditch, in the second, we suck out moist air. The resulting convection flow will cause air masses to seep through the cracks between the boards. Both options work equally well. It is usually more convenient to organize an inflow - the pit is always located closer to the gates and inlets.
Note. Laying an additional air duct with a poured screed is not easy - you will have to chisel the concrete and dig a trench. It is easier to open the pit and dry the wooden panels in the summer. But at the stage of constructing a garage, it is better to develop and implement a design for ventilation systems in advance.
Plastic pipes for internal sewerage are the most practical solution for arranging natural air exchange in a repair pit. They are cheap and create minimal aerodynamic resistance to flow. Additional convenience is the use of ready-made elbows and tees.
The plan shows that with such a scheme it is necessary to use 2 supply grilles located on the facade of the building
Stove chimney as an element of the ventilation system
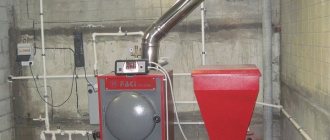
Since in winter many motorists heat their garages with wood and oil stoves, a number of points should be taken into account when organizing air exchange:
- A boiler or furnace requires air to burn fuel. The heater takes it directly from the room, so you need to take care of replenishment - ensure an influx from outside.
- A properly installed stove chimney is a good exhaust hood that works constantly, even when the flame in the firebox goes out.
- From the previous paragraph it follows: the chimney pipe easily replaces the ventilation duct, so there is no point in assembling a separate hood. One condition: after extinguishing the stove and leaving the box, fully open the damper - the draft regulator in order to improve air exchange.
The stove chimney, with the draft regulator open, is capable of removing a sufficient amount of air
Food for thought. Often, owners of garages and private houses are prejudiced against ventilation. Argument: together with the removed air mass, the building loses heat. We answer: the amount of losses directly depends on the inflow - how much air the grille lets in, how much air the hood releases to the street.
Conclusion: adjust the cross-section of the inlet openings with doors and gates. The ideal option is to install a supply wall valve.
Adjustable inlet valve built into the external wall