How to cover a wood-burning stove with brickwork
Here you will learn:
- Features of potbelly stoves
- Is it possible to line a potbelly stove with bricks?
- How to properly line a stove with bricks
A potbelly stove is one of the simplest stoves. By burning solid fuel in its interior, it provides heat to residential and non-residential premises. These ovens are divided into factory-made and home-made. Thanks to their simple design, they are easy to assemble with your own hands. In the future, it is recommended to cover the potbelly stove with bricks. This step will increase its effectiveness and protect users from burns. Get information about the lining in our review.
Finishing a potbelly stove with brick: tips and tricks – Working with Brick
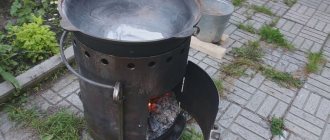
The potbelly stove is familiar to all summer residents. It is not profitable to buy expensive heating devices for change houses and country houses, but an old potbelly stove will cope with the task and will not ruin the owner. This stove does not require fuel, has a cooking surface and is small in size. In some cases, you can line the potbelly stove with bricks.
Potbelly stoves come in cast iron and metal. The first ones are, of course, more economical. The problem with all metal stoves is rapid heat transfer. As soon as all the fuel has burned out, the potbelly stove instantly cools down, and with it the heated room.
Fast heat transfer helps when you need to quickly warm up a room, but requires constant loading of fuel. The potbelly stove got its name for such “gluttony” - no matter how much fuel you put in, it’s not enough. To increase the efficiency of a potbelly stove, during the October Revolution the chimney pipe was lengthened.
Burning gases passing through a long pipe heated it, so the length of the chimney could be equal to the perimeter of the room.
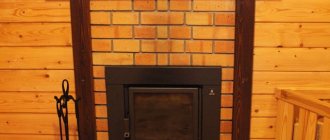
An easier way to retain some of the heat is to line the stove with bricks. The heat emanating from the stove heats the brick, and as it cools, it releases the accumulated heat. The brickwork will allow the stove to remain warm for a couple of hours after it has cooled down.
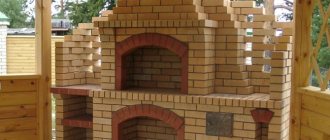
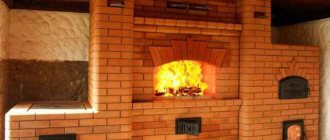
Covering a potbelly stove with bricks in this way not only increases efficiency, but also externally transforms a cheap stove. For greater beauty, you can use special heat-resistant tiles.
So a potbelly stove can become visually very attractive and resemble a Dutch or Swedish stove.
Cover example
How to cover a potbelly stove with bricks at the dacha
To heat a room in a country house or country house, a potbelly stove or fireplace is often used. A cast iron or metal stove is easy to manufacture, easy to maintain and affordable.
The furnace material - metal or cast iron - has both negative and positive properties.
So, while promoting rapid heating of the room, a metal stove, on the other hand, cools down quickly with the same “success”.
You can find a large number of videos on the Internet with instructions for lining a stove or fireplace, but we propose to consider this problem in detail in the article.
To begin with, let us list the main qualities that distinguish a potbelly stove with a lining from the original stove:
- The structure, made from brick with your own hands, allows you to retain heat inside for a long time, distributing it evenly throughout the room.
- After turning off, the stove will maintain a high temperature in the room for a long time, eliminating the need to reheat the cold house after the next turn on.
- The design of a brick-lined potbelly stove or fireplace is safe to use. as it relieves the owner from the possibility of getting burned when in contact with a hot metal body.
Selection of material and tools
You can cover a potbelly stove with a brick casing with your own hands and on your own. The main problem is the correct selection of the necessary tools and bricks of a certain quality.
For lining a potbelly stove or fireplace, classic bricks, clay stove bricks, are used. characterized by heat resistance qualities.
When exposed to high temperatures, such a brick will not undergo deformation, and, most importantly, will retain its performance properties.
The surface of the brick does not affect the functionality of the final structure. This can be a smooth solid ceramic brick or a brick with a textured surface.
For decorative aesthetic purposes, it is better to use textured brick. which will perfectly complement the interior of any room.
You cannot use brick with voids, as high temperature will lead to its destruction.
The entire arsenal of tools necessary for lining a stove and fireplace with bricks with your own hands includes. trowel, spatula, pick or rubber hammer, grinder, level, angle, plumb line and fishing line for laces.
Mortar for stove masonry
Unlike masonry walls, the furnace requires a mixture not of cement, but of clay, consisting of a certain ratio of sand, clay and water. In different places, clay has a different structure, so there is no ready-made proportion for this mixture; it has to be established experimentally, mixing clay and sand in different proportions, rolling balls and leaving them to dry completely at room temperature.
Those proportions of material whose balls are cracked are not suitable for masonry. The ideal version of the solution will be obtained from that version of the batch, the ball of which, when dropped on a concrete floor, will not crack. There is a simpler solution, if it is not possible to get clay - buy a ready-made oven mixture and dilute it, strictly following the recommendations on the packaging.
Brickwork
Before you start laying bricks, you need to make sure that the floor in the house can withstand such a load. If there is a solid foundation, then everything is fine, but placing a stove weighing more than 800 kg on a wooden floor is prohibited. If you doubt the stability of a wooden floor, it is better to remove some of the boards and pour an additional section of the foundation. In addition, it is important to place a sheet of asbestos on the floor, then a sheet of metal, and only on them begin to make even brickwork.
To avoid the ingress of coals from the potbelly stove, the sheet of metal and asbestos should protrude about 40 cm in front of the future stove.
Additionally, leave a gap of 50 cm between the wall and the firebox. Metal expands when heated, unlike brick. If you cover the metal body of the stove closely with bricks, it can crack and completely collapse, causing a fire in the house.
Do-it-yourself brick stove: diagrams and step-by-step instructions, manuals
Potbelly stoves are one of the most popular variations of heating units, with which you can quickly, inexpensively and efficiently heat a house, cottage or one room, such as a garage.
However, with all their advantages, such potbelly stoves also have one significant drawback, namely, they cool down quite quickly and do not accumulate the accumulated thermal energy very well.
You can cope with this problem in one very simple and proven way, namely, by covering a cast-iron or steel potbelly stove with bricks.
- Foundation and preparation of materials
- Laying a brick stove
a potbelly stove made of brick, as mentioned earlier, with its low cost and the possibility of quick and easy assembly with your own hands, has a number of advantages that it acquires if you line the firebox with brick:
- A potbelly stove lined with brick will not overheat too much, and its steel or cast iron walls will gain additional protection, so if you accidentally touch it, you are guaranteed not to get burned;
- A brick potbelly stove, unlike simple fireboxes not lined with such materials, will be more efficient; although it will take a little longer to heat up, it will accumulate thermal energy better;
- You can cover potbelly stoves with bricks if you previously wanted to build a full-fledged fireplace stove in your home, but you don’t have enough free space.
A potbelly stove made of brick with your own hands must be made in accordance with all the rules and according to prepared or individually created instructions, a drawing, and if you want to provide brick walls with faster heating, you can supplement them with several ventilation ducts. In order for the brick screen and firebox partitions of the potbelly stove not to overheat, it is necessary to place it at a short distance from the firebox, which will be about 100-200 millimeters.
Foundation and preparation of materials
In order for the brick base of the potbelly stove to be assembled in accordance with all the basic requirements and rules, you will need to acquire the following materials and tools:
- Trowel and hammer;
- Grinding machine and building level;
- Plumb;
- To assemble the walls themselves and the protective screen of the potbelly stove, only a special brick is used, which has a heat-resistant base, it is also called a stove brick.
In order to bond the bricks together, it is also necessary to first prepare a solution of clay and sand that is correct in composition and consistency.
You can fasten the bricks together using clay mortar according to the following scheme:
- The containers are filled with a solution of sand and clay, which will have different ratios;
- Now the mixture must be given 1-3 days until it dries completely;
- Each composition is checked for manufacturing quality; to do this, it is necessary to roll a cake from each container;
- After the cake has completely hardened, it must be thrown from a distance of about 1-1.5 meters and the good composition should not crumble.
Thus, although you will spend a lot of time and effort preparing the masonry mortar, you will ultimately be one hundred percent sure that such a mixture is of high quality and ideally suited for these purposes.
In most cases, the design of a potbelly stove also involves the assembly of an additional foundation, but this is done quite quickly, since such structures are characterized by a small total mass.
In order to build an additional foundation in the house for a potbelly stove, you need to dismantle the section of the floor on which your heating unit will be installed and lay a single layer of brick on it.
Also, as the first layer, experts recommend pouring the floor with concrete, and to improve the strength of such a structure, laying out waterproofing in several layers.
Laying a brick stove
In order for the masonry process to be carried out at the highest level and, in the end, such a structure to be perfectly smooth and accurate, it is necessary to use a pre-etched pattern or order.
Also, for the first row, as a rule, markings are made directly on the floor, after which it is checked against the drawings; now you need to lay the brick out dry.
Do not forget that the brickwork and the emerging walls of the potbelly stove should not be adjacent to the steel or cast iron firebox, as this will lead to overheating.
It is also necessary to correctly select the gap distance between the firebox and the brickwork, for example, if the distance is less than 30 millimeters, the walls will heat up very much; if you leave free space with a distance of more than 100 millimeters, the structure, on the contrary, will heat up weakly and not intensely.
In order for the masonry of the brick vault for the potbelly stove to ultimately be more reliable, stable and durable, it is necessary to first soak the brick in plain cold water. This is to ensure that all the air is expelled from the material and you end up needing less masonry mortar for adhesion, since it will not be absorbed as intensely into the wet brick.
Now, to further form a brick frame for a steel or cast iron stove, you must follow the so-called order or scheme, which is described in detail below:
- The first row of the brick vault is laid flat, the shape and dimensions are determined based on the dimensions of the potbelly stove firebox itself;
- Starting from the second row of brickwork, it is necessary to lay bricks not completely filling the space, but leaving several gaps the size of half a brick, which will act as ventilation holes;
- Each row is regularly checked for evenness using a building level;
- The third and fourth rows are formed completely, now it is important to eliminate the remains and excess mortar so that unevenness and roughness do not form on the internal and external walls. A rag slightly dampened with water is best suited for these purposes. It is important to remove all excess mortar regularly, approximately every 2-4 rows of laying, without waiting until it is completely dry;
- When performing masonry work and assembling a brick base for the steel stove of your potbelly stove, the front part must be left completely open - this is necessary so that the door can be easily opened and fuel can be periodically loaded into it and cleaned;
- You can use a metal corner as a bridge, after which the brick walls of the potbelly stove base must be completely wiped again with a rag soaked in water and the base allowed to dry completely for 2-3 days. Now all seams are again checked for integrity and tightness, if necessary, re-filled with masonry mortar, rubbed down and dried again. This procedure must be done until the brick structure for your potbelly stove becomes completely sealed.
Also, if necessary, experience, skill and a well-designed diagram, you can assemble a potbelly stove with your own hands entirely from brick, steel or cast iron; in this case, only the door itself or the hob, if provided for by the design, is made.
The upper part of the brick vault of a potbelly stove can have a different shape and design, everything depends entirely on your wishes and preferences, however, when designing the upper section of the heating unit, experts recommend taking into account a number of mandatory requirements in the work:
- In order for the upper part of the structure of a brick potbelly stove or its base to be as reliable as possible and subsequently accumulate thermal energy well, it is necessary to lay tiles made of asbestos cement, and as an alternative to this variation, you can use a panel made of glass magnesium;
- How and where exactly the chimney is located plays a big role. It can be completely covered with brick and thus be in a so-called protective and at the same time decorative box. You can also direct the chimney and bring it to the roof through the inside of the house, if free space allows you, or through the wall and then secure it to the external facade of the building.
In order for your brick foundation to be as stable and reliable as possible, you must remember to comply with the basic requirements and safety rules; you should also not lay the brick in such a way that it is located and displaced by more than half of the other bricks, since in this case the stability will be greatly affected and will be broken.
A potbelly stove with a brick base and frame is an excellent option for those who need a high-quality and complete source of heating for a home or a separate room, but do not have the opportunity, free space or large funds to build a full-fledged and massive brick fireplace stove with several fireboxes, oven and hob. The presence of a brick base will allow you to profitably accumulate all the accumulated thermal energy, rationally distribute it throughout all the nooks and crannies of the rooms, with minimal escape through the chimney. In turn, the chimney hood is also an integral element of any solid fuel heating unit, and it must also be mounted and installed in accordance with all existing fire safety standards and requirements.
A do-it-yourself brick potbelly stove does not have to be bulky and massive, since such a brick vault is not very heavy, and there is no need to install a massive and complex foundation for it. At the same time, the brick will extend the service life of such a structure, make it safer in operation and increase efficiency to 80 percent or more.
This video clip presents a detailed procedure or diagram for constructing a brick potbelly stove with your own hands, which you can build on your own:
Required Tools
To organize your work you need the simplest tools. If there is no electricity on the site, you can do without mixing with a drill and do everything by hand. To work you will need:
- Trowel for laying bricks and cleaning off excess mortar.
- Pickaxe for dividing bricks (if necessary).
- Plumb to maintain even vertical masonry.
- Water level for horizontal leveling.
- Container for solution.
- A shovel or drill with an attachment for mixing the solution.
- Joining, if desired, make neat seams.
- Sieve for sifting sand 1.5*1.5mm. Burlap is used for washing.
- An abrasive attachment for a drill for cleaning finished masonry from excess mortar.
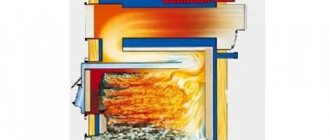
Brickwork
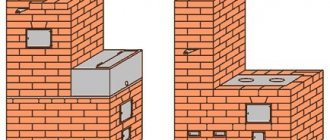
Image 2. Stages of bricklaying.
According to the markings, start laying the brick. Try laying the first row without mortar first, just to check the fit of the bricks and the possibility of somehow fitting them, sawing it if necessary. The entire first row is laid completely, while in the second row small holes should be made - 2 on each of the 4 sides, keeping to the size of half a brick. They will act as ventilation holes, which can be made in the shape of circles or polyhedrons to give your stove a beautiful and original appearance.
Why cover with bricks?
Potbelly stoves come in cast iron and metal. The first ones are, of course, more economical. The problem with all metal stoves is rapid heat transfer. As soon as all the fuel has burned out, the potbelly stove instantly cools down, and with it the heated room. Fast heat transfer helps when you need to quickly warm up a room, but requires constant loading of fuel. The potbelly stove got its name for such “gluttony” - no matter how much fuel you put in, it’s not enough. To increase the efficiency of a potbelly stove, during the October Revolution the chimney pipe was lengthened. Burning gases passing through a long pipe heated it, so the length of the chimney could be equal to the perimeter of the room.
An easier way to retain some of the heat is to line the stove with bricks. The heat emanating from the stove heats the brick, and as it cools, it releases the accumulated heat. The brickwork will allow the stove to remain warm for a couple of hours after it has cooled down. Covering a potbelly stove with bricks in this way not only increases efficiency, but also externally transforms a cheap stove. For greater beauty, you can use special heat-resistant tiles. So a potbelly stove can become visually very attractive and resemble a Dutch or Swedish stove.
Why cover a potbelly stove with bricks?
It’s not for nothing that metal and cast iron stoves are called “stoves”; they require constant loading of fuel, which significantly increases the consumption of firewood. But replacing a furnace is often too expensive. In this case, a good option would be to line the potbelly stove with bricks.
Brick is a material that retains heat well and does not cool down for a long time. If you cover the stove with brickwork, then all the heat from the stove will be received by the bricks, which will allow you to retain heat for several hours even after the fuel stops flowing.
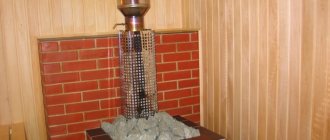
Brick covering increases safety. If you accidentally touch hot metal in a steam room, a burn cannot be avoided. Brick does not heat up to such high temperatures, so visiting the steam room will become safer.
How to cover a potbelly stove with bricks with your own hands? Tips and instructions | "Build a bathhouse Ru"
A potbelly stove is often used to heat a steam room. Cast iron or metal stoves are easy to maintain, easier to make than brick stoves, and quickly heat the room.
Despite their advantages, such stoves also have a drawback - they cool down quickly. Of course, while the fuel is burning, the stove heats up the steam room, but as soon as the wood runs out, it stops heating the room, and it quickly becomes cool.
What to do in this case? A simple option is to line the potbelly stove with bricks.
Why cover a potbelly stove with bricks?
It’s not for nothing that metal and cast iron stoves are called “stoves”; they require constant loading of fuel, which significantly increases the consumption of firewood. But replacing a furnace is often too expensive. In this case, a good option would be to line the potbelly stove with bricks.
Brick is a material that retains heat well and does not cool down for a long time. If you cover the stove with brickwork, then all the heat from the stove will be received by the bricks, which will allow you to retain heat for several hours even after the fuel stops flowing.
Brick covering increases safety. If you accidentally touch hot metal in a steam room, a burn cannot be avoided. Brick does not heat up to such high temperatures, so visiting the steam room will become safer.
Another advantage of brickwork is aesthetics. Often a potbelly stove cannot boast of aesthetics; many steel and cast iron stoves are inferior in appearance to brick stoves. The brick can be finished with tiles, creating the atmosphere of an old Russian bathhouse in the steam room, or, for example, with heat-resistant tiles.
What material should I choose to line the potbelly stove with brick?
Ordinary brick will not be suitable for these purposes. It is important to use a material that can withstand temperature changes.
A special oven brick is suitable for the work. It can withstand temperatures up to a thousand degrees. Is it possible to line a potbelly stove with ceramic bricks? Yes, such a brick is also suitable; it can withstand temperatures slightly lower, up to 800 degrees, which also meets the established requirements.
Please note that the brick must be solid, since voids under the influence of high temperatures will lead to the destruction of the brick.
As for the surface of the brick, it can be smooth or textured.
If according to the plan there is further finishing of the brick, then it is better to go with the smooth version, but if there is no additional coating, then textured brick will help complete the interior design.
Don't skimp on quality, choose the best brick! Low-quality brick may not withstand temperature changes or high humidity, reducing all efforts to cover the potbelly stove with brick to nothing.
How to cover a potbelly stove with bricks with your own hands? Instructions
The first step is to prepare the solution.
Step 1. Preparing the solution
The mortar, like the bricks themselves, must be heat-resistant. A simple option is to buy dry mixtures for laying stoves. To prepare the solution, you just need to add water and stir in the required proportions.
The advantages of this option are: time saving, no need to select the fat content of the clay and a guarantee that the masonry will be of high quality.
This option is preferable for those who do not want to waste extra time and are not confident in their abilities.
Wood-burning stoves for baths: their advantages over others
A more labor-intensive option is to prepare the solution yourself. To determine the required proportions, you need to take into account the fat content of the clay; the higher it is, the more sand you need.
How to find out the fat content of clay? You need to mix it with water until a dough-like mass is formed, roll into a ball and let dry.
When the ball dries, you need to squeeze it on both sides with wooden planks; if the clay crumbles, it means its fat content is low, if it cracks, it’s high.
To prepare the solution, you need to mix the clay with water; if the clay is oily, then the ratio should be 1:1, if dry - 1:2. Leave the mixture for a day. Next, you need to strain the clay and add sand to it to get a creamy mass.
You need to use only clean water without mechanical and chemical impurities. An increased content of mineral salts will lead to the formation of stains and streaks that will be difficult to remove.
In order to give the solution strength, you need to add 1 kg of cement per 10 kg of clay and 150 g of salt.
Before starting work, we recommend checking the quality of the prepared solution. This is easy to do: you need to connect several bricks with it and leave for 5-10 minutes. Next, take the top brick, if the bottom one does not fall off, the mortar is of high quality, and you can move on to the next step. If the bottom brick has fallen, then it is necessary to adjust the ratio of the added components.
Another option for assessing the quality of the solution: roll a sausage 20x1.5 cm and fold it into a ring. If small cracks appear, then the solution is suitable for brickwork; if there are no cracks, then it is too greasy and you need to add sand; if the cracks are too large, then, on the contrary, there is more sand in the mixture than necessary.
Of course, if the solution is greasy, then it can be easily laid in a light layer and does not form cracks, but when it dries it shrinks greatly, so this option is completely unsuitable for furnace work. An overly thin solution is also not suitable; it does not shrink, but when it dries it crumbles.
Step 2. Preliminary preparation of the furnace for operation
Before moving on to masonry, you need to make sure that the floor in the bathhouse can withstand such a load. Bricks, especially solid bricks, weigh quite a lot, so after laying the stove will begin to place a high load on the base.
A durable, reinforced concrete floor can withstand a load of up to 800 kg per square meter, any other floor - no more than 150 kg. If the stove weighs more than 800 kg, then an additional foundation will be needed.
Before covering the potbelly stove with bricks, you need to install it on a special reinforced base. To make it, you need to lay asbestos cardboard on the floor, cover it with a steel sheet, and lay the bricks in two dense rows.
If you plan to make a lining for an already built bathhouse and an installed stove, then the stove needs to be disconnected and moved away. If the floor is already old and damaged, then the best option is to cut out the logs and fill the base under the stove with a cement foundation, of course, if the bathhouse is on the first floor. Next, also lay asbestos cardboard, a sheet of metal and one row of bricks.
The steel sheet should protrude 30 cm beyond the masonry so that if coals fall out, a fire does not start.
Step 3. Covering the potbelly stove with bricks
The lining begins with marking and placing plumb lines.
There should be a gap of about 10-15 cm between the masonry and the room. An opening of about 3-5 cm must also be left between the masonry and the stove. These are fire safety requirements and a guarantee that the stove will not deteriorate.
When heated, metal expands more than brick; if they are made close together, then when heated there is a chance that the steel will destroy the masonry. The opening is also needed to ensure air convection.
For a potbelly stove, it is recommended to make a lining of half a brick - this will be enough to increase heat transfer, while the design will be less expensive and will not make the structure much heavier.
The first row must be made continuous; the layer of mortar should be no more than 5 mm thick. In the second row it is necessary to leave ventilation holes: on each side you need to make a gap of approximately half a brick.
The lining can be done in different ways: from all sides, from three or even two.
During the work process, it is important to remember that access to the potbelly stove must be free. To lay the doors, you need to install metal corners; it is important to leave space for access to the firebox door and ash pan.
It is imperative to use a level to check the evenness of the erected walls, since this directly affects the functionality and durability of the stove.
It is recommended to take a break every 3-4 rows to allow the solution to harden.
The top of the oven can be covered or left open. If you make a grate on the stove, it can be used for cooking.
When the lining is ready, you need to leave the oven for at least 2 days so that the masonry is completely dry. Afterwards, you can clean it with an abrasive material and soap and water to remove any drips of solution.
Further, if necessary, you can do the finishing.
It is necessary to put the furnace into operation gradually, making several preparatory fireboxes. Check if the oven is working correctly and if there are any problems. After making sure that everything is in order, you can begin to enjoy the bath procedures.
Knowing how to cover a potbelly stove with bricks, you can significantly improve the performance properties of a metal or steel plate. The lining also allows you to update the appearance of the stove, making it more neat and stylish.
Step by step lining
The first row is laid completely without gaps ; for more reliable adhesion, the bricks are moistened with water. In the second row it is necessary to provide ventilation holes : for this, two small gaps (the size of half a brick) are left on each of the four sides. All subsequent rows are laid without holes, maintaining the same thickness of the seams, which should not exceed 5 mm .
Finally, you need to clean all the seams, removing any remaining mortar, and you can clean the surface of the stove with a brush dipped in soap and water. To ensure strength, it is necessary to leave the structure for a day .
Thus, we looked at how to line an iron stove with bricks, and even without studying the video lessons on this topic, we found out that it is easy to do it yourself. However, watching the video instructions will also be useful.