Technical requirements
The stove for a mobile bath has a number of technical characteristics that determine its capabilities:
- Thermal power.
- Availability of a heater. Most often it does not happen. Instead, the body is lined with found cobblestones.
- Oven dimensions.
- Unit weight.
- The material from which the main elements are made.
The parameters are indicated in the technical data sheet. It can be found in a pack with a mobile camping stove.
Varieties
There are two types of stove equipment for hiking:
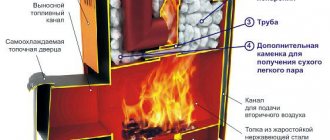
- “Poshekhonka” is a compact stove whose weight does not exceed 10 kg. The body is made of stainless steel sheets up to 0.08 cm thick. It is equipped with separate legs, a firebox door, and protective screens. Additionally, it has two 1.5 meter pipes for assembling the chimney. It has an air intake, with the help of which firewood can burn for about 6 hours after one stowage.
- “Bereg” - has a prefabricated heater that can hold up to 25 kg of stones. There is a special hole on the door of the combustion chamber, with which you can adjust the intensity of the air supply into the firebox. A special spark absorber is fixed on top of the firebox so that they do not damage the walls of the camping steam room. The total weight of the unit is 11 kg.
Some modifications of the “Bereg” design have a removable water tank with a capacity of 12 liters. The kit includes tubes for the pipeline and support legs.
Homemade sauna tent
Professional options are very convenient, but the price is not suitable for everyone. You can make a sauna tent with your own hands, spending no more than a couple of hundred rubles. It is enough to have a piece of tarpaulin and tape with you - everything else will be found on the ground.
Covering material
Polyethylene film will do. Don’t take a construction one, a covering one for greenhouses is suitable - it does not release toxins when heated. The film is fixed to the skeleton of the tent, gluing the seams with tape. It is advisable to make a two-layer tent to reduce heat loss.
It’s even better to use a tarpaulin instead of film - it’s fireproof. You will need a single piece measuring 6 by 6 meters - enough for a bathhouse for four people.
Frame
In addition to poles (8 pieces with a diameter of 300-400 mm and a length of 1 meter), the skeleton can be made from aluminum posts (from under an old tourist or retail awning) or from polypropylene pipes. We connect it in the form of a cube and fasten it with tape. The ends of the poles will need to be wrapped with the same tape so that they do not damage the coating.
After the frame is assembled, we stretch the tarpaulin on top. We leave the edges to lie freely on the ground, press them down with turf or stones - this is necessary to reduce heat loss. We position the entrance towards the water so that you can immediately take a dip.
Floor
We line the bottom of the tent with spruce branches: spruce branches not only insulate the feet from the cold, but also scent the air in the steam room. You can sit directly on it, or you can use folding chairs.
Heating part
There are different “recipes” for making them - from gas cylinders, from copper wire, from barbecues. But the simplest option is a heater made of cobblestones lined with firewood.
The stones need to be flat, ten centimeters in diameter - large ones will not warm up quickly, small ones will cool down immediately. Layered rocks cannot be used - they explode when heated.
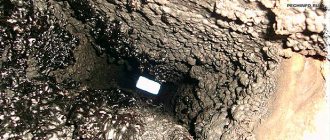
Before installing the sauna, firewood is collected. Dead wood with a diameter of 10-15 cm is suitable; it burns well. The stones are stacked on top of each other in a “well”, covered with dead wood on top and a fire is lit.
There are two ways to heat a camp sauna: “black” and “white”.
- Firebox “on white”. The awning and fire are laid out separately from each other at a safe (but not too large) distance. A recess is dug under the awning. When the boulders warm up, they need to be carefully but quickly moved under the tent. To do this, you can use, for example, a sapper shovel or a spear - dig a groove to a recess under the awning and roll hot stones over it.
- Firebox "black". The coals are removed from the burnt-out fire, and the tent-covered frame is installed directly above the hot stones. This sauna is hotter, but at the same time smoky. Pay close attention to the process of extinguishing the fire. Hot coals and fragments left behind can burn your feet, so you should not go under the awning barefoot.
Popular models and prices
In specialized stores for tourists you can find various models of camping stove equipment. Several models stand out among them:
- "Bannaya Shore". It is equipped with five pipes for chimney assembly, 50 cm long. Additionally, protective screens 0.5 mm thick are supplied. Without stones, the entire oven weighs 13 kg.
- Camping stove "Yarillo". A small but powerful stove with which you can heat a homemade steam room with a volume of up to 20 m3. The total weight of the structure is 9.5 kg.
- "Therma Sonita". A large camp stove with a heater located on top of the body. The kit includes a chimney. The total weight of the structure without stones is 19 kg. The peculiarity of this model is that it has a gate. It is needed to make the wood burn longer.
The average price of camping stoves is 14,000 rubles.
Option for building a mobile sauna from timber
The most reliable option is a mobile sauna made of timber. You can do it like this:
Stages of building a camp bathhouse on a solid wooden frame - an ideal low-budget option for a summer residence
But the simplest and most proven option is a strong and comfortable camping sauna with a stove. Its cost, including sewing and accessories, is three times cheaper than store-bought, which is also smaller in size. And the money raised can be spent on a good camp stove, quality stones and, of course, meat for barbecue.
The bathhouse made according to this project can accommodate 8 people - and there will still be a lot of space left due to the inflating of the bathhouse with hot air. And such a bathhouse can even be safely used as a quickly deployable rain shelter, which cannot be done with a store-bought version.
So, its width is 2 m, height – 2 m, length – 2.5 m, weight – 1.9 and dimensions when folded – 40x20x20 cm. And here is what you will need from materials:
- Slings 50 mm 0.5 m long and 25 mm 2 m long.
- 2.5 meters of 15 mm braid.
- Reznik (2 cm) – 2 meters.
- Lavsan or nylon threads - 1 spool.
- 7 mm zipper with two-way pawl, 2 meters.
- Polyester cord - 16 m.
So, all the pieces according to the pattern need to be sewn together with nylon threads with a double seam - first the wall parts, then the lower moulds, which are not sewn together at the corners. The last thing you need to do is attach the roof, zipper and connecting tape. To make guy loops, you need to double fold a 50 cm piece of sling with a 25 mm diameter and 12 cm of sling with a width of 5 cm - as shown in the diagram. A cord should be tied to the outermost loop, which will stretch and secure the bath tent.
Cutting fabric for making a camp bath
Now you need to make elastic loops - from a piece of elastic folded in half and sew them in the lower corners of the awning. In the resulting middle upper loop, when installing the bath, the upper ends of the columns will be inserted. In addition, the elastic bands themselves can be pulled directly onto the pegs, without even threading the posts through them.
All that remains is to sew a beautiful and comfortable cover for the new camping bathhouse, and you can go camping.
Manufacturing
There are several methods for making a homemade camp stove that have been tried by many people. A simple stone stove:
- Collect large boulders on the banks of a river or lake. Chop large dry firewood.
- Draw on the ground where the heater will be installed.
- Using a sapper shovel, dig out a layer of soil 20 cm deep. Make bevels along the edges of the hole inward.
- Lay dry firewood as the first layer, with stones on top. Repeat the steps until you get a multilayer pyramid.
- Light the first row of wood, gradually adjusting the stones so that they do not fall apart.
Gradually, the firewood will burn out, leaving hot boulders in place of the heater, which are suitable for creating steam.
To manufacture a more complex design, you will need to prepare tools and consumables. After this, you can begin manufacturing the equipment.
Preparation and drawing up of drawings
To accurately calculate the amount of materials, you need to prepare a drawing. To do this, on a sheet of paper you need to draw the oven as an assembly, the elements separately. Indicate exact dimensions and joint locations. In addition, you need to buy a special tent from which an impromptu steam room will be made.
Tools and materials
After creating the drawing, you need to prepare consumables and tools:
- stainless steel sheets up to 1 mm thick;
- reinforcement of different sections;
- hinged door;
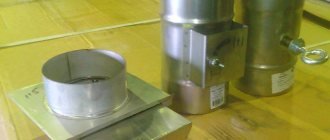
- tubes for chimney assembly;
- metal strips for making locks.
The tools you need are a welding machine and a grinder with discs.
Equipment manufacturing
Stages of assembling a camp stove:
- Cut out individual parts of the body from stainless steel sheets.
- In the front part, cut a hole for hanging the door.
- Make a hole on the back of the body to which the chimney pipes will be connected.
- Attach homemade locks to each part of the body, with the help of which you can assemble the structure in field conditions without tools.
It is especially recommended to cut out the legs from the reinforcement and prepare fastenings for them.
How to make a camp sauna tent
You need to start by choosing a place. You will need a flat piece of soil near a pond. It is better to arrange such a bathhouse on the banks of a river, stream or lake: it is good to plunge into cool water after the steam room, and you will need to wash somewhere.
Collecting materials
Then you will need to worry about finding frame material, firewood and stones. If you have a ready-made awning or an old canvas tent, there will be less hassle; if you don’t have anything like that, you can get by with a piece of plastic film. Its dimensions depend on the size of the tent you are going to set up. If a couple of people are going to steam, then a small structure is enough, but for 4-6 people you will need a piece of polyethylene 6 x 6 meters (the thicker the film, the better).
Poles for the frame can be found in the nearest forest or planting, and there you also need to find dead wood for the stove (or bring a couple of bags of coals with you). And one of the important activities is searching for stones, thanks to which you can take a steam bath. When they heat up, they accumulate heat and allow you to maintain the desired temperature in the steam room for some time. It is advisable to pick up stones on the banks of a river or lake. They must be homogeneous, smooth, without foreign particles and inclusions (mica sparkles, layers of quartz, etc.).
Bath stones can be picked up on the river bank
Important! When heated, layered stones can break into small pieces, causing serious wounds. The stones should not be very large, but not very small either. The most optimal size is 10-20 cm and a slightly elongated shape. If you take smaller stones, they will not accumulate much heat and will cool quickly, but large specimens will take a lot of time to warm up. Although, if you have enough time, you can also lay large stones as the basis for the hearth.
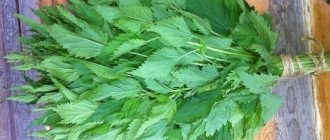
Don't forget to make a broom for the steam room. Fortunately, there are plenty of materials for it both in the forest and in the field. True, you can do this a little later, when the bulk of the work is done and you wait until the stones heat up.
Read how to make a stove for a camp sauna here.
Stages of making a camping sauna tent
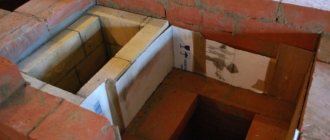
When all the materials have been collected, you can begin building the steam room. To do this, first of all, you build a hearth/fire/fireplace out of stones - whoever has the skill or desire to do it.
How to fold a stove for a sauna tent
One of the simplest options is to lay firewood and stones in layers, then light a fire. Then you just need to maintain intense combustion until the stones turn red or white (depending on the degree of heating and the type of stones).
When constructing a fireplace, you can use an iron sheet on which to lay stones
When the stove is folded and the fire is lit, you can begin to assemble the frame. If you have an iron frame from an old tent, that will work too. And if the height of the iron posts is not enough, and they are hollow (as is usually the case), then they can be extended with the same poles. So, you need four corner posts that need to be driven into the ground. From above, along the perimeter, you need to tie poles that will connect everything into one structure.
Making a frame around the hearth/fireplace/stove
It is advisable to tie a few more sticks on the roof - they will prevent sagging. If the tent turns out to be high, you need to add more strapping around the perimeter about halfway up the height (remember to leave room for entry by raising the strapping higher on one side). The poles can be secured with rope, wire, tape, etc. The main thing is that the design is sufficiently reliable.
Real tourist bath attendants have a ready-made frame for a camp bath in their arsenal. As a rule, such frames are made of light alloy tubes.
You can use a ready-made prefabricated frame for a sauna tent
After installing the frame, you can flood the heater. While the stones are heating up, start laying out the floor. The best option is to lay coniferous spruce branches on the bottom, and on top - the foliage of birch, oak, linden - any trees that are nearby.
We insulate the floor of a sauna tent using pine spruce branches
When the stones begin to heat up, set the water to heat, and while it is heating up, you can begin to pull the awning and secure it. Just until all the firewood has burned out, you cannot seal the tent hermetically - you can inhale smoke, or, what is much worse, carbon monoxide. You can leave either one of the sides or the roof open, depending on the design of the awning/film.
When all the firewood has burned out, the ash and coals are raked out and taken out of the tent, leaving only heated stones. Now you can seal everything hermetically. By the time you have sealed everything, the air in the camping steam room will have warmed up well. All you have to do is add steam by pouring water or brewed herbs onto the hot stones. The camp sauna tent is ready. You can steam!
If you use plastic film, the heat will not last long and you need to steam quickly. If a tarpaulin was used, then the heat should be enough for 3-5 full sessions, and this is almost a real bathhouse.
Exploitation
Rules for using a camp stove for a bath:
- Before assembling the structure, you need to prepare the base. To do this, you need to remove the top layer of soil and level the substrate. You can strengthen the base with stones or thick logs located along the edges of the structure.
- You need to ask the seller about the availability of screens that can protect the walls of an improvised steam room from thermal radiation.
Place 1-2 buckets of water next to the tent to put out the fire in an emergency.
People who love to hike can continue to hike no matter where they are. To do this, you need to buy a camp stove, an awning, and assemble a homemade steam room.