Photo of a sauna on the balcony (see below)
Here you will find projects on how to make a home mini sauna in apartment rooms: on the balcony, in the bathroom and closet. All master classes will be accompanied by step-by-step photos (step by step) for making them yourself. We will provide reviews by the author and attach interesting videos of the construction of Finnish saunas indoors.
The procedure for carrying out construction work
Making a sauna in the bathroom with your own hands will require a lot of effort and time. But the result, if all the work is done correctly, will exceed all expectations. When the project is drawn up and a construction permit is obtained, the necessary materials need to be purchased.
The walls that will separate the steam room from other rooms are assembled using frame technology. The ceiling should not be higher than 2 m. Otherwise, heating will require more energy resources. Thermal insulation must be used during construction work. It is best to use mineral wool in such conditions. Its thickness should be from 5 to 10 cm.
You also need to purchase vapor and waterproofing. The first of these materials will protect the insulation from getting wet. Waterproofing is used when arranging the floor. This is especially important if the sauna is installed in an apartment on the second or higher floors. The canvases will need to be laid without tension, fastening them with construction tape.
The decoration inside the cabin will look harmonious if lining is used for this. The sheathing should be 10-12 mm thick. The wood will need to be treated with an antiseptic and fire retardant. You also need to use heat-resistant varnish. This will significantly increase the life of the finish.
A sauna in a small bathroom will require a minimum amount of building materials. They are purchased with a small reserve in accordance with the prepared plan. There must be a distance of at least 2 cm between the film and the lining.
The outside of the frame can be covered with wood. But in the bathroom you will need to think through the design down to the smallest detail. Instead of finishing the external walls with clapboard, you can cover them with moisture-resistant plasterboard. Ceramic tiles are subsequently laid on it. You can choose any material used to decorate the walls in the bathroom.
Do-it-yourself steam room: work order
A sauna in the bathroom of your apartment will require a significant investment of money and time. You will have to seriously prepare for the work: purchase building materials, choose a high-quality and economical stove.
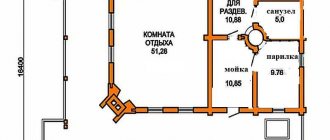
The decision to make a sauna according to an individual project will allow you to take into account the characteristics of your home and the wishes of family members.
Depending on the area, you can choose different sauna options
. Work order:
- The walls that will separate the sauna from the other part of the room are assembled following the example of creating frame partitions;
- In order for the heating process to be as fast as possible and energy costs to be reduced, it is not recommended to make the sauna ceiling at a height of more than two meters;
- Installation of thermal insulation is required, and the most suitable material is mineral wool 5-10 centimeters thick;
- To protect the insulation from moisture, a vapor barrier film is used. The canvases are laid overlapping without tension and secured with a construction stapler, the joints are taped;
- For wooden cladding of the interior of the sauna, clapboard or block house is used. The thickness of the skin should be 10-12 millimeters. The wood is treated with antiseptics (inorganic, organic or mixed) to increase its service life in rooms with high humidity, and then, if desired, coated with heat-resistant varnish;
- It is necessary to leave a ventilation gap of at least 2 cm between the vapor barrier film and the lining;
- The frame of the sauna is covered from the outside with the same wooden paneling. However, in order not to disturb the overall style of the room, you can cover the sauna with plasterboard and put on it ceramic tiles or other material that is used to decorate the walls of your bathroom.
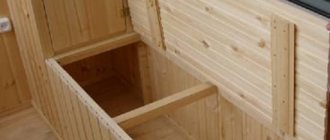
Stage 1 of work: frame assembly
Insulation with mineral wool slabs
The final stage is clapboard covering
Tips for choosing materials for heat and vapor barrier
Experts recommend using slabs rather than roll materials. They are much more convenient to work with, they are denser, keep their shape and do not move down. However, you cannot use foam boards or extruded polystyrene foam boards for a sauna; their operating temperature does not exceed 75 ° C. Also do not install glass wool insulation. Even if you properly seal the insulation, microscopic pieces of glass cannot be completely cleaned from the bathroom after renovation. The fragments can get into the skin, eyes or respiratory system.
It is recommended to use aluminum foil as a vapor barrier. The heat-reflecting effect of this material reduces the time required to warm up the steam room. However, the thickness of the foil is only 50 microns; you must work with it carefully, since the sheet breaks easily. It is more convenient to use a two-layer film based on craft paper; it is much stronger. There are also special insulation for saunas, one side of which is already covered with foil. They need to be installed with the metal side facing the inside of the room.
How to make a floor
Just like the walls and ceiling, the floor in the sauna also needs to be insulated. Mineral wool cannot be used for this purpose, as it compresses under load, and the floor will “walk” and the tiles will crack. The best option is extruded polystyrene foam, which is placed under a layer of concrete and tiles, where it is not exposed to high temperatures. The operating procedure is as follows:
- Lay insulation boards on the sauna floor, pre-cut to the required dimensions;
- Glue the joints, fill the gaps with foam;
- Fill the surface with floor screed solution;
- After the concrete has hardened, lay the ceramic tiles on the adhesive.
There is no need to install waterproofing under the sauna floor, since polystyrene foam does not allow water to pass through. Wooden gratings are placed on the passages to prevent slipping. In places where water drains into the sewer, a trap receiver with a siphon is installed.
Laying insulation boards
Shelves and benches
Beds or seats are made from hardwood. The resin contained in pine or spruce lumber appears on the surface of the boards when exposed to high heat. Sitting on a sticky bench is unpleasant, there is a risk of getting burned or hopelessly ruining bath towels or mats. Linden or aspen lumber is considered the best for arranging a sauna; such boards do not heat up too much.
Shelves usually have two tiers, the first at a height of 50-60 cm from the floor, and the second another 40 cm higher. So that you can not only lie down, but also sit, the upper shelf is made removable, foldable or narrower than the lower bench.
Sauna shelves and benches made of hardwood
Sauna door
In order for the room to warm up faster and stay warm longer, it must be closed. A transparent door will allow you to avoid installing a lamp in the sauna. However, you cannot use ordinary glass; it is better to purchase a ready-made door made of tempered glass that can withstand high temperatures and not deform. If you installed light in the sauna cabin, you can install a solid wooden door.
The width of the doorway should be at least 60 cm, so as not to create unnecessary obstacles to exiting the sauna.
Sauna door with heat-resistant glass
Also, for safety reasons, do not install locks from the inside. In addition, the door should open outward and not interfere with leaving the room. Avoid metal objects in the sauna interior: the handles on the door should be wooden, they will not burn your hands. It is also useful to protect the stove with handrails to prevent accidental touching of it due to the small size of the room.
If the size of the apartment bathroom is small, there is often not enough space to open the sauna door. Consider alternative options, such as installing a sliding door. When there is no room for it, a hinged one can be the ideal solution: two narrow panels open on the sides.
Ventilation required
A channel for air flow is made below, near the floor. It is best to place a hole with a diameter of 5-6 cm as close to the stove as possible. For air outflow, a second hole is needed in the upper part of the opposite wall of the cabin or on the ceiling of the sauna. The area of the exhaust duct should be at least twice as large, that is, about 9 cm in diameter. Such circulation saves heat: hot air entering the bathroom from the sauna warms this room too. And not cold, but warm air enters the steam room.
Scheme of natural low-efficiency ventilation
Particular attention should be paid to the ventilation of the bathroom if you have installed a sauna in it. The exhaust duct should go outside, if possible, or into a common ventilation riser for the house. It is useful to install an electric fan that turns on when a certain air temperature in the bathroom is reached.
Floor arrangement
When considering how to make a sauna in the bathroom, you need to pay attention to the floor technology. It will also need to be insulated (like the walls and ceiling). Mineral wool is not suitable for flooring. This material will compress under load. Therefore, it is necessary to use polystyrene foam for these purposes. It is covered with a 3 cm layer of screed, and then finished with tiles. In this case, the material will not be exposed to high temperatures.
First you need to completely remove the old flooring, right down to the ceiling. Sheets of expanded polystyrene are laid out on a surface cleared of construction debris. They are placed close to each other. Gaps and joints are filled with polyurethane foam. If you are installing a sauna in the bathroom of an apartment, you need to cover the floor with waterproofing before pouring the screed. Otherwise, you can ruin the decoration of your neighbors’ bathroom.
Next, a cement-sand mortar is prepared, to which it is advisable to add a plasticizer. The concrete must cure properly. To do this, cover it with film and periodically water the surface. This way the screed layer will not crack.
The drying process of the screed takes approximately 3-4 weeks. You cannot start finishing earlier. A few days after pouring the concrete, it will be possible to walk on it, as the top layer will become strong enough. Relief ceramic tiles should be laid on the floor. You can also use decking boards for these purposes.
When arranging the floor, it is necessary to provide for a drain. A slight slope of the floor is made in its direction. A drain is installed on the drain hole. Wooden gratings should be laid on the floor. This will protect you from injuries while using the sauna.