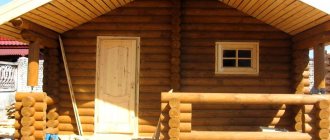
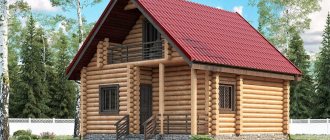
A 6 x 3 timber sauna is a classic version of a steam room on your own country plot. The bathhouse of this design is small and compact. This option is suitable for a family holiday or for a fun time with friends.
A sauna made of timber is durable and retains heat well; on a small terrace you can set up a relaxation area with a barbecue grill.
Living room 3 by 6: design and layout features
The design of a living room of 3x6 square meters largely determines the layout of the room: a rectangular, elongated shape requires a visual expansion of the space. Therefore, pieces of furniture should be placed both along the walls and perpendicular to them. Some elements, such as chairs, can be placed diagonally.
You should avoid placing furniture along one wall or piling elements in only one corner.
Light, pastel colors of the walls, wide curtains, and mirror elements will allow you to visually expand the space. Bring distant walls closer to or dark colors in the decoration.
For example, the farthest wall can be painted terracotta, while leaving the adjacent walls white: this will not only make the shape of the room more square, but will also become a stylish and fashionable element of decor.
The 3x6 living room, due to its shape, is ideal for organizing a relaxation area and a dining area in one room. A place to relax can be equipped with soft corners, a fireplace, and a home theater. The eating area should contain a dining table, chairs, and furniture for storing cutlery.
It is recommended to organize a dining area away from the entrance to the room: this way, guests will not need to go through the dining room in order to get to the recreation area.
Planning the greenhouse area according to Mittleider
Traditionally, the layout of beds in two and three rows is used. Both options are quite feasible in greenhouses with dimensions of 3 by 6 meters. We provided approximate calculations above. However, there is another known method, an innovative one - the method of Jacob Mittleider.
Scheme of a Mittleider greenhouse with three beds
When a greenhouse is planned according to Mitlider, crops are planted in beds 45 cm wide. This resembles the traditional option. However, it is recommended to make the widest possible paths between the beds. For example, a good passage width is 90 cm. This technique will ensure good air flow and sufficient illumination.
Layout of beds according to Mittleider.
The technique involves creating comfortable conditions for the gardener. It is recommended to plant plants in two narrow rows, leaving free soil between them. In this case, there will be a good air exchange, and the person will not have to reach far to the bushes to work.
Scheme for growing vegetables in box-beds according to Mittleider
The most original method is to place the beds on racks that are arranged in a spiral. Can be made from pipes that are used for communications and water supply. This method is ideal for growing low-growing crops, such as greens and strawberries.
Features of designing a living room combined with a kitchen
The kitchen-living room has many advantages: it is a comfortable, modern room that allows you to profitably expand the space. Organizing a kitchen-living room involves dividing the space into zones for preparing and eating food, places for comfortable communication and hanging out, and receiving guests.
Zoning can be implemented using:
- Colors. Designers advise using one color in different shades and with different saturations. For example, the kitchen may have bright orange furniture and textile elements, while the living room may have muted colors of caramel, toffee and cinnamon.
- Various textures. The principle of separation of different materials in the decoration of walls and floors is not only effective, but also practical. For example, easy-to-maintain tiles are ideal for the kitchen floor, and parquet is ideal for the living room, where a comfortable, warm floor is important.
- Lighting. Lighting fixtures of different sizes and intensities will help you create the right accents: in the living room it would be more appropriate to use soft wall or floor lighting, in the kitchen with a dining table - central chandeliers.
- Partitions. Bar counters are most often used as a delimiter. Such an element is both functional and decorative, allowing you to easily and effectively separate zones. In addition, roller shutter doors can be used as partitions.
Advice: if you are just planning to combine two rooms by remodeling, you should leave a fragment of the wall as an arch or decorative partition to solve the zoning problem.
Characteristics of bath material
A bathhouse can be built from various materials, but timber is the most preferable option. This is due to the following factors:
- Ease of installation.
- No shrinkage.
- Ability to retain heat.
- Unlike a log house, timber elements are laid on the foundation without preliminary assembly.
- Affordable price of the building.
There are 4 main types of bars:
Comparative table of characteristics of laminated veneer lumber and regular timber.
- non-profiled with a rectangular or square section;
- profiled solid;
- glued;
- LVL timber.
For the construction of a home sauna, the most acceptable is considered to be a profiled beam of a solid structure, which has precise dimensions and appropriate processing. This material ensures a tight fit between the wood, which facilitates installation and eliminates additional processing of the walls. The shrinkage of a building made from such material does not exceed 5%.
It is better to make the first crowns of the bathhouse from hardwood timber. This type of wood rots less in conditions of high humidity.
Starting from the 3rd crown, the log house can be built from coniferous wood: spruce or pine. The natural resins contained in this material help retain heat indoors.
The timber material is made in different sections: from 120 x 120 mm to 200 x 200 mm. But the most appropriate for building a house is considered to be timber with dimensions of 150 x 150 mm in longitudinal section. For internal partitions, timber 150 x 100 mm will be sufficient.
Before starting construction, the wood must be treated with antiseptic agents to prevent rotting and the appearance of insects. If there are no special antiseptic liquids, then motor oil can be an excellent alternative.
Methods for zoning a bedroom-living room
The layout and design of the bedroom-living room is a pressing issue for absolutely all owners of one-room apartments. After all, the only living room should include areas for recreation and leisure, and receiving guests.
The issue of organizing a full-fledged sleeping area is especially acute if residents, for example, for medical reasons, cannot sleep on functional folding sofas. In this case, a bedroom-living room with a bed is the only way out.
Expert opinion
Mikhailova Maria Vasilievna
Furniture store manager. Knows everything about comfort and interior design
Today, there are several universal ways to combine a common and individual area, even in a small room:
- Partitions. These are unique room zoning systems. The modern market for decorative elements offers a wide variety of stylish partitions made of glass, wood, and textiles. Shelves and high cabinets can be used as partitions. A literary wall for storing books is also suitable for these purposes.
- Curtains and carpets. A soft carpet under the bed in the sleeping area in tandem with a thick, transparent or fringed curtain will effectively and efficiently separate the relaxation area from the main one.
- Zoning with various materials for finishing walls and ceilings. The main thing here is to adhere to a single color scheme and style of the room. Ideas for such a design can be gleaned from photos on the Internet.
In addition, if the parameters of the apartment allow, the bed can be taken out onto a glazed and insulated balcony or loggia, or raised onto a specially designed second tier (suitable for apartments with high ceilings).
When organizing a living room-bedroom, it is important that the seating area is closed and located away from the entrance to the room.
The interior of the hall is 18 square meters. m: budget option for an ordinary apartment
Every person dreams of comfortable housing, where it will be cozy, spacious, and warm. But the apartments built in the second half of the 20th century pleased few people with a truly large area.
Hall design 18 sq. m.
- one of those tasks that often seem difficult within the confines of the most ordinary Khrushchev. But successful combinations of color, furniture and layout significantly change the idea of such apartments.
Choosing the right color for the hall
Design of a room of 18 square meters. m. is developed taking into account different parameters - geometry, number and placement of windows, features of functional areas in the living room. Often the big problem of halls in Khrushchev-era buildings and small apartments is the narrow shape of the room, which prevents sufficient natural light.
But this parameter also depends on the choice of color.
- To get the most illuminated, spacious room, you should decorate the room in light colors. On any area, even 18 sq. m. (in particular, in an apartment) it will be much lighter and more comfortable if you choose white, milky, ivory, pastel sand, beige as the main color. The white palette reflects the sun's rays to the greatest extent. For any sq. meters, the interior of the hall turns out to be sparkling and free.
- Many people tend to choose warmer colors in the interior - beige, sand, caramel, ivory, champagne, etc. They combine perfectly with a wide range of other shades.
- The pastel palette of all shades looks luxurious: the interior design of a hall with an area of 18 square meters. m will be more emotional and creative if you choose lilac, blue, turquoise, terracotta, coral in whitened, muted tones. Interior solutions can be both modern and retro, but if there is not enough space for all the ideas, it is better to devote 18 square meters to absolute functionality and impeccable comfort, rather than decorativeness.
The room in which we rest a lot and sometimes for quite a long time cannot be gloomy, flashily bright and annoying, or, conversely, excessively boring. It is important to find a balance here that will allow you to spend time here both actively and lazily, in company and in solitude.
Arrangement of beds in greenhouses 3 by 6
Typically, compact greenhouses 3x6 m are widely in demand in suburban and summer cottage areas. Here are the key features of such greenhouses.
- The greenhouse must be placed in an open place. It is important to organize a convenient approach to it.
- The beds usually run along the long sides, along the walls.
- For better and longer-lasting lighting, the long side should be facing west.
- It is important to create conditions for comfortable care of the beds. The height of the ridges relative to the path is usually a maximum of 40 cm.
- It is advisable to leave paths at least 45 cm wide. Only in such conditions is full-fledged effective work possible.
- It is better to make beds 60 or 90 cm long. Wider beds are used with paths on both sides, and when approaching from one side, beds 60 cm wide are suitable.
Optimal width of beds in a greenhouse
It is important! It is necessary to take care of the proper width of the paths. If they are too narrow, it is inconvenient to walk on them, there is no place to mark the necessary equipment, inventory, watering hoses, and the integrity of the beds will be constantly compromised. It is much more convenient to work with wide paths.
Greenhouse made of polycarbonate 3 by 6
Layout and zoning on 18 square meters
Traditionally, zoning of the hall is not required if all 18 square meters. m.
dedicated specifically to the guest area. In this case, there is a regular set of furniture - a sofa, a TV, perhaps cabinets or cabinets for storing personal belongings, books, CDs.
If there is not enough space in the remaining rooms of the apartment, then the living room can have wardrobes for clothes, built-in compartments, and chests of drawers. But still, quite often in the living room of an ordinary apartment it is necessary to equip both a bedroom and a dining room.
The layout of the hall can include different areas, and this is not necessarily a dining room: the living room can have a playroom for kids, a place for communication, for tea drinking or privacy.
When carrying out renovations in an apartment, you should take these features into account and select the minimum cost tools:
- When implementing an interior in a modern style, you can choose a clear graphic design of the hall, in which the division of zones does not require bulky or voluminous solutions . Here it is enough to choose different shades for each zone, and they can lie in the same range - gray or steel, beige, light blue and dark blue, light green and green.
- For living rooms with sleeping places, you can arrange a modern design with podiums and multi-level structures - for games, relaxation, reading, watching TV . Under the elevations you can “hide” a pull-out bed, storage space for toys and other accessories. If the height of the room is not enough for elevations, then you will have to use standard solutions - openwork or glass partitions for part of the opening, visual tint differences in decoration, etc.
- For a one-room apartment, the hall design can be implemented with niches, podiums and multi-level ceilings . Here you can make interesting use of both the bedroom and the nursery - you can hide the parent’s bed in a raised area, and on the podium you can arrange a playroom and sleeping area for a baby or even several children. If initially there are no niches for such a solution, they can be built specially. Although they “steal” space, it will be possible to implement several functional zones at once on a few square meters.
Expert opinion
Mikhailova Maria Vasilievna
Furniture store manager. Knows everything about comfort and interior design
When it is not possible to demolish walls in a panel house, the living room will have to be planned in a limited space. In many ways, the design of the hall in an 18 sq. m.
m. depends on the geometry of the room and the features of the building: in a square room it is easier to arrange an ordinary spacious living room with a small corner for privacy and relaxation, but in a long narrow living room, for example, 6 by 3 m.
there is room for both a new niche and a separate area - an office, a place to study or play.
Construction of foundation and walls
Before starting construction of a bathhouse, you need to mark the site. The construction area will be 6 x 3 m, which should be cleared. At this stage, it is necessary to provide for the location of the drainage pit. Next we move on to the foundation.
Of all the known types of foundation for a bathhouse, it is better to choose a strip foundation. This option is simple and quite suitable for such a light structure as a home sauna.
Making a foundation for a 6 x 3 bathhouse consists of the following steps:
- Digging a trench according to the marking of the site. The depth of the trench depends on the freezing of the soil. In average climatic conditions, this parameter is 1.2 m. The width of the trench should be 30-40 cm.
- A sand cushion 10 cm thick is poured into the bottom of the pit and compacted.
- Laying the reinforcement frame, rods with a diameter of 10 mm.
- Formwork installation.
- Pouring with concrete mixture.
Construction of sauna walls from timber.
The foundation should rise 15-20 cm above the ground. If wooden walls start immediately from the ground, then there is a high probability of rapid rotting of the material.
After a week of pouring concrete, the walls begin to be erected. But first, a layer of waterproofing must be laid on the concrete surface. For this, 2 layers of roofing material or treating the foundation with mastic are suitable.
Next, wooden slats 15 mm thick are laid on the waterproofing along the perimeter, and the space between them is filled with polyurethane foam. This is necessary so that the first crown can be conveniently attached to the foundation, as well as for additional waterproofing.
So, from the 150 x 150 beams, they begin laying the first crown. Before installation, the beams must be checked again for dimensional accuracy and treated with antiseptic impregnation. The evenness of the entire structure depends on the quality of laying the first crown.
The first crown is attached to mortgages. But many experts do not recommend using fastenings, but leave the structures in a free state, in anticipation of future shrinkage.
The remaining rows of the log house are laid on the first crown. Jute insulation is laid between the crowns of the bathhouse. It provides good thermal insulation, prevents the formation of cold bridges, and also prevents the formation of mold. Tow or flax are used as insulation.
The crowns are secured to each other with dowels. These fastenings allow you to preserve the structure of the house without twisting and drying out the beams. These hardware are 6 x 200 nails. The nails are driven in increments of 1 m to a depth of 25-30 cm.
Finishing materials for the hall
As a rule, furnishing a living room on a budget involves renovating the hall yourself, because it is through the work of craftsmen that you can save money.
For this reason, the choice of finishing materials is based on ease of use:
- The floor is covered with any available materials - linoleum, laminate, less often - boards and especially parquet.
- To decorate the walls, it is better to choose wallpaper, no matter what solutions are chosen for the living room in general . Gluing strips of any width is much easier than plastering and evenly painting vertical surfaces.
Among the entire range of wallpaper for halls, you can choose many options in a wide range of colors - both plain and patterned. In this case, the area does not play any role - at 18 square meters.
m. in the interior of the living room, you can use both large and small patterns, even a budget option can be anything - it is important to choose a harmonious pattern for the chosen style.
An interesting solution would be wallpaper for the living room with macro photography - a current trend that allows even the most modest room to use sophisticated techniques for arranging an elegant interior.
- When decorating walls and ceilings in an ordinary apartment within a small budget, you can choose the simplest paper coverings and paints . But many designers call two-level stretch ceilings the most practical solution today. Of course, it is difficult to install such canvases on your own, but this is perhaps the only surface where you will need help. Moreover, the suspended ceiling in the hall covers an area of 18 square meters. m. will turn out to be the most practical, wear-resistant and durable solution, no matter what design style is chosen.
Of course, you can find many options for decorating the living room and any adjacent rooms, but most of them are beyond the budget. For the comfort of the living room and its harmony, simple solutions in a discreet palette are used, this is how you can achieve organicity and elegance even in the most budget-friendly interior.
Furniture arrangement
Furnishing a traditional budget living room usually consists of choosing upholstered furniture, a TV and a cabinet underneath, cabinets for storing things and various items. Depending on the total area of the apartment, the number of cabinet structures can be minimal or, conversely, quite extensive.
Arrangement of furniture in a hall of 18 square meters. m, as a rule, is simple and clear - a sofa is almost in the center of the room, opposite it is a TV, at the end there are wardrobes.
But you can move away from the basic options and choose a more functional and comfortable one:
- The living room itself can be divided into a relaxation area and family time . Then, for example, a compact table and a couple of armchairs are placed near the window, then a sofa and a TV, and closer to the entrance - a playroom for children or cabinets for organizing storage space.
- How to furnish the most ordinary rectangular room ? 18 sq. m. can be represented by 6 by 3 with a three- or, conversely, six-meter side where the window is located. By the way, if the outer wall is 6 meters, there will most likely be two window openings. Then the amount of natural light increases, but the functional area for cabinets decreases.
- A square living room is most often arranged symmetrically - relative to the central axis, which can run diagonally or parallel to the walls . And here you will have to deal with the furniture issue - how to arrange the furniture - based on your own needs and the location of the windows. Between the openings there can also be a fireplace or its imitation - the design of a room with a fireplace will be even more elegant and expensive.
Rectangular hall
In the interior of a rectangular living room, it is easiest to use different design ideas, but usually it is here that you have the opportunity to furnish an 18-meter hall, as in the best design projects - elegantly, stylishly, comfortably. At the same time, an elongated and narrow room can become an ideal space for placing several zones - a dining room, a bedroom, an office, a children's room, and a playroom.
You can divide these eighteen meters quite simply - place a corner sofa not in a corner, but in the middle of the room, and the room will immediately receive several functional areas.
With access to the balcony
In a living room with a balcony, this difficulty arises - the doorway limits the space for placing furniture and especially for a corner sofa. Therefore, here you can put or hang a TV on the wall, arrange a corner for relaxation, a playroom (with safety for the baby).
In a budget room, the window sill can be extended with a table and a place for schoolchildren or students to study.
Basic principles for creating beds in a greenhouse
Now it’s time to consider the formation of beds in greenhouses with dimensions of 3 by 6 meters.
We focus on the cardinal directions
First of all, you need to remember the cardinal directions when planting beds with different crops. You can use boxes, racks, or make beds directly on the ground. In any case, the location of plants relative to the cardinal points will be of great importance. Plants should receive maximum heat and light, solar energy.
Optimal location of the greenhouse on the cardinal points
For accurate orientation, you will need a compass. It is best to place the beds in a direction from north to south. This is when the plants will be able to receive more sunlight throughout the day.
It is important to remember: regardless of the culture, type, dependence on heat and light, each plant must be placed in the beds, taking into account its maximum possible growth before harvesting. Under no circumstances should low-growing plants be in the shade of tall ones.
Low-growing plants in the greenhouse should not be in the shadow of tall ones
Plant height arrangement
Experts note: it is tall plants that need a special approach. Large growth and the presence of foliage determine significant shading of the bed. As a result, other plants may suffer from lack of heat and light. The optimal solution is to place tall plants along the “east-west” line. Then the lower tiers of leaves will be perfectly illuminated by the morning sunlight.
Tomatoes are planted in a greenhouse according to this scheme. On the north side there is a row of indeterminate tomatoes with a height of up to 2.5 meters.
Sometimes it happens that greenhouses have to be installed in uneven terrain. In this case, it is advisable to choose a slope with a southern exposure. Such a site should have a slope oriented to the south. Shelves and beds are placed across the slope. This is an ideal option because the maximum number of plants will be exposed to direct sunlight, since they will fall on the greenhouse at an angle.
It is important! You may encounter various interferences and problems when orienting yourself in accordance with the cardinal directions. If you cannot install the greenhouse properly, you have to choose the best possible option.
There are also pitfalls. For example, if the slope is southern, but there is shadow from the tree crowns, the best option would be to locate the greenhouse on a northern slope, but free from plantings.
We take into account the design features of the greenhouse
Design features also influence the order of planting in their own way. Here's what you need to take into account.
- For growing short trees and tall crops, a gable-type greenhouse is optimal. You can use the space as rationally as possible if you make a bed directly in the center, under the ridge, that is, in the place where the ceiling is highest. Then the tallest crops can be planted there.
Gable greenhouse 3 by 6 meters
Advice! Experts and experienced gardeners note that you cannot save on passes. The paths must be comfortable. The optimal minimum is 40 cm. Have you decided to use a wheelbarrow? Then it is better to leave an 80 cm passage in the center, and plant the plants on the sides in two beds.
Lighting: which chandelier and lamps to choose for an 18-meter hall
To choose a chandelier for a hall of 18 square meters. m, it should be taken into account that here you will need different “scenarios” for relaxation and pastime. In addition, it is necessary to ensure a sufficient level of illumination at any time of the day.
When choosing a chandelier for such a room, pay attention to:
- Depending on the number of light bulbs, you can and should choose a model in which you can use several of them separately.
- Considering the massiveness of the lamp - you should not choose bulky products that will take up space.
- Regarding the transparency of the lampshades - it is advisable to find transparent or simply frame models that match the style so that the chandelier is visually light.
The central lamp must be supplemented with floor lamps, sconces or spotlights in a multi-level ceiling.
Decor
Budget arrangement of the living room does not exclude the use of decorative elements that are necessary both for harmony in the interior and for comfort. It is best to choose wall decorations - paintings or photos, use lamps as decor and sofa cushions.
In this case, such elements will not make the atmosphere oversaturated, but will simply pleasantly dilute the functional solutions.
Making the best beds in a 3 by 6 greenhouse
It's time to look at the step-by-step instructions for arranging beds in a greenhouse. It is important to ensure maximum efficiency and create the best conditions for plants.
You will need fertile soil. The soil is prepared specially or purchased ready-made. In addition, you need to stock up on boards, sawdust or straw. You will also need manure as the main fertilizing layer. We act according to the algorithm.
Step 1. First, a trench is dug at the site of the bed.
First you need to dig a trench
Step 2. Then you need to install a fence - formwork made of wooden boards.
Options for fastening boards in wooden fences for beds and flower beds
An example of a wooden fence for garden beds
Step 3. Then pour out a layer of straw or sawdust. Its thickness should be 10-15 cm.
Step 4. Then comes the turn of manure. You need to take manure, which is already beginning to rot. The layer is made compacted. Height – 20 cm.
Use manure that has already begun to rot
Step 5. The created pillow is poured with boiling water to soak the manure and the bottom layer. After this, the beds should be left alone for two days.
The beds are filled with manure, now they need to be watered with boiling water
Step 6. Next, you can add a layer of fertile soil and peat. It should have a height of 30 cm.
The beds are covered with a 30-centimeter layer of soil
Peat prices
peat
You can make multi-layer fertilizer using chicken manure and a decomposition stimulator. When decay is intense, maximum thermal energy is released. This is precisely what is necessary for better growth of planted crops. You can leave organic fertilizer under the black film for a week so that it warms up well, and then pour out the soil and plant the plants.
Organic fertilizer can be covered with black film for a week (pictured is a mini-greenhouse)
To protect seedlings from rodents, you can line the bottom layer with a special mesh. Also, sometimes instead of sawdust, rotten boards, bark and stumps are placed down. Manure can be replaced with grass humus. Everything must be compacted well and poured with boiling water; be sure to let these layers “simmer” before filling in the soil.
How to make beds in a polycarbonate greenhouse
To find out how to properly make beds in a polycarbonate greenhouse, as well as which beds are generally suitable, read this article! We also recommend reading about the watering hose.
Even marshy, rocky or sandy soil can provide good conditions for growing various crops. Simply install the boxes and fill them with fertile soil. The boxes are warmer and protect against pests. The height of the box is approximately 40 cm.
Example of an alternative: growing tomatoes in buckets
Plants in buckets are easy to care for
Narrow room design: 100 best ideas
In the ranking of complex, inconvenient premises, narrow spaces confidently take first place. The owners of such rooms often have to choose one of two things: aesthetics or convenience.
To fully arrange the furniture and not overload the room is, at first glance, an impossible task. Let's see how designers deal with this problem and take the best ideas.
Narrow room: ideas for optimal organization of space
To make a narrow, elongated room as attractive and cozy as possible, you should take a closer look at some design techniques that visually expand the room. By correctly arranging pieces of furniture, choosing the type and color of wall, ceiling and floor coverings, you can significantly change the geometry of the room, while simultaneously filling it with stylish and beautiful decor.