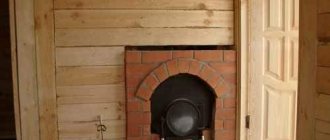
Stove heating continues to be a very popular method of heating private homes. Accordingly, all issues related to this process are very relevant today. Most often, the stove fails due to the presence of a large number of cracks, which make its operation unsafe, since carbon monoxide penetrates into the room through them.
Faced with such troubles, owners of private houses ask the question: “how and how to cover the stove so that it does not crack?” It is this problem that we will pay attention to in this article.
Reasons for furnace failure
Before looking for the best way to fix the problem, it is necessary to determine the causes of cracks. It could be:
• low quality of the solution used;
• violation of finishing technology;
• shrinkage of the brick structure;
• uneven heating;
• non-compliance with the rules for operating the stove.
If the stove sank due to an improperly poured foundation, smoke will pour out of all the cracks during the fire, the doors will no longer close tightly, and the brick will gradually begin to collapse. If such problems are discovered, you should immediately dismantle the entire structure, strengthen the foundation and lay it out again. However, in some cases you can do without radical measures.
The fact is that a slight shrinkage of the stove in the first couple of years is considered quite normal, and if we are talking about small cracks, they can simply be repaired correctly.
All other reasons can be easily eliminated; it is only important to figure out how to cover the stove so that it does not crack.
Best answers
Garniy Khlopchik:
Now listen to the correct answer from a professional. To “lean out” fatty clay, up to 30% of burnt ground clay is added to it. Sand causes problems during firing, so it is not used. The mixture is called CHAMOT. Such a mass can be up to 10 cm thick, subject to slow drying. The fire shrinkage of fireclay is also small, which is why all monumental ceramics are made from it.
Veloria Granta:
yolk or maybe liquid glass
VASILY login:
add regular sand. and the proportions depend on the purpose
Dr.Evil:
The drying mode, plasticizer additives, including organic ones, depend on the purpose and further technical process - firing, coating with something, etc.
Vladimir Ivanov:
Guys, don't worry: asbestos powder is added.
Konstantin:
if the clay cracks when drying...it means it is “oily”...add sifted sand...preferably river sand...
Anastasia Babashkina:
Sand is sand, but there is a point - the clay must be kneaded well, all of it, piece by piece, in order to extract all the fragments of stones, glass, and debris from it. Because it is because of foreign bodies that the work cracks in half the cases, and when fired, it simply falls into pieces.
Determining the extent of damage
Before getting started, you should consider the damage and determine the scope of work. If small cracks appear on the surface of the stove (even if in large numbers), to eliminate them you will need to remove the lining and clean the brick from the plaster.
Once all the finishing has been removed, you can start caulking the cracks. At this stage, everyone is wondering what solution to cover the stove to prevent it from cracking.
For these purposes, you can use one of the following mixtures:
• made of clay and sand;
• from special grouts for ovens;
• made of fireclay clay;
• from oven glue.
Can’t decide what to cover the stove with to prevent it from cracking? Consider each option individually.
A mixture of clay and sand
Sealing cracks with clay mortar is the simplest and most economical way to restore a stove. At the same time, the quality of repairs will be no worse than using newfangled and expensive materials.
For these purposes, you can take absolutely any clay, the main thing is that it contains as few impurities as possible. After soaking, high-quality raw materials should become oily, homogeneous and plastic. Before covering the stove with clay (to prevent the surface of the fireplace from cracking in the future), pay attention to the specifics of preparing this solution.
Decorative clay finish
Recently, clay colored plaster has become one of the most popular materials for interior decoration. It is used in many decorating techniques and is suitable for emphasizing the home owners’ commitment to natural, traditional materials.
Often the natural texture of a clay wall is complemented by the application of relief designs or patterns. To do this, the clay is puttied with a fine-grained compound without impurities. Then they roll over a layer of putty 3-5 mm thick with rollers, stamps, or form a pattern with their own hands.
The finishing layer can be coated with a vapor-permeable casein primer or paint in various colors.
Here are a few photos of clay in the interior.
Texture of decorative clay plaster
Wall decoration
Ecology of consumption. Estate: Plastering with clay mortar solves several issues at once. Firstly, there is no need to search and buy a mixture for work. Secondly, clay is an environmentally friendly material. Thirdly, due to the use of natural materials, repairs are significantly cheaper
How to make your own clay putty
Mixing the mixture is carried out in several stages.
1. Before mixing clay with sand, it should be soaked in warm water for at least 12 hours.
2. The wet solution should be thoroughly mixed and all lumps formed should be broken up. In this state, the clay combines with sand much better.
3. To prepare the working mixture, it is recommended to take 4 parts clay and 2 parts sand. The last component should be as clean as possible and pre-sifted. The volume of liquid depends on the degree of humidity of all components.
4. If you do not plan to whiten the stove, add lime to it at the stage of mixing the solution. All components are mixed until the consistency of sour cream. The finished mixture is covered with plastic wrap and left for 12 hours.
5. The settled solution is kneaded again. To check if there is enough water in it, take the putty in your palm and roll it into a ball. If it starts to crack when you squeeze it, add more water.
6. The oven should be lightly heated, water should be poured over the cracks, after which you can begin sealing.
7. To prevent the appearance of new cracks in the clay, you can add straw, but a more reliable way is to use a plaster mesh. If you apply a clay solution to a stove lined with such material, you can forget about the cracks for a long time.
Fireclay clay
Fireclay clay is often used to restore old stoves. This material is characterized by fire resistance, so stoves finished with it are reliable and durable.
You can purchase this type of clay at any construction market. It is sold in 20 kg bags and is not expensive at all. The working solution is prepared strictly following the instructions on the packaging.
Grout
To seal a brick oven, you can purchase a special grout. In stores there are various formulations that are produced specifically for these purposes. It’s worth noting right away that this option will cost you quite a lot, however, it is optimal for lining stoves and fireplaces.
If you cannot afford to purchase a specialized composition, prepare it at home. To do this you will need the following components:
• clay;
• sand;
• water;
• straw;
• salt.
The clay needs to be thoroughly kneaded, filled with water and set aside for 12 hours. After the specified time has passed, the required amount of sand should be added to the mixture. In the process of kneading the two components, finely chopped straw and salt are gradually added to them. Clay and sand are taken in a ratio of 4:1, with about 50 kg of straw and a pack of salt added for every 4 buckets of clay.
The resulting composition can withstand temperatures of more than 1000 degrees.
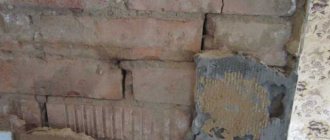
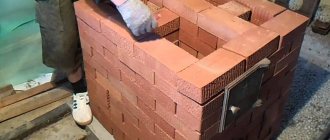
Features when repairing the firebox
Most often, the firebox is damaged when it is made of ordinary red brick, rather than fireclay. The brick delaminates and falls off in plates. How to repair a brick stove in this case? There is no point in covering and reinforcing red brick; it still crumbles from high temperatures. Since it is impossible to reduce the temperature level in the firebox, additional lining must be made to reduce the effect of temperature on the walls.
The internal lining of the firebox is made using the following materials:
- Cast iron . It will last a long time. But there is one trick: you need to leave a gap between the wall and the cast iron. To do this, they lay corrugated cardboard, which will burn immediately during the first fire and will burn out, but the gap will remain.
- Steel . For that. To repair with steel. It is also necessary to make a gap. But the steel will still burn out quite quickly, especially if the repair is carried out in a sauna stove.
- Fireclay brick SHA-6 (“fly”) . It is capable of serving without splitting under prolonged loads of extreme temperatures. A gap of 1 cm is left between this brick and the wall using basalt cardboard. The solution is taken the same as when laying fireclay. After repairing the stove using a firebox lining, the rate of heating of the room will be reduced, but the temperature inside the firebox will be higher. Combustible gases burn out completely.
- Fireclay brick . You can repair a damaged firebox using ordinary fireclay bricks placed on edge. True, it will reduce the combustion space; the gap between it and the wall will also have to be maintained.
- Vermiculite boards . Such slabs are environmentally friendly, do not emit harmful fumes, are made entirely of natural material, and are highly fire resistant.
- Superizol (calcium silicate) . When the question arises of how to repair a furnace firebox with your own hands, it is worth considering this safe material of mineral nature. It can easily warm up to 1000 degrees.
Attention: vermiculite boards and superisol are not used often. But they justify themselves in cases where you don’t want to reduce the size of the firebox. The only task that will have to be solved when repairing the furnace firebox is organizing the fastening of these fire-resistant panels.
They are placed in the same way with a gap. This will allow the major repairs of the brick kiln to be postponed for some time.
Oven glue
To prevent the stove from cracking in the future, you can use heat-resistant glue to repair it. It belongs to the category of ready-made materials for finishing fireplaces, which are sold on construction sites. Its main qualities include resistance to high temperatures and durability.
This adhesive mixture contains fireclay powder and fire-resistant types of cement. Today, there are two types of glue - plastic and hard.
The first option is used for sealing cracks, and the second is intended for plastering the entire surface of the stove.
The main advantage of oven glue is its very fast drying, so you should not mix the solution in large quantities.
Classification of clay mortars
The variety of clay compositions is also reflected in the classification of the plaster itself for which it is used.
Clay plaster can be obtained from the following components:
- from light clay, the plasticity of which is 0.17-0.27;
- from heavy, ductility more than 0.27.
The second option is used much less frequently, because due to its density it cracks over the years under the influence of temperature changes, and the proportions have absolutely nothing to do with it.
The color range of this building material is very diverse:
- white (kaolin);
- gray;
- black;
- red (most often used in construction work);
- yellow;
- blue.
Decorative clay plaster
Please note that the natural composition of clay does not always indicate the environmental purity of the product. Always pay special attention to the composition of the clay
The following components can be added to it in various proportions:
- dolomite;
- calcite;
- quartz;
- magnetite;
- cellulose;
- sodium gluconate;
- urea.
Clay decorative plaster
Below is a table of variations in the composition of the mixture in volumetric parts.
| Components | Composition of the mixture in volume parts | ||||
| A | B | C | D | E | |
| Cast mortar (based on soil and sand in a ratio of 1:2) | 10 | 10 | 10 | 10 | 10 |
| Sand | 25 | 25 | 25 | 25 | 25 |
| Cellulose | — | 5 | 5 | — | 5 |
| Casein glue | 1 | — | — | — | 1 |
| Urea | — | — | 0,2 | — | — |
| Sodium gluconate | — | 0,2 | — | — | — |
Studies carried out at one time have proven that the addition of such impurities to the composition of clay plaster simplifies the process of laying the mixture and improves its strength. But, be careful with your choice, because all such supplements have a high level of natural radioactivity. It is better not to use clay with a “dangerous” composition at all when plastering surfaces, and do not hesitate to ask the seller about the place where the material was mined. And also remember that the proportions of additives greatly affect the elasticity of the clay solution.