What's next for us? Let's look at the contents)
| Video master class on making flowers | |
| Step-by-step instructions for making flowers | |
| Paper rose | |
| Paper orchid | |
| Lush paper flowers | |
| Sweet bouquet of paper and candies | |
| Master classes on flowers made from paper in silence, napkins and paper towels | |
| Paper flowers with rounded edges | |
| Paper flowers with pointed petals | |
| Paper flowers. Chrysanthemum | |
| Paper towel flowers | |
| Paper flowers (we use napkins) |
Tea rose made of paper - master class
Cute roses made of colored paper will not leave anyone indifferent. The manufacturing technology is very simple. The master class includes making a large rose and an unopened bud. This rose can be made from music, packaging, or glossy paper.
To work you will need:
- Colored decorative paper pink and green or cardboard.
- Wire.
- Glue gun or glue Moment Installation.
- Green tape or corrugated paper.
- Scissors.
- Pencil or stick for rounding the petals.
Transfer the template to paper. Fold the sheet 2 times. Cut out the 5 largest parts (pictured). We find the middle of the flower and pierce the hole of all 5 flowers with an awl or knitting needle.
We string the first flower onto the wire. To prevent the wire from slipping, we put a piece of foam rubber on the tip or make a cotton ball. We begin to twist the center of the rose. We do not curl the petals of the first flower. Next, we begin to glue each of the petals one by one to each other. To do this, drop a drop of glue onto the inside of the part and hold each petal until it is “grabbed” by the glue.
We put the next flower on the finished leaf from below. Here we should already twist the leaves down. And again we begin to glue, pressing the petals and dripping a drop onto the petal. We work like this until all 5 colors are gone. at the end we string the green part and decorate the stem.
The bud is glued together from individual petals, pressed and twisted. You need to cut out 10 individual petals. Then they are glued together in groups of 5, making 2 buds. Next, we insert one bud into another, and only after that we pierce the bud with wire. We decorate the stem of the bud in the same way as the stem of a large flower.
We design the branches separately. The roses are ready.
The video shows a detailed master class on making roses and buds:
Manufacturing instructions:
To make these paper flowers, we will need:
Tools and materials:
- Double-sided colored paper (possibly with patterns) or pages from newspapers, magazines, books
- Scissors
- Glue
1. First, take scissors and cut out a square from colored paper (the larger the square, the larger the flower will be).
We twist the square so that we get a rhombus. 2. Fold the diamond in half diagonally. We have a triangle.
3. Once again, fold the two corners of the triangle into the middle to form new corners, as in the photo below. We have a rhombus again.
4. Now let's start creating the core. Thanks to the core, our paper flower will look more natural. To do this, carefully straighten the two side corners. The bend line should be exactly in the middle on them.
5. We bend the side corners of the triangles (F and G) inward so that they do not extend beyond the boundaries of the sheet.
6. Next we need to fold the two side triangles in half. The corners remain inside. After this, apply glue to the sides, as shown in the picture, and glue the petal.
7. We have one petal with a core.
8. To make one flower, we need five such petals. We already have one, we need to make four more of these petals. To do this, repeat the previous steps four times.
9. We got 5 petals. Now, to make a flower out of them, spread glue on the sides of the five petals and glue the petals together.
To make paper flowers more vibrant and original, you can use colored paper with patterns.
If you want to give a vintage look to your paper flowers, you can make flowers from newsprint or from book pages.
By showing your imagination, these paper flowers can be used to decorate almost any holiday or gift!
Basic techniques and secrets of creating life-size flowers from corrugated paper
The entire decorative effect of the finished product depends on the beauty of the flower head. The process of its formation is similar to making flowers from isolon, but adjusted for the properties of the material. Let's learn how to create large flowers from crepe paper with your own hands!
Accordion method
This funny hat can be made with children - the flower is assembled according to the accordion principle.
We will need several sheets of thin corrugated paper 20–25 cm wide. The length and quantity depend on the desired splendor of the finished flower. Before starting work, the sheets must be placed one on top of the other and the edges aligned.
Stages of work:
- Fold the sheets like an accordion and use scissors to give the edges a semicircular shape.
- Mark the middle of the prepared strip and tie it with thread or clamp it with floral wire, forming a loop for subsequent assembly.
- Disassemble the accordion, smoothing the edges.
- Lift the layers one by one, straightening each sheet.
- When all the layers are separated, the flower is ready.
- You can make several flowers and connect them through prepared loops.
The hanging balls from the previous photo were created using this principle. To create such colors, you can combine paper of several colors.
The difference with this design is that the inner part of the flower is cut with fringe separately, and then both parts are combined into a single flower.
And here are more flowers made using the same technique.
Detailed method
You will use this method if you decide to collect giant flowers from corrugated paper with your own hands. To do this, you need to cut out individual petals and leaves using templates. Patterns for large flowers differ from small ones only in size, so you can use the ones we offered in the article about corrugated paper flowers.
This giant peony hat is made using this method, but you will need some thick paper to keep it in shape.
The size of the petals depends on the author’s idea and the purpose of the decor: the largest petal can reach a length of 45 cm, but during assembly they will need additional fastening together so that the flower does not fall apart.
Since you will need a lot of blanks, it is better to make patterns from thick cardboard or pressboard - this way they will last longer. You can cut the petals with scissors or a stationery knife.
Tip: unroll the roll, fold it several times and then cut it out - you will get several blanks at once.
Next begins the most creative stage in creating a flower - giving shape to the petals. Smooth curves and detailed edge work are achieved by straightening the folds with your hands, stretching the workpiece using a metal ruler or the blunt edge of scissors.
First, use a pencil or stick to curl the edges of the petal, pressing firmly to secure the bend.
The volume is created by straightening the corrugations: slightly stretch them in the upper part of the petal and almost completely straighten the middle.
Finally, you can use the same technique to add wavy edges.
Important! When applying the template to the sheet, you need to make sure that the folds go along the petal - then it can be formed correctly.
This type of MK describes in detail the process of making peony petals:
If you are just learning how to collect large flowers from paper with your own hands, many of the nuances may seem incomprehensible. Let's look at them with an example.
This chrysanthemum is assembled from separate parts, mounted on a branch and placed in a stand made of a flower pot. We'll talk about these assembly details a little later.
For the flower head we will need:
- corrugated paper;
- cardboard circle with a diameter of 30 cm;
- glue gun
Cut out the blanks of petals and leaves according to the pattern, process the edges and give them shape.
You will need at least 30 petals of each size, 6 blanks 20 cm high for the sepals and as many leaves as your imagination and the length of the stem dictate.
Assembly is carried out on a cardboard circle. Let's look at the nuances that make the flower look realistic:
- The petals should be directed strictly to the center, thanks to this we will maintain the symmetry of the flower.
- Filling is carried out in circles, with each subsequent layer shifted towards the center by 1.5 - 2.5 cm. This will ensure a smooth decrease in the diameters of the petals, without the formation of voids. Approximately three rows should be obtained from each type of part. If necessary, you should add these or other blanks.
- The closer to the center, the more the petals should be bent upward, and the smallest ones are bent almost vertically before gluing, thereby filling the middle. This principle is laid down by nature - the petals open from the bud.
After the front part of the flower head is ready, we glue a piece of cardboard tube to the back side, the diameter of which is suitable for the future mount.
The reverse side is decorated with six sepals. They should be glued in a spiral, overlapping the next one, to cover the entire surface of the cardboard base.
Belt method
Flowers made in this way differ little from the previous ones. The whole peculiarity is that the petals are not cut out separately, but are formed on the tape: the profile of the petal is formed in the upper part of the paper strip, and the lower part remains uncut.
Peony made using this technique:
And another fancy flower, reminiscent of a dahlia:
Leaves and stem
If you make life-size flowers with your own hands, you will definitely need a stem and leaves. To realistically reproduce the structure of a leaf, make veins and create a relief:
- lay a wire in the middle of the sheet,
- position the corrugations towards the top of the leaf,
- reproduce the wavy edge.
Watch the video for making leaves for growing flowers:
The next element of a growth flower is the stem. Depending on the purpose, the stem can be made to hold the flower in the hands or as a stand.
A flower with a small stem is comfortable to hold in your hands
In these colors, the stem can be made from a cardboard tube, for example, from foil or cling film, or you can cut a piece of plastic pipe. This leg is multifunctional - such a flower can be placed freely on a stand made of metal rods.
To create spectacular photo zones, a flower on a stem, as in this photo, would be an excellent option:
The stem is made of a wire frame. The secret of its stability is in a plastic cup filled with cement mortar.
Advice. A plastic cup can be replaced with a small flower pot, and cement mortar can be replaced with any building mixture: gypsum, alabaster and the like.
The resulting stand should be wrapped in thick paper, then decorated with green corrugated paper. Using any technology convenient for you, make leaves and screw them to the trunk using wire.
A metal-plastic tube or even a real branch can also serve as a stem - for beauty they need to be decorated with green tape.
The metal-plastic tube holds the flower securely and looks great in the interior
Stand
Guests of the holiday will be very surprised when they find out that you made life-size flowers from corrugated paper with your own hands. And to decorate everything, you will need a stand. It can be metal, wood or a weighted flower pot.
It is especially important to make a stable stand if you plan to install not just one flower, but a whole branch or a giant bouquet.
For options for making stands for full-sized flowers, see the video:
Important! Take care of stable stands when decorating wedding ceremonies. Flat supports are perfectly camouflaged under a layer of artificial grass.
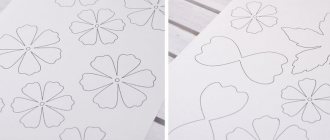
Paper rose
Let's make such a wonderful paper rose together. For this we need:
Tools and materials:
- Scissors
- Ruler
- Threads
- Scotch tape (preferably colored or double-sided)
- A piece of wire
- Stretch Crepe Paper
- Ball or candy
Step-by-step instruction:
1. First we need to prepare the preparations. To do this, you need to choose the color for our rose and cut crepe paper of the desired shade measuring 7 x 5.5 cm - these will be our petals. The more preparations we prepare, the more magnificent the rose will look.
2. Now we need to stretch our blanks across. This is necessary in order to give them a bend and shape.
3. Next, we make a blank using green paper (look at the picture). This trick will make our rose look more realistic.
4. At this stage you need to connect the stem of the rose with its petals. Carefully wrap the petal blanks around the ball or candy and attach them to the stem with a thread.
5. Now you need to make the wire more similar to the stem. To do this, take green paper and wrap it around the wire. After this, we attach the green leaf blanks to colored or double-sided tape.
That's all! The paper rose is ready. If you want to make a whole bouquet of such roses, then repeat all the steps as many times as necessary.
To make the bouquet look more fun, you can use paper of different colors.
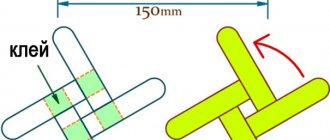
Do-it-yourself voluminous paper flowers - diagrams and templates
Making a craft begins with an idea. Some people implement it right away, while others need to initially draw a diagram of the future product.
But one way or another, it’s best to start creating a craft with a template. You can either draw it or find it on the Internet. The simplest option is to make several blanks of the same shape, each of which should be slightly smaller than the previous one. Then these blanks are placed on top of each other and fastened together. As a result, we get a three-dimensional flower. The template diagram for such a product is shown below.
Another option for making a three-dimensional flower craft is to cut out a finished template, fold it along the fold lines and glue its parts along the marking lines.
It's like an expanded model of a cube. Cut and glued. More complex options include preparing parts of different sizes and even shapes. By combining everything together with glue, we get a wonderful craft.
For example, you can make a flower like this.
To make this craft, you will need to cut out four petals of different sizes, six pieces of each size, and a central circle to which everything will be attached.
Below are templates that you can use to cut out the petals of the future flower.
Take paper of the desired color (not necessarily blue, as in the example). We transfer the petal templates onto it and cut out six pieces. The result should be twenty-four blanks. Then we fold the lower part of each petal with a corner and glue it together. At this point, the preparatory stage is completed and assembly can begin.
Take the previously cut circle and glue six petals of the largest size onto it.
Then we take slightly smaller petals (number three in the diagram) and glue them in the spaces between the large petals, also in a circle.
We proceed in the same way with the remaining elements of the flower. As a result, we get an original flower. If you make several of these in different colors, you can interestingly decorate any vertical surface with them.
If you don’t have colored paper or don’t want to color your craft, you can download a ready-made color template, print it on white paper and simply glue it into a finished craft. For these purposes, you can use, for example, this template.
And one more interesting option that does not require large expenses and is done quite easily and quickly.
Here you only need a sheet of white paper if you want to make the flower white, or another desired color (for example, red). You will also need a sheet of green paper to make flower leaves. And, of course, scissors and glue.
We start by cutting out a circle of the required diameter from paper. The larger the diameter, the larger your craft will be.
Then draw a spiral in a circle with a pencil and cut it out with scissors.
Finally, at the last stage of work, we begin to twist the spiral into a flower from its outer edge.
Having twisted the spiral into a flower, we glue the free end so that it does not unwind. All that remains is to cut out a couple of leaves from green paper and stick a flower on them. That's it, the craft is ready.
DIY paper orchid
Such wonderful orchids can be used for decoration or you can make a branch and put it in a vase.
Tools and materials:
- Scissors
- Color printer
- Glue
- Paper
- Clothespin (if we want to decorate gift wrapping)
Paper orchid templates
Download and print these templates on a color printer
Step-by-step instruction:
Painted paper roses
Now let's make paper roses. It’s not difficult to make a white rose for decorating a room or wedding hall. Take paper or cardboard (you can take glossy paper from gift wrapping). Cut out rose petals and leaves according to the template. You can make it in a small version and decorate a box or casket with a rose. A large rose has 18 petals, a small one has 12 or more. The flower and leaves are painted with watercolors or gouache. The petals are curled downwards with a pencil or a round wooden stick. For a detailed description, watch the video.
The video shows a detailed master class “Big paper roses”:
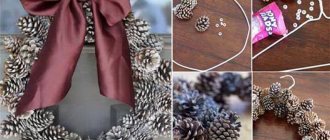
Sweet bouquet of paper flowers
Such a bouquet of flowers with a sweet surprise inside will be a unique gift for a loved one!
Let's start making it.
To make such a bouquet of flowers from paper, you need to prepare the following tools and materials:
- Corrugated paper
- Wide tape
- Narrow ribbon (0.5 cm)
- Wire
- Green type tape
- Scissors
- Wire cutters
- Wooden skewers
- Wrapping paper or mesh for a bouquet
- Sprigs of greenery
- Bow for decoration
Well, and, of course, chocolates
Step-by-step instruction:
1. First you need to take wire cutters and cut the wire for the stems into 10 cm pieces. In our case, you need 7 pieces of wire.
2. Take scissors and cut a thin ribbon (0.5 cm wide) into pieces about 25 - 28 cm long.
3. From corrugated paper we make seven blanks in the form of rectangles, measuring 18x12 cm.
4. Then cut out small rectangles in the bottom corner of a sheet of paper, measuring 9cm x 5cm. These will be our future flower buds.
5. Place the smaller piece on top of the larger one and place the candy on the smaller piece.
6. We twist our blank together with the candy into a tube, forming a bud.
7. We take the wire and place one end of it in the middle of the bud. We wrap the bottom of the bud blank around the top of the wire, forming the stem of the flower.
8. Now you need to wrap the tape around the top of the wire to secure the stem and bud well.
9. We take the previously cut ribbon and tie it around the bud with the candy.
10. Now we need to fluff the flower and give it a wavy look. To do this, gradually turn away the edges of the paper at the top of the bud, pulling it a little so that the paper stretches and bends like a petal.
11. We carry out all the above steps with all the buds.
12. We take a wooden skewer and, using tape, attach three flowers and decorative greenery to it. Then we add other flowers and continue wrapping the stem with tape.
As a result, we should get a bouquet like this:
You can stop here, or you can continue and beautifully package the composition.
13. We take the packaging, which should be longer than the stems of the bouquet, place the bouquet diagonally and wrap the flowers in the packaging.
14. We tie the bouquet with a ribbon and decorate it with a bow.
The bouquet of flowers is ready!
Complex voluminous flowers
When in the middle of winter you want summer or you urgently need to decorate a room for a wedding, paper flowers will come to the rescue. It’s not difficult to understand how to make flowers out of paper that won’t evoke associations with children’s crafts by looking at the diagram.
An important detail: It may take practice to understand how to make flowers from this type of colorful paper. This is not worth wasting quality paper on.
A newspaper, photocopier paper or notebook sheet is what you need for training.
- Volumetric inflorescences made of corrugated paper, for example, peonies, turn out to be almost indistinguishable from the living original if you choose the tone and use crepe or corrugated paper. You will need to cut out a lot of petals and give them the desired shape, then collect them around the center on a stick. This flower is as suitable for candy bouquets as a rose. With candy it will not be as lush as without it, less “natural”, but this does not make it worse than a “natural” peony made of thin crepe paper.
- Inflorescences made by twisting. One of the simplest but most effective types of flowers for a bouquet or basket. A strip of paper is cut like a fringe, either straight or figured. Then it is carefully and tightly wrapped around a skewer wrapped in green paper; it is advisable to glue each turn. Green sepals are glued on top, the folded paper is straightened, if necessary, stretched or bent. Corrugated paper is suitable for this.
- Lush flower using the puff pastry technique. Corrugated, crepe or tissue paper is cut out according to a template; you will need to do this many times. The parts are glued or stitched in the middle. A bead is glued into the center as a centerpiece. Corrugated petals can not only be slightly bent or twisted with a pencil, but also extended.
- Asymmetrical plants such as irises, orchids, pansies and others. To make a bouquet of them, you need to stock up on templates. Having printed and cut out all the details from paper, they are transferred to the sheets from which the flowers will be made. Cut out again and begin assembling the parts into a flower. Templates are always simple and clear; step-by-step instructions are usually not required for them; just look at the picture of the finished plant to understand what to glue to what.
- Huge flowers are made exactly the same as ordinary ones. The only difference is that a small flower requires small details and allows for small flaws. Huge inflorescences for photo shoots or decoration are best made from thick and bright paper. Roses and peonies don't look as tacky in any size as flowers like crocuses or bluebells.
- Paper flower made from napkins. Paper napkins make delicate flowers that are only suitable for interior decoration or gift wrapping. They are made according to the same principle as puff flowers made from regular paper.
Important! The easiest way to make “puff” or “twisted” flowers from the listed flowers. When you have no experience, but want to create something beautiful, you should start with these options.
There is another option for a voluminous flower, which, despite its beauty, is easy to make. This is calla lily. To make it, you will need to cut out a heart from white or colored corrugated paper, take floral wire and wrap the upper end with yellow material, this is the middle of the flower. Next, a heart is wrapped around the wire, the sharp end should “look” in the same direction as the middle. After the wide part is secured to the wire, the remaining free edges are slightly bent. The stem of the inflorescence is designed like a plant stem.
Interestingly, most paper flowers have analogues among crafts made from ribbons, including ribbons with wire inserts. Textiles of this type can be trimmed with lace.
Paper flowers with rounded edges
Quiet paper usually comes in large sheets, in a stack of 8-10 layers. This is exactly how many layers we need for the flower.
1. Take a stack of eight sheets and cut out a rectangle of any size. The diameter of the flower will be equal to the width of the leaf.
2. The next step is to fold our rectangular sheets into an accordion. The height of the fold was about 2 centimeters, but you can also experiment with this parameter.
We fold the sheets into an accordion until the very end, turning the sheet over after each movement.
This is how it should turn out.
3. Cut a piece of rope, ribbon, fishing line or thread
4. We tie our accordion in the middle. It should look like this.
5. Use scissors to round the edge to form a rounded petal.
It is difficult to cut through all layers at the same time, so try to cut in several steps.
6. On the other side we do the same.
This is how it happened:
7. If you buy ready-made pom-pom flowers from tishu, then you will be given exactly such a blank, which now you need to open, forming the flower as follows: starting from the top, lift all layers of paper to the middle.
At the same time, rotate the flower, grabbing the paper in turn from one side to the other.
After a while, you will have a stunning paper flower in your hands!
You can also watch all the steps in this video:
It was a flower with round petals. Go ahead!
Paper flower with pointed petals
1. We repeat all the same steps until the petal formation stage.
2. At the stage of petal formation, we do not round the edge, but make it sharp.
3. We make sharp edges on both sides.
4. Now open the flower and see what happens.
This is what a miracle turns out to be like in the end!
Paper flower. Chrysanthemum
The next version of paper flowers that we will learn to make resembles a chrysanthemum.
1. We take the workpiece, but now we do not round or sharpen the edge, but cut it into thin strips.
2. We do the same on the other side.
3. Opening the flower.
As a result, we got such a flower.
Very cool!
Materials for large interior flowers
- Decorative wrapping paper. It is better if it is dense and shiny. We choose juicy, bright, pure colors. There may be options, depending on the interior of the room in which the composition will be located. For example, where it is necessary to maintain the severity and nobility of the setting, we make flowers from tinted paper in dark and pastel shades (brown, beige, gray, sand, black, etc.). Wrapping paper also comes with a pattern - it can make very interesting interior flowers , only in this case choose decorative paper with a small pattern.
- Paper or thin green cardboard - for leaves.
- Glue.
- Scissors.
- Twine/string.
- Double-sided tape.
Flowers made of paper (paper towels)
Let's now look at how to make these paper flowers using paper towels. 1. Tear several rectangles from the paper towels.
In our version, the paper towels came with perforations. It needs to be cut off.
2. Now divide each sheet into several layers, depending on how many layers it consists of. They are usually two-layer or three-layer.
Thus, we obtain a fairly thin and durable paper suitable for making flowers.
3. Take 8 thin pieces of paper and stack them on top of each other.
4. We fold the sheets into an accordion, bend them in the middle and tie them.
5. We make sharp edges on both sides.
6. Opening the flower.
We made such a beautiful flower from paper towels in just a couple of minutes!
Corrugated paper flowers
DIY flowers made from corrugated paper are colorful and picturesque, thanks to the properties of the material itself. They look like chrysanthemums or peonies.
How to make paper flowers with your own hands:
- Create blanks in the form of rectangles 5-6 cm wide.
- Fold the blanks like an accordion.
- Tighten with thread in the middle. Straighten the workpieces.
- For one flower you will need 3-5 blanks. The more blanks there are, the fluffier the flower will be. Fold the blanks into a flower and tighten with thread.
- Secure the flower to a wire or a sheet of paper.
Advice. Using this technique, you can create flowering paper balls that can be used for decoration in any season.
Paper flowers (we use napkins)
Now let's look at creating flowers from paper napkins.
In our version, we took a multi-colored napkin. Let's make the lower layers of the flower yellow and the middle white.
1. As with paper towels, we also divide the napkins into layers.
2. Stack the yellow layers of napkins and cut out a rectangle of the desired size.
3. Stack the white layers of napkin and cut out a rectangle slightly smaller than the yellow rectangle.
4. We place the yellow layers with the colored side up, and place the white center just below the main petals.
5. We fold the layers into an accordion.
6. Open the accordion and carefully separate the yellow layers from the white ones.
7. We put the layers back into an accordion, only the white ones into a separate accordion, the yellow ones into a separate one.
8. Take a white accordion and cut its edges into thin strips.
9. Take a yellow accordion and make rounded edges.
10. Open both accordions and combine them in this way: put the white one on the yellow accordion and assemble it back into the accordion.
11. Bend it in the middle and tie it.
12. Layer by layer we open the flower.
This is such a wonderful flower! Agree, napkins make no less original flowers!
Finally, one more master class: