To get a larger harvest, it is not necessary to install a greenhouse; it is enough to build a small greenhouse. It won't take up much space and will be much cheaper.
An excellent solution in this situation would be to build a greenhouse from a profile pipe with your own hands, and you will find the dimensions and drawings in this article. This reliable and durable design will allow you to obtain harvests earlier.
We also suggest that you read the step-by-step instructions on how to make a greenhouse from polypropylene pipes with your own hands.
Advantages of a greenhouse made of profile pipes
In a greenhouse, the main role is played by the frame, so it must be durable and have stiffening ribs that will hold its shape and withstand various loads. The ideal material for making the frame would be profiled metal pipes.
They have a number of advantages:
- ease of processing;
- the ability to create structures of different shapes;
- long service life - metal profile buildings last up to 15 years, and as practice shows, much longer;
- do not require care or protection from pests;
- affordable;
- compatible with any material.
In addition, compared to a wooden structure, construction made from profile pipe-rolling materials is more compact, so placing it on the site will not be difficult.
The only drawback of this structure is the longer construction time.
Deciding on the material
Since it was decided to assemble the frame of the greenhouse from a profile pipe, first of all it must be understood that the structure must be durable. Therefore, a profile with a section of 40x20 or 40x40 mm with a wall thickness of 2 mm is used as the main load-bearing elements. Fastening elements - longitudinal profiles, the main job of which is to hold the load-bearing structures in one position, can be made from a profile pipe of a smaller cross-section or the same, with a wall thickness of 1.0-1.5 mm.
By varying the pipe parameters, you can save a lot of money, especially if the greenhouse structure is large. But the snow load factor is taken into account. If this parameter is significant in the region where the greenhouse is being built, then you should not skimp on material.
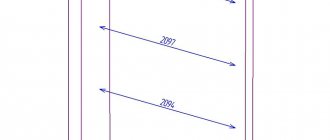
About the length of the pipe, equal to 6.05 m. If you accurately calculate the structure, this requires hand-drawn drawings, then you can reduce the amount of profile metal waste. This is especially important when an arched greenhouse is being built. You can calculate the design in such a way as to make a whole truss from one pipe without cutting or adding. An important point, because the dimensions of the greenhouse, namely width and height, depend on it. Here the correspondence is inversely proportional: the height increases - the width decreases, and vice versa.
Matching the width and height of an arched greenhouse
The next point concerns polycarbonate sheets, more precisely, their length, equal to 6 or 12 m. The arch of the frame is a semicircle, respectively, the length should be equal to the length of the polycarbonate sheets or be slightly less. You should not enlarge it, because cutting a piece from a whole sheet means ruining the sheet.
For example, a greenhouse with a height of 2 m. The length of the arch is half the length of the circle, whose radius is 2 m. We calculate the circumference: L = 2πR = 2x3.14x2 = 12.56 m. Divide the resulting size in half, we get - 6.28 m One sheet 6 m long is not enough to cover the opening. There remains a gap of 28 cm. It will have to be closed with an additional piece, which is bad in terms of reducing waste, plus - a joint appears, which is better to avoid in a greenhouse structure.
Therefore, we carry out further calculations, for example, the height is 1.9 m. We carry out the same calculations: 1.9x3.14 = 5.966 m, almost 6 m with a small undercut and a minimum of waste. The width of such a greenhouse is 3.8 m; it can accommodate 4 full-sized beds.
Regarding the length of the greenhouse, there are no restrictions. It all depends on the site for construction. The number of trusses, it is this indicator that determines the length, is selected at the rate of 1 m between the arches. The size is determined by the width of the polycarbonate sheet, equal to 2.1 m. Three trusses must be installed under it: two at the edges, one in the middle. Adjacent sheets should be overlapped on an arch made of a profile pipe. The overlap size is 5-10 cm from each sheet. That is, the width of the sheet is 1 m between arches (between three – 2 m), plus overlap.
The optimal distance between trusses is 1 m
Be sure to watch the video:
Selection of design type
Before you start making a greenhouse from profile pipes with your own hands, you need to decide on a design model and sketch out a drawing. After all, the angle of refraction of sunlight depends on the shape of the structure.
The main types of greenhouses made of this material:
- Arched - construction requires special equipment to give the shape. Otherwise, having curved parts of the required size and a drawing, assembling such a greenhouse with your own hands will not be difficult. The arched design creates uniform lighting, regardless of the location of the sun.
The disadvantage of the model is limited functionality, since tall crops along the walls will not be able to grow.
- Single-pitch is a simple option, mounted to the walls of residential or outbuildings. Using this compact model allows you to save not only space, but also building materials.
- A gable or hipped roof is a separate building. In such a structure, better illumination is created for crops, in contrast to a lean-to structure.
Tent - simple design, no curved elements. Therefore, gardeners often install it themselves. In addition, the advantage of a greenhouse with a gable roof is the ability to plant crops of different heights.
It is worth noting that the hipped version of the roof will cost more than the arched one, since installation of the frame requires more material, both main and covering.
- Fedorov’s greenhouse is popularly called “breadbox”; it is easy to make it yourself based on the developed drawing. Suitable for growing seedlings, flowers and vegetables, the only drawback is that it is not intended for tall crops. The design is simple, equipped with a lid that provides access for caring for plants.
Which design to choose for a greenhouse?
Before you make a greenhouse with your own hands from a profile pipe, you should decide what shape to make the future structure. There are several design options: arched or tunnel type, in the form of a house with a pitched or gable roof. Each type has its own characteristics and nuances.
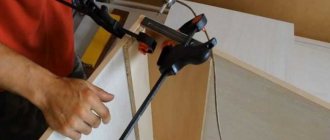
How to bend a profile to build an arched greenhouse
Although working with metal pipes is fairly easy, there are a few things that can be challenging.
For example, when erecting an arched structure, they will have to be bent, and bending the profile with your own hands is not an easy task.
Arched greenhouse made of metal pipes
The metal is bent using a special machine - a pipe bender, but it is not practical to purchase it for the manufacture of one greenhouse, since the device is not cheap. It is easier to use the services of professional companies, but you will also have to pay for each bent part, which will increase the cost of the structure.
You can try to do this yourself by filling a profile pipe with river sand. But first it needs to be well dried and heated over fire. To do this, spread the sand in a thin layer on a metal sheet and hold it over the fire so that the moisture leaves it. Place a wooden plug on one end of the pipe, fill it with sand and close the other side with another plug. Heat the metal with a blowtorch and bend it carefully.
Pipe bender - a device for bending pipes
The manual bending method is complex and ineffective; it is more suitable for bending single parts.
To build an arched greenhouse from a profile pipe, you will need at least six arches. Therefore, if there is no special machine, it is better to choose a greenhouse of a different design.
Advantages of a rectangular greenhouse
A greenhouse made from a profile pipe is the simplest and most quickly erected structure. This form involves the use of straight pipes, which are easy to process and easy to cut. Welding a profile pipe, as a rule, does not cause any difficulties.
Gable greenhouse with metal frame and polycarbonate
As a covering material, you can use not only polycarbonate, but also glass, which is excluded in arched greenhouses. Cutting the material is also very simple.
Rectangular structures allow you to place several greenhouses adjacent to each other on a site with maximum space savings.
How to make a drawing yourself
To make a greenhouse from profile pipe-rolling material, you can use a ground-based or shallow-depth version. Ground-based is convenient because it completely eliminates darkening; it is intended for construction in middle and southern latitudes. In a shallow type of greenhouse, heat is drawn from the ground. However, dark spots form near the walls, which negatively affects plant growth.
When drawing up a drawing of a greenhouse made of profile pipes, it is worth taking into account the removable upper parts, which will provide air access inside. In addition, to make the frame more durable, it is necessary to provide special elements that are fixed along the walls.
A profile with a cross-sectional size of 40×20 mm or 40×40 mm is best suited for the frame, as it has high strength. The optimal wall thickness is 2 mm or more. To make a horizontal screed, you can take a profile with a wall thickness thinner than 1-1.5 mm.
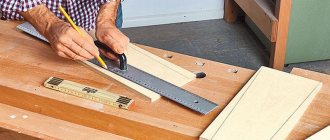
The drawing must indicate the exact dimensions - width, length and height. In addition, the connection points of the main and guide parts should be indicated.
Below is a drawing with dimensions for various types of greenhouses.
In accordance with the greenhouse drawing, which indicates the dimensions, construction costs are calculated and a cost estimate is drawn up. During the calculation process, you should add a 10% reserve in case of damage during transportation or installation.
Drawing of a greenhouse similar to a breadbox
How to prepare the foundation for a greenhouse
Despite the fact that the metal structure is relatively light in weight, it will require a strong and reliable foundation. Only in this case can you be sure that a greenhouse made from a profile pipe, made by yourself, will withstand any load and will last a long time.
The foundation firmly fixes the frame, providing stability, retains heat well, and serves as an obstacle to the penetration of rodents and insects into the greenhouse.
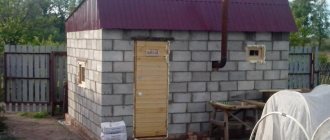
How to make a block foundation
The block foundation is highly durable and reliable. The block foundation has increased waterproofing properties, making it suitable for installation in lowlands and on very wet soils.
Stages of construction of a block foundation
In order to make a base from blocks, you need:
- Prepare a level area, mark it according to the size of the greenhouse, drive in pegs and pull the rope.
- Dig a trench, the width of which should be 5 cm larger than the size of the block. Its depth is calculated so that the block is level with the ground.
- Fill the bottom with a layer of gravel of 10-15 cm.
- Make a concrete solution and first fill all the corners with it. Then press the blocks into them, and using a level, correctly align the vertical and horizontal of the base.
- Carry out this procedure with all the other blocks, installing them along the entire perimeter of the foundation, and then fill all the existing voids with mortar.
- It is necessary to lay 4-5 rows of bricks on the block base, between which install anchor bolts to secure the metal frame of the greenhouse.
- After the brickwork has firmly set, the structure can be installed.
Block-brick foundation - diagram
Installation of a concrete foundation
A concrete foundation is one of the most reliable foundations for a greenhouse. It is usually installed in areas with low (from 2 m and below) groundwater levels, and it is also recommended for sloping areas located on slopes and slopes.
To make a greenhouse from a profile pipe, a finely damaged concrete foundation is quite suitable.
To set it up you need:
- Prepare the site as described above, dig a trench up to 30 cm deep. Its width should be 25 cm greater than the foundation itself.
- Pour moistened sand onto the bottom and compact it well to form a dense layer 5-7 cm high.
- Next you need to make the formwork. Old unnecessary boards or sheets of plywood are suitable for this. Its height should be approximately 5 cm greater than the height of the foundation.
This is what the formwork with poured concrete looks like
- To strengthen the base, install reinforcement. For a greenhouse structure, it will be enough to lay longitudinal metal rods with a diameter of 8 mm at a height of 8-10 cm from the sand layer.
- Prepare a concrete solution in the following ratio: cement - 1 part, crushed stone - 2 parts, sand - 3 parts. Fill the trench with it to the required level, leaving at least 5 cm to the top of the formwork. The entire foundation must be poured simultaneously without interruption.
- Stir the concrete with a stick, removing air bubbles; it is even better if you do this with a construction vibrator.
- In the compacted solution, install anchor bolts or embedded metal parts in places where, according to the greenhouse diagram from a profile pipe, it is supposed to attach the frame to the foundation.
Ready concrete foundation
Now you need to wait until the foundation has completely hardened. This process usually takes at least three weeks. During this time, especially if the weather is hot outside, you need to periodically moisten the concrete base with water to prevent the formation of cracks.
Tools and material
To make the process of installing a greenhouse easier, in addition to the drawing, you need to stock up in advance with the necessary tools that will be needed in the work:
- a shovel - it is needed to level the ground;
- auger - to mount the frame posts;
- grinder - you will need it to cut profile pipes;
- screwdriver - necessary for screwing in self-tapping screws;
- pliers and a hammer are an indispensable tool in any construction work;
- measuring accessories - corner, building level and tape measure;
- welding machine - if you are going to weld parts;
- with a hacksaw - if you plan to lay polycarbonate.
It is important to know! It is impossible to cut polycarbonate with a grinder, as it melts; a hand tool is required for cutting metal with small teeth
You will also need wooden pegs and rope.
The correct choice of material plays a big role in the construction of our structure. To calculate the required amount of profile, it is necessary to take into account that the measured length of pipe products sold in stores is 6.05 meters. Based on this value, a drawing of a greenhouse from a profile pipe of the required size is drawn up.
In order to correctly calculate the required amount of material, you need to take into account the design features and geometric parameters of the structure. The length of all frame parts is added up, then the resulting number is divided by the standard length of the profile pipe. This value will determine the meter quantity of the profile.
How to choose and calculate the material for making a frame
For the frame you will need a profile pipe with a cross section of 40x20 and 20x20. The first, more powerful and durable, is used for frames and lower trim, the second is useful for horizontal connections of frames and vertical elements. To make a metal structure, you need to prepare a greenhouse project from a profile pipe and calculate how much material is required.
Developing a plan is a very important preparatory stage in the construction of a greenhouse.
The strength and stability of the entire structure depends on how correctly it is made. If this point is difficult for you, below is a drawing of a greenhouse made from a profile pipe with dimensions that you can use.
The diagram allows you to visually see what the future greenhouse will look like and determine the required amount of material.
Drawing of a rectangular greenhouse
To build a greenhouse with an area of 18 m2, you will need 90 linear meters of metal profile with a section of 40x20, including:
- for the bottom trim – 18 m,
- for vertical posts and doors – 40 m,
- for the roof – 30 m.
In addition, for horizontal ties, reinforcement and additional elements, you will need about 50 more m of 20x20 pipes. As a result, the greenhouse frame made from a profile pipe, made according to the drawing, will look as shown in the photo.
Metal frame of the future greenhouse
Step-by-step instructions for building a greenhouse
Before you start building a homemade greenhouse from profile pipe products, you should decide on the site and prepare the place.
SUPER GREENHOUSE - DIY bread box. Part 2
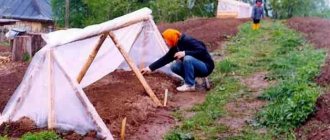
Preparing the area
To build a greenhouse from profile pipes with your own hands, you should start by determining the location of its installation. An important role is played by the type of soil. It is better if the structure is located on sandy, dry soil, where moisture does not accumulate.
In addition, the location of the greenhouse according to the cardinal directions is of great importance in obtaining a good harvest. It is good if the long side is located to the south, so the plants can receive more light from the sun. Also, you need to take into account the design features of the greenhouse:
- single slope - slope of the slope to the south;
- gable and arched - the longitudinal axis of their structure is directed from north to south, the permissible deviation is 15 - 20 degrees.
After choosing a location, the area needs to be prepared. First of all, the perimeter of the future structure is indicated by driven wooden pegs onto which a rope is pulled. Regardless of the chosen model, you should dig a trapezoidal trench to lay biofuel; as it decomposes, it helps to warm the soil.
Foundation
A greenhouse made from profile pipes is a fairly strong structure that is not subject to deformation. To install a greenhouse, it is enough to make a type of columnar foundation from asbestos-cement pipes.
It is done as follows:
- wells are drilled in the ground at the same distance from each other, their diameter is larger than the size of the pipes themselves;
- asbestos pipes are installed in these pits;
- the gap between the pipe and the ground is filled up and compacted with a sand-crushed stone mixture;
- Cement mortar is poured inside the pipe so that there are no voids;
- A metal plate or a piece of reinforcement is immersed in the concrete composition; they will be the connecting link between the foundation and the frame.
It is possible to make a strip foundation or a light bulk foundation to protect the greenhouse from cold air entering inside.
We make arcs for a greenhouse from a profile pipe - 2 ways to bend corrugated pipes
To make your own arched greenhouse structure from a profile pipe, which is pre-cut to the required size, it needs to be shaped into a rigid arc. You can do this procedure by contacting a company that performs such work, where the profile is curved using special equipment. If you plan to do it yourself, then there are two ways you can use.
- How to bend a profile pipe in a “cold” way? There are two options for bending the profile in this way - with and without internal filling:
- If a profile pipe with a thickness of up to 10 mm is used, then the process can be carried out without filler.
- And if you take a profile that is thick, you will need a filler: sand or rosin. In winter, you can pour water inside the pipe and wait until it freezes.
A thick spring is used as a means of bending a profile in a “cold” way, but the diameter must be such that it can be inserted inside the pipe. This material has excellent spring properties, which allows you to easily bend the profile without changing the cross-section.
How to bend a profile pipe radius without a pipe bender. Bending device.
In addition, to give the workpiece an arched shape, you can use bending plates, in the holes of which rods should be placed; they will be a stop when bending. The pipe is placed between two rods, at a distance that corresponds to the level of bending. The profile is bent by moving the workpiece from the center to the edge. This method of “cold” bending is very labor-intensive.
You can use special factory-made pipe benders, manual or stationary.
- Bending technique with preheating. This bending technique is recommended if the thickness of the profile pipes is large. The method is suitable for use at any time of the year. The process looks like this:
- Two plugs are made of wood for both sides of the pipe. In length, it is made 10 times larger than the width of its base. The wide side of the plug should be 2 times larger than the hole in the pipe.
- After this, you need to make grooves in one plug to allow the accumulated gas to escape when heated.
- Now you need to heat up the processed part of the profile.
- Sift and dry the river sand. Then heat it on a metal sheet to 150 degrees until all the moisture has evaporated.
- Install a wood plug without grooves on one side of the pipe.
- Pour heated sand inside through the other end. You should constantly tap the walls of the workpiece so that the sand is compacted well.
- When the pipe is completely filled with sand, install a second plug.
- Mark the bend location on the profile with chalk.
- Firmly fix the pipe in the cleats, placing it on the template.
- Then heat the metal until its color turns red. In this state, it becomes softer and can be given the required shape. This is done with a movement that should be smooth and clear.
- After the profile has cooled, the workpiece is compared with the required template. If everything is done correctly, you can remove the plug and shake out the sand.
Important! The profile, which has welding seams, should be bent so that the connecting line is located on the side. It is not recommended to bend along the weld seam.
how to bend a pipe without a pipe bender for a canopy sugut.net
It is better if all hot bending work is done in one go. Excessive heating of the metal leads to a loss of its strength.
Installation of arches
If you plan to make a collapsible greenhouse with your own hands, then you can connect the arcs and vertical posts using bolts. Opening doors are also attached to them, for example, if the “butterfly” model is selected. For capital construction, it is better to use welding.
It is necessary to cut the posts to which the arcs will be attached. You will need longitudinal strips designed to connect the arcs inserted into the rack. The joints are also secured with crabs or welding.
Important! After welding, it is recommended to treat the seams with a primer, this will increase the reliability of the connections.
The manufactured frame is installed on the foundation and attached to the reinforcement that is fixed in it.
The easiest option is to place the arcs directly on the reinforcement sticking out from the foundation.
Greenhouse construction process
After the foundation has completely hardened, you can begin making a greenhouse from a profile pipe, based on the drawing.
It is impossible to make a frame from metal pipes with your bare hands.
To do this, you need to have special devices and tools: a drill to make holes, a grinder to cut pipes and a welding machine to weld parts to the main structure.
How to make a frame from pipes
To build a greenhouse frame with your own hands from a profile pipe, you first need to make the bottom trim. To do this, take a pipe with a cross-section of 40x20, attach it to the base and mark the joints with the foundation. If you plan to mount it with anchor bolts, then you need to make holes in the pipes and then screw them with special nuts. If embedded elements are hidden in concrete, then the pipes are welded to them.
Perform this operation on all sides of the greenhouse and weld together all parts of the lower frame. Next, vertical pipes and the main roof elements should be cut and welded in one-meter increments at an angle of 30 degrees. After this, the middle horizontal tie is welded from a profile with a section of 20x20. Next, the top screed is made, the remaining parts of the roof and the central pipe are welded to it.
End span assembly
But you can do it differently: do not cut the pipes into pieces, but only cut them in the right places with a grinder and carefully bend them. In this case, it is advisable to purchase pipes 12 meters long, which allow you to completely manufacture one span of the structure. If this assembly method is chosen, then each span is assembled separately and then welded to the bottom frame. After you have assembled all the main elements of the greenhouse frame from a profile pipe with your own hands, the middle and upper horizontal ties are welded.
Frame assembly sequence
How to cover a greenhouse with polycarbonate
A standard sheet has a width of 2 m, which corresponds to the width of two spans of the greenhouse. Thus, the polycarbonate will only have to be cut to length.
To fasten the sheets, self-tapping screws with thermal washers are used, which are installed in increments of 20-30 cm. Holes with a diameter of 2 mm larger than those of the self-tapping screws are first made in the pipes. This will help avoid the formation of cracks in the coating due to thermal expansion.
Correct fastening of polycarbonate to the frame
The sheets are covered on both sides with a special film, but only the front side, on which the manufacturer’s logo is usually applied, provides protection from ultraviolet radiation. Before installation, remove the film from the inside; it is better to remove the outside film after installation. Polycarbonate has a honeycomb structure, where dust, small insects and bugs can get in, so its ends are protected with silicone sealant or adhesive tape, and it is also applied to the joints.
Polycarbonate can be fixed using a special connecting profile consisting of two guides. One side of it is attached to the frame, then sheets are installed into it and covered with the other part of the profile. This method is more expensive than using self-tapping screws, but it is more reliable and provides the coating with a long service life.
Fastening with a split profile
Video tutorial and professional advice
To see in detail how to make a greenhouse from a profile pipe with your own hands, watch the video in which the master talks about his personal construction experience and shares secrets.
Some may think that making a greenhouse from a profile pipe is very difficult. Well, today there are many options: you can buy a ready-made greenhouse or invite specialists who will build any structure in a day.
But if you want to save money and are willing to work a little to provide yourself and your family with fresh vegetables, you can handle this task.
Choosing material for cladding
An important step when constructing greenhouses yourself from profile pipes is the choice of material for the coating. Not only the appearance of the greenhouse, but also the quality of the future harvest depends on it.
There are several main types of material:
- Glass - has high protective properties. A greenhouse covered with glass protects seedlings from frost, while retaining heat well and not blocking the passage of sunlight. All these qualities create excellent conditions for the growth of many crops (peppers, cucumbers, tomatoes). However, there are also disadvantages - high cost, complexity of installation and fragility. Therefore, this material is rarely used for greenhouses in garden beds.
- Polyethylene film is an inexpensive material, but it does not have high strength; in addition, it deteriorates in direct sunlight, so its service life is not long.
- Non-woven material - perfectly transmits sunlight and water, while providing plants with protection from negative atmospheric influences. It is not expensive, but such material is not durable, it will last no more than 5 years. In addition, it is not durable and can be damaged by strong gusts of wind.
- Cellular polycarbonate is a hard polymer that is light in weight and has high strength. It scatters the sun's rays well, which has a beneficial effect on the thermal insulation conditions inside the structure. Today it is often used to make a greenhouse from a profile with your own hands, since working with this material is not difficult if you correctly calculate the required size.
Structural elements
Greenhouse structures differ from each other in shape, materials and technologies used. Greenhouses that have one or two slopes, a tent shape or an arch are most popular. From a design point of view, greenhouse structures can be made in a stationary form, when there is no possibility of dismantling them, and in the so-called mobile form , which allows the greenhouse to be disassembled for the purpose of storing it in any room in the winter.
As for the structural elements, their set is as follows:
- The foundation is the part of the structure that serves as its foundation, which is necessary to provide stability by distributing the resulting loads. Various materials are suitable for making foundations, such as wood or brick. The best option for constructing a base for a greenhouse is to build a strip foundation in the form of a single monolith, which must be embedded to a depth of at least 80 cm, but ensuring that the freezing point of the soil will be above this mark.
- Frame is a part of a structure, defined as a load-bearing structure, which is assembled using wooden elements and made of PVC or steel. The strength of the frame is the stability of the entire structure. Depending on the chosen material, the pros and cons of this part of the structure manifest themselves. The choice of wood for making the frame significantly reduces the complexity of installation, but is due to the disadvantage of a short service life. Even treating wood with water-repellent compounds does little to improve the durability of the frame compared to a similar structure made of steel. At the same time, the steel frame, although characterized by a long service life and the ability to withstand heavy loads, is susceptible to corrosion.
- PVC frame – strength, flexibility, tightness and safety. This material has a higher price compared to those already mentioned. It is very reliable, which is ensured by stiffening ribs in the form of arches, which are installed every 2 meters. The result is a streamlined shape that eliminates the retention of precipitation on the surface. Assembling a frame from a profile pipe is a low-labor activity that does not require the use of special equipment.
- A profile pipe is a durable structural element that provides additional convenience, which is manifested in the fact that lighting, an irrigation system, etc. can be mounted on its inside.
- Coating is protection from the negative effects of the environment, the manufacturing material of which is usually glass, polycarbonate and film. Fastening is carried out on the frame of the greenhouse. The optimal coating is polycarbonate, which is a reliable barrier to cold air, but does not prevent the passage of sunlight. A coating made of this material gives the greenhouse an attractive appearance and ensures durability of use at relatively low costs for its acquisition.
- Fittings – everything that is part of the fastening system. Its selection depends on the design of the greenhouse and the covering material. If you plan to use polycarbonate, then you will need thermal washers, connecting profiles and self-tapping screws necessary for attaching this material to the metal. A special profile is used to fasten polycarbonate sheets. And if it is aluminum, then this is an ideal option, but quite expensive. It is equipped with rubber seals that provide the required level of waterproofing.
Preparatory work before erecting a frame for a greenhouse
Where does the construction of a greenhouse and greenhouse for a summer cottage begin? Naturally, with the purchase of all the materials and tools necessary for this.
A small greenhouse on a wooden base.
Here is a list of what you will need to make a greenhouse with your own hands according to drawings or photos:
- profile pipe measuring 20x20 mm, which will be used as longitudinal guides;
- profile pipe measuring 20x40 mm for installing vertical struts of the structure;
- metal screws;
- regular door hinges;
- paint and primer intended for exterior use;
- welding machine (preferably with a power of more than 3 kW);
- good construction level;
- tape measure;
- square;
- Bulgarian;
- screwdriver
In all respects, a profile greenhouse is strong, reliable, durable and safe.
With all these tools available, you can safely begin building the greenhouse frame.
DIY greenhouse. Types and stages of greenhouse construction
Unfortunately, not the entire territory of Russia is conducive to growing your own vegetables and fruits for many months. In most climatic zones of the country, the dacha season is extremely short, while many people strive to grow as many crops as possible on their plot for subsequent harvesting. In this connection, gardeners and gardeners willingly use greenhouses, with the help of which the growing season is extended, which makes it possible to harvest an earlier and more abundant harvest. In some cases, if you have a well-built greenhouse, self-grown crops can be consumed all year round.
Of course, for these purposes it is necessary to take into account a number of features, which we will discuss in detail in this article.
Peculiarities
A greenhouse built with one’s own hands always warms the gardener’s soul. The design can be of very different sizes and shapes, and homemade greenhouses are no worse in use and functionality. The device can be easily viewed in diagrams and drawings; materials for manufacturing may be different. Often, fiberglass reinforcement is used as a frame; there are also no problems with removable covering material - mainly polyethylene film, glass or polycarbonate. Taking into account all these features, it is possible to erect such a structure on a site in one weekend, and homemade buildings are in no way inferior in quality to those purchased in a store.
Advantages and disadvantages
Convenient homemade greenhouses are very popular among summer residents. An undoubted advantage is the fact that a self-made greenhouse at the dacha will be relatively cheap. A budget greenhouse can be made from different materials, the most important thing is to equip it with an opening roof and take care of the quality of lighting for the plants. Speaking about the disadvantages, of course, it should be taken into account that you will have to spend time studying the types and designs, as well as familiarizing yourself with the drawings and construction plans at the dacha.
Kinds
Greenhouses are designed taking into account the botanical characteristics of the plant species for whose needs the greenhouse is being built. These also include the amount of light transmitted and the temperature inside. The greenhouse can be either year-round or used during a certain season. In general, all types of greenhouses are suitable for growing a variety of crops - be it Chinese cabbage or flowers.
At first glance, greenhouses can be divided into the following categories:
- single-pitched;
- gable;
- teardrop-shaped;
- dome;
- polygonal;
- Dutch.
- In most cases, pitched roofs are used in the construction of greenhouses or winter gardens, since this type of building has a passage. As a result, you can easily enter the premises without regard to weather conditions. This type of greenhouse is best installed on the south side of a residential building.
- Greenhouses with gable roofs are very popular in our country and are currently the most common design.
- A teardrop-shaped greenhouse is a very durable structure, perfectly transmits sunlight, does not retain precipitation in the form of snow on the surface, but it is quite difficult to install, so such greenhouses are rarely made independently.
- The dome greenhouse has an impressive appearance and does not require a lot of materials, but its main advantage is that, due to its design features, it can be installed in areas with seismic hazard. The main tasks during construction are good sealing and high-quality insulation.
Preparing a greenhouse from a pipe for winter
In order for the greenhouse to stand for several winter months without damaging the structure, it is necessary to take care of this in advance and carry out preliminary disinfection. This can only be done when all plants and auxiliary materials have already been removed. In this case, it is necessary to treat not only the soil, but also the frame itself in order to destroy all pathogens of mold, mildew and bacterial infections.
How to treat a greenhouse in the fall? Most often, sulfur is used to disinfect a greenhouse. Fumigation is carried out at a temperature of 10-15°C. In this case, the standard calculation is 40-50 g of sulfur per 1 m2. Small pallets with the substance are placed at some distance from each other and set on fire. Fumigation should be done by burning sulfur towards the exit to the street. When the last fire is set on fire, close the door tightly and leave the greenhouse in this state for several days. After this period has expired, open all windows and doors and allow the room to ventilate.
A greenhouse is an indispensable element in a summer cottage.
On a note! When fumigating a greenhouse, do not forget about self-defense and compliance with safety rules.
As you can see, independent construction and maintenance of a greenhouse from a profiled pipe is a simple science. All you need is basic knowledge of tools and a little patience. However, if everything works out, you will be able to benefit greatly from the results of your work. And in order not to doubt the result, look at the photos of do-it-yourself greenhouses made from scrap materials. Some options simply amaze with their beauty and functionality.
How to use a greenhouse effectively
How to use a greenhouse correctly to get the maximum amount of benefit from its existence? In warm weather, it is recommended to leave the greenhouse open to provide the plants with the most favorable living conditions. With the arrival of cool weather, the greenhouse is closed to maintain a microclimate inside that is suitable for plants. Thanks to the structure maintaining the required temperature, you can start planting plants in early spring, when the open soil has not yet warmed up. In the autumn, even in the event of frost, nothing will threaten the harvest in the greenhouse.
If you simultaneously grow several different crops, then experts recommend dividing the greenhouse into zones using plastic film. To water plants, you can use either a regular watering can or a more modern and convenient method - drip irrigation.
Growing vegetables in a greenhouse
In the spring, after the greenhouse has stood idle all winter, it is necessary to prepare it for use. This applies to both the structure itself and the soil in it. First of all, carefully inspect all elements for damage. If everything is in order, simply clean the greenhouse of accumulated dust and dirt. If defects are identified during the inspection, carry out appropriate repairs or replace the part.
Depending on the material that was used to cover the greenhouse frame, there are several ways to wash it. The most common and easiest option is to use a regular garden hose.
Indoor profile greenhouse for growing flowers