Why is it beneficial to use bunk beds?
The obvious advantage of these beds is their spaciousness and the ability to rest comfortably for both children and adults:
The feasibility of assembling bunk beds for children is determined by the small area of the room.
The need for additional sleeping places is ensured, taking into account individual sizes. Possibility of creating sleeping places for adults, below, and for children, on the second shelf.
Expansion of the living area for spending free time. Rational use makes it possible to save on the quantity and cost of furniture, as well as on cleaning the room.
A unique look will help create a unique interior with a harmonious and cozy atmosphere, which is so important for a sleeping area and for a healthy, sound sleep. Stylish examples can be ordered from the catalog of finished products, or you can make a bunk bed with your own hands according to the provided drawings.
Using beds not only as a place to relax, but also for storing things and clothes, writing instruments. Some types can combine a desk, a folding desk, a built-in wardrobe, retractable drawers, and a small exercise machine.
Variety of materials: their pros and cons
When choosing or assembling a bunk bed with your own hands, you must take into account the characteristics of its materials. For such furniture the following can be used:
- Chipboard (or laminated chipboard);
Inexpensive material significantly reduces the cost of the model. But it has minimal resistance to damage and a short service life. To make chipboard, glue is used, which is harmful to human health.
- MDF;
Often used to make bumpers, sides and cabinets adjacent to the bed. Has a long service life. Unlike chipboard, it is completely safe for humans.
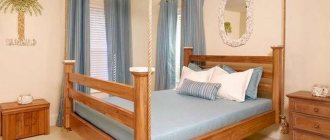
- solid wood;
Wooden beds have a long service life. They are durable, reliable, and useful for humans. A good wooden bed will help create a special microclimate in the bedroom. True, such models have a high price.
- metal.
They have a simple style and will fit perfectly into a room with any style. Strong, reliable and durable. Such models are a metal structure, complemented by wooden or metal bases and mattresses.
Features of the bed
Considering the obvious advantages, it is necessary to note the existing disadvantages, among which are:
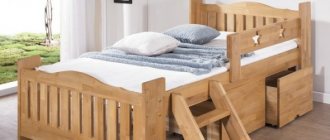
Safety must come first. For a small child, there should be sides on the top shelf; on the bottom they will also protect against falling.
When choosing a bed design, carefully inspect the stairs. A simple, vertical one is suitable for older children.
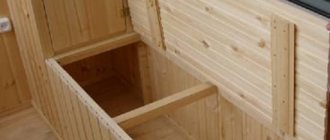
For kids, it is better to choose an inclined option, with comfortable wide steps and handrails. The space under the steps can be used for spacious drawers for clothes, toys, and household items.
How to make a pull-out bed with your own hands
To create a pull-out bunk bed, you can use laminated chipboard. The design made from this material is easy to manufacture and does not require special skills and experience from the craftsman. The first step is to create or select a ready-made drawing of a children's bunk bed with the dimensions of all elements.
For the manufacture of the main structural parts, laminated chipboard sheets with a thickness of 19 mm are used. For the lid and lower side of the podium, you can use a furniture panel 22 mm thick. All elements are made on the basis of detailed drawings of a children's bunk bed with your own hands. The photos clearly show every detail of the design of the appropriate dimensions. The components are fastened using screws, bolts and angles.
To create the top tier, you need two sheets of chipboard for the headboard and footboard, and you will also need two thin strips for the side walls. The retractable structure is made of parts of the same height. The length of this part should be 10 cm less than this value of the upper level.
Wheels are attached to the legs of the lower tier for convenient use
The lower tier is equipped with wheels, thanks to which the bed can be moved freely if necessary. For the lathing, wooden boards 10 cm thick are used. For beds 1.7-2 mm long, there should be at least 7 such strips.
When there is limited free space in the room, and you need to arrange two or more sleeping places, a bunk bed comes to the rescue. Today there are many design options that are selected based on the stated requirements. Having completed a detailed drawing of a children's bunk bed, you can independently assemble the chosen model, which will fit perfectly into the interior and save space.
Types of multi-tiered furniture
A DIY children's bunk bed can be one of the following types:
A standard option for two identical beds, where there are bunks on the bottom and top according to the selected sizes. Experts advise: if your child is 6 years old or older, use adult bed dimensions, 90x190 cm, to make them. The ladder in this form is located on the side and is not removable. For greater stability, the structure is attached to the wall.
Model with a double bed below, which can be transformed into a sofa. The staircase is located on the side, which is not always convenient in order to save space. But due to the lower sofa, which comfortably accommodates several people during wakefulness, there is no need to purchase additional furniture.
Design with an extra bed and a side staircase with built-in drawers. The design provides a third lying place, which is hidden under the bottom of the lower bed and pulled out if necessary.
Savings on furniture occur due to spacious drawers; no additional chests of drawers or wardrobes are required. This model is very large, reliable, and stable.
Note!
Do-it-yourself screen: a step-by-step master class for creating it yourself. Types of screens, manufacturing materials + design ideas- Do-it-yourself installation of interior doors - preparation of the structure, selection of doors, installation step by step + instructions from professionals
DIY shoe rack - types of designs, manufacturing materials, step-by-step master class with simple diagrams and drawings
Non-standard options when several people need to stay in one room. The upper bed is equipped for children's needs, the lower double bed is for parents. The design requires massive parts and fits organically into any interior.
Dimensional designs for large families, with a minimum number of seats designed for four people. The bed is located along the wall with a ladder in the middle.
Such a do-it-yourself bunk bed will require more raw material, additional fastening, and preliminary calculations for installation.
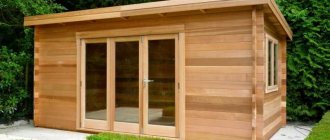
Combined attic structures. On the top floor there is a sleeping place with a side, vertical staircase; below, if necessary, there is a children's corner, a closet, a sports complex, a desk, a computer desk. To assemble bunk beds of the design you like, you can use drawings and diagrams from our website.
Useful tips
- When choosing the material from which the bed will be created, you should take into account the need for finishing (painting or cladding), which is quite labor-intensive and not always possible in a city apartment. To eliminate this stage, you can use laminated chipboard, which does not require finishing work and allows you to choose a color that is in maximum harmony with the rest of the interior items.
- A bunk bed is a fairly massive, cumbersome structure. When choosing a color, you should give preference to light or white shades. Dark tones evoke a feeling of dominance; the bed “presses” on the person in the room and is constantly in sight. Light-colored products are psychologically perceived much more positively.
- In the absence of the necessary production base, the best choice would be to attract outside specialists. They need to order all the difficult-to-manufacture parts and only do the assembly themselves. This will speed up the process and avoid complex, noisy and dirty work at home.
Creating a bunk bed with your own hands is a complex process that includes design, production and design work. The quality and appearance of the future product depends on them. In the absence of skills in working with tools, knowledge of the characteristics of materials and assembly techniques, it will be very difficult to achieve the desired result. Therefore, before starting work, you need to soberly and critically weigh your strengths and capabilities so as not to waste time, effort and materials. The quality of work must be as high as possible so that a bunk bed made by yourself pleases the craftsman and his household for a long time and brings satisfaction from the work done.
Material selection
After selecting a suitable design, taking into account the number of beds and the location of the bed in a room with convenient access to the stairs, consumables, their quantity, quality are determined, and tools are prepared.
Stages of work
How to make a bunk bed yourself? This question is asked by everyone who has decided to correct the problem with the lack of sleeping space in the children's room. Let's try to consider the stages of making a bunk bed at home. Step-by-step instructions will help you complete this work without outside help.
The manufacturing process looks like this:
- the first thing you need to do is choose a bed model;
- draw up a drawing and diagram;
- purchase materials and prepare tools;
- based on the drawing, prepare parts of the required sizes;
- assemble the main frame;
- make the back, side walls, stairs, legs;
- assemble the overall structure.
During design and development, drawings of the bed are prepared. Particular attention is paid to the safety of the entire structure as a whole: strong frame, reliable side walls (fences), easy stair climb.
The most durable is metal
Metal products have the greatest strength and reliability.
Note!
Do-it-yourself sliding wardrobe - manufacturing manual with a full description of the stages, types of structures, choice of manufacturing materials (photo + video)Do-it-yourself carriage screed: step-by-step instructions for creating it yourself, diagrams and drawings for beginners, selection of materials and tools (photo + video)
- DIY stool - types of stools, manufacturing materials, step-by-step master class with simple diagrams and drawings for beginners
A frame made of any type of metal profile, round, square, rectangular or flat, looks stylish, ensures structural reliability, withstands significant loads, is not subject to mechanical damage, is easy to wipe clean, and has a service life of several decades.
Compared to other materials, metal will be more expensive, but with welding skills you can save on the services of a welder.
Economical option
The use of MDF, furniture panels, chipboards for furniture assembly simplifies the work and makes it more cost-effective. It is enough to cut out the necessary parts from the sheet and connect them together. Cutting into parts can be ordered in construction stores and construction markets.
Multi-storey structures involve the use of additional materials, metal, wood to impart stability, ensure reliability and strength.
Furniture panels are mainly intended for covering the finished frame. What is the advantage of mastering such material, its ready-made appearance, wide range of “wood-like” colors. It is already covered with a smooth, laminated sheet with a water-repellent surface and does not require additional impregnation.
The disadvantages of operation include the release of the adhesive composition used in the production of shields. To reduce the effect, all edges are securely insulated.
Production video
- Most videos dedicated to making bunk beds with your own hands demonstrate only certain aspects of assembly. The lion's share of them was filmed for informational purposes only.
- Amateur videos are often shot by experienced home craftsmen: you can learn a lot of useful things here. But only interesting or important moments from the performer’s point of view are demonstrated here. Processes that he considers trivial or well-known are poorly covered.
- The most informative source for a beginner is the instructions for assembling a finished wooden bed. Here the material includes not only the installation sequence, but also a description of all the required parts, dimensions and illustrations for fasteners.
Using the instructions and more detailed video material, it is quite possible to make a bunk bed.
A homemade bunk bed with your own hands is a practical and attractive solution for a nursery. Its design is quite simple, so even a novice craftsman can make it. And it’s even easier to decorate it to the child’s taste.
Instructions for assembling a finished wooden bunk bed (video):
Self-assembly of furniture
Recently, more and more often furniture is made to order or craftsmen assemble the structures with their own hands. This is due to a more precise fit “in place”, taking into account the individual characteristics of the child, his leisure time, and hobbies.
Making it yourself will cost less and you will be confident in the reliability and strength of the design; if necessary, you can always add or replace individual parts.
Experts advise you to carefully read the instructions before work, adhere to safety rules, and do not skip important manufacturing stages.
Schemes and drawings
Making any design of a bunk children's bed with your own hands begins with a drawing. Moreover, you need to make this drawing yourself. Ready-made diagrams and drawings of do-it-yourself bunk beds are not always suitable and here’s why.
- The determining parameter for the size of a do-it-yourself bunk bed is not so much the width and length as the height. If it is expected that children will sleep on it for several years, then the sizes are selected with a large margin. Most often these are standard - 90*190 cm. Alternatively, you can measure the mattress that will be used and determine the parameters of the lounger based on its width and length. In this case, the length of the bed should exceed the length of the mattress by 8 cm, and the width by 10 cm.
- The height is determined by the height of the ceiling in the room. The child on the second tier should not only sit freely, but also move around. In addition, the ceiling hanging directly above your face is very unpleasant. Minimum - a sitting child should not reach the ceiling with his raised hand.
- The distance between the first and second tier is selected based on the same principles. The easiest way to do this is for an adult: sitting on the second tier, dad does not touch the bottom of the upper bed with his head.
- The distance between the bottom of the lower bed and the floor is at least 30 cm.
- When calculating the ratio, you need to take into account the thickness of both mattresses.
Completion of the drawing is mandatory. Moreover, diagrams of two sun loungers, the facade of the structure and the end are required. It is necessary to draw the diagram, taking into account the scale, and in as much detail as possible. Using this drawing, it is much easier to calculate the required amount of materials.
If you use a ready-made do-it-yourself bunk bed diagram found on the site, you need to make sure that the dimensions indicated on it are suitable for a child’s room. They can only be changed proportionally: you cannot simply increase the height of a bunk bed by 30 cm and place the lower lounger higher. Any change affects the stability of the structure. This requires compensation both by adjusting other parameters and by overall strengthening the frame.
DIY bunk bed drawing
Consumables
Required tools and materials:
- Solid wood;
- A set of power tools for woodworking: saw, jigsaw, drill;
- Brushes for material processing, painting, impregnation;
- Paint, impregnation. You can use combined mixtures that include varnish and toner or impregnation and color;
- Set of connecting and fastening parts;
- Varnish.
Detailed master class on manufacturing
Step 1: Determining the bed design. Calculation of consumables. Sleeping place 190x90 cm. You can independently adjust the dimensions of the structure with the transfer of changing the size of the necessary parts. Construction of a drawing (you can download ready-made diagrams from the Internet with attached cutting and dimensions).
Step 2. Processing, drying, impregnation of wood. The material must be dry to avoid deformation later.
Step 3. Cut into parts. For assembly you will need 4 longitudinal posts, staircase parts with transverse footrests, boards for a berth with holes for ventilation - 2 pieces, fencing sides made of timber - at least 5 pieces (for double boards or decorative decorations, parts are added locally, based on their drawing designs).
Step 4. Assembling the structure. It is better to connect the parts of the bed in the room where it will stand, so as not to run into the problem of a large product drifting with its significant weight.
Step 5. Finishing. Painting, varnishing. Experts recommend applying several layers, allowing each layer to dry thoroughly.
Step-by-step instructions for making a bed with your own hands
Assembling a 2-tier bed with your own hands is not a difficult task. But to obtain safe and reliable furniture, you need to carefully consider the plan for its assembly and draw up a detailed drawing of the product. Below we looked at master classes on how to independently assemble beds with two floors of different types. The proposed diagrams will help you easily make furniture without errors. When changing designs, it is recommended to maintain the proportions of the products and take into account the parameters of the materials used (if they differ from those proposed). This will eliminate the risk of assembling low-quality furniture that will not withstand the load and may be damaged during operation.
It is recommended to assemble the products in the room where they will be located. If manufacturing will take place in another room, make sure the finished furniture will fit through the bedroom doorway.
Loft bed: diagram, tools and manufacturing process
You need to make a bed with a “loft” immediately in the room where it will be used: subsequent transfer of furniture will be impossible. To work, you will need a beam with a cross-section of 10x10 cm, boards and slats with a thickness of more than 3 cm, a screwdriver, wood screws, a pencil, a level, a ruler, and a saw. To equip sleeping places, we recommend purchasing a ready-made slatted bottom with suitable dimensions. Using plywood to organize it will not allow you to obtain reliable and safe furniture. The structure should be assembled step by step according to the following scheme:
- Assembly of U-shaped sidewalls from timber. Additional fixation of the jumper from the board in the lower part (so that the “legs” of the bed are securely fastened).
- Assembling the top of the furniture: assembling a rectangle from boards turned edge up. Fastening 2 slats on the inside of the assembled plank rectangle to prepare the base for the slatted bottom.
- Attaching the U-shaped sides to the assembled top of the bed.
- Installation of the side to the base of the sleeping bed.
- Assembling a staircase from two beams and slats placed between them.
- Painting products with harmless paints, varnishing.
- Installation of slatted bottom, installation of stairs, laying of mattress.
Bunk bed with roll-out mechanism
A two-level bed with a roll-out mechanism has two sleeping beds located one above the other. But the distance from the base of the top to the base of the bottom remains minimal. Therefore, for assembly accuracy, we recommend drawing up a detailed design taking into account the optimal distance from bottom to top, at which the top one will not cling during the process of rolling out an additional stock. For work you will need: a 10x10 cm beam, a board and slats with a thickness of over 3 cm, a roll-out mechanism, 2 slatted bottoms, a screwdriver, a screwdriver, wood screws. The crib is assembled according to the following instructions:
- A small frame is assembled from timber, boards and slats (they act as the basis for the slatted bottom). The boards will determine the location of the upper sleeping bed.
- The lower sleeping bed is being assembled from boards. The slats are screwed into the assembled rectangle under the slatted bottom.
- The roll-out mechanism is being installed. Attaching the lower stock to the mechanism.
A bed with a roll-out second bed does not require a stationary ladder. It can be easily replaced by an attached model.
Solid wood duplex bed
A bed with 2 tiers made of solid wood is assembled from the following materials: timber with a section of 10x10 cm, boards and slats with a thickness of more than 3 cm, 2 slatted bottoms. The tools required for the job include a screwdriver, saw, level, pencil, and wood screws. Assembly is carried out as follows:
- Assembling the bases of sleeping boxes according to the size of the purchased slatted bottom from 4 boards (for each bed). Screwing around the perimeter of the assembled bases inside the slatted support to install the slatted bottom.
- Fastening the assembled bases to the 4 support beams. Please note that the distance between the sleeping beds must be at least 1 m (in addition, a mattress will be placed below).
- Making a side from slats and boards, attaching it to the top of the bed.
- Screwing vertical slats (vertical parts of the stairs) to the base boards.
- Screwing steps from slats to the vertical elements of the staircase.
- Painting the bed, varnishing the wood.
Bunk bed made of metal pipes and corners
An iron bed, if painted with high quality and equipped with plastic corner caps, can be used for both an adult and a teenage room. To make furniture you will need the following materials and tools: metal corners 45x50 mm, metal square pipes with a side of 25-30 mm, bed net, grinder with metal circles, welding machine, hacksaw for metal, curved U-shaped pipe (for the side) . Furniture should be made according to the following scheme:
- Welding the bases of the sleeping beds of the bed from the corners. Cutting out parts of the corners for their tight fit to the square pipes during subsequent welding of the elements.
- Welding the bases of the sleeping boxes to 4 pipes to create a strong frame.
- Welding the auxiliary legs to the lower sleeping bed.
- Welding the mesh and welding the side.
- Separately welding a ladder from square pipes and then welding it to the bed.