Advantages and nuances of self-production
The main advantage of making a table with a mirror and lighting yourself is the great variability of designs and a variety of materials. Regardless of the specifics of a particular model, the structure of the product always consists of three basic elements: a work surface made of wood or chipboard, a large mirror, and a place to store cosmetic accessories (a drawer or a bedside table). Possible modifications:
- Two mini chests of drawers connected by a tabletop.
- A cabinet of three sections, to which is attached a narrow table in the shape of an L.
- A table in which four drawers are allocated for storing cosmetics; they are arranged in pairs in two tiers.
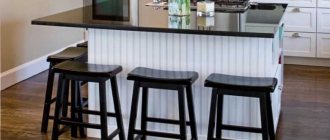
- The surface of the bedside table simultaneously functions as a tabletop.
The latter option is especially convenient for small apartments and is also easy to manufacture. This model can be safely placed in the hallway. But in this case the mirror will need to be hung separately. The remaining models are more complex, but functional and look interesting in the interior.
The complexity of the design and the choice of material should be calculated based on experience in creating furniture and the availability of tools. A DIY dressing table with a mirror is the best gift for family and friends.
Great variability of designs
Variety of materials
Required functionality
Benefits of a dressing table
An important component for any woman is to get herself in order before going to work, a walk, a party, etc. For this you simply need a dressing table. It is convenient to store cosmetics in it, and it can also serve as a decorative element. Such products most often contain a mirror, thanks to which applying makeup is as comfortable as possible.
The dressing table is a convenient place to tidy up your appearance.
Bedroom, bathroom, dressing room or living room, no matter what room is used to install it. It will still become an accent in it. This furniture will fit beautifully into any apartment interior.
You can store not only cosmetics in it, but also hairpins, elastic bands, and various accessories. After all, there are many drawers. A stylish lamp or lamps will add sophistication to it.
In addition to cosmetics, drawers can also store other things, such as accessories and jewelry.
Materials and tools
The most popular materials used to make a makeup table are wood and MDF. Some craftsmen, continuing the traditions of Soviet times, work with chipboard and laminated chipboard. The drawers and back wall are usually cut from sheets of plywood. What you will need for the work is indicated in the table.
| Tools | Set of screwdrivers, tape measure, square, drill and screwdriver, electric jigsaw, sandpaper for sanding surfaces |
| Accessories | Hinges and handles for bedside tables, decorative elements for shelves |
| Fastenings | Nails, self-tapping screws, Euro bolts, metal corners, drawer guides |
As a mirror, a rectangular, elongated panel with a semicircular end is placed on a women's or children's dressing table. Its width in the middle is 50 cm, the height can vary depending on the wishes of the master. To create the backlight, you will need to drill several sockets around the perimeter of the glass frame; the socket and switch will be located at the bottom. For makeup mirrors, any suitable size diode lamps are used. You can make a dressing table with your own hands without lighting.
Chipboard is considered one of the cheapest and most accessible materials. However, if the stoves are made from low-quality raw materials, they will constantly release dangerous toxins into the air.
Materials
Fastenings
Accessories
Cutting and assembling a table with dressing tables
Apply markings to the chipboard using a pencil or thin marker. It is better to cut straight lines on a stationary circular saw with a fine-toothed cutting part. Curved lines are made with an electric jigsaw. The corner dressing table looks very comfortable in the interior.
- When using an electric jigsaw, pay special attention to the correct cutting. The plane of the blade and the end edge must form a right angle. In case of distortions and chips on the plane of the chipboard, you will have to decorate the edge with a “U”-shaped end tape.
- Blanks cut to size are marked for holes along the plane and on the end side. To mark, you will need a carpenter's angle and an awl. Place the dots in the laminated surface with a marker. Marking several identical holes in the end part of the workpieces, stack them using a carpenter's square, draw a vertical line with a pencil and, having determined the center, mark the dots with a marker.
- For drilling, you will need a special confirmat drill or two regular wood drills with a diameter of 5 and 8 mm. A 5 mm through hole is drilled in the planes and an 8 mm chamfer is removed under the confirmation head. The chamfer is removed to a depth of at least 2 mm. A 5 mm hole is drilled in the end parts to a depth of at least 4 cm. It is important to drill holes without deviations or distortions.
- To assemble the dressing table frame for the bedroom, you will need a special “G” or “Z”-shaped 4 mm hex key or a reversible screwdriver attachment. To begin, attach the individual parts, leaving minimal play for correcting the workpieces. Having received the overall picture, having aligned and corrected the details, you can clamp it tightly.
- There are two types of end tape – flat or “U”-shaped. If the surface is cut neatly, without chips or distortions, you can glue a flat trim. The PVC end strip is placed along the front edge and welded with a well-heated iron. Excess edges are removed from the back side with a sharp mounting cutter. The “P”-shaped edge hides chips and distortions of the end edge, but it creates a edge on the plane of the chipboard, and in some places this can create some inconvenience. This kind of trim cannot be used in places where workpieces are joined, or it must be trimmed to ensure a tight junction of the planes.
Drawing selection
A dressing table for a girl or woman is made according to the diagram. Detailing for cutting the basic elements of the product can be done manually or using computer programs. The first option is suitable for craftsmen without experience, the second - for those who have made furniture on their own more than once. When choosing drawings and diagrams, you must consider:
- Design dimensions.
- Its complexity, number of components.
- The presence of a sufficient number of places (sections, drawers, shelves) for storing cosmetic accessories.
- The material for which the drawing is being developed.
You should also consider the presence or absence of backlighting. You can choose a ready-made drawing with dimensions or draw it yourself. Another option is to adapt the dimensions of the finished diagram to the area of the room in which the table will be located. On many thematic forums you can find practical advice on how to assemble a dressing table for a beginner.
If you decide to use a professional computer program, it is better to choose the Russified version, because Western graphic editors may not meet domestic furniture manufacturing standards. Because of this, confusion with sizes may arise, which will significantly complicate the work.
Hanging facades and attaching mirrors to dressing tables
- There are two methods for fixing mirrors: mechanical fastenings and double-sided tape for glass and mirrors. Holes for fastenings are drilled along the perimeter of the figured mirror with a diameter equal to the fasteners and are attached with PVA glue. In the second case, on the back of the mirror there are standard pads or sticky pads made of special double-sided tape for mirrors are glued. For facade doors, special blind holes are provided for attaching furniture hinges. For doors without mounting slots, they need to be drilled out. The diameter for fastening the furniture hinge is 35 mm; you need to put a limiter on the drill, since the hole is blind, 12.5 mm deep. The hinge fits into the socket, is aligned and fastened with short screws to the back of the facade and the inside of the side wall of the dressing table. There are two adjustment screws on the hinge, with the help of which the facade is corrected along the planes.
The final touch is to attach the handles to the fronts of the cabinets and drawers. To do this, holes are drilled along the diameter of the mounting screw. Be sure to place metal or plastic washers on the inside. Beautiful stylish handles always catch the eye and can radically change the most inconspicuous furniture.
With your own hands? What models can be made at home? How to make a dressing table not just a functional item, but also a bedroom decoration.
A dressing table is an optional item, but as practice shows, it is necessary. Sometimes it turns into a shelf mounted under a mirror and is placed not in the bedroom, but in the bathroom or hallway, but in some form it still exists.
And if there is no desire or opportunity to purchase a ready-made item in a store, you can make a dressing table with your own hands.
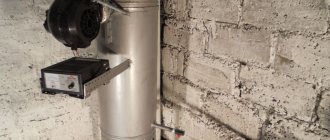
Backlight installation
Installing LED lighting for your makeup table is necessary so that you can find something in your nightstand without turning on a bright chandelier. This is especially true if you plan to place furniture in the bedroom. The main thing is to strictly follow the step-by-step work algorithm:
- Make a frame for the makeup mirror according to the shape of the glass. You can buy ready-made.
- Drill holes around the perimeter for cartridges.
- Insert LED lamps.
- Install a push-button switch with a socket at the bottom.
After this, the dressing room mirror is installed in its place: attached to the tabletop or hung separately. If the frame is square, the number of lamps is 10: 4 on the sides and two on the top. For round glass, the illumination depends on the diameter.
Before you make a dressing table with your own hands, you need to think about the shade and intensity of the lighting. The color of the illumination is chosen at the discretion of the future owner of the furniture. But it’s better to stick to white lamps; with this light it’s more convenient to do makeup. Multicolor LED lamps that can be controlled using a smartphone are suitable for the bedroom. They can change the brightness and color of the glow, which is very convenient.
An original product made from scrap materials will become a worthy decoration for any interior. A homemade makeup table will last much longer than a purchased one. The main thing is not to overload it with cosmetics and other things, so that over time the tabletop does not bend. Interesting furniture made in vintage style will create a unique atmosphere at home. You can place a table with a mirror and lighting in the hallway or in the bedroom, depending on the availability of space.
Make a frame for a makeup mirror
Drill holes for sockets, insert LED lamps
Install a push-button switch with a socket at the bottom
Set in place
Ready
Manufacturing and assembly of a drawer for a dressing table
Decide on the guides. You need two of them, roller or sliding, it’s up to you to choose, the main thing is not to confuse the right ones with the left ones. The longer part of the guide is attached with short screws to the side wall of the dressing table, and the second - to the drawer.
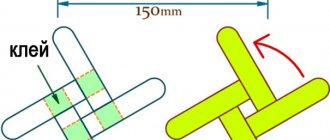
- Three planks of equal thickness and height and an MDF front strip will be required for the dressing table drawer. In the lower part, departing from 5 mm, a longitudinal groove is made, the thickness of which is equal to the thickness of the bottom made of fiberboard or plywood. The drawer is assembled using confirmations or wooden dowels. With a laminated chipboard side wall thickness of 20 mm, two blind holes for dowels are no deeper than 15 mm. Standard wooden furniture dowels have sizes from 4 to 30 mm in diameter and up to 200 mm in length with a longitudinal grooved surface. The structures are assembled under the dowel using PVA glue. The bottom is fixed in the grooves, but does not stick to the glue.
Manufacturing process: step-by-step instructions
Curly shape of the vanity table top with dimensions
You can make a dressing table with your own hands with or without a mirror (the mirror is purchased and decorated separately, fixed directly to the wall). Beginners are recommended to make a model without a mirror. Making a dressing table with your own hands must be done in the following order:
- creation of a draft model (drawing indicating dimensions, list of all materials, elements);
- pattern of all elements on paper/cardboard in the full size of the table;
- cutting the material according to the pattern using a jigsaw with your own hands (you can order a pattern using professional equipment from the seller);
- sanding the ends of all parts with sandpaper;
- double priming of the ends with “Moment” glue of the end sides of the parts;
- pasting the end edge (gluing with a hot iron);
- holes are drilled in the designated fastening points on the internal surfaces;
We pre-drill the parts fastened with confirmations
assembly of the frame (tabletop, back wall, support posts/legs of the table are fixed with confirmations);
We tighten the sides of the cabinet with confirmations with slats and a bottom
- sidewalls, support legs and other elements, if necessary, are duplicated with a corner to increase the reliability of the structure and its durability;
- assemble the drawers: the front and back parts are drilled into the end, the side elements are drilled into the plane (the bottom is secured with small nails);
- the guide parts are fastened with self-tapping screws to the sidewalls, the counter part is attached to the sidewalls;
- the fittings are fixed on the front side of the drawers (pre-drill holes in the designated places);
- finished boxes are installed in guides;
- The product is decorated with your own hands to taste.
We assemble the module “panel with mirror + shelf with supports”, attach it from below, through the tabletop
If the project involves the presence of a door, you need to drill a hole to secure the furniture canopy (fastened with screws). To achieve greater reliability and stability of the product, craftsmen recommend additionally gluing each connection with a suitable glue, for example, PVA. To do this, before tightening the fasteners, the ends are coated with glue.
Diagram of a dressing table with two cabinets for making it yourself