How does the layout affect the interior?
- perception of the coating as a whole - the selected layout option must correspond to the purchased material and look aesthetically attractive after installation;
- creating a creative interior - you don’t have to buy a batch of tiles of the same color and size. You can experiment, try to arrange it in several different ways, and then choose the most interesting one;
- material consumption - all tile laying options require different numbers of products per 1 m2. For example, the classic layout is the most economical, while the unusual layout requires the purchase of more tiles. Also, if your choice fell on non-traditional layouts, be prepared for the fact that you will have to additionally process the materials and, possibly, purchase auxiliary parts;
- visual effects - with the help of the correct selection of ceramics and the method of laying it, you can enlarge the room or raise the ceiling.
- classical;
- diagonal;
- with offset;
- Christmas tree
Laying tiles in a modular way
This method requires an initial accurate calculation of the layout of tiles of different sizes, taking into account the size of the seam. Allows you to create individual compositions; ready-made layouts with the attached diagram and tiles are also available. The easiest way to implement it is to purchase large tiles with an imitation of a typesetting row.
The basic principle of installation is the repetition of a non-uniform pattern over the entire floor area.
Modular floor tile installation
The article examined what options there are for laying tiles on the floor; after reading them, you can choose which option is most suitable for you.
Options
What are the most popular layouts of tile and ceramic materials in the bathroom on the floor and walls today:
Standard without offset
This is the most popular layout plan. In Soviet times, all bathrooms in new buildings were decorated this way, so for many this layout causes instinctive visual rejection. Her example in that version can still be seen to this day in the apartments of elderly people. However, if it is done using large tiles, then the standard layout without offset looks quite stylish and original.
Diamond laying
Or diagonal. Also a very common layout option. Peculiarities:
- Creates a very interesting visual effect and looks stylish. With its help, the most original and stylish designs are obtained. Gives depth to the room and sharpness to the design.
- This is a rather labor-intensive option, so only an experienced master finisher can carry out such a layout. Requires careful calculations and careful cutting of material. Labor costs are comparable to laying mosaics.
Wall panel
Features and rules:
- This layout design makes the room lower while expanding it. You should carefully study the floor plan.
- The floor can either coincide with the walls or be completely contrasting with them. Each design is interesting in its own way.
- In some variations you can see a combination of light bottom and dark top. However, this layout of tiles in the bathroom lowers the ceiling level, so it is suitable for narrow and high rooms. But in most of our standard apartments, small and not too high bathrooms are still more common.
- The border on the walls of the bathroom can be made either as a narrow strip or as a fairly wide independent section, tiled in several rows. In addition, there may well be several of these strips, especially if they are narrow. Just don’t forget that each of them will make the room a little lower.
With border
In this layout option, the tiles that are laid on the floor continue on the wall. But not completely on the entire wall, but 2-3 rows above the floor. Higher up, it is advisable to make tiles of a different shade, most often lighter. This layout plan will make the room design lower and wider.
Fragments with an accent
Adviсe:
If you decide to choose such a bathroom tile layout project, you should know that you do not need to focus on more than 2-3 areas of the bathroom. An ideal example of a layout where accents are made in the area of the washbasin, heated towel rail and shower. Or in another similar version. If you do not want to increase the height of the ceiling, then the accent area should not start directly from the floor, but it is better to do it at some distance
In this case, there is also no need to bring the accent to the ceiling. You can make accents using mosaics. This layout plan does not apply to the floor. Accents made on the floor look ridiculous and inappropriate.
Or in another similar version. If you do not want to increase the height of the ceiling, then the accent area should not start directly from the floor, but it is better to do it at some distance. In this case, there is also no need to bring the accent to the ceiling. You can make accents using mosaics. This layout plan does not apply to the floor. Accents made on the floor look ridiculous and inappropriate.
Equality of colors
In this case, they take several colors - contrasting or similar, usually 2-3 shades - and decorate the bathroom walls with them. In this case, the colors should not be mixed. One wall is laid out in one color, the second in another, etc. You definitely need to choose a harmonious combination of colors. Peculiarities:
- This way you can visually clearly separate the functional areas in the bathroom. For example, highlight the area near the washbasin in red, and use black tiles to decorate the area near the shower. The layout can be both horizontal and vertical.
- In this case, the floors are finished with tiles of the same colors, but they can be mixed. For example, it would be great to use a checkerboard layout for the floor.
- This design does not look good in a small bathroom, as it will visually make the room narrow and small.
The traditional way of laying tiles on the wall and floor
This option for laying ceramic tiles on the wall and floor is considered the most common and simplest. In this case, it is assumed that the tiles will be installed parallel to the walls with the rows fitting as closely as possible to each other. In this case, the laying of tiles or porcelain stoneware on the floor should be as even as possible.
Traditional way of laying tiles
Laying tiles on the floor in the traditional way involves using a product in the form of a square or rectangle.
Decorating a room with the traditional method of laying tiles
Distinctive features of traditional styling
Traditional installation of ceramic products on the floor and wall can become impressive and unique if you use different colors. Although this option is considered simple, it is also recommended to know some tricks:
- Before laying, carefully examine the tiles for manufacturing defects. To do this, lay it out on the floor. And if everything is fine, then it can be used at work. Even the slightest unevenness and roughness are very noticeable;
- If you use a traditional layout of porcelain stoneware or tiles, then be prepared for some monotony in the design. After all, the tile itself is not very decorative. To add color and color, it is better to use additional bright decorative elements in interior design;
A little paint and color in decorating the floor in the traditional way
This method is optimal for seamless tiles.
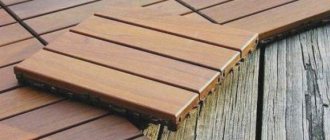
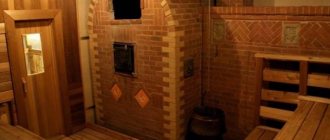
TeremOK
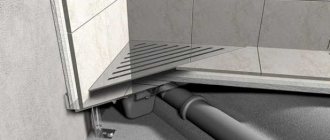
If you want to decorate the floor in an original, “antique” way, then you should pay attention to the method of arranging the floor, known since the time of the French kings - laying tiles in wooden frames . This type of coating is not uncommon in Europe in our time. This option of covering the floor with tiles and wooden frames is suitable for almost any base: concrete, old tiles, etc. The main thing is that it has a stable and more or less flat surface.
If the base has many defects, then it is best to lay logs on top of which to make a subfloor from moisture-resistant OSB-3 board or moisture-resistant plywood. Plywood or boards should be laid in two layers, so that the seams of the sheets overlap. It is very convenient to attach frames to such a base using screws.
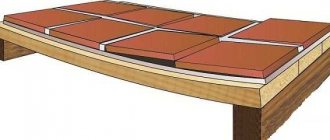
Frames are best made from hardwood. In terms of strength, they should not be much inferior to ceramic tiles, otherwise the frames will quickly wear out. It is very good if the frames are made of oak. You can also take rather rare teak or ash. When choosing ceramic tiles, try to maintain the appropriate style, close to ancient ceramics. Naturally, the tiles must be floor tiles, non-slip and abrasion resistant. It is advisable to choose the size of the tile so that 9 tiles fit in 1 m². This is approximately a 30 x 30 cm tile.
To lay the floor in French, you need to have hardwood planks with a cross section of 50 x 14, ceramic tiles 250 x 250 or 300 x 300 cm (9 pieces per frame), pins cut from the same wood, elastic tile adhesive, a hacksaw, wort (a device for cutting at an angle), an electric drill, a spatula, a router for processing edges, cutting grooves and quarters, varnish or oil for impregnating wood.
First of all, you should mark the subfloor or base. You can draw directly on it or make a drawing on paper after first “taking measurements” of the room. You need to immediately think about the number of tiles placed in one frame. The optimal option is 9 tiles (as noted above), although it all depends on its size. It should be kept in mind that frames should not be made too small or too large. On average, the frame size is about 1 m².
Next, you should prepare the frames, for which you need to choose smooth and beautiful boards. Plan them and select the grooves. Carry out pruning using wort. Calculate the dimensions of the frame based on the dimensions of the tiles, taking into account the seams. The thickness of the planks is about 14 mm. This corresponds to the thickness of the tile (10 mm) plus 4 mm for the adhesive layer. The outer side of the ribs of the planks should be processed - chamfered at an angle of 45 degrees and cleaned. This is the lifting of corners during operation.
In the middle of the opposite edge of each plank, a longitudinal groove (cut) should be made with a depth of 6 mm and a cross-section in the form of a right triangle. This is done using a 45⁰ single-angle cutter and a router. The frame is assembled in such a way that the beveled part of the cuts faces the floor. This groove performs a double function: by drilling holes (3 mm) perpendicular to its inclined wall, you can screw the plank to the plywood base using screws (3x25 mm). In addition, when laying tiles, this groove is filled with cement, which ensures more reliable adhesion of the adhesive mortar and wood. And yet, the groove creates a local expansion of the adhesive joint, which reduces the possibility of cracking due to the fact that ceramics and wood have different coefficients of thermal expansion. The connection of the planks can be made either at an angle of 90⁰ or 45⁰. Squareness should be checked using a square. The frames are glued with polyurethane wood gauge. After manufacturing, it is advisable to immediately treat the frames with a moisture-proofing agent. Tinting and coating with parquet varnish will only emphasize the naturalness of the wood.
The finished frames should be laid diagonally on the base. Make a marking line on the floor and screw an aluminum ruler along it. This ruler will serve as a stop and must be removed after gluing the first frame. Subsequent frames must be attached end to end. The lower surface of the first frame should be coated with polyurethane glue using a staple, positioned correctly on the floor and screwed with 12 screws (3x25 mm) through pre-drilled holes in the walls of the triangular grooves. Adjacent frames are fastened together by their outer edges using insert strips measuring 5x20x850 made of waterproof plywood. The subsequent installation of frames is carried out in a similar manner. As a rule, at the end of each row it becomes necessary to trim the frame. To do this, measure the distance from the wall with a tape measure, mark it on the frame and saw off the excess.
After all the frames are secured to the base, attach each of them at the four corners to it with pins. Then the design will take its finished form. To do this, you need to drill holes with a diameter of 8 mm in place in the frames and the base of the floor. The pins are made by splitting scraps of wood (the same as for the frames) into blocks and shaping them into a cone shape using a knife. Having lubricated them with glue, hammer the pins into the holes with a mallet, and cut off the excess flush with the frame and sand it with sandpaper.
The tiles are laid in the usual way using cement adhesive. Take care of the cleanliness of the wooden frames by sealing them with mounting tape while you are tiling. Leave even seams between the tiles, which you then fill with fugue. Be careful not to stain the wooden frames.
Types of layouts
There are many types of laying tiles on the floor and walls of the bathroom, from the simplest to the incredibly complex. Each option has its own advantages and features. Let's look at the most popular types of tile laying.
Straight
The simplest and most popular option for laying tiles in the bathroom. The tiles are located strictly parallel to the floor and walls, side by side. For such a layout, a simple rectangular or square shape is suitable.
Running
Otherwise, such a design is called brick or stone masonry. In order for such decor to look harmonious, it is worth choosing the right proportions of the tiles. The ideal ratio of width to length is 1 to 2. How beautifully you can lay out tiles in the bathroom, imitating brickwork, is shown in the photo below.
Diagonal
One of the most difficult methods of laying tiles in the bathroom, requiring experience. When choosing such masonry, it is necessary to take into account that due to the constant cutting of tiles, the material consumption will be much greater compared to other options. However, the effort and money spent will be worth it, since diagonal laying of tiles is also one of the most impressive.
Despite its effectiveness, diagonal design is not suitable for every bathroom. If the area is small, it is better to use simpler options, since the diagonal will only make all the shortcomings of the room visible. It is better to choose a similar layout for a spacious room, but you should pay attention to the curvature of the walls - they should be perfectly smooth without deviations from the perpendicular axis. You can see in the photo how to use tiles laid diagonally in bathroom design.
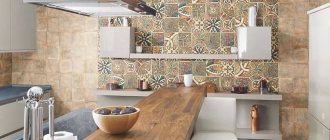
Modular
An eye-catching choice for bathroom design. In this case, tiles of different sizes are used; they can be laid out in any combination, which gives room for imagination. There are a lot of options for combining different tiles in the bathroom; the most interesting ones can be found in the photo.
Horizontal
Clear lines can significantly change the proportions of a room. The horizontal layout of the tiles most often consists of a dark bottom combined with a light top. There may also be an option with several horizontal stripes of different colors. With this design, plain tiles are most often used.
If you choose a finish with patterns, it is better to separate parts of the masonry with a plain border. To make the design more harmonious, the border is used not only at the bottom of the walls, but also under the ceiling. You can see what the horizontal tile layout in the bathroom will look like in the photo below.
Vertical
With a vertical tile layout in the bathroom, brighter stripes clearly stand out against a plain background. The width of the stripes can be different, the same or alternate. However, it is worth considering that too many stripes look too bright and are not suitable for decorating all the walls of the bathroom. In this way, it is better to highlight only one wall, a separate area or niche.
Vertical stripes visually stretch the room upward, while at the same time narrowing it slightly. This looks good on long longitudinal walls, but not on the ends in narrow rooms. Using stripes, you can highlight different areas of the bathroom, if it is combined with a toilet, as well as the most significant design elements.
Mosaic layout
The combination of regular tiles and mosaics in the bathroom looks very impressive. A real mosaic is more difficult to install, since it requires laying out hundreds of small elements exactly according to the diagram, without ever making a mistake.
However, there are simpler options - ready-made mosaics on a grid or imitation. Mosaics can be used in different ways:
- Wall decor. The mosaic pattern can be made in one color or with a full pattern. The choice of ornaments, colors or subject of images depends on the style of the interior and the personal wishes of the household.
- Flooring. If the bathroom is small, colorful mosaics on the walls may look too bright, but similar decor on the floor will look good even in a small area.
- Zoning of space. Using mosaics, you can divide the bathroom into zones. This type of finish is especially popular in the shower area or on the wall along the bathtub.
- To attract attention. Mosaics can be used to highlight specific details, such as a sink or bath towel hooks.
- Decoration. Mosaic does not have to occupy the entire bathroom; it can be a border, individual stripes or patterns.
- Hard to reach places. The tiny details of the mosaic allow it to be used for finishing the most complex surfaces.
How beautifully to combine tiles with mosaics in the bathroom can be seen in the photo.
How to lay out tiles in a bathroom
Ceramic tiles are the most popular, reliable, durable and easy-to-care material for bathroom walls and floors. To create a stylish interior, you can choose tiles, borders, and inserts from one collection. Or you can choose completely different “ceramics” and think over your own version of the layout.
The layout is a combination of tiles of different colors and shapes, as well as base tiles with borders and decorative inserts. With the help of the correct layout, you can even out the proportions of the room, zone the space and simply create a stylish, unique interior.
Functional solutions
| Hide the shortcomings and highlight the advantages of the layout - a well-made tile layout can handle this. Below we will tell you how to choose a tile layout for narrow rooms and rooms with low ceilings. |
Layout for rooms with low ceilings
Bright vertical stripes will help make the space more slender. It is best to place them in the area of the mirror, toilet, shower stall - this way you can emphasize the functional areas. Designers advise using several stripes: one main, wide and/or bright, and several additional ones.
A border of decorative tiles laid at the top of the walls will also help to visually raise the ceiling. A bright stripe will attract attention and lead the eye higher.
| Other ways to visually increase the height of a room:
|
Layout for a narrow room
If you want your bathroom to appear wider, your layout option is “white top, dark bottom.” Between the color blocks you can put a border or a series of decorative panels. It is important to “parallel” contrasting rows and interior items. For example, lay out light-colored tiles so that the stripe begins in the same place as the bottom edge of the mirror or wall cabinet.
Another way to visually expand the room is to make a wide, light horizontal stripe around the entire perimeter. It is important that it passes approximately at eye level.
Additional techniques for visually expanding the bathroom:
|
|
Classic layout options
If your bathroom is spacious enough, classic tile layouts will do.
| Allocation of functional areas Multi-colored tiles will help divide the bathroom into zones. You can use from two to four colors or combine a basic neutral background with inserts of a different shade (optionally, with a print or complex texture) |
| The wall as an extension of the floor The front wall and floor are decorated with tiles of the same color and size. This technique helps organize the space. The most simple and stylish solution. |
|
| Example of accent fragments | Accent fragment Most of the walls are decorated with base tiles in a neutral shade. The smaller one is made bright, or, as an option, also with a complex texture. Options with patterns and botanical prints, wood and natural stone stylization are suitable. You can also use panels or mosaics as an accent. By the way, if there are small irregularities on the walls, they can be successfully hidden with the help of mosaics. |
| Contrast inserts It is not necessary to lay out vertical and horizontal stripes of tiles. You can randomly place bright areas on one or two walls. If you prefer order, place a bright frame around a rectangular mirror or add a statement edging along the bathroom. |
| Non-standard direction The layout looks impressive diagonally, at an angle of 45 degrees. This technique, by the way, allows you to visually increase the space of a small bathroom. Rectangular tiles can be laid in a herringbone parquet pattern. Pay attention to other parquet laying schemes: “brick”, “wicker”, “deck”, “squares”. The popular “hog” tile can be laid not only in the usual horizontal, but also in vertical rows. Using this technique it is easy to highlight functional areas. |
| It is not necessary to cover the entire surface of the walls with tiles. You can use ceramics in the lower part, and plaster and varnish or paint the upper part. The main thing is that the upper border of the tile goes just above the washbasin. If you install a sink at a standard height of 85 cm, the tiles should go up to a height of 115 cm. You can focus not on the sink, but on the door. In this case, the tiles should go 10-15 cm below the door frame. Another option is to lay tiles only in the wet zone, that is, in those areas of the room where water usually gets in. | An example of a combination of tiles and painted walls |
Universal tips
1. Horizontal stripes make the space wider, vertical stripes make the space taller.
2. If you decide to mix tiles and painted/plastered walls, remember that the paint and varnish must be moisture-resistant, with bacterial protection.
3. It is best to place decorative borders and inserts no lower than eye level.
| 4. If you are not ready to experiment with bright tiles and contrasting combinations, use medium or small plain tiles and colored grout. 5. If you want to do diagonal laying, choose small format tiles. With it, there will be less waste when cutting - this way you can save money. 6. Tiles from different manufacturers and from different collections may not be the same in thickness. To avoid problems, lay tiles from the same series on one wall. |
Layout planning
To plan the layout of the tiles, you will need a tape measure, a ruler, simple and colored pencils and paper.
| Start by measuring the floor and walls of your bathroom. Then draw a floor plan. It needs to indicate: the perimeter of the floor and walls;
|
|
Choose tiles, porcelain tiles and mosaics in Leroy Merlin hypermarkets and on our website. Don't forget about glue, corners, grout, tools and inspection hatches.
Diagonal pattern
The basic method of laying ceramic tiles is considered the main one for any subsequent ornament, one of which is diagonal. It is one of the most complex, but very beautiful and original methods of laying ceramics.
The peculiarity of this ornament is that its pattern is turned over at an angle of 45 degrees to the wall. It is recommended to use square-shaped tiles, preferably plain ones. The difficulty is that every piece of ceramic that is adjacent to the walls is trimmed. And this significantly increases the time required to complete construction work and a lot of waste is generated.
On the other hand, using this method of laying tiles, you can effectively hide any unevenness in the floor and visually significantly expand the space of the room. The most successful use of the diagonal method is in the kitchen and in the hallway of the apartment (house). And for the bathroom this is an ideal option.
Layout of tiles diagonally from the center.
In this case, it is very important to correctly calculate the materials, especially if a checkerboard layout pattern will be used in the future. Installation recommendations are identical for both floor surfaces and walls
The installation recommendations are identical for both the floor surface and the walls.
Before you begin directly laying tiles, you need to prepare the floor surface. So, you need to thoroughly clean the base of the floor from the remnants of the previous covering material. It can be linoleum, bitumen or wooden elements. Regarding weak and particularly absorbent areas, it is also necessary to pre-prime the surface. After all, a flat floor surface helps simplify construction work on laying ceramics and significantly saves special tile adhesive. If the floor renovation will be carried out in the bathroom, it is additionally recommended to waterproof the base.
Getting started with diagonal laying does not require much effort. After all, the tiles are laid in a direct way using rectangular ceramic elements whose length is equal to the diagonal of the square ceramic tiles. The latter are the main ones in the construction process.
Then, using previously prepared tiles in the shape of a triangle, the second row is laid along the hypotenuse. As for the subsequent rows, it is recommended to lay them according to the following patterns:
- Using the horizontal row method, the upper and lower corners must be positioned in a straight vertical line. Whereas on a straight horizontal there will be lateral angles.
- The inclined row is considered a very complex method of laying “diagonally”. After all, only a specialist can produce it; a beginner cannot do it.
Diagonal arrangement of flooring material
Scheme for laying tiles diagonally.
The basic installation method is the basis for creating different tile installation options. One of these methods is laying “diagonally”. This option is not easy, but the most beautiful.
The peculiarity of this pattern is that the pattern grid is turned over at an angle of 45°. To implement this method, you should use a square-shaped material. In this case, it is recommended to use ceramic tiles of the same color. The disadvantage of this method is that the tiles located in the corners must be cut off. This will take quite a lot of time and generate a lot of waste. You should pay attention to this when purchasing tiles.
This installation method makes it possible to hide existing floor imperfections and visually expand the room. It can be used to decorate the kitchen, hallway or bathroom.
If this installation method is chosen, you will need to make an accurate calculation. This is especially necessary if a checkerboard diagonal laying is chosen.
Before installation, you will need to carefully prepare the surface. The base should be cleaned of various particles of bitumen, wood inserts, linoleum or paint. Absorbent substrates need to be primed. It is very easy to lay tiles on a perfectly level surface, and the adhesive costs will be minimal. In order to install this material in the bathroom, it is recommended to waterproof the surface.
Scheme of the initial stage of laying tiles diagonally.
If the tiles will be laid “diagonally”, then the 1st row should be laid using the standard method. In the initial row, you need to use rectangular ceramic tiles, the length of which is equal to the diagonal of the square tile. The next row should be laid from triangular-shaped material, which must be prepared in advance. All other rows can be laid using the following methods:
- Row at an angle. An installation method that can only be performed by a highly qualified specialist.
- Row horizontally. In this case, it is important to ensure that the corners of the material, which are located above and below, are located on a straight vertical. The side corners should be on a straight horizontal line.
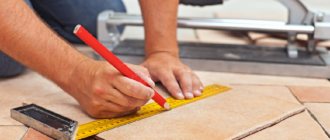
How to choose the optimal layout
Before choosing a tile, it is worth drawing a sketch by hand to decide on the type of cladding. To do this, you need to draw a detailed plan of the room with all dimensions and furnishings:
- carefully take measurements of the floor and walls, openings, and indicate the parameters on paper;
- draw up a drawing of the bathroom and be sure to show the location of the doorway, window (if any), all niches and ledges;
- indicate the location of plumbing fixtures, sockets, switches, and pipeline outlets.
Now that the plan is ready, you can choose the optimal layout scheme using sketches with colored pencils. Such a sketch will help determine the best location of decorative elements, places to cut tiles, and problem areas. Be sure to consider the degree of complexity of the work if you plan to do the cladding yourself.
Tile layout options may depend on the geometry of the walls and the presence of protrusions
Correct layout of tiles in the bathroom
Repair of ceramic floor tiles
Under the influence of fluctuations in temperatures, loads and time, sooner or later repairs will be required. Let's look at common problems and options for solving them.
Repairing minor chips and scratches
You can easily fix such minor defects with your own hands. It is enough to take grout for the joints that matches the color. Dilute it with water to the consistency of thick sour cream and apply it to the surface of the ceramic tile with a rubber spatula (or just by hand).
Repair with replacement of one element
If one or more adjacent tiles are cracked or falling apart, repairs must be made to completely replace these areas. The most difficult thing is to remove the broken elements without touching the whole ones. There is a way to do this neatly:
- First of all, take care of yourself - put on safety glasses, a helmet or at least a cap, and take care of your hands and feet.
- Cover adjacent elements and joints with adhesive tape or masking tape to prevent damage to their surface.
- Using a grinder, make cuts along all four sides of the damaged tile. The cut should go as deep as possible so that our manipulations do not affect the adjacent plates.
- Drill several holes with a drill (without perforation mode).
- Using a chisel, pressing against the drilled holes, break the plate into pieces.
- Clean the surface of old tile adhesive. Apply a layer of deep penetration primer. Using a notched trowel, apply a layer of adhesive to the floor (or tiles).
- Lay the tiles. Use a building level to ensure the new element lies level.
- Let the glue dry completely, then use grout to go over the seams.
The video shows how to replace one tile on the floor (~ 3 minutes video)
Reasons for tile deformation
In any case, no matter what kind of repair you carry out, the most important thing is to understand the causes of such defects and try to correct the cause itself, and not deal with the consequences every time. If defects, and usually this is cracking of elements, occur due to temperature changes and, as a result, movement of the base structure, it is necessary to consider the possibility of thermal insulation of the floor. If the causes of defects are related to humidity, it is necessary to take care of waterproofing or selecting materials with the highest level (lower percentage) of water absorption.
These days they make floor tiles of amazing quality, so if you frequently repair tiles, you may have selected the specifications incorrectly. Contact your building materials supplier or find a new one.
Large format tile installation system
Regardless of where the tiles are laid, you need to know that a lot depends on the skill of the tiler, and on how and with what materials he is used to working. Laying on cement mortar is still very common, and any tiler usually has his own rules for its preparation, using one or another brand in combination with a specific part of sand and plasticizer. In turn, this also affects adhesive mixtures, which are presented in a huge assortment: some prefer to put on a more fluid composition, spreading it with a delicate layer, while others, on the contrary, prefer a more viscous one, which can be laid in a relatively thick layer and therefore small bulges on any surfaces will be corrected directly with the adhesive during installation.
Laying
Much attention is also paid to the mixture for laying flooring. It should be homogeneous
A mixture that is too thick or thin will not work. If during the work the master breaks the tile and it is impossible to buy a replacement in the store, then the professionals have a proven technique for this. You need to crumble the old tiles and lay them out in the form of a mosaic.
You need to know that whole tiles are laid first. And only at the very end the missing halves are assembled. The trimmings begin to be laid out after the main laying fabric has dried. Then sheets of plywood are placed on the finished part of the floor and the missing parts begin to be laid out.
Excess mixture that comes out should be removed with a cotton cloth. If it is not possible to completely remove it right away, then after finishing the work all excess must be removed. Special chemicals or ordinary water and rags will help with this.
Offset brickwork
To add variety to the interior, some owners use a scheme that replicates the brickwork of the walls. It got its name because the elements of each next row are shifted relative to the previous one.
The amount of displacement can be different, by half a tile, by a third or even by a quarter. The latter is called “deck” due to its similarity to the covering of ship decks. The choice depends on the taste of the apartment owners.
Note that this type of installation is suitable for rectangular tiles. With its help you can create a beautiful “parquet” tile pattern. It is especially good if the ceramic surface imitates natural wood.
Stylists do not recommend using tiles of 2 contrasting colors in this method.
Note that offset installation can be done either with a parallel installation method or with a diagonal installation method.
In order for the floor surface in a kitchen with this type of coating to be smooth, the master must strictly maintain the same distance between the masonry elements.
Methods for laying one-dimensional tiles
At the moment, the following options for laying out tiles on the floor are most in demand:
- Base;
- Basic at an angle;
- Chess;
- Checkered at an angle;
- Take a running start;
- Take a run at an angle;
- Lines and geometric shapes;
- Kaleidoscope;
- Carpet;
- Sockets;
- Combining drawings.
Criteria determining the choice
Modern options for laying out tiles on the floor are determined by various factors, among which we note:
- Geometric complexity of the room;
- Assortment of facing materials on the market;
- Aesthetic preferences of the customer;
- Project budget;
- Qualification of the craftsmen involved in installation.
Choosing the optimal layout type
- The basic type of installation has become widespread due to its simplicity and versatility. The fact is that such technology is equally in demand both in the arrangement of residential premises and in the finishing of public buildings.
The photo shows the basic layout
You can find tiles laid in even rows close to each other in commercial centers, offices, waiting rooms at airports and train stations, and in other places with high traffic levels. The advantage of the technology is the short installation time and guaranteed aesthetic result.
- The basic layout of porcelain tiles on the floor, made at an angle, is an opportunity to quickly and easily diversify the interior of a room. In this case, the tiles are also laid in rows close to each other, but diagonally.
As a result, a properly laid flooring consists of evenly spaced, equilateral diamonds.
Basic angled position
- The chessboard laying method can be done with your own hands, but it is considered more difficult to implement. Most often, for this method, contrasting tiles are selected in order to highlight the checkerboard pattern as much as possible.
Chess method
But, according to experts, there is no particular need to purchase contrasting tiles, since products with a difference of one or two tones can be successfully used to create a checkerboard pattern. To implement the most attractive floor design, it is advisable to use tiles without a pattern. If there is still a pattern, we position the tile so that the image is in the same direction.
- Checkerboard laying at an angle is performed like regular tile installation, but in a diagonal direction.
- The installation is carried out approximately in the same way as finishing brickwork. The point is that each subsequent tile is laid with some offset relative to the previous one.
Installation in a running motion
The optimal aesthetic result in this case is possible by using rectangular porcelain tiles with a wood texture. As a result, a properly tiled floor will resemble parquet.
This installation technology requires special care, since the expansion joint should be minimal so as not to spoil the aesthetics of the parquet board. One way or another, this technique suggests the advisability of installing rectangular rather than square tiles.
- Porcelain tiles are laid at an angle at an angle by craftsmen with a high level of qualification, since the facing material is not located parallel to the walls, but at an angle of 45 degrees.
Installation at an angle
By the way, the use of this method is relevant in rooms with perfectly smooth walls.
According to experts, tiles laid at an angle emphasize the unevenness of the walls and this must be taken into account when choosing the optimal method
- The herringbone pattern imitates classic parquet. Of course, to achieve the desired result it is necessary to use rectangular tiles.
Herringbone tiles
Methods for laying floor tiles (photo)
Now there are a huge number of types of tiles and ways of laying them on the floor. Unusual designs and color variations make your eyes run wild, and it’s difficult to make a choice. It is important not to forget the general concept of the interior, shades and furnishings.
Base
In basic installation, the tiles are laid in a row
Basic installation - the easiest way to create a seamless fabric
Another option for basic installation is at an angle. The rectangular shape with this layout does not look so impressive, but there are also ways to diversify the space. You can, for example, make a frame from a darker one, placing a lighter one in the center, or randomly insert details of contrasting bright colors.
Large tiles laid at an angle will look better
Photo gallery: options for laying tiles with a base sheet and at an angle
Chess
In this variation you can play with contrast, or you can take tiles of different shades of the same color
With this type of flooring, you will bring a more joyful mood to the room, making the interior brighter and more cheerful. It is not necessary to use tiles and decorative materials in contrasting colors; you can make the floor softer by using slightly different shades of the same color. If you purchased a floor covering with lines or stripes, you can create a checkerboard effect if you lay it so that the lines are perpendicular to each other.
Keep in mind that this method will generate a lot of waste.
In the second option, the tiles need to be laid according to the same pattern as in the example with the base one at an angle. The only slight difference is that you will have to alternate light and dark colors. And don’t forget that with this installation you will have a lot of waste.
Photo gallery: chess styling ideas
Staggered layout
This method resembles brickwork
When laid staggered, the floor pattern should resemble brickwork. For this option, both square and rectangular tiles are suitable. But there is one caveat: if you choose tiles of several colors or different textures, then visually your floor will seem crooked to you. This will not be in any way connected with errors in work, it will appear so visually. The other method is more labor-intensive. In this case, the tiles are not laid parallel to the wall, but at an angle of 45 degrees. This type of installation requires perfectly smooth walls and corners of the room; such a floor will only highlight any unevenness.
The most popular installation methods
There are several most popular ways of laying tiles on the floor. Let's talk about them in more detail.
Basic drawing
The basic ornament has existed in our country for a very long time. At one time, they designed standard bathrooms, for the decoration of which square tiles were used. Modern experts recommend using large tiles to complete the basic design (an exception may be aprons in the kitchen). The basic version is ideal for laying rectified tiles without gaps.
Basic at an angle
This drawing is somewhat more interesting than the basic one. But to get started, you will need an inexpensive tile cutter, since to create the original pattern, the tiles will have to be cut very carefully. The basic ornament at an angle hides curvature and surface defects and is perfect for installation in the kitchen and bathroom.
Laying out in a run
The method is usually used to cover the surface with rectangular tiles and is an imitation of the laying of ancient sidewalks and pavements. The running method is used by specialists when there is a need to emphasize the authenticity of a room or when creating interiors that have a historical focus. Laying should begin in the center of the room in the shape of a triangle.
Chess drawing
A spectacular ornament, which most often uses contrasting colors, greatly enlivens the space, giving it brightness and elegance. Suitable for any room and surface.
"Chess" at an angle
An original ornament that has the same characteristics as “chess”, but at the same time perfectly hides the curvature of the surface. Staggered laying can have the opposite effect, as the surface will appear uneven due to an optical illusion.
Line drawing
This pattern looks very original in any interior. To perform this installation, you need to purchase tiles of the same size and shape, but in different shades. Looks great and unique as borders.
Carpet pattern
The laying pattern in the form of a carpet is suitable for people who want to create an unusual design using tiles or ceramic tiles. The idea of a drawing is limited only by the imagination of a specialist. Tiles of various shapes, colors and sizes are suitable for installation.
Drawing "ornament"
Similar to the previous picture. It seems that when compressed you can see a checkerboard pattern, so the “ornament” can only be enlarged. At the same time, increasing the center gives the pattern an additional advantage. In the photo you can see that the dark tiles around the central, lighter part take on the appearance of borders.
Kaleidoscope drawing
This is a collection of cute and fun patterns. When performing, small tiles of various colors and shades are used. A large tile in a “kaleidoscope” installation turns into a set of awkward spots.
Herringbone pattern
The installation method imitates parquet and is suitable for rectangular and elongated tiles. In this case, the material can be placed either in a zigzag or randomly. It is not recommended to use tiles with marble or stone imitation on the surface. A cladding that has a long and narrow shape will visually enlarge the room. A larger tile, on the contrary, will reduce it. With this installation method, the use of a large number of colors is encouraged.
When actually using one of the installation methods, do not forget about the rules for working with tiles and some of the nuances of making ornaments. And then any, even the most daring experiment, will have a positive result.
Preparation of the floor base and materials
Now you know some options for laying tiles on the floor. Before proceeding with the most suitable type of installation, we recommend that you prepare the base on which the material will be laid out. Ideally, this preparation should consist of installing a floor screed, followed by leveling with self-leveling mixtures and priming the surface. But if the renovation budget is not too luxurious, it is enough to remove the old screed in places of pronounced damage, plaster and level the “horizon” of the floor.
Good luck! We think you will succeed in everything you set out to do.
It is difficult to imagine a house or apartment in which at least one room is not decorated with ceramic tiles. Its popularity has remained high for probably centuries. And all because the material is truly amazing, having many advantages over others. It is moisture-resistant, wear-resistant, easy to maintain and install, comes in a wide range of colors, shapes, textures, and at the same time costs in a very different price range. Everyone can easily find a suitable option for themselves.
cutting
This is not a difficult task, but it requires skill and special tools. There are different types of tiles, each of them requires its own set. For tiles with a porous structure, you need to use a glass cutter. Such a device will not be able to cut other ceramics; there are special types of electrical devices for it.
There is a special scheme for using a glass cutter at home. First, the cutting line is marked. The tiles should be laid on a horizontal surface to avoid slipping. Then a straight line is drawn using a ruler using a tool. It is not recommended to press down firmly on the tiles during this work.
Then you need to tap on the other side of the plate along the cut. The next step is to push the tile to the edge of the table with the cut end and press on the edge of the tile. If all the technology is followed, the ceramics will break off strictly according to the mark. Uneven ends can be corrected using pliers or sandpaper.
The scheme for using a tile cutter when working with tiles is somewhat different.
The tiles are laid on the base of the tile cutter. After this, the blade is pressed tightly against the plate and the tool handle is pulled
Close attention should be paid to the correct direction of the blade in relation to the tile. All these manipulations must be done at one time so that all the edges come out smooth.
As a result, the resulting cut is broken off by hand.
Layout methods
There are several installation options, on which not only the overall appearance, but also the spatial perception of the bathroom will completely depend.
Standard
This is the most popular and fairly simple method that allows you to significantly save time and materials. With this layout, the tile modules are placed in even, straight rows, seam to seam. This standard design option can also be combined, in the form of a harmonious multi-colored cladding, due to which it is possible to significantly diversify the design.
The photo shows a bathroom interior with a standard tile layout made in two colors.
With offset
This layout is also called running or dressing. When using it, it is possible to create an imitation of brickwork and, depending on the direction of the rectangular elements, make changes to the geometry of the space.
The photo shows the layout of green boar tiles with an offset on the wall in the interior of the bathroom.
Checkerboard
Basically, this classic layout involves the use of square black and white tiles, reminiscent of a chessboard. Also, to create a more interesting pattern on the surface, other combinations would be appropriate, for example, blue and yellow, red and white, beige and brown, or purple and light green.
Herringbone
It has a rather luxurious appearance and is characterized by the placement of elements at an angle of 90°, which repeats the laying of parquet boards. This design is distinguished by the presence of several subspecies, such as French herringbone, double herringbone or triple herringbone, which looks like weaving.
The photo shows a bathroom with narrow rectangular tiles in different colors with a herringbone layout.
Diagonally
Thanks to diagonal laying, you can not only decorate the surface, but also hide its minor defects and visually expand the boundaries of the bathroom. For this method, square tile products are most often used, with a plain or patterned design. The only negative is that after cladding a lot of excess material remains.
With border
It involves dividing the room by color into two parts, where the cladding of the lower level has darker shades, and the upper one has lighter shades, or vice versa. With this installation you can make the room lower or wider.
Modular
Looks great both on the walls and on the floor. For a modular layout and creating an interesting geometric pattern, at least three tile elements of different sizes are used.
Linear
Provides the ability to apply tile finishes of different colors, which can be arranged in the form of wavy, solid, broken or parallel lines in any order.
The photo shows the interior of the bathroom, with a wall lined with mosaic tiles with a linear layout.
Carpet
This method is externally similar to a carpet with a magnificent geometric pattern. A tiled carpet or panel can feature bright patterns on a plain fabric or be framed with a colored border.
Ornament
It can have the most varied, intricate design and ornate patterns with alternating different masonry options and the use of tiles or mosaics in three or more shades.
How to decide on the method of laying ceramic tiles?
When choosing a laying scheme, you should proceed from:
With the help of one technique or another, the presence or absence of a pattern or decor, you can transform a room beyond recognition. There are many graphic editors on the Internet that allow you to see your room as a 3D model and experiment with its arrangement and renovation. Naturally, the financial capabilities and taste of the home owners play a leading role in the choice of flooring and the method of its installation.
A pattern laid out organically and correctly on the floor covering increases its beauty several times. It is not for nothing that almost all manufacturers of ceramic tiles provide various possibilities for organizing a beautiful picture, this can be decor, frieze, inserts, panels, various borders and other elements, combining which with the tiles you get one whole picture, floor covering. A person with imagination can easily create a real masterpiece from the floor ceramic options available on the market today.
When organizing the drawing you should consider:
Decorating your own home is incredibly pleasant, especially if you have the desire and opportunity to do so. The accessibility of the Internet has crossed out all facets of the impossible; thanks to it, today you can learn everything and implement any ideas and plans.
ViSoft Premium
This is specialized bathroom design software for professionals. One of the functions is tile layout. The database contains a large number of samples - almost 39 thousand types of tiles from different manufacturers (at the time of writing there were 362). The layout project is developed based on the samples that are in the database; new ones cannot be added.
There is also a Russified version
Here is a summary of the program's capabilities:
- Selected tile samples are automatically placed in the specified area.
- It is possible to view other layout options.
- To create a bathroom interior, you can choose plumbing fixtures from a huge database. In this case, the sets are compiled automatically. If necessary, they can be adjusted.
- During the creation process, the project can be turned in any direction, evaluating the result from different points.
- Take “snapshots” of the results obtained.
There are two operating modes: drawing and sketch. In drawing mode, a black and white image is created, which can later be “filled” with different colors. Sketch mode - immediately with color.