How to lay porcelain floor tiles under wood: methods and options
Today, wood building materials are very popular due to the fact that they have a number of benefits for humans. However, wood has a shorter service life than other facing materials. To solve this problem, many owners began to consider other materials that would have no worse technical characteristics, but could visually imitate wood flooring.
This became possible after giving a certain coating to porcelain stoneware. Tiles made from this material are durable, reliable and their service life is much longer than that of wood. The article will discuss how to install such a coating, starting from the preparatory stage and ending with the installation itself.
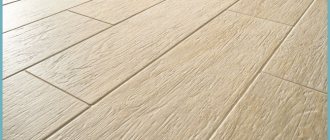
Ceramic granite flooring with wood finish
Today, wood look porcelain tile flooring is considered the best replacement for wood. This material is considered environmentally friendly, and its surface can imitate any other materials with its own color and structure. It is very popular to use ceramic granite to visually imitate a wooden floor: parquet, parquet tiles, ordinary boards, etc.
The material on the outside hardly stands out from unusual wood, and the service life is several times longer than that of natural products. An additional advantage of using porcelain tiles is that they can be equipped with a floor heating system, which is widespread nowadays.
New production technologies even make it possible to visually give the coating direction. This is done in the same way that porcelain stoneware , which looks like wood from the outside, has a texture on which there are marks suitable for the cutting direction: tangential or radial.
Laying out wood floor tiles
When choosing tiles for the floor in an apartment, you want something very natural, practical and durable. In this case, porcelain stoneware or wood-look ceramic tiles are ideal; these materials fit the request, except that the imitation of natural wood and the practicality of a ceramic floor will not create the same comfort for our feet as real wood, but there are solutions for this , for example, the same warm electric floor under tiles or water floors, if we are talking about a country house or cottage with its own boiler room.
But judging by the title of the article and the photos posted, it is obvious that we will talk about the layout of such tiles (simulating wood). Please pay attention, we will talk about classic options, without Christmas trees and various kinds of tile art.
You can often see that for such tiles they choose a fairly classic layout, for example, in a checkerboard pattern; in my opinion, this is far from simulating a wood floor. As a rule, such tiles replicate laminate, parquet boards, solid wood, parquet, and for this reason, in order to recreate a good imitation, it would be correct to lay it in the same way as you would lay parquet or solid wood, depending on the size of the tile itself.
Now I’ll go back directly to laying out wood-look tiles. There is a desire to give some advice and recommendations, both for master tilers who encountered this for the first time, and for everyone who made a similar request in the search) In no case am I going to teach and confuse / since choosing a tile is already difficult, and if you take into account Everything is getting even more complicated!/.
First recommendation (advice for laying wood-look tiles - classic options).
There is no need to rush into purchasing tiles. After choosing a tile, before making a purchase, I recommend that you make a layout “on paper”, which you can do yourself using standard programs that are on every computer. Personally, I used Paint, it turned out clear and quite visual. If you understand that this tile suits you in appearance, texture, pattern /print/ of wood, it can have from three to eight or more patterns.
If the number of prints on the printer is small, avoid choosing tiles with knots, especially if the tile is small, otherwise there will be too many "spots" in the form of knots.
In my example, the layout of wood-effect tiles Estima Brigantina 120X30
Layout options that I was able to select
Option No. 1
Option No. 2
Option #3
Option No. 4
Option number 5 - which we settled on
Second recommendation.
The tiles have been purchased and delivered, and this layout should be repeated locally. Understand what width of seam is suitable for your tiles. In some cases it is needed minimally, but in other cases a seam of 2-3 mm will look good. Be sure to determine the place from where it will be laid in order to understand how and where it will end on all sides. In rare cases, it is possible to avoid unsightly trimming along the edge of the wall by using just one millimeter of seam)
Several photos to illustrate the layout of wood-look tiles
If you are reading the article, then you are seriously “confused” by this
and it is important for you to know all the details that are not visible at first glance. Especially if the entire floor in the apartment is being laid, then of course it is advisable to look at everything!
The main thing I wanted to say is written above. Laying out wood-look tiles, any layout, is a very important part of tiling work. This should be done by a designer, but somehow I heard “. Why overpay!? “I hope the short material I have prepared on this topic will bring you benefit, understanding and savings.
If you need individual advice. You can use the “ask a question” form and I will definitely answer you in a short time.
Preparing the base
The requirements for the base under ceramic granite also correspond to the standards applied to surfaces under ceramics . It is leveled , cleaned of dirt, and various cracks and other defects are eliminated by priming. In some cases, a cement mixture with liquid glass additives may be used. The tiles are laid on a concrete base that is in optimal condition. at least a month must pass from its installation , otherwise the ceramic granite will not be able to be held stably and firmly. In this case, the humidity of the base should not be higher than 3% .
According to the instructions of most manufacturers, you should prepare a solution with a liquid consistency. In this case, the adhesive composition for tiles should have increased adhesion, be as elastic as possible, and be heat- and frost-resistant. If porcelain tiles are laid under wood with a format exceeding 40x40 cm, it is necessary to use special solutions for large-format models.
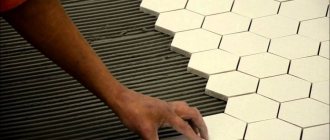
The adhesive composition is poured onto the base , leveled with a device with a smooth surface, then a serrated tool is taken to create a comb coating . The tiled elements are placed edgewise, and you need to rest them against the placed slab, then it stands next to it and moves slightly away from the installed fragment. It is also necessary to maintain gaps (to regulate them effectively, it is recommended to use tile crosses). After this, the groove is cleared of excess applied composition. You should also ensure that the entire area of each tile is covered with mortar without dry areas .
When this work is completed, you should make sure that the adhesive mixture has hardened sufficiently . The seams between the tiles are rubbed down, since without jointing them the coating will look untidy . All inter-tile niches are treated with fillers. The grout should contain ingredients similar to glue and include a color pigment that matches the base material. The mixture is also prepared according to the instructions, then it should be poured onto the area to be treated, leveled with a spatula with a rubber strip, and then applied with a squeegee. Having sealed all the tile seams, it is necessary to remove the remains . After this, after giving the mixture time to harden, the wood-effect porcelain tile is sprinkled with dry grout and wiped with a squeegee, moving it diagonally relative to the tiled surface. Then the excess grout is washed off in exactly the same way. The finished gaps are dried with dry wipes or a rag.
Return to content
Possible solutions and what different craftsmen do when laying porcelain stoneware under wood.
The first option is to level the joints between the tiles using SVP.
One small detail - Uncle (USA, Boston, North Shore) additionally applies adhesive to the tiles when using SVP. Although, his glue “MAPEI ULTRAFLEX” is highly plastic (“ S2”) , for deformable bases and large format tiles on facades, balconies, terraces:
The most popular glue in the USA.
This is about the eternal debate - is it necessary to apply glue twice to porcelain tiles when using SVP. The specialization of this master’s work is narrow: ceramic tiles in bathrooms and heated floors. That is, there is a lot of experience in performing similar operations. If he came to such technology, then there were reasons for it.
About the positive aspects of porcelain stoneware
Porcelain stoneware is a continuous, homogeneous material, without internal cavities and voids. Tiles do not absorb moisture. This allows you to cover bathroom floors without fear of water destroying the tiles from the inside.
There are no pores inside
By laying the floor surface with wood-look porcelain tiles, it is possible to create a floor similar to parquet. Among other things, this tile has amazing wear resistance and durability. Once installed, such a floor can serve for a long time without wear and tear.
Resistance to liquids and mild chemical processes, a wide range of patterns and textures make it possible to use tiles in many cases. It is an excellent finishing material used to decorate bathrooms, kitchens, toilets, and other rooms where there is a significant flow of people (we are talking about hospitals, restaurants, public institutions).
Very durable
Tile manufacturers, for greater similarity, give their products the dimensions of parquet boards.
Modern models convey the structural features inherent in oak, yew or larch. This allows you to use individual fragments as decorative fragments.
Room measurement
Initial measurements of the room before laying ceramic granite flooring
under
a tree
, should not be limited to just measuring the area of the surface to be covered. During the construction work of the building, the slightest distortion of the angles of the walls is quite possible, which means that the opposite floors may not be parallel.
This difference can be a couple of centimeters, which means that the tiles on one of the walls will have to be cut in a wedge shape. The elegance of such a covering is slightly compromised, and in order to avoid places that cannot be shown to guests or in the photo, it is best to insert them near the walls where the furniture will be located. It is important to avoid placing such cut pieces near doorways.
If it is not possible to close such a place, then you need to achieve the greatest symmetry. Since the laying begins specifically from the center of the floor, when gluing back and forth, a professional must obtain equal empty areas near two opposite walls and insert identical wedges of tiles into them. Due to the need for such inserts, tiles should be purchased in quantities 5-10 percent larger than what was calculated when measuring the area of the room.
Also a fundamental point in this matter is the preparation of a tile laying scheme. Today, a large number of drawings are known according to which ceramic granite can be installed. This issue has an impact on the speed and difficulty of installation work. The naturally selected scheme should correspond to the theme of the room design. The owner has the right to conduct some experiments and lay out tiles on the floor without gluing in several versions in order to understand which one will look the most beautiful.
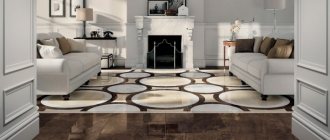
A selection of photographs with design ideas
Our photo selection will give some idea of the possible design options. But you shouldn’t take them as dogma, these are just ideas that need to be used creatively.
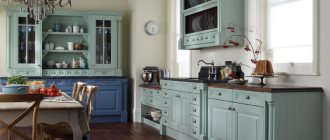
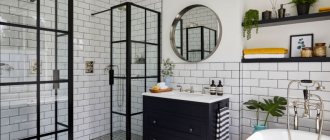
Thanks to the ingenuity of floor tile manufacturers, you can now admire the exquisite texture of wood in any room, regardless of its purpose. This opportunity will primarily be of interest to connoisseurs of ecological style who are planning renovations in the kitchen or bathroom.
Humidity and temperature changes do not allow the use of laminate and natural wood there, but modern tiles will create the complete illusion of natural material, and will not “be capricious” in a humid environment.
Country-style kitchen tiles will look organic and very homely. Aged surfaces, forging, and appropriate textiles will create a special mood. The combination with glossy surfaces of ultra-fashionable cabinet furniture may also be interesting.
In addition, wood-effect ceramic tiles can be used in more original and unusual ways: they are often used for cladding kitchen backsplashes, finishing panels and niches. Such non-standard techniques allow you to make the interior original and individual, unlike others.
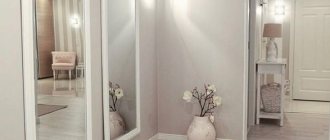
Porcelain tiles and ceramic tiles with a wood-like texture will be a non-standard solution for the floor in a hallway or spacious hall. They will perfectly withstand the loads associated with the high traffic of these premises, and from the threshold they will tell about the good taste of the owners.
Tiles in the living room are a rather unusual, fresh solution that will bring additional bonuses: you can save on buying expensive parquet and get an equally impressive floor covering in return. In addition, if the installation technology is strictly followed, it will last for many years without requiring repairs.
Rules for caring for porcelain tiles
Despite all the strength qualities of porcelain stoneware, finished coatings made from such tiles require maintenance. The most affected are the tile joints , the filling of which is a less resistant material than ceramic granite itself, so when such spaces are subject to heavy loads and contamination, cleaning should not be delayed.
It is not advisable to use acidic products when cleaning floors . Of course, the floor covering will not be damaged by them, but the gaps between the tiles are very sensitive to chemicals. For example, if cement is included in the grout, the seams will change color. Therefore, it is recommended to use traditional detergents.
In addition, it is undesirable to use preparations that contain abrasively active additives , since many of them can leave scratches on the surface.
During renovation work, you should also be more careful when handling porcelain stoneware coatings. During plastering, the mortar used may fall onto the floor. In this case, it is necessary to have time to clean the coating before the mass hardens. If the mixture begins to dry out, you will have to soak it first and then remove it.
No matter how carefully the porcelain floor tiles are used, it is impossible to foresee everything, so you should know what to do in a given case. For example, no one can 100% protect the coating from the appearance of unpleasant stains on it, which can only be eliminated with special mixtures . Food stains can be washed off with baking soda . In case of old stains, you will have to use a mixture containing caustic soda . Glue, tar stains and paint and varnish are removed with special solvents , including acetone, and cement mortars with lime can be removed with acid-containing products . But do not forget about the grout between the tiles, which can be damaged by such influences .
Ceramic granite goes well with other floor coverings , including parquet. But it is important to take into account one circumstance: between different types of surfaces it is necessary to make an insert - a cork compensator , with which you can place one coating on another. In addition, floor care products will vary in such cases.
How to lay tiles on a bathroom floor
Ceramic parquet flooring is particularly difficult to install. The variety of shapes makes it possible to lay out almost any pattern typical of solid wood or parquet floors.
Another feature of wood-look tiles is that they are laid end-to-end, without seams. In those rare cases when this is not possible, it is recommended to take the thinnest crosses and select the grout exclusively to match.
The completely smooth surface without seams typical of ceramics allows you to lay wood-look tiles in hallways, living rooms and even bedrooms. The only thing is that the rooms will require installation of heated floors.
It will be quite difficult to lay tiles “in a pattern” on your own without certain skills. An error of a few millimeters or in the shade of the next plate can play a cruel joke - instead of an ideal floor, you will get a low-quality semi-finished product.
Layout of floor tiles. With offset (staggered)
This method is reminiscent of brickwork. Quite a common and original way of laying tiles on the floor. Rectangular, monochromatic tiles look best, although square ones are often used. The offset cladding method will create a historical atmosphere in your room. A suitable option for avoiding overall monotony and hiding minor defects.
Method of laying tiles with offset (staggered)
Photo: laying contrasting tiles with offset
Features of the drawing. Brickwork floor tiles are ideal for kitchens and hallways, adding originality to the space. Laying “staggered” is done only in horizontal rows, and each tile of the next row is laid so that its middle coincides with the seam of the previous row.
Laying technology. Laying tiles with offset is practically no different from the traditional method. The only peculiarity is that it is important to maintain the same thickness of the seams. Diagonal masonry looks beautiful and unusual. In this case, the tiles are laid at an angle of 45 degrees relative to the wall. The floor surface must be absolutely flat, otherwise all the work done will be ruined.
Method of laying deck tiles
Before starting work, it is necessary to lay lighthouse slabs in the corners of the floor. This will determine the floor level. Then moisten the screed with water and lay the ceramic tiles on the mortar in rows along the lighthouse. After this, level the masonry with a hammer and remove the lighthouse slabs. After two to three days, fill the seams with cement or liquid mortar.
Rich assortment
Any ceramics that helps imitate wood looks great in any classic interior. It is often used to implement the concepts of rustic style and extravagant ethnic style.
On sale today you can find floor tiles of any color. The color palette is varied. The collections include almost white tiles (bleached wood), gray wood-like tiles look great in the interior, and almost black tiles (wenge-colored wood). Other shades of wood are also available to buyers. How to choose the right option in all this variety? The answer to this question must be sought in the characteristics of the room being decorated.
- For example, tiles of dark tones from the collection of stained oak, exotic zebrawood, and cherry can decorate floors in spacious rooms and large rooms.
- Tiles that can imitate the cut of birch or pine, oak or teak are most often used to decorate the floors of small rooms. The light texture visually expands the boundaries of space and allows you to fill the room with air.
- Tile imitating the surface of walnut or maple, ash or Karelian birch is traditionally chosen for bathroom flooring.
- Rich colors of pear or alder, as well as mahogany, are most suitable for kitchens.
Note! In the collections of European manufacturers you can often see tiles with uneven coloring. With its help, an aged floor surface is formed. A similar effect is created using the brushing method (artificial aging). This material is good for the Provence style. Placed on the floor, it attracts attention with its uneven coloring. If you manage to combine the colors of the tiles with the colors of textiles or furniture filling, you will get a homely, warm and cozy interior.
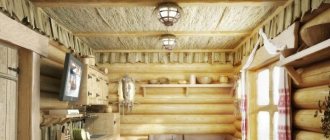
How to lay tiles on a wooden floor?
The work is carried out on logs - these are wooden cross members, which are characterized by a large cross-section. They serve as supports for the whole object or some structural elements. Wooden flooring is also in most cases mounted on top of the joists. If tiling is to be done, a rough base must be prepared. The condition of the floor may vary:
- The floorboards are completely dismantled due to their poor condition: extensive rot, cracks, and rot have appeared. If the flooring is damaged, you will need to remove all or only some of the covering elements. Having removed them, check the condition of the lags. If they are not damaged, installation work can continue. In the case where the logs are also exposed to negative factors, these elements are replaced or restoration is carried out: the crossbars are only partially replaced and treated with special compounds.
- Sometimes logs are covered with cheaper materials - chipboard, OSB, plywood. The next step is laying the cladding.
- If the joists are seen to be in good condition, the decking base is left in its original condition, but the floor structure is checked for damage. In this case, the tree has just been laid, or the base was installed not so long ago and has not had time to wear out. In both cases, the flooring is not replaced, but additional leveling may be required.
For each option, a different cladding technology is selected, since the process of preparing the base is different.
First method: dry leveling
To lay the tiles, prepare the base. To prevent the cladding from deforming during operation, its installation is carried out on slabs/sheets used to level the floor on the joists. Materials that can be used for this purpose:
- drywall, characterized by moisture resistance;
- gypsum fiber sheet;
- cement bonded particle boards;
- moisture-resistant plywood.
All these varieties are laid in 1 or 2 layers. The slabs can be fastened with self-tapping screws, and the installation step of the fastening elements should be small, otherwise the coating will “play” when walking. To make the rough base more durable, it is recommended to process the end sections using a special glue that is designed to work with the material.
If a wooden floor is installed in a bathroom, kitchen or other room where humidity regularly rises and there is a high probability of contact with water, the joints of the slabs are covered with membrane-type polymer waterproofing. It is important to protect the corner areas where the wall meets the floor. Here the waterproofing is applied with a slight overlap on the wall (up to 5 cm).
The preparation of the wooden floor for tiles is carried out before installing the cladding. For this purpose, a primer composition is used. They process the resulting coating. At the next stage, the painting mesh is laid. It is recommended to repeat the priming procedure on top. This measure will improve the adhesion of the adhesive and the base. An important point is the need to lay the subfloor slabs so that the joint joint falls in the middle of the wooden crossbar (joist).
Cement bonded particle boards should be laid on top of the plasterboard/plywood. They are the main structural element of a floor installed using dry leveling technology. This is due to the sufficient strength of such products and their durability. During the installation of the base, its surface is constantly checked for quality, for which a level is used. You cannot lay tiles on uneven floors.
Advantages of the dry leveling method:
- you can add a layer of insulation to the subfloor structure;
- due to the low weight of the floor, the level of load on the joists is reduced;
- high installation speed, because in this case there is no need to work with cement screed.
So that the process does not have to be interrupted, the necessary materials are first calculated: the number of slabs, fastening elements, and cladding is determined. This method also has disadvantages. For example, installing a multi-layer floor structure, which is also raised on joists, will help reduce the height of the ceilings. This means that dry leveling technology is not suitable for all objects.
Wood effect floor tiles - cost
The cost of ceramic parquet is an order of magnitude lower than regular parquet. Especially if you compare rare types of wood and their ceramic counterpart. Buying wood-look tiles will help you significantly reduce your renovation budget.
The cost of installing ceramic and wood flooring is comparable. But in terms of maintenance, tiles will cost you much less than parquet or natural boards. Sanding, varnishing, refinishing, painting - all these words will cease to have meaning for you if wood imitation tiles are laid on your floor. Even if one tile is damaged for some reason, for example, you drop something heavy on it, replacing it will be much cheaper than a parquet tile.
Tile or natural wood: which is better?
It is incorrect to compare natural wood and ceramic tiles. These materials are from different categories. The wood has a beautiful pattern, it is warm to the touch, looks quite respectable, and has high thermal insulation properties. But at the same time, wooden flooring is quite difficult to care for, it is afraid of moisture, and cannot be cleaned with many common household chemicals. Wooden planks do not fit well with underfloor heating systems. If the coating is made from valuable wood, the finishing material is quite expensive, and the wooden dies are subject to wear. Over time, they dry out, swell, and an unpleasant squeak appears.
High-quality wood-effect ceramic floor tiles are free from such disadvantages. At the same time, she looks quite attractive. It can be easily washed with water and household chemicals; after cleaning, no whitish stains remain on the surface of the tile. Wood-effect floor tiles boast high chemical inertness, so even if paint, some greasy substance, or any organic matter gets on the surface of the flooring, there will be no stains left on the floor after cleaning. Ceramic floor tiles are not afraid of humidity, temperature changes, and mechanical stress. The described material costs an order of magnitude cheaper than expensive wooden analogues. Therefore, the popularity of using wood-look tiles is constantly growing.
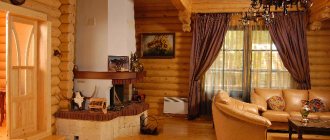
Experienced designers often use the described finishing material to decorate floors in kitchens, bathrooms stylized as a sauna or Russian bath, in corridors and hallways. Wood-effect tiles laid on the wall look original. A similar technique is often used to highlight certain functional areas.
Note! Decorative wood-look wall tiles are much thinner than floor tiles, which is why they cost less. At the same time, the effect of the wooden surface after cladding is completely preserved.
While describing the advantages of the new material, it is necessary to mention its disadvantages. The main one is the cold surface of the floor covering. You can't walk on this kind of floor barefoot in winter. The use of a heated floor system helps eliminate this inconvenience. The ability to combine the use of ceramic tiles and a heating system has made it possible to use tiles for decorating residential premises. Today, ceramic parquet floor tiles often decorate the interiors of children's rooms, living rooms and bedrooms.
Finally, imitation wood helps to easily connect non-residential loggias and terraces to residential premises. In this case, it is better to use not floor tiles, but more durable porcelain tiles that look like wood. They are highly wear-resistant and can withstand low temperatures.
Note! Tiles that imitate wood have a rough surface, so the cladding surface will be difficult to slip. Any tile material can boast of high strength; it does not absorb moisture, so its use helps to provide additional waterproofing of the floor and protect those who live on the floor below from flooding.
Finishing the wall base
It also makes sense to tile the wooden bases of the walls only when an additional plywood or plasterboard layer has been created. Otherwise, the tile simply will not stay on the wall.
The elements are also laid on the primed surface of the sheets. Moreover, installation begins from the second row. They move forward, capturing small areas. It is recommended to increase the layer of adhesive composition by applying it to walls and ceramics. This will give the cladding additional space to move. Regulatory crosses are placed on the seams. The average seam size is 3 mm. It is not allowed to lay tiles in a seamless manner in a wooden house. Since changing the volume of the base may lead to the overlapping of elements.
Lastly, they begin laying out the first row of tiles, since in most cases it represents a row of cut fragments. The cracks and joints are sealed with silicone sealant, the seam gaps are covered with grout after the glue has dried.
It is possible to tile wooden surfaces in a bathroom or kitchen in a wooden house, especially when all the intricacies of the installation and construction process in a given situation are known. Happy renovation!