If there is no need to use the attic for living, insulate the ceiling in a house with a cold roof. Thermal insulation will affect the comfort of living:
- the air temperature in the interior will increase;
- humidity stabilizes;
- the cost of purchasing energy resources will be reduced;
- the speed of air movement will decrease (there will be fewer reasons for drafts).
Advantages of installing an unheated attic
Thermal insulation of the ceiling of heated rooms or the floor of the attic has a number of advantages:
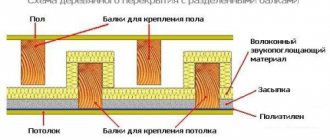
- A buffer zone is created between the external environment and heated rooms. The gradual transition between cold and warm air has a positive effect on the service life of insulation and building structures. In winter, ice does not accumulate on the roof.
- The cost of purchasing building materials is reduced, because the ceiling area in most cases is less than the roof area.
- The requirements for the professional skills of a specialist are reduced, which makes it possible to carry out the work independently.
- The time a building is without a roof during insulation is significantly reduced, which is especially important in regions with frequently changing weather.
Let's start with calculations
During construction, it is necessary to take into account the weight of the insulation to be used. If the house has already been built, then when installing protection against heat loss, care should be taken to reduce the additional load on the load-bearing walls and foundation of the building. Calculations are carried out in 3 stages:
- determining the thickness of the selected insulator;
- calculating the weight of the resulting insulation;
- determining the possibility of using one or another isolation method.
Exceeding the permissible load on the floors, walls and foundation will lead to the destruction of the building either during the work or upon its completion.
Calculation of insulation thickness
Before insulating the ceiling in a private house, you need to calculate the thickness of the thermal insulation layer. To do this, first decide on the floor structures. Then, using the diagram, determine the heat transfer resistance parameter for your region. The value for floors is indicated in blue numbers.
Then the parameters of all layers are entered into the columns of an online calculator to calculate the thickness of the floor. If a specific layer from the calculator is not used in your floor design, the field is left blank.
Important! Thanks to the online calculator, you can clearly see how the thickness of the ceiling insulation changes depending on the material used.
Determining the thickness
To find the height of the insulating layer, you need to know two values:
– standard thermal resistance of floors for the region of residence;
| Locality | Required thermal resistance of the ceiling R, m 2 °C/W |
| Anadyr | 6.0 |
| Arkhangelsk | 42829 |
| Astrakhan | 42828 |
| Barnaul | 42859 |
| Belgorod | 42889 |
| Blagoveshchensk | 42920 |
| Bryansk | 42950 |
| Vladivostok | 42981 |
| Vladimir | 42739 |
| Volgograd | 42889 |
| Vologda | 42770 |
| Voronezh | 42950 |
| Grozny | 42769 |
| Derbent | 42949 |
| Ekaterinburg | 42829 |
| Ivanovo | 42739 |
| Izhevsk | 42798 |
| Irkutsk | 42951 |
| Yoshkar-Ola | 42798 |
| Kazan | 42770 |
| Tver | 4.0 |
| Kaliningrad | 42828 |
| Kaluga | 42981 |
| Kemerovo | 42920 |
| Kirov | 42829 |
| Kislovodsk | 42797 |
| Komsomolsk-on-Amur | 42951 |
| Kostroma | 42739 |
| Krasnoyarsk | 42920 |
| Samara | 42739 |
| Mound | 42859 |
| Kursk | 42919 |
| Lipetsk | 42950 |
| Magadan | 42830 |
| Maykop | 3.0 |
| Makhachkala | 42980 |
| Moscow | 42981 |
| Murmansk | 42890 |
| Nalchik | 42797 |
| Nizhny Novgorod | 42739 |
| Novgorod region | 42981 |
| Novorossiysk | 42918 |
| Novosibirsk | 42920 |
| Oymyakon | 42832 |
| Omsk | 42890 |
| Ordzhonikidze | 42797 |
| Eagle | 42981 |
| Orenburg | 42770 |
| Permian | 42829 |
| Petrozavodsk | 42770 |
| Petropavlovsk-Kamchatsky | 42770 |
| Pskov | 42950 |
| Rostov-on-Don | 42828 |
| Ryazan | 4.0 |
| Salekhard | 42891 |
| Saint Petersburg | 42981 |
| Saransk | 4.0 |
| Saratov | 42981 |
| Smolensk | 42950 |
| Sochi | 42796 |
| Stavropol | 42769 |
| Surgut | 42740 |
| Syktyvkar | 42859 |
| Tambov | 42981 |
| Tomsk | 42920 |
| Tula | 42981 |
| Tyumen | 42829 |
| Ulan-Ude | 42982 |
| Ulyanovsk | 42739 |
| Urengoy | 42983 |
| Ussuriysk | 42770 |
| Ufa | 42770 |
| Khabarovsk | 42859 |
| Khanty-Mansiysk | 42951 |
| Cheboksary | 42770 |
| Chelyabinsk | 42829 |
| Chita | 42771 |
| Elista | 42828 |
| Yuzhno-Sakhalinsk | 42770 |
| Yakutsk | 42831 |
| Yaroslavl | 42950 |
- coefficient of thermal conductivity of the material used
| Material | Specific thermal conductivity coefficient, W/m K |
| Fibrous materials | 0,038 – 0,052 |
| Expanded polystyrene | 0,032 – 0,036 |
| Polyurethane foam | 0.026 |
| Expanded clay | 0.11 |
| Ecowool | 0,038 – 0,041 |
| Natural materials | |
| Felt (various types) | 0,031-0,05 |
| Foliage (dry) | 0,05-0,06 |
| Tow | 0,037-0,041 |
| Moss | 0.04 |
| Needles | 0.08 |
| Straw mats | 0,05-0,06 |
| cotton wool | 0.037 |
| Thin shavings (packing) | 0,05-1 |
| Campfire (various types) | 0,04-0,065 |
| Sphagnum (peat) | 0,05-0,07 |
| Wood sawdust | 0,05-0,08 |
| Straw (stuffed, cut) | 0.04 |
For example: To get the result you need to divide the first indicator by the second. The resulting number shows the thickness of the layer in meters.
The required thermal resistance for the ceiling in Saratov is 3.9 m2 K/W. It is planned to use polyurethane foam with a thermal conductivity coefficient of 0.026 W/m K. When divided, we obtain 0.1014 m. To obtain the required heat savings, it is necessary to apply 10.2 cm of insulation.
Classification of insulation
Comparative table of characteristics, pros and cons of insulation materials.
| material | scope of use | pros | minuses | coefficient of thermal conductivity |
| sawdust | mounds in old attics, between walls | inexpensive material, easy to use, good air permeability, environmentally friendly | easily rots and burns | 0,070-0,093 |
| expanded clay | floors and attics of durable ceilings | does not burn, does not rot, holds heat well | very heavy | 0,085-0,160 |
| Styrofoam | walls, attics | inexpensive material, resistant to moisture and rotting | smoldering from fire with the release of toxic substances, creating a “greenhouse effect” | 0,047-0,065 |
| mineral wool | walls, attics | inexpensive, easy to use, holds heat well | unstable to moisture, shrinks and deforms | 0,048-0,070 |
| ecowool | walls, attics | breathes well, environmentally friendly material | not resistant to moisture | 0,032-0,041 |
NOTE. Artificial materials win in almost all respects. Their weakness is the greenhouse effect, as well as the toxicity of combustion products. However, these shortcomings can be compensated for by additional fire-fighting measures, as well as by constant ventilation of the room in winter.
Depending on the structure of the material, all ceiling insulation materials that are used in houses with cold roofs can be divided into several groups:
- Monolithic (massive) - these include artificial materials (foam plastic, polystyrene), which are laid on the ceiling in large blocks that reliably prevent heat loss.
At the same time, they block the removal of excess moisture from the air, as mentioned earlier. - Fibrous (porous) are materials with a developed internal structure, represented by numerous fibers. These fibers form large internal spaces that fill air bubbles that reliably retain heat in the house. A classic example is mineral wool.
Threads of mineral wool, as well as ecowool, are able to absorb and retain moisture, but at the same time the protective properties of ecowool are practically not reduced. At the same time, it has been experimentally established. that moistening mineral wool by even 1% of its mass leads to a decrease in thermal conductivity qualities by up to 8%. This is explained by the fact that loose fibers begin to disintegrate, so the material loses density. - Bulk insulation - for example, expanded clay and sawdust. They protect the house from cooling by creating a dense layer that retains heat well. The advantages of these materials are also that they allow the surface to “breathe” and do not create a greenhouse effect in the house.
Video review of some types of materials that are used to insulate walls and ceilings in houses with cold roofs
Calculate the weight
To determine the mass of a heat insulator, it is necessary to multiply its volume by its density. The volume is found by multiplying the layer thickness by the area determined by the product of the length and width of the thermal insulation.
We take the density of the main insulation materials from the table:
| Material | Density, kg/m 3 |
| Fibrous materials | 100 — 120 |
| Expanded polystyrene | 25 — 35 |
| Polyurethane foam | 54 — 55 |
| Expanded clay | 200-400 |
| Ecowool | 42-75 |
| Natural materials | |
| Felt (various types) | 100-150 |
| Foliage (dry) | 50 |
| Tow | 180 |
| Moss | 135 |
| Needles | 43 |
| Straw mats | 85 |
| cotton wool | 80 |
| Thin shavings (packing) | 140-300 |
| Campfire (various types) | 150-350 |
| Sphagnum (peat) | 150 |
| Wood sawdust | 190-250 |
| Straw (stuffed, cut) | 120 |
Fired clay
The use of pure clay as a heat insulator is hardly possible due to the need to use a layer up to 80 cm thick. Therefore, clay that has been heat-treated to give volume - expanded clay - has long been used. This is an environmentally friendly, non-flammable material. Quite light, with good thermal insulation ability. Can be used on both wooden and reinforced concrete floors.
The smaller the expanded clay fraction, the worse it retains heat.
Before installation begins, wooden structures are treated with septic tanks and fire retardants. A rough ceiling is installed from inside the room, which will take on the weight of the expanded clay.
Positive properties of expanded clay:
- does not generate dust during operation;
- has good vapor permeability;
- does not absorb moisture;
- does not require the use of protective membranes and films.
To ensure passage across the attic floor and use it for household needs, boards are laid over the joists or a subfloor is installed.
To insulate reinforced concrete floors, simply pour the required layer of expanded clay. If there is a need to use an attic, a reinforced cement-sand screed is installed on top of it.
We insulate the ceiling with expanded clay: video instructions
And finally, another option for insulating the ceiling of a house with a cold roof is expanded clay. This is the densest, and therefore the heaviest material.
It can only be used if there is confidence that the ceiling structure can withstand the load, which can be easily calculated based on the mass of the material per square meter of area.
Detailed video instructions can be seen here.
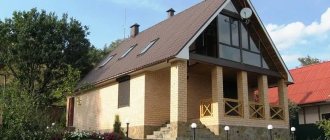
Almost anyone can insulate the ceiling and roof of their home, since such work does not require special skills. In addition, a variety of material options are suitable for almost any situation.
Choosing the right insulation means correctly correlating its properties with your needs. And for this it is important to understand the main sources of heat loss.
The roof takes the largest share of all heat loss, since, as is known, warm air is lighter than heavy air - it rises and cools down quite quickly if the ceiling is not sufficiently protected from cold temperatures.
INTERESTING FACT. If you decorate the walls of the house with the same insulation and choose a wall thickness of 200 mm, then on the floor the same heat saving effect can be achieved with a layer of 300 mm, and on the roof - 400 mm. This once again shows that the most vulnerable place is the ceiling of the house, and if it is even cold to the touch, it means that the roof must be insulated immediately.
Loose pulp
Ecowool is made from wood fibers and has many advantages:
- low fire hazard due to the use of fire retardants (refers to low-flammable, self-extinguishing materials;
- sufficiently low density even in compacted form, which does not create excessive load on the floors and foundation;
- quick installation of any thickness is possible;
- does not spread microorganisms, fungus and mold inside and on the surface;
- has a high vapor permeability;
- forms a continuous, unbreakable carpet without the formation of cold bridges;
- environmentally friendly.
Before installation, it is necessary to install a diffusion membrane, which will ensure insulation of the internal living space from the fibers of the heat insulator.
It can be laid in two ways: wet and dry.
When dry laying, ecowool is poured onto the surface of the ceiling, leveled and compacted.
What we mowed down is how we insulate it
The possibility of obtaining a natural thermal insulator at a low price increases the attractiveness of using reeds and straw in this role. These materials are used in the form of pre-arranged mats, as well as in the form of finely chopped stems. When using mats, installation is carried out in several layers, taking into account that the top layer should overlap the joints of the bottom one. It is also used as the main filler using the technology of producing insulator from sawdust and cement (clay).
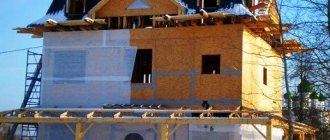
Roof types
Depending on the design and materials used, roofs can be of 2 types:
- Warm type. When making such a roof, the slope is made in the form of a “layer cake”, in which, in addition to the outer covering of the roofing material, waterproofing and thermal insulation, and sometimes vapor barrier, are provided. In this case, the attic can be used as a living space, where normal temperature is ensured.
- Cold roof. This design provides only protection from precipitation and does not have thermal insulation. The roofing materials themselves have increased thermal conductivity values and cannot act as insulation. As a result, a cold attic is formed, used as a storage space.
The type of roof is most often determined by economic considerations. For private houses with permanent residence, a warm roof looks preferable. Country and country houses with seasonal residence often have a second version of the roofing structure.
Specifics of a cold roof
A cold-type roof has its own characteristics and specifics. It has a simplified design, when only waterproofing and roofing are applied along the rafter sheathing. This makes it possible to make it easier and cheaper. A cold roof is a budget option for a private home.
The main specificity of this roof is the absence of thermal insulation on the slopes, but an air space is created under them, providing a kind of buffer zone. Air has a certain thermal resistance, which allows it to gradually cool the rising heat flow. As a result, an ice crust does not form on the inside of the roof.
The air space in the attic also reduces the effects of cold, but this is not enough to significantly reduce heat loss. The real way to retain heat inside the house is to insulate the ceiling.
From the bottom of the sea
Buildings located close to the sea and ocean coasts are insulated with algae. This natural, environmentally friendly material has some advantages:
- good thermal insulation ability;
- high vapor permeability;
- resistance to temperature changes and high humidity;
- low water absorption;
- resistance to biological forms of life (rodents and microorganisms);
- zero fire hazard;
- no need to use vapor barrier membranes;
- saturation of premises with iodine.
Used in the form of pre-prepared mats.
They made me from stone, slag and glass (insulation)
The use of natural materials with deep processing allows us to obtain materials for protecting premises with better performance at a lower price.
The use of fiberglass materials is associated with certain difficulties during installation and subsequent use. Glass dust and small fibers released during the production process can injure the human respiratory and vision organs. Contact with skin may cause lesions and allergic reactions. Work without sufficiently serious protective equipment is impossible. During operation, it forms fine dust, the inhalation of which is harmful to health. The extremely low environmental performance of the material makes it impossible to use it in rooms and buildings where people are constantly present.
Cotton wool obtained from furnace slag also has extremely low environmental test results. When water gets in, acidic fumes are released, which are dangerous if inhaled and destroy metal structures. Thin and brittle fibers can remain suspended in indoor air for a long time. They have an increased ability to absorb moisture.
The situation with environmental certification for slabs, mats, and rolls made from basalt fabric is almost excellent. Relevant documents allow for the insulation of floors in residential buildings, structures for long-term human stay, children's and medical institutions. Recommended for work on wooden floors.
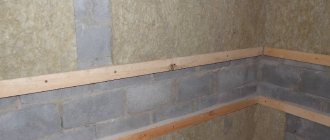
Features of ceiling insulation
Cold overlap
How to properly insulate a ceiling in a cold attic? Air gaps are left above a cold or heat-conducting ceiling (for example, concrete). The first, auxiliary between the vapor barrier film and the insulation, comes into effect when there are large temperature changes and heavy condensation. It must be well ventilated.
It is easier to make the main gap between the insulation and the waterproofing layer ventilated - just leave a small gap around the perimeter. It is preferable to insulate a cold ceiling both from above and from below. The insulation used for the ceiling located under a cold attic must be moisture resistant.
Warm ceiling
The vapor barrier is laid on the ceiling without a gap, then the insulation is laid. The air gap between the thermal insulation layer and the hydrobarrier membrane should also be left and will provide the possibility of its ventilation.
Before we move on to considering measures for thermal insulation of the ceiling of a private house, we will deal with those problems that should be solved at the stage of choosing the insulation method and materials.
- Choice of material. If the chimney passes through the ceiling and attic, then to insulate the ceiling (at a distance of at least one meter from the pipe) you need to use materials with maximum fire resistance.
- Insulation is a home for rodents. This is a common problem that can be solved by choosing the “right insulation”, various folk remedies and special chemicals.
Vapor barrier membrane
In a private house, insulating the ceiling on the room side is associated with protecting the ceiling and material from moisture, which is inevitably present in the air. A vapor barrier membrane (film) solves the problem.
Core Technology
Insulation of the ceiling under the roof allows all work to be carried out efficiently without regard to external weather conditions.
High vapor permeability and the possibility of getting wet mineral wool insulation requires the mandatory installation of a vapor barrier membrane. In residential premises there is constantly air saturated with moisture, which tends to leave the room with excess humidity.
The presence of 20% moisture in the material by volume reduces the heat-holding capacity by 2 times. When 40% is reached, the insulation efficiency is zero.
The film is secured with a construction stapler. The strips are laid perpendicular to the laid and secured joists. The tightness of the connection is ensured by securing the edges of the strips with double-sided tape.
It is more convenient to file a rough ceiling or sheathing for finishing using screws.
The insulation is installed from the attic side. The width of the insulation should be 10 - 20 mm narrower than the distance between the joists. Otherwise, gaps will form that allow heat to escape. They must be filled with insulation scraps, or the orientation of the material must be changed, which will lead to excess material consumption. The height of the joist boards should be greater than the thickness of the heat insulator.
Pressing the insulation against the enclosing structures leads to its compaction and an increase in the specific thermal conductivity coefficient.
Boards are laid on top of the low-density heat insulator to make it possible to use the attic for technical purposes. High-density slabs can be protected by installing a screed made of cement and sand.
Ceiling insulation technologies
You can insulate both the surface of the ceiling and the roof. In particularly extreme climatic conditions, both methods are used at once. Accordingly, the technology for attaching thermal insulation to the surface will depend on the installation method.
Roof insulation with ecowool: step-by-step instructions
Ecological wool is a fairly new material. which not only insulates the walls well, but also allows them to “breathe” freely, ensuring optimal gas exchange between the room and the street.
She has absorbed all the best from her closest sister - mineral wool. Moreover, unlike it, ecowool is much less sensitive to moisture, as mentioned earlier.
Dry and wet installation method
There are two ways to apply ecowool to the surface:
- Wet - in this case, the material is mixed with lignin and sprayed using a special installation onto the surface to be insulated. The convenience of the method is that the material adheres well to the surface and dries quickly, but it is not accessible to everyone, since such a process cannot be reproduced manually, and it is unprofitable to buy a unit just for it.
- Much more popular is the dry method, in which the material is loosened using a construction mixer and then laid directly on the surface.
A video of the process can be seen here.
How to put ecowool correctly
To do this you need to follow these steps:
- A film protecting against steam is laid over the entire roof area (kraft paper will also work) - this is a backing for ecowool.
- Next, the material itself is prepared - it is poured into a container and loosened with a mixer, as a result of which the ecowool increases in volume by 2-3 times.
- The resulting ecowool flakes should be laid out in an even layer and patted down to make them denser. You can level it with regular plywood. On the ceiling, the layer thickness reaches about 20-30 cm.
- Next, you can lay a layer with an overlap if you need to walk in the attic. And if no one lives there, then you can leave it as is.
Insulating the ceiling with polystyrene foam: step-by-step instructions
Polystyrene foam is quite often used to insulate ceilings both in private houses and in city apartments on the upper floors, if the roof of the house is cold enough.
The material is inexpensive, lightweight, easy to use and holds heat well. At the same time, it serves for decades without significant complaints.
NOTE. When choosing polystyrene foam, pay attention to possible external defects that indicate a defect:
- yellowness of the surface;
- significant differences in the size of the balls forming the layer of material;
- chips, deformations on the edges
Also, you should not buy material if you know that it was stored in the open air - such conditions significantly deteriorate its quality.
Amount of material and necessary tools
Before starting work, you need to prepare all the tools that will be needed to install foam sheets on the surface, and also calculate the amount of foam itself. Typically, grades from PSBS-15 to 35 are used. It is best to take sheets with a thickness of 5-6 cm.
Either special glue is selected as the installation material, or a frame made of ordinary metal profiles or wooden slats is used.
Installation of foam plastic with glue
You can purchase special glue for gluing foam sheets.
Another option is to make it yourself from cement and sand in a ratio of 5:1. Water is added in the amount necessary to obtain a thick, dough-like mass.
IMPORTANT. If you mix the solution yourself, you should not immediately get a thick consistency - initially it is better to make a less viscous mixture. The fact is that after a few hours it will thicken, after which it will be possible to definitely decide whether to dilute it or leave it as is.
A diagram of the correct placement of glue strokes on the wrong side of the sheet is shown below.
It is better to carry out gluing work in moderately warm conditions at temperatures from +5 to +25 C. This way the foam will adhere most firmly to the surface.
NOTE. Glue consumption is usually 4-5 kg per square meter, but in fact it can be more.
You also need to take into account that for different types of work the consistency of the glue is selected:
- for gluing foam plastic - a thick consistency so that it does not spread from the spatula;
- for fixing the mesh - somewhat thinner;
- for the last layer - even thinner (similar to the viscosity of low-fat sour cream).
Strengthening with a frame
For a more durable service, as well as in the case of highly heterogeneous surfaces, the insulation is attached to a pre-built frame. The sequence of actions will be something like this:
- Preparing the surface - getting rid of obvious defects (if possible), removing old material, as well as paint or lime residues after whitewashing. It will also not be superfluous to coat the ceiling with any antiseptic so that bacteria or microfungi do not appear in the cavities. This is especially true for old houses with wooden roofs.
- Next, you need to fix all the wires and provide insulation for the lamp outputs.
- Installation of transverse profiles (usually an interval of about half a meter, but in general it is selected in accordance with the dimensions of the foam sheets) using dowels and self-tapping screws.
- Then the longitudinal structural elements are attached, and sheets of foam plastic are mounted into the resulting cells using screws or glue. The sheets must be applied tightly to avoid even small gaps. Therefore, all measuring work must be done especially carefully, otherwise a lot of heat will escape into the cracks.
- At the last stage, finishing material (for example, drywall) is installed using screws.
Detailed video instructions for insulating a roof with foam plastic, as well as a description of the interesting nuances of its operation, are presented here.
Styrene insulation
Polystyrene heat insulators produced using different technologies acquire qualities that are widely used in modern insulation systems:
- A heat-holding capacity unattainable for natural insulation materials (about 0.03 W/m K). This is achieved due to the presence in the volume of the material of a huge number of limited spaces with still air, which is an ideal insulator.
- A negligible degree of water absorption (from 0.4 to 4% of the volume at full immersion) and zero vapor permeability, which is especially important under unfavorable operating conditions.
- Increased resistance to compression, which determines the possibility of covering the insulation with heavy ties.
- A wide range of thicknesses allows you to select a layer close to the design one, thereby reducing purchasing costs.
- Standardized dimensions ensure ease of calculation and installation, as well as maintainability of the heat insulating layer.
- Low biological activity does not allow microorganisms and rodents to spread.
- Once the source material has been stabilized, the production process is environmentally friendly.
Application technology
How to properly insulate a ceiling under a cold roof using expanded polystyrene (EPS)?
Based on physical properties, it is recommended to use PPS when insulating structures made of metal and reinforced concrete. When working with wooden ceiling components, it is necessary to provide additional ventilation.
When laying it on the floor of the attic, it is enough to level the surface: knock down the protrusions, fill the potholes. For height differences of more than 10 mm, apply a leveling screed.
Diffusion membranes are not used in this case. Lay the slabs close to each other. The resulting gaps are filled with scraps or polyurethane foam. The slabs of the second layer are laid with a shift in relation to the first, overlapping its joints.
The insulation boards are secured with wide-headed dowels. The depth of the dowel is at least 60 mm. Its cap should be recessed into the plane of the slab by 1-2 mm.
Then the entire surface is covered with a reinforced cement-sand screed to ensure the safety of the insulation from mechanical, chemical damage, and natural phenomena.
Sawdust and leaves
These insulation materials have been used for many decades. This is a completely natural, environmentally friendly and cheap thermal insulation. For these reasons, it is still used today. With the correct installation technique, leaves or sawdust insulate a cold ceiling well. The layer thickness should be optimal in specific climatic conditions.
Such materials are used in combination with others. For example, sawdust is mixed with shavings, and leaves with clay. The shavings create a porous structure, and sawdust fills it and makes the insulation denser. Clay is also a binding and compacting material.
The disadvantage of these materials is their high flammability. To prevent this, sawdust or leaves are mixed with fire retardants. Thanks to these preparations, the insulation becomes completely non-flammable or slightly flammable. Since the roof has several wooden floors, they also need to be treated with fire retardants.
Sawdust or leaves are often used for thermal insulation of the ceiling structure of baths because they can withstand high temperatures and do not require additional waterproofing.
How to properly insulate a ceiling under a cold roof? Thermal insulation of houses can be carried out from the room or attic. Both options need to be considered.
Liquid heat insulator
Polyurethane foam is delivered to the work site in a liquid state. This insulation is obtained as a result of a chemical reaction of two components under pressure. As a result, it acquires physical and chemical properties very similar to EPS. The big advantages are:
- the possibility of insulating any building materials;
- carrying out thermal insulation in hard-to-reach places;
- creation of a single thermal insulation layer on the entire insulated surface without the formation of cold bridges.
Application of polyurethane foam requires certain preparation and equipment. Failure to comply with the technology or the dosage of starting substances can lead to the receipt of a final product with properties different from the required ones.
In the case of thermal insulation of reinforced concrete floors with subsequent transformation of the attic into a technical room, it is necessary to install floor joists. In other cases, surface preparation is not required before starting work.
There is no need to use hydro- and vapor barrier. All subsequent processing of the insulated surface consists of arranging a subfloor or screed.
Installation using adhesive solution
How to properly insulate a ceiling under a cold roof with dense material? To do this, it must be secured with glue. Such thermal insulation can be polystyrene foam, penoplex or basalt wool. The glue can be a special cement-based mixture, liquid nails or polyurethane foam.
Special mixtures are diluted in accordance with the instructions on the package. Be sure to take drying time into account. This will determine how much you need to knead. If the glue dries quickly, you should prepare a small amount. In a cold room, the hardening process will proceed more slowly than in a warm room.
Then the glue is applied over the entire surface of the insulation with a comb or pointwise with a spatula or trowel. Polyurethane foam is applied with a special gun. If necessary, use a spatula, but do not touch it with your hands. Foam is difficult to remove from the skin.
After this, we insulate the ceiling by pressing thermal insulation slabs against it. For better adhesion, you need to hold the material for a few seconds. When 1-2 m² of slabs are fixed, holes are drilled through them in the ceiling to secure the insulation with dowels. All gaps between the plates are filled with polyurethane foam. This will avoid cold bridges.
If the roof is too cold or the insulation thickness is insufficient, you can lay a second layer of thermal insulation in the same way. In this case, the slabs must be laid in such a way that the joints of the first layer fall in the middle of the second. If necessary, the insulated ceiling can be plastered.