At all times and among all peoples, the rose was considered the queen of flowers. These truly beautiful flowers with an extraordinary aroma are still extremely popular among people, as evidenced by the fact that there are more than two hundred subspecies of this beautiful plant.
Interestingly, breeders have bred roses of all colors of the rainbow and a huge number of shades. The possibility of an unlimited choice of colors makes rose crafts one of the most popular activities both for children and for skilled craftsmen who make original souvenirs.
An ancient legend
According to the ancient Greeks, such a beautiful flower could not have appeared without the intervention of the gods. So, emerging from the depths of the sea, Aphrodite dropped drops of foam onto the ground, which immediately turned into white roses. Scarlet flowers appeared from drops of the blood of the goddess’s chosen one - Adonis.
Fortunately, today, to easily and quickly decorate your home with a rose from paper made by yourself, there is no need to scatter foam on the ground or shed drops of blood.
The Queen of Flowers can be made using the simplest tools and materials - paper, pencil, scissors and glue.
DIY roses from socks step by step
It is no longer possible to surprise anyone with a gift in the form of socks; on the contrary, it has become quite banal. But making a bouquet out of socks and presenting it for a holiday can be an original idea. This bouquet can be a great surprise for a baby’s birthday, or a gift for your husband on February 23rd. But, to be honest, even a woman will not refuse such a gift, since there can never be too many socks.
Let's look at how to make a bouquet of socks with your own hands using children's socks as an example.
Materials:
- Socks
- Wire
- Tape
- Decor
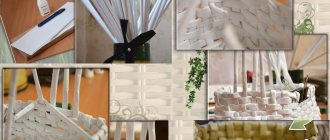
Each sock needs to be twisted as shown in the pictures. Insert a wire into the base of the sock flower
Wrap the base with tape
You can also wrap artificial leaves.
You can use a basket to create a bouquet. Insert a piece of foam into which you can stick rose stems from socks.
You can also collect the socks in a bouquet and wrap them in wrapping paper.
The simplest option
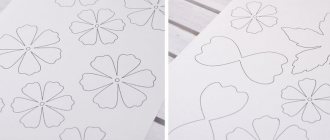
A spiral is drawn on a square sheet, and there is no need to strive to depict ideal lines - the more varied they are applied, the more original the flower will turn out. Then:
- a blank is cut out along the applied contour;
- the strip is rolled up, and a little glue is added to make it more dense;
- At the base, a twig and several leaves of green paper are added.
The rose is ready. By making several flowers of different sizes in this way, you can arrange a luxurious bouquet.
Roses - spiral
You can stick this rose on a postcard and give it to someone or decorate an element in your interior with it. You will need: colored square (10×10), heat gun, double-sided cattle.
Process of creation:
- Draw a spiral inside the square and cut it out.
- Roll it up from the outer edge.
- Apply glue to the base of the flower and secure.
You will get a rose, make several of them to create a composition that will decorate your home.
Manufacturing
Let's take a closer look at how to make a paper rose with your own hands. The entire manufacturing process will take six stages.
- On a white sheet we draw the outlines of the plant. Be sure to use wavy lines when drawing.
- Start cutting out the design from the center so that you end up with a kind of spring.
- The resulting blank is transferred to paper of the desired color.
- Cut out a template from colored paper.
- Take a piece of wire, add a drop of glue and wind the cut spiral, thereby forming a rosebud.
- Check how firmly the bud is glued to the wire and, if necessary, further strengthen it.
By making several artificial flowers in this way, you will get a bouquet of luxurious roses.
How to make a rose from felt with your own hands
Handicraft masters are very fond of such material as felt. And this is not without reason, since felt is sold in a variety of colors, different thicknesses, with or without glitter.
Jewelry - brooches or hairpins made from this material - have become very popular recently. Therefore, you can consider the option of making a felt rosette, because it can complement the image as an accessory.
Materials:
- Felt: green, pink or red
- Threads
- Pencil
- Hot gun
You need to cut out 4 round pieces with a diameter of 7-8 cm from felt. You can make them using a compass or circle some round piece of furniture. Cut each circle in half. Sew a semicircle along the straight side with matching threads.
Finally, pull the thread taut, gathering the petal and securing the thread. We need to make 7 petals like this.
From one petal we twist the middle of the bud.
We fix the rosebud at the base with stitches and a knot.
We wrap the petal around the middle of the rose and secure it with a thread near the base.
We wrap the next petal around the previous ones and fix it. There will be as many petals as lush as you want the flower to be.
Cut out leaves from green felt. We attach them with a hot gun to the base of the rose.
Where can you use felt roses?
Origami
This is another option for decorating a flower from a simple material. To make this craft you will need materials traditional for Japanese technology:
- scissors;
- pencil;
- two-color paper.
The work process is as follows:
- The sheet is folded diagonally, the excess strip is cut off to obtain a square blank.
- The template is folded again until the second diagonal appears.
- We bend the square, forming lines similar to the lines of a snowflake.
- We shift the upper right part of the workpiece to the left, and the lower part opposite to it to the right side and get a triangle.
- The vertices of the resulting geometric figure are brought to the middle, and we draw a finger along the folds.
- We unfold the workpiece and bend the upper corner back.
- We straighten the rosebud and bend the curved corner inward.
- We “assemble” the corner again and fix the folds.
- Raise the side corners to the top of the workpiece.
- Flip over and then fold all sides towards the center. A small hole appears at the bottom of the workpiece.
- It is necessary to blow into the hole so that the bud is filled with air and straightens.
- Using a pencil, curl the rose petals.
- The paper strip cut off at the beginning of the work is twisted into a stem and inserted into the hole.
The rose made using Japanese technique is ready!
DIY roses from cotton pads step by step
Getting creative with children is not difficult, because you can use a variety of materials. Think about how you can congratulate your grandmother in an original way with a homemade gift. This could be a bouquet of roses made from cotton pads. You can also make a whole topiary with your own hands.
But first, consider making a simple rose from cotton pads with your own hands.
Materials:
- Cotton pads
- Corrugated green paper
- Scissors
- Threads
- Wooden skewers
- Glue
Apply glue to the edge of the skewer and wrap a cotton pad around it. Hold for a few seconds for good fixation. This will be a rose petal. At the base, apply glue again and wrap it with another disk. The middle of the second disk should be at the junction of the edges of the first.
We will also make another 5-6 cotton pads, which need to be glued in a checkerboard pattern.
Now the bud is ready and you can start creating greenery. For this you need green paper. Cut a rectangle out of it and cut out cloves from one edge. Glue it to the base of the bud. Wrap the skewer in green paper. It should not unfold, so secure it well. We will also attach a green leaf to the stem.
The basis is money
In addition to small denomination bills, all you need to decorate a rose is wire. Then:
- the “denyuzhka” is bent in the center, and then in two;
- the workpiece is pulled together with wire in the middle;
- four blanks are made in a similar way;
- by connecting the individual parts, we form a flower;
- connect all the wires of individual buds and make a plant stem.
The “money” rose is ready. Having a sufficient number of “unnecessary” bills, you can arrange a whole bouquet of “valuable” flowers!
Elegant flower
We offer an option for making a small rose from corrugated paper.
And for this work you need the most minimal set of tools and materials:
- green corrugated color for the stem and leaves, and yellow for the tea rose;
- scissors and glue;
- pencil.
The manufacturing process will differ from the previous one.
Stages of work
- Stage No. 1. A sheet of yellow paper is folded into four, and then diagonally, and we get a triangle.
- Stage No. 2. The blanks are cut and unfolded in such a way that the result is eight petals.
- Stage No. 3. Four templates are designed in a similar way.
- Stage No. 4. We begin to change the number of petals in the workpiece. In the first we remove one piece, in the second - two, in the third - three, and finally in the fourth - four.
- Stage No. 5. We glue the blanks so that the outer leaves overlap, and we get buds with three, four, five and six petals.
- Stage No. 6. Leaves are cut out from the green base, decorated with an accordion and attached to the flower.
An elegant, stylish rose plant is ready.
Another option
In addition to green and pink corrugated paper, you need to prepare tape, wire, a thin stick for the stem and a cutting tool.
Manufacturing consists of five simple steps.
- Step No. 1. Five petals in the form of droplets and 15 in the shape of hearts are cut out from the pink base.
- Step No. 2. The petals should be stretched.
- Step No. 3. The base for the stem should be wrapped with adhesive tape.
- Step No. 4. The formation of a bud is carried out as follows - first, five droplets are attached, and then all the prepared hearts.
- Step No. 5. Leaves are cut out of green paper and attached to the stem of the flower.
Another version of the flower, made from a corrugated base, is ready.
Master classes on creating roses
Today we are going to get acquainted with master classes on making the most original models of crafts:
- A simple bud using the origami technique.
- Bouquet of fresh roses made of corrugated paper.
- Felt miniature hat crafts.
- Lush buds made of ribbons.
- Roses from colored napkins.
Each of the presented options is distinguished by its special grace, beauty and bright saturated colors.
A simple bud using the origami technique
To work, we only need a diagram with a detailed photo report, paper, scissors, glue and the creative spirit of the master. Let's prepare a work surface - a wide, comfortable table, and unfold a sheet of plain paper on it. Next we proceed according to the given scheme:
- A sheet of paper must be cut into long strips.
- First, we make modules for the bouquet.
- Fold the corner of the strip at one end. Repeat two or three more times.
- Now the next step is to roll the first curl, holding the tip of the corner.
- Now we repeat all the steps, alternating turning the corners and folding the bud.
From one strip we will get one bud. Make eight to ten buds of different colors, arm yourself with glue and a beautiful base for the applique. Another interesting option is to create a bouquet from a decorative wicker basket using illustrated paper. Place a sheet of illustrated paper on the bottom of the basket and place rose modules on top of it. For better fixation, treat each rosette with glue along the side surfaces.
Bouquet of fresh roses made of corrugated paper
Corrugated paper is an excellent material for creating crafts. To make a beautiful and colorful bouquet, prepare the following materials:
- Paper of various shades.
- Scissors.
- Glue.
- Packaging for a bouquet.
- Satin ribbon.
- Decorative elements (beads or rhinestones).
You may also need an iron during the process.
For further work, use the following instructions:
- Cut equal squares from corrugated paper. You will need quite a lot of them, about 10-12 pieces per bud.
- Use several colors to make the bouquet bright.
- We treat each square with a hot iron (the temperature should not exceed 60 degrees, otherwise the material can be damaged) and then slightly pull back the edge of the future petal. After cooling, the workpiece will take on an original and realistic appearance.
- Now we begin to form the bud. We will sew the petals together using thin threads of the same color.
- Each inflorescence needs to be decorated with rhinestones or large beads; if desired, you can open the product with transparent acrylic varnish.
- The final stage is packaging the bouquet in illustrated paper or forming an interesting wedding bouquet in the shape of a ball.
It is necessary to glue the buds together using a glue gun.
Felt miniature hat crafts
You can decorate a child’s hat for a holiday or a walk in an original way using miniature roses made of felt and guipure. For work we will need the following materials:
- Felt and guipure.
- Scissors, threads and needles.
- Template for rose petals.
To make beautiful rose crafts, use the following step-by-step instructions:
- Using felt templates, we cut out blanks for the petals.
- Each petal should be ironed, the edges can be stitched with shiny threads to create an original border.
- The petals need to be sewn together very tightly so that the product holds its shape on the hat.
- After assembling the inflorescences, you can begin to design the sepals. To do this, we cut round “skirts” from guipure, which we sew to the finished buds. Thus, our roses turned out to be quite lush and strong products.
All that remains is to attach the blanks to the hat using glue or thread.
Lush buds made of ribbons
Skilled needlewomen have come up with a way to create original wavy buds from wide satin ribbons. To work, use the step-by-step instructions:
- The edges of the ribbon should be scorched with a lighter so that the threads do not unravel in the future.
- Lay one of the ribbons in front of you, fold one edge with a corner.
- Sew along the fold line with threads of the same color, and it is advisable to use a thin seam.
- Make the next corner and stitch the fold line again.
- Alternate each step, repeating them sequentially until the very end of the tape.
- Now let's start assembling the bud. To do this, we begin to roll the stitched satin ribbon in a circle, forming an original inflorescence.
Satin ribbons allow you to create lush buds, known for their glossy shade. You can use such buds as decoration on a dress, handbag, craft, or as a bow on a hair tie.
Roses from colored napkins
For work we will need napkins of two colors: cream for the bud and green for the stem. We then follow the diagram below:
- Place a cream napkin in front of you on the table and bend the top edge 0.5-1.0 cm towards you.
- Now we take the upper left corner of the napkin with two fingers and begin to roll the bud counterclockwise.
- Lightly press the resulting inflorescence to secure it in the desired shape.
- We roll up a stem tube from a green napkin.
Most often, such buds are used on the festive table as decoration.
Giant roses
To work on decorating large-sized flowers, you need the same materials and tools as when making roses of regular size. The choice of base color depends on the preferences of the craftsman.
Progress
Making a giant rose begins with the creation of 18 blanks - six each of large, medium and small sizes. Next steps:
- At the base of the cut blanks, it is necessary to make as many cuts as possible.
- The ends of the petals turn away from the worker.
- Six large blanks are glued together.
- Templates of medium and then small sizes are glued.
- A piece of cardboard is glued to the bottom of the flower.
- The paper is slightly bent and cuts are made on the fold side.
- The cut paper is twisted into a ring (of a circle that will fit in the middle of the plant) and unfold the cut parts of the sheet in different directions.
- Glue the resulting blank into the center of the bud.
The giant flower is ready. It can be placed in a large vase and decorated with a composition in a free corner of the room.
How to make a rose from plasticine: a children's craft
Plasticine is the very first material that children begin to work with. It may be simple fun for them, but it develops fine motor skills. Both boys and girls can make this flower, because girls love flowers, and boys will want to make a pleasant surprise for their mother or grandmother.
Materials:
- Plasticine: red, green
- Stack
- Board
- Wooden skewer
Cover the skewer with a thin layer of green plasticine to create a stem. To create petals, roll balls from red plasticine.
Press down each ball, stretching it in different directions. Make one flatbread long.
We wrap a long cake around the edge of the skewer, and then the rest of the petals.
The edges of the petals do not need to be tightly attached to the bud. After all, our rose should be lush.
Attach a sepal under the bud.
Form rose leaves.
We attach the leaves to the stem, and you can also add thorns to the stem of the rose.
Knowing how to make a rose from plasticine, any child, even kindergarten age, will be able to make a craft for his mother on March 8th.