Is it possible to build a Russian stove with your own hands? This is really possible, but first you should carefully study the instructions, carefully analyze all the diagrams, but most importantly, it would be a good idea to undergo an internship with a professional.
The best option would be to carry out all the necessary work under the supervision of a qualified stove-maker, who will prevent possible errors when reading the order during the ]]>laying]]> process.
]]>
]]>
The problem is that just one incorrectly placed brick can ruin everything.
There are often cases when, due to such an oversight, the masonry had to be completely redone, since the ]]>stove]]> either had no draft at all, or it was too strong.
If you are not afraid of warnings and are not afraid of possible difficulties, and you decide to test yourself as a stove maker without making irreparable mistakes, it is important to follow the instructions exactly and follow the rules of work. In addition, the choice of material should be approached with full responsibility.
You need to know the necessary parameters for the design of capital heating devices so that they fully comply with specially developed standards: this is the only way to avoid claims from fire inspectors.
Stove power selection
Good advice from an experienced stove maker
Before buying a stove, you need to decide on the power. Be sure to take into account the square footage of the heated space and the power consumption when heating the incoming fresh air. “Rus” stoves are ideal for small and large steam rooms, as they are capable of heating rooms with a volume of 4 to 18 cubic meters.
When choosing power, calculate the volume of the steam room and add for each square. meter of glass door or window 1 cubic meter. meter of the estimated volume of the furnace. You should not buy sauna stoves with more power than you need. In this case, it may turn out that the miser pays twice. Those bathhouse owners who purchased a unit that is too powerful will experience overheating of the steam room, which will make it difficult to create the desired microclimate.
Materials and their quantity
A Russian stove with a fireplace with the above dimensions will require at least 2,500 bricks and 580 kg of masonry mixture (clay, lime, lime-gypsum, clay-gypsum or cement mortar). It is worth taking a little more material than necessary, given that during the work approximately 5-10% goes into battle. If you are laying out a stove for the first time, you may need to re-lay the vaults due to incorrect calculations, so a supply of bricks and mortar will not be superfluous.
Two types of bricks are needed: approximately 1750 pcs. hardened red (better than the M-200 series), the rest is fireclay fire-resistant brick (the Sh-8 series is suitable). When creating a foundation for a Russian stove, you will need: sand, boards for formwork, crushed stone, cement, reinforcement (9-10 millimeters in diameter). When arranging a stove with a fireplace, the following materials are used:
- Stove doors (3 pieces - firebox with tempered glass to fit the size of the firebox, blower 30x14 cm, cleanout 14x14 cm).
- Fireplace grate (approximately 22.5x17.5 cm).
- A hob with burners if subsequent cooking is planned on the stove.
- Smoke damper (6 pieces - one standard 13x24 cm and five “summer movement” - 25x40 cm).
- Ventilation grille (it is placed on the facade of the stove, choose a model that matches the decor).
- Metal corner, strip (each measuring 150 cm), steel sheet of minimum size 5x50x50 cm.
The role of the steam generator in the furnace
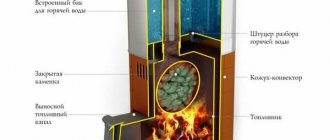
To prevent the air in the steam room from overheating above a comfortable 95°C, a steam generator is simply necessary. This is a metal chamber that is generally installed on the side of the firebox. Thanks to this installation, the steam generator heats up much faster than the stones. They do not fit closely to the firebox and conduct heat much more slowly than metal.
“Rus-Panorama” stoves of modifications 12 LNZP, 22 LNZP and 27 LNZP have steam generators that help achieve ideal temperature conditions and moisture levels in the steam room. Bath stove “Rus-Panorama” 18 Pro with a steam generator is considered the best heater for a Russian bath.
The main advantages of this model.
- Has 2 operating modes. Regular steam generation mode, when steam is generated from water hitting an open heater. Another option is the “Russian bath”: steam arises from water dripping dropwise from the tank onto the hot walls of the firebox.
- It has the lowest heating rate for the steam room and the lowest operating temperatures, ranging from 80 to 90°, which creates a comfortable and mild climate in the Russian bath.
A wood-burning stove for professionals is “Rus” 18 LNZP. It is designed for large rooms with a volume of 10-18 cubic meters. m, weight of stones – 90 kg, tank capacity – 55-80 l, oven weight – 61 kg. With the same parameters, a gas-wood-burning unit for a bathhouse weighs 12 kg less. The size of the stove and the required mass of stones depend on the square footage of the heated room.
Preparation of mortar for masonry
For beginners in the stove business, it is better to purchase ready-made mixtures for stoves. They are made from components that are ideal for laying Russian stove bricks. All you need to do is pour the powder into a container, add liquid in the proportion indicated on the package, and get to work. The disadvantage of ready-made mixtures is the price. It will be 4 times more expensive than preparing a clay solution with your own hands. If you want to save money, here are the instructions:
- The sand is passed through a fine mesh sieve.
- Clay is poured with water in a ratio of 3:1. The mixture is left to soak for 2-3 days.
- Stir the lumps into the clay and pass through a sieve. The result is a creamy substance.
- Mix clay with sand in a 2:1 ratio (the proportion is approximate, depending on the fat content of the clay). The solution should be thick, but not stick to the spatula. If the clay is too thick, the proportions with sand are changed to 1:0.5, if the clay is too liquid - 1:3.
The presence of convection is very important
Convective air flows occur when the air between the firebox and the casing heats up and rushes upward, and a cold flow flows down under the furnace. Then it heats up between the firebox and the protective casing and also goes up. This pattern of air current movement is called convection.
Efficient convection oven
Thanks to this phenomenon, layers of warm and cold air inside the steam room are mixed, equalizing the temperature, which prevents your feet from getting cold. Convective currents heat air more efficiently in the vertical direction. In summer, 50-60 minutes are enough to heat a steam room to 95°, in winter – from an hour to an hour and a half. And if the stove has a steam generator, the room heats up even faster.
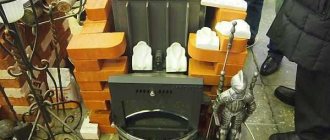
Metal stoves are made from sheet iron 4-5 mm thick. The water tank can be located on different sides. A special open thermal chamber is provided for laying stones. These ovens are very economical. They heat up quickly, but also cool down.
Drying
After completing the laying of the Russian stove, it will be necessary to carry out the drying procedure. There are two ways. You can, for example, open the blower door, views, and valves (to create a draft). After 2 days, start heating the fireplace at the lowest power (if the fireplace is wood-burning, then use only dry pallets).
When drying, the stove should operate in a gentle manner: 2 times a day for 40-60 minutes daily , until the walls become dry to the touch and the inter-brick mortar becomes light in color.
It is worth considering that moisture from the damp solution will evaporate. It is necessary to thoroughly ventilate the premises after the drying procedure. If condensation appears on the walls, the water must be wiped off with a rag.
Depending on the size of the stove, drying lasts 4-7 days. Then you can start using the oven at full capacity. If you start turning on the fireplace at full power without first drying it, the walls will crack.
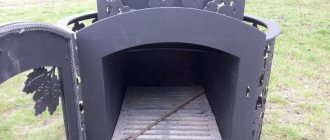
Furnace combustion tunnel
It is very convenient when the stove in the bathhouse has a combustion tunnel that runs through the wall. In this case, you need to add firewood from the next room. What are the advantages of having a combustion tunnel?
- Saving breathing air, which is released when wood burns in a steam room.
- Cleanliness in the steam room. When using firewood, dirt always appears, but due to the presence of a tunnel, it will remain in another room.
- Adjustment of the ventilation system, since to maintain combustion a lot of air from the steam room will go into the firebox.
- The combustion tunnel has a fireplace window. This is an excellent solution for a relaxation room, allowing you to create a unique atmosphere and a great mood. The living flame fascinates and fills you with vital energy in addition to the healing effect of the steam room.
The wood-burning heater “Rus” 9 is equipped with a combustion tunnel. The number next to the model name corresponds to the volume of the heated room. This stove is capable of filling the steam room with steam in a fairly short period of time. Thanks to this, the heater itself can be located in the steam room, and the firebox can be located in the relaxation room.
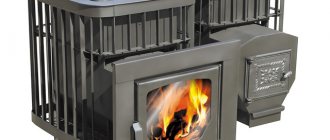
Metal stove with chimney
This heater can hold about 25 kg of stones. It is small, its dimensions are 672x308x469 mm. Heat distribution in the steam room occurs evenly. Reviews from many experts indicate that this model is optimal in all respects and is ideal for small Russian baths.
Why is this the best swimming place for a girl?
Very often unmarried girls or widows washed themselves in this way. There were also explanations for this.
In a number of Russian regions, for a long time it was believed that it was either completely sinful for a lonely girl to go to the bathhouse, or it was only possible in the company of her mother or a married woman. Therefore, often there was nothing left to do but climb into the oven.
In addition, there was an opinion that the bannik (i.e., the brownie) likes to joke with the bathers: for example, throw a hot stone, pour boiling water on them, prop the door, etc. He allegedly played much more serious pranks with the girls. Similar tricks were also attributed to the kikimora, who allegedly lived in the bathhouse under the floor. Therefore, the girls preferred to wash in the hut, next to the images that protected them from evil spirits - they always hung in the red corner.
Advantages of the sauna heater “Rus”
The main part of the furnace firebox is made of steel, which contains up to 13% chromium. The structural elements experiencing the greatest thermal load are made of steel with 17% chromium content. This alloy increases the durability of the heater. Some models are equipped with a stainless steel water tank, in which the water quickly heats up to 95°. The tank is mounted at the base of the chimney or removed to an adjacent room if there is a heat exchanger.
The Rus-Panorama sauna heaters are equipped with a door with heat-resistant glass, which allows you to control the process of burning wood and admire the beauty of a live fire. The maximum diagonal of this screen is 17 inches, which guarantees excellent visibility. Also, all models are equipped with a self-cooling door, which prevents burns during combustion. The presence of several operating modes, like the “Rus-Panorama” 18 Profi, increases efficiency and reduces fuel consumption.
A small drawback is that the chimney elements and stones are not included in the stove set and must be purchased separately. This does not reduce the advantages of “Rus” stoves, but gives the opportunity to show imagination when choosing additional materials. It is very easy to maintain the units; the system for self-cleaning the chimney and collector from soot helps with this.
Provided that the installation and operation rules are followed, such heaters will serve regularly for at least 10 years. “Rus” are stoves for connoisseurs of a real Russian bath. Enjoy Your Bath!
Self-assembly
Construction of a Russian stove
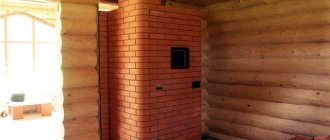
To assemble the device with your own hands, you need to know the structure of the Russian stove. The heater must be built from bricks and other durable materials with high combustion resistance.
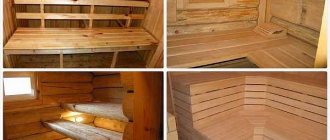
The main element is the crucible. This is a firebox consisting of a roof and a hearth below. Firewood is placed under it and dishes with food for cooking are placed. The opening in the furnace is the mouth. There is also an opening in the back wall called the pole window. They form a space between themselves - a shelf, in which hot food is placed to maintain the temperature. The pole includes an over-pipe, where the smoke collects, and above it there is a hailo, which is covered with a view. It limits the penetration of cold air masses into the stove. The overpipe is closed with a special valve, thanks to which the draft in the chimney is regulated. There is a compartment under the pole for storing utensils. There is also an oven in the lower part in which you can store firewood.
After getting acquainted with the design of a rustic Russian stove, preparatory and then installation work begins. The algorithm for assembling a Russian stove with your own hands with drawings is presented in the form of step-by-step instructions.
Brick selection
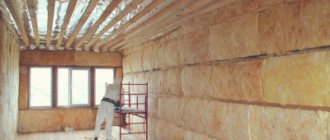
The selection of materials for the furnace is an important task, as they must comply with fire safety regulations. For this reason, each element of the structure is made from its own material. Clay bricks are used to lay the stove and chimney. For the floor and roof - refractory or refractory brick. Plaster, tiles, and natural stone are used as facing materials. For fire-resistant insulation, clay bricks, asbestos cardboard, asbestos-cement boards and other fire-resistant materials are chosen.
To create a chimney, a solution based on cement or sand and lime is used. You can mix it yourself or buy a ready-made mixture in the store.
When purchasing, it is important to monitor the quality of materials. The brick must have precise dimensions and a surface free of chips and foreign inclusions. It is better to choose red clay. Buy fine-grained sand with particle sizes of no more than 1.5 mm.
Tools
The wizard must have the following set of tools:
- ruler;
- pencil;
- Master OK;
- level;
- plumb line;
- pick;
- rubber mallet;
- Bulgarian;
- bucket for solution;
- mixer in case of mixing the mixture yourself;
All tools can be purchased at a hardware store.
Choosing a location for the oven
Accommodation option
Before starting work, you must select a location for installing the stove. The following factors are taken into account:
- Foundation. It can be created separately for the stove and be ready. A layer of waterproofing is required to increase service life and performance characteristics.
- Free passage of the chimney ceilings. Pipes must not damage or interfere with existing supporting structures.
- Convenient location. The user should be able to approach the oven without any problems and use it for its intended purpose.
- Maintaining fire safety distances. A sheet of metal 700×500 mm is placed in front of the pole window. There should be a distance from the stove to the combustible wall equal to the height of the stove. There must be at least 125 cm from the pole to the opposite wall. Metal beams next to the chimney must be at least 130 mm away from the inner surface.
Following these recommendations will help you choose the best place for the Russian stove.
Getting to know the procedures
A stove whose wood-burning compartment is lined with bricks must be assembled partially from fireclay bricks. In order for such a design to work properly, order is necessary. You can find the diagram on websites and in specialized literature. Individual projects are made to order only.
Since the Russian stove is a classic solid fuel design, it is necessary to approach the choice of a craftsman responsibly and give preference to a stove maker who is familiar with the technology of laying old stoves. This way, you will be confident that the stove will work properly and will not malfunction.
The classic order includes a variant with forty rows. Before laying, an additional foundation is traditionally assembled, and the first row of bricks must be perfectly level. The last two rows of the order are the chimney.
On the second row, chimney channels begin to form, leaving space for the combustion chamber and other provided structural elements. Other rows are laid in a similar manner, up to and including the fifth.
On the sixth row, a combustion chamber equipped with a door is installed. In order for air masses to circulate and move evenly, decorative ventilation grilles are installed. The combustion hole stacks are laid using refractory stove bricks. Next, we lay the 7th and 8th rows, make a short circuit at 9th and block the lower passage channel.
On rows 11-13 we form an arched crucible. Next, by analogy, rows laid in the shape of a chimney are assembled. At the necessary stages we install the closing and sliding elements.
Modern variations
The furnace, the masonry of which is carried out today, has a more modern and modified functionality for the better. In order for the design to be most efficient and provide maximum heat, it is best to replace old materials with more modern ones.
A dacha, which today can be heated with a modern boiler, cast iron or steel firebox, which is not difficult to install, will look stylish. However, nevertheless, many prefer modern variations of classic Russian stoves, which allow them to recreate the comfortable and cozy atmosphere of antiquity in the house.
If we compare the efficiency of modern gas boilers, solid fuel cast iron and steel fireboxes with a water circuit and a Russian stove, the first two options will certainly be more efficient and easier to install. However, a brick oven surpasses them in its visual design, which for many becomes the determining factor.
Thanks to modern developments and innovative solutions, a stove with a stove bench not only has a more interesting appearance, but also fits well into any interior, produces quite decent power, allowing it to be used for heating.