Foam blocks: features and characteristics
Traditionally, a bathhouse is built from wood materials, such as timber, logs, etc. They are good for everyone, except perhaps the need for constant maintenance, since the wood begins to rot quite quickly under the influence of dampness. Without some care, a wooden bathhouse will very quickly lose its original appearance.
Foam block bath projects
But recently, bathhouses are often built from foam blocks. This material is an excellent alternative to traditional wood, as it has a lot of advantages and in some cases even surpasses wood in its characteristics. A foam block is a block of a certain size made from foam concrete or cellular concrete . It has not been a novelty on the construction market for a long time, but previously it was used much less frequently than now, due to the fact that its main disadvantage - hygroscopicity due to high porosity - has been overcome.
Foam block
However, the presence of porosity is the main feature of such materials. Thanks to it, foam blocks have an excellent level of thermal insulation, are able to perfectly retain heat in any structure, and are not too heavy materials. The pores inside the block can have different sizes and are located randomly throughout its entire interior.
Important! Due to the presence of pores, blocks absorb water very strongly. In the summer this is not scary, but in the winter the water, freezing, expands and can damage the blocks. That is why foam block buildings, and especially bathhouses, must be carefully insulated from water. Moreover, waterproofing work is carried out both inside and outside the building.
Foam concrete - production process
Foam concrete bath: advantages and disadvantages
Foam block is a porous building brick, characterized by large dimensions and low weight. In its manufacture, cement, sand and a foaming agent are used. Like any building materials, foam concrete blocks have their advantages and disadvantages. With proper design of the bathhouse and compliance with all technologies during construction, some problems can be avoided. The main advantages of foam blocks include:
- resistance of the material to fungus and mold (foam concrete, unlike wood, does not rot);
- minimal thermal conductivity (due to their cellular structure, foam blocks retain warm air and maintain a comfortable temperature in the room);
- environmental factor (foam blocks are less toxic than bricks);
- relatively low price;
- ease of installation.
The disadvantages of the material include a tendency to crack and instability to sudden temperature changes. It is worth noting that foam concrete structures are installed on a shallow strip foundation to minimize the effects of settlement.
The cellular structure of foam blocks is not suitable for steam rooms due to the high level of humidity. In order to prevent premature destruction of the walls, they are sheathed with a special waterproofing material.
Frequent temperature changes in baths reduce the thermal insulation properties of foam blocks. Without additional insulation with mineral wool, the walls of the building will freeze. High temperature changes in baths reduce the thermal insulation properties of foam blocks.
Types of foam blocks
Foam blocks, depending on the manufacturing technology, may have different properties and some differences in appearance. The table below provides a description of the main varieties of this material.
Foam blocks are different
Table. Types of foam blocks.
| View | Description |
| Aerated concrete | This version of foam blocks is made from cement with the addition of aluminum powder. During the chemical reaction that occurs due to the addition of powder, pores are formed in the mixture. The future block is placed in an autoclave, where great pressure is applied to it, and the concrete hardens. The sizes of such blocks may differ from each other, this is due to the peculiarities of their manufacture. But deviations from the standards (average block dimensions 30x25x60 cm, weight - 30 kg) are, as a rule, insignificant, which makes it possible to obtain a minimal seam when laying blocks. Also, this version of foam blocks is called gas block or autoclaved foam concrete. The material is quite often used for the construction of baths and other structures. It is lightweight, conducts heat well, does not burn, and is not afraid of frost. It is also a fairly economical material and easy to process - it can be cut with a hacksaw. |
| Silica concrete | This type of block has a white color due to the addition of lime to the composition from which it is made. It is necessary to bind the mixture. This version of foam blocks has the highest hygroscopicity. There are a lot of pores in the structure of each block - 50% of the total volume. Due to the presence of a large number of voids, the blocks are very light and can be used for construction on light foundations. This material has excellent heat and sound insulation properties, so a bathhouse made from it will keep warm for a long time. |
| Foam concrete | This version of the foam block is produced in almost the same way as conventional aerated concrete, but without the effects of temperature. Concrete hardens naturally, but a special foaming agent is added to the mixture from which the block is made, after which the finished mass is poured into molds, in which it hardens naturally. |
| Sand block | These are blocks made of cement, water and sand. This is the standard mixture for creating concrete. Such blocks are economical, resistant to external factors, and environmentally friendly. They also have voids, but the blocks almost do not absorb water. The main disadvantage of the material is its low thermal conductivity, so a bathhouse made from it will have to be additionally insulated. And their mass is large, so it is not recommended to lay them on a weak foundation. |
Structural and thermal insulation block
Note that each of these types of materials is suitable for building a bathhouse for any project. It’s just that some materials need to be well protected from moisture during the construction process.
Prices for gas blocks
Gas block
Walls
The first row of blocks is placed on a cement-sand mortar, eliminating all unevenness. This row should be checked with a level and adjusted with a rubber hammer.
Laying the first row of the wall
The next row of foam blocks is placed with a shift of half a block in relation to the first row.
Note! In further masonry, not mortar is used, but special glue for foam concrete
Glue is a very important component when laying blocks; its consumption is minimal, since it is usually applied in a thin layer of 0.5 cm. Preparing the adhesive solution takes a little time, and detailed instructions and proportions are given on the packaging. To prepare the composition, you need to stock up on a container and an electric drill with a special whisk attachment in order to mix the mixture.
Sample of adhesive composition for foam block
It is necessary to raise the walls of the bathhouse in three rows of blocks, and do not forget to lay a reinforcing layer of metal mesh between them, which is very important for strengthening the structure.
Advice! During the construction of walls, constantly check compliance with the horizontal and vertical lines of the masonry.
Waterproofing
At the stage of constructing a wooden bathhouse frame, it is necessary to simultaneously waterproof the ceiling, walls and floor. Before you properly build a bathhouse from foam blocks, you should also take care of the waterproofing material.
In this case, foil material is widely used, which, while protecting the walls from moisture, can provide good vapor and heat insulation of the bath. The main advantage of this waterproofing material is its ease of installation.
Thanks to the thin foil, the dimensions of the room are not reduced; in normal cases, up to 4 cm is added to each wall due to the waterproofing layer.
Installation of waterproofing
Waterproofing technology using foil material consists of the following steps:
- First, 40×40 wooden blocks are fastened in a horizontal position;
- Insulation is laid between the bars;
- Foil is laid on the bars, which must be carefully pulled and fixed to the bars using a construction stapler;
- All joints are insulated with special aluminum tape;
- The bars are placed vertically on top already in a vertical position;
- A facing board or lining is attached to the vertically installed bars.
Waterproofing the floor in a bathhouse depends on the type of the floor base itself. When waterproofing a concrete floor, it is necessary to level the surface from cracks, irregularities and bumps. Then the area should be coated with bitumen mastic and then laid with plastic film or roofing felt.
Next, the following stages of laying the floor surface are carried out.
The next option for waterproofing a concrete floor involves the following steps:
- Plywood is attached to the subfloor, on which a special material is laid - waterproofing;
Note! For best effect, the edges of this material should be placed on the walls.
- We glue all the joints of the laid waterproofing with aluminum tape;
- A reinforced mesh is installed on top of the waterproofing material;
- Then the concrete screed is poured;
- After the screed has hardened, installation of the floor tiles is carried out.
Note! For foam block material, it is necessary to purchase in advance special umbrella-type dowels, which are also called “fungi”
Dowel "umbrella"
Choosing material
When calculating how to build a bathhouse from a foam block, you should not lose sight of the choice of the material itself. When purchasing, pay attention to M25 foam blocks, which have a density of D700.
Foam block M 25 - the best option
It should be noted that in the modern building materials market there are several main sizes of foam blocks, but for the construction of a bathhouse it is recommended to use a block measuring 200*300*600 mm.
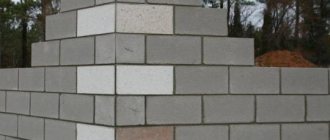
They should be laid on edge, keeping thin seams between them, which prevents heat loss through the so-called “cold bridges”.
Block laying
The laying of blocks must be done on edge, the first row of blocks is laid on a cement-sand mortar, and the subsequent rows on a special adhesive mixture. All seams formed between blocks should be no more than 5 mm, in order to avoid the formation of the so-called cold bridge.
Reinforcement with reinforced mesh
Every fourth row is additionally reinforced with reinforced mesh. Professionals strongly advise using a laser level when building a bath structure, since this type of level is highly accurate.
The walls are ready!
The adhesive mixture is applied to the foam block with a special trowel; the blocks should be fixed using a rubber hammer.
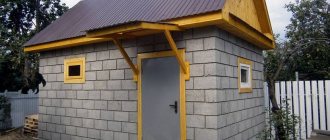
Foam block bath projects
A bathhouse is not just a place where you can steam, although the steam room is perhaps the most important room in it. The bathhouse is also used to keep the body clean and for relaxation, so it must also have other rooms. That is, in one bath there must be a steam room, a wash room, and also a room where you can undress. In addition, the bathhouse can be equipped with a relaxation room, a terrace, and, if opportunities permit, even a swimming pool.
Design of a bathhouse with a relaxation room inside
The most common version of the foam block bathhouse project has a steam room, a wash room, as well as a relaxation room, which in this version also acts as a locker room. It usually has quite large dimensions, since, in addition to hangers, it contains a table and chairs. The most budget-friendly option for a bathhouse is a 4x6 m structure. This design allows you to place a partition in the bathhouse, leaving most of the room for a dressing room and a relaxation room. The second half of the building is divided into two more parts by a second partition, and a steam room and a washing room are organized in the resulting rooms. However, the premises can be made to the size that will be more convenient and relevant - for example, make a large steam room.
Advice! Even when building a small bathhouse, it is still recommended to make a small dressing room at the entrance. This room will allow you to keep the room warm in winter.
Bathhouse project 4 by 5 meters
The stove for the sauna must be selected taking into account the size of the steam room. As for the doors, they need to be positioned so that they do not interfere with anyone and do not take up much space. It is also important to consider that the steam room and washing room should have small windows. The top edge should be level with the door lintel.
The bathhouse will be a little more spacious if you build a bathhouse according to the 6x6 project. In this case, one of the options for distributing space is as follows: 5.3 m2 is occupied by the steam room, 7 m2 by the washing room, 1.7 m2 by the locker room, and 11.2 m by the rest room. The bathroom occupies 1.8 m2. In the steam room you can place two shelves on which you can lie, and the stove is installed so that it can be heated from the rest room. It is important to understand that, if you wish, all projects can be remade to suit yourself.
Layout of a bathhouse made of 6 by 3 foam blocks (several projects)
You can also organize a bathhouse according to a 6x3 m project. Moreover, there are no fewer arrangement options here than in other cases.
When designing a bathhouse, it is important to understand that the steam room should be located in the farthest corner of the building , and not at the exit from the bathhouse. This is one of the most important rooms where the heat should be well maintained and maintained. But at the same time, the largest room should be the rest room, because no one will sit in the steam room for a long time. It’s nice to alternate steaming sessions with long sittings at the table in the relaxation room, so it’s best to make this room the most spacious. For the washing room, you can leave a small nook, but such that it is comfortable and not cramped to be in, and you can also install benches, place shelves for basins, etc.
Bathhouse project
If the bathhouse has a terrace, then you can organize a barbecue area on it. Also in the summer you can relax on the installed chairs. If desired, you can make a second floor in the bathhouse.
Bathhouse project 6 by 6
In general, it is worth noting that all standard bathhouse designs are similar to each other. If you want to do something original, then you need to come up with a new project yourself or together with a specialist and bring it to life.
Video – Bathhouse project
Preparation for construction: drawings and project dimensions
The construction of a bathhouse must be preceded by careful planning, choice of location and selection of the necessary material. For the construction of this structure, a flat plot of land is selected. The quality of the soil plays a big role, which ideally should be dense. If the selected area has unevenness, these defects are removed. In case of a sloping area, leveling is carried out by digging a deeper foundation at the site where the platform is raised. This way the base level will be level.
The dimensions of the building material facilitate quick construction
When choosing the size of a bathhouse, there are no established templates. Usually this is a small building with an area of about 16 m2, equipped with a rest room (dressing room or hall), a room with a shower and a steam room. Depending on the project and budget, this building may additionally have a room with a swimming pool, a locker room and a toilet.
As an economical option, a project with three necessary rooms is perfect. The building has a square shape measuring 400x400 cm. The height of the ceilings in the bathhouse is 230 cm. From the floor to the ridge board of the roof is 330 cm.
Option with three rooms
Tips for choosing foam blocks
The durability of the bath depends on which foam block is chosen during its construction. However, one should also take into account the time after its manufacture, after which the material acquires the necessary strength. This period is 28 days. Therefore, it is not recommended to use foam blocks that have not passed this curing period.
When purchasing foam blocks, experts recommend paying attention to the following factors:
- Manufacturer. Large factories do not need to risk their authority in the market, so you can be confident in the quality of their products. The materials from these companies are accompanied by appropriate quality certificates confirmed by laboratory tests.
- Product price. I should be wary of the fact that foam blocks are sold at a price below the market price. This can only be the case when second-class material is sold or the discount is due to the volume of goods or the distance to the place of delivery.
- Storage conditions of the material and its packaging. Foam blocks must be kept in a dry place, protected from moisture, and the packaging must not have any defects.
Whether a foam block is suitable for construction or not can be determined by visual inspection. Even the appearance of a material can provide enough information about its quality.
Knowing its properties will help you make the right choice.
To obtain the necessary information, you need to pay attention to:
- The structure of air cavities (pores). This can only be determined by splitting the foam block in half. Both the inner and outer surfaces must remain the same, and the cells isolated from each other. If they are connected, the material will absorb moisture.
- The size of the cells. The strength of the material will be much less if its structure contains a lot of air.
- Color. Foam blocks contain cement, so the color over the entire surface should be a uniform gray color. If the material is light (almost white), this indicates that the proportions of cement in the mortar during the manufacture of the block were not met. This fact does not correspond to GOST 25485–89 “Cellular concrete”.
- Correct form. To determine this, you need to place two foam blocks on top of each other. If there are gaps, then laying a large number of similar blocks will lead to excessive consumption of the adhesive mixture.
- Foam block weight. This can be tested by selecting a random block and weighing it.
Each modification is used for certain types of buildings
To check the strength of the foam block, you need to try to break off a fragment from the edge using only hand force. If this succeeds, then the material is of poor quality. There is another verification option. To do this, you need to pierce the foam block through with a nail using your hand. If this was achieved without much effort, then it is not worth building a bathhouse from this material. These methods only apply to structural blocks marked D600 to 900. There are also blocks marked D300, intended for thermal insulation, and not for masonry walls. This type of foam blocks is easy to destroy.
Calculation of the amount of material per bath, examples
To determine the required number of foam blocks to build a bathhouse, you do not need to carry out complex mathematical calculations and involve specialists. This is quite possible for everyone. You just need to know the dimensions of the future building and the material parameters. The bathhouse will be built from foam blocks measuring 200x300x600 mm.
To simplify the calculation, you must first determine the number of foam blocks in one wall. To do this, you need to divide the width of the wall by the length of the block: 400:60 = 6.67 foam blocks for one row. Then divide the height of the structure by the height of the block: 240:30 = 8 rows in one wall. Now you need to establish the total number of foam blocks in one wall, namely, multiply the number of blocks in one row by the total number of rows: 6.67 8 = 53.36 foam blocks. Since the structure of the bathhouse at the base contains a square, to calculate the foam blocks of the entire perimeter you need to multiply: 53.36·4 = 213.44 foam blocks.
For the partition between the rest room and other rooms, you need the same number of foam blocks as for one wall - 53.36.
To calculate the amount of material for the partition between the shower and steam room, you need: 185:60 = 3.08 blocks for one row, where 185 is the width of this partition, and 60 is the width of the foam block. Then 3.08 8 = 24.64 blocks in total are needed for this wall, where 8 is the number of rows.
Now let’s sum up the total number of foam blocks without taking into account windows and doors: 213.44 + 53.35 + 24.64 = 291.44 (rounded to 292 blocks).
Next, you need to determine how many foam blocks are occupied by three entrance doors, two windows and a firebox. The door has dimensions 210x60 cm, window - 60x60 cm, hatch - 60x30 cm.
We calculate how many blocks one door will take: 210:30 = 7 rows, where 30 is the height of the block. Since the door width is 60 cm, it is equal to the foam block, so 7 rows · 1 block = 7 blocks. Total: for three doors 7·3=21 blocks.
Now let’s calculate how many blocks one window measuring 60x60 cm will occupy. For this, 60:30 = 2 rows. Since the width of the window and the block are equal, then: 2 rows·1 block=2 blocks. Total: two windows require 2·2=4 blocks.
After this, you need to calculate the total number of foam blocks required for the construction of a bathhouse, taking into account windows, doors and a furnace hatch. To do this, you need to subtract the space occupied by doors, windows and hatches from the total number of blocks: 292–26 = 266 pieces in total.
Required Tools
To build a bathhouse from foam blocks you will need the following tools:
- Bayonet and shovel.
- Concrete mixer or drill with a special mixer attachment.
- Containers for water and cement mortar.
- Large watering can.
- Pump and flexible hose for supplying solution.
- Stairs.
- Hammer.
- Mallet.
- Trowel.
- Hacksaw.
- Hammer.
- Spatulas of different sizes.
- Screwdriver.
- Self-tapping screws and nails.
- Plane.
- Wall chaser.
- Construction level (it is better to use the laser version).
- Roulette.
- Large square.
- Plumb.
- Cord.
- Graphite pencil.
A gable roof will be erected for this structure. To build it you need the following materials:
- For the manufacture of the rafter system - wooden beams with a cross-section of 100x50 mm and a length of 250 cm in the amount of 8 pieces. The angle of inclination of the roof with this length of beams will be 30 degrees.
- For sheathing - plywood sheets.
- Mauerlat - beams with a section of 150x50 mm, 500 cm long - 2 pieces.
- Metal corners and plate for fastening wooden roof elements.
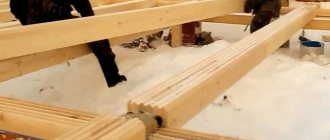
- For floor beams - beams with a section of 150x50 mm, 5 m long, in the amount of 10 pieces.
- Insulating and finishing material.
Construction of a bathhouse from foam blocks
After creating the project, you can calculate the required amount of materials and begin construction. It is important to take into account that the design of a bathhouse made of foam blocks for any of the projects is subject to certain requirements. So, as for external walls, it is better to take blocks with a thickness of about 25-30 cm for buildings in the central zone of the Russian Federation, and in the northern regions you need to take blocks with a thickness of 35 cm or more. Moreover, the lower the density of the blocks, the warmer the building will be, so this also needs to be taken into account. For partitions, you can take thinner blocks 15-20 cm thick, this will be enough.
Important! Walls made of foam blocks in every third row need to be reinforced. For this purpose, ribbed rods with a cross-section of 12 mm are used, which are laid in grooves. The groove must be located at least 3 cm from the edge of the block and have a depth of more than 12 mm.
DIY budget sauna
Insulation of the bathhouse is necessary if it needs to constantly maintain a positive temperature. Then the costs of maintaining the desired indicator will be lower. But if the bathhouse is used irregularly and periodically, then insulation can be neglected.
An important point is the hydro- and vapor barrier of the bath . Blocks can be prevented from being hygroscopic with special solutions that will help protect the material from moisture (the blocks will not absorb it). They just need to coat the walls. However, in the sink and steam room it is necessary to provide good protection from water. Vapor barrier in this case is done by laying a special film.
Bath building made of foam concrete
On a note! You can avoid impregnating the walls if you provide good ventilation in the bathhouse.
You can decorate the interior of the premises like this: cover the steam room with clapboard, make tiles in the sink. In the rest room, the walls can be decorated with wood. The main thing is not to forget about vapor barrier here too.
The roof is installed like this. First, a reinforced belt of reinforcement is made along the top row of wall blocks (with a cross-section of 8-14 mm for longitudinal reinforcement and 6-8 mm for transverse reinforcement) and filled with M200 concrete. The height of the belt should be about 20-30 cm. Then the roof is mounted on the finished armored belt.
Installation of a roof for a bathhouse
Prices for various types of timber
timber
Construction of foundation and walls
Building a bathhouse from foam blocks is a simple procedure. Such a structure is erected in approximately the same way as a brick one. The difference is that the seams in the masonry of foam blocks are very thin, and special glue is used as a solution to hold the blocks together. When building even a small bathhouse from this material, it is advisable to reinforce the walls. To do this, in every fourth row, metal rods are placed in gutters cut out with a grinder. An armored belt must also be placed on top of the masonry.
It is recommended to make the foundation for a bathhouse made of foam blocks strip and quite powerful. All foam materials are fragile. And therefore, even with small movements of the soil, walls made of them can crack. For the same reason, blocks should be laid as evenly as possible, using piers, plumb lines and a level.
Generalized instructions for constructing a bathhouse from foam blocks
Step 1. First of all, you need to create a bathhouse project, describing in detail all the dimensions and parameters of the structure. You should also select a suitable site on the site where the bathhouse will be built. Thus, the site, according to SNiP 30-02-97 , must be located at a distance of 1 m from the fence, 8 m from the neighbors’ house and at least 5 m from the border of the site. Also, the bath area itself must be dry.
First, a bathhouse design is drawn up
Step 2. Next, you can decide on the type of foundation and start building it. Foam concrete is lightweight, which means you can make a simple foundation (for example, a strip foundation).
Foundation arrangement
Step 3. After creation, the foundation must be covered with waterproofing, after which you can begin laying the first rows of blocks.
Laying the first rows of blocks
Step 4. The blocks need to be placed on top of each other in a checkerboard pattern, that is, so that the joints between adjacent blocks in one row do not coincide with the joints of blocks in the row below. It is recommended to fasten the blocks with special glue rather than standard cement mortar. It is important to ensure that the masonry is level and even, and do not forget about the presence of doors and windows. Every three rows the walls should be reinforced.
To fix the blocks it is better to use special glue
Step 5. When the frame of the bathhouse is ready, you can begin installing the roof. In this case, a simple gable roof is being built. The rafters rest on tie rods installed and secured to the load-bearing walls.
In this case, a simple gable roof is being erected
Step 6. The roof can be covered with metal tiles or corrugated sheets. The main thing is to install materials according to the rules.
Now you can start laying the roofing material
The roof is covered with corrugated sheets
Step 7. After this, you can move on to the interior decoration of the bathhouse - creating a floor, covering walls, etc. It is important not to forget to carry out waterproofing work!
Interior arrangement of the bathhouse
Building a foundation with your own hands
A bathhouse in a country house is a capital structure, so it is impossible to do without a reliable foundation. Let's look at how to do this with step-by-step instructions.
Which is better
The best option is a shallow strip foundation. You can, of course, use a monolithic slab or a pile foundation, but in this case it will simply be a waste of money.
How to choose the right type of foundation:
How to build
Required tool:
- concrete mixer or container for mixing mortar;
- welding inverter;
- hammer;
- bayonet shovel;
- building level;
- roulette;
- angle grinder (“grinder”);
- Master OK;
- hacksaw;
- rule;
- scrap;
- axe.
Example of a project with an attic and dimensions
You will also need consumables: cutting wheels, electrodes (1.8 mm), nails (60–80 mm).
Click to enlarge
How to build a foundation: step by step
The foundation installation process step by step:
- Clear the area of everything unnecessary, level it, mark the perimeter of the bathhouse using wooden stakes.
- Dig a pit around the entire perimeter of the future bathhouse, 50–60 cm deep and 30–35 cm wide.
- Stick steel pins (rebar) into the corners of the foundation and tie a thick thread to them.
- Using a level, accurately mark the upper horizontal line of the foundation (the thread will serve as a visual boundary).
- Manufacture and weld a steel frame from reinforcement with a diameter of 10–12 mm. It will be enough to place three rows of reinforcement at the top and bottom so that the total height of the foundation is 70 cm. For vertical elements, thinner reinforcement can be used, the step between them should be 1.5 m.
- Put together formwork from boards 25 cm wide around the entire perimeter. In the washing room, provide a hole for the sewer drain in advance by placing a receiving pipe with a diameter of 100 mm.
- Prepare concrete mortar by mixing cement with OPGS in a ratio of 1 to 4.
- Pour the solution into the formwork, align the top edge using the rule according to the level of the tensioned thread.
- Cover the foundation with a tarpaulin or thick burlap, take a break from working until the concrete has completely dried (14–21 days, depending on weather conditions).
A beautiful and elegant building that will decorate your site
At the stage of pouring the base of the bathhouse, a foundation for the bathhouse stove can be constructed in a similar way if it is planned to be built of brick. We also recommend that you familiarize yourself with the projects of brick baths.
Construction of foam block walls
The process of constructing walls from blocks is no different from similar actions when using ordinary bricks. However, due to the fact that the dimensions of the foam blocks are larger, the work goes faster. The best option for building walls is M25 blocks.
What designs of frame houses for baths there are are indicated in this article.
What the design of a bathhouse and a utility block garage looks like is detailed in this article.The article indicates projects of bathhouses made of timber with an attic, as well as the technology for their construction: https://2gazon.ru/postroiki/bani/proekty-iz-brusa-s-mansardoj.html