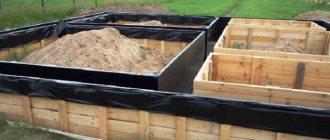
Door frame assembly
Door frame with seal
box with seal
Door frame without seal
An interior door consists of a door leaf, hinged hinges, a mortise lock or latch, and a door frame. As a rule, the door frame for doors of the middle price class is supplied in the form of a do-it-yourself “designer”, that is, in disassembled form. The box consists of three profiled wooden beams, covered with veneer or film to match the color of the door leaf. The length of vertical beams is 2100-2200 mm; horizontal beams are 1000-1100 mm. Door frames differ from each manufacturer in their readiness for installation.
Door frame with factory cut 45 degrees.
For some manufacturers, the door frames are already sawed off and cut at an angle of 45°, just to the size of the door leaf and are completely prepared for assembly. But most boxes are delivered unprepared. They need to be prepared.
Cutting material
The manufacture of the box largely depends on the correct execution of this stage of work. It is necessary to transfer the dimensions to the material and cut the parts in accordance with the data received. In this case, the method of connecting the elements of the trap should be taken into account. A reliable way to connect wooden parts is with a groove. It is quite difficult and time-consuming to cut such a connection with your own hands, so you can find ready-made parts.
Since you need to make the door frame yourself, it is easier to use the second connection method - diagonal. To do this, all elements joining each other are filed at the edges at an angle of 45 degrees. To perform the work with precision up to a degree, a special tool is used for cutting - a miter box. Check the dimensions not only in relation to the opening, but also the door leaf itself. Consider the presence of a threshold in advance.
Let's consider two options for assembling the door frame
Option 1. Sawing and assembling the box at an angle of 45°
Wash down the boxes at 45 degrees
Correct joining of the door frame in the corners
Washed down the boxes on the miter box
The door frame is ready for assembly
- Take two future vertical bars of the box. With a canvas size of 2000 mm and a finished floor covering of 30 mm, the length of the short side of the beam should be -2000 + 30 + the gap between the canvas and the finished floor: 10-15 mm = 2040-2045 mm.
- Place a mark on the inside of the box beams along the required length of the canvas.
- Saw off the excess at an angle. The cutting angle of the timber should be 135° on the inside or -45° on the outside. The length of both vertical beams of the box must be the same.
- Do the same procedure with a horizontal short beam. The only difference is that you have to saw off from both sides. Be careful with the sizes. The main thing in all carpentry work: Measure twice, cut once.
When marking, do not forget that the gap between the canvas and the box itself should be 3 mm.
Option 2. Assembling the box at an angle of 90°
Assembling the box at an angle of 90°
Door frame view for direct connection
Door frame connection at 90 degrees
Preparing for Direct Box Connection
With this assembly option, in the vertical posts of the future box, the so-called box ledge is removed by the thickness of the vertical beam. See picture.
Installation of trim strips without groove
After installing the box, measurements are taken of the uncovered part of the wall. If the slopes are not plastered, then the planks are attached using the following method: a board or beam is screwed to the slopes so as to fix the extension on top and at the same time maintain verticality and maintain a right angle between it and the box.
If the slopes are smoothly plastered, then you can do without an additional block, provided that there is no need to maintain a gap between the extension and the wall.
Work algorithm:
- An extension is attached to the bar;
- The remaining gaps are foamed;
Important! To speed up the hardening process of the foam, the surfaces are moistened with water.
We eliminate the gaps after installing the planks.
- After the foam has hardened, the excess is cut off;
- The final stage is securing the platbands.
Assembling a door frame step by step
Door frame assembly
Assembling a door frame with a gash
After preparing the box, we begin assembling it.
Place the prepared parts of the box on the floor. Connect the corner joints of the box with screws, two screws in each corner. In door frames sawn at 90°, the self-tapping screws are screwed in at right angles (photo top left). In door frames sawn at 45°, the screws are screwed in at an angle of 45° (photo top right). The box is "almost complete."
In order to maintain parallelism of the vertical posts and the same distance between them according to the size of the door leaf, place the door leaf on the “almost assembled” frame, since it will stand in the opening. Fix the gap between the canvas and the box by inserting identical pieces of hardboard or wedges into the gap.
Fixing the canvas in the box for its correct assembly
Now the box needs to be fixed in this position. There are several ways to do this.
Ways to fix the door frame in the desired position before installation
Method 1 . Secure the door frame using thin slats. Nail the slats perpendicular to the posts, using thin nails to the very edge of the vertical posts. There should be two slats: in the middle and at the bottom.
Mounting angle for box assembly
Method 2. Strengthen the joints of the box beams of the future box. Add wide and rigid force angles with holes for fastening to the screws. Screw the force angles, strictly checking the perpendicularity of both vertical and horizontal beams. But I recommend adding another fixing bar to the bottom of the box.
The assembly of the door frame is completed, remove the door leaf from the frame. The assembled box is ready for installation.
In the last article we found out how to cut holes for installing a door handle and latch. It's time to figure out how to assemble the door frame.
The door frame consists of two side vertical elements and one upper horizontal element connecting the first two. Less commonly, the lower horizontal element is also used as a threshold, but this is rather an exception to the generally accepted rules.
Installing an interior door frame into an opening
After all the preparatory steps for installing the door frame in the opening have been completed, you can begin installation. In order to prevent the U-shaped structure from “driving”, it is necessary to install auxiliary strips (spacers) on it; two are enough – at the bottom and in the middle of the rack.
In order to check the correctness of the frame geometry, you must use a plumb line or level. It is easy to construct a plumb line using twine and a bolt, tying it to the head.
Having placed the structure in the indicated place, check the verticality of the racks again. Don’t be too lazy to do this; if it’s uneven, the door won’t close. This procedure is carried out on both sides of each rack.
The box is installed using anchor bolts. They will fix the door block and prevent its deformation. To do this, you need to drill 3 through holes in the racks directly into the opening, and then tighten the bolts.
The gaps between the door frame and the opening are eliminated using polyurethane foam. In order not to stain the front side of the structure, it is necessary to cover it with masking tape. Fill the voids with foam carefully, taking into account the fact that when it hardens, it increases the volume by 30-40%. To prevent the box from moving, it is necessary to install wooden spacers. After the foam dries, they are removed.
How to properly file the ends of a door frame
One of the rules of “good form” is to file the joints of the frame and platbands at an angle of 45 degrees. The highest quality cuts are made using a miter saw. If you do not have the opportunity to use this tool, you can use a miter box and a special hacksaw for an ultra-clean cut with a “pass” or “tenon”. I highly recommend that you first practice on ordinary bars and “get your hands on it.”
First, the side elements of the box . Do not immediately cut the racks to length. I'll explain why. If you cut the top part incorrectly at an angle of 45 degrees, you will no longer have the opportunity to correct the mistake by cutting it again, because the post has already been shortened, and there will simply be nowhere to make it even shorter. First, file the most difficult part, that is, the upper corner joints and check the correctness of the file with a square. The angle should be clear, without deviations, and the cutting plane should be perfectly flat. If there is a deviation of even a couple of degrees, when assembling the box, you will not be able to achieve an angle of 90 degrees at the joints, which is a prerequisite for quality work.
Having finished cutting down the racks, we move on to the transverse element of the box . Here you also need to be very careful. After all, the second end will need to be sawed down not only at an angle, but also along the length, so that the necessary gaps remain between the door leaf and the side posts of the frame. The length of the inner part facing the door leaf should be 8 mm. greater than the width of the door leaf . If the width of the door leaf is 60 cm, then the length will be 60.8 cm. Make precise markings and make a cut.
Now you need to cut the side posts to length. There is a small nuance here that should not be overlooked. Not only do we need a gap above the top of the door leaf, we also need a gap below of about 10mm. But the floor on which the box will be installed may not be perfectly flat, or “out of level.” In this case, if we cut the side posts to the same length, then during installation the door frame will warp, because one post will be higher than the other.
To avoid this, you need to check the level of the floor in the doorway. It is most convenient to use a laser level here, but you can also successfully see the difference with a regular rack level. It is only necessary that the level itself fits the width of the doorway. If the level is short, then do the following simple operation. Cut an even block of the required length, and place a level on it, thereby increasing its length.
Material for additional elements, parameters and preparation for installation
The most expensive types of parts for external doors are made from solid wood. Usually coniferous wood is used.
Important! Soft wood is suitable for making extensions, since these elements do not experience enormous loads.
Budget options include expanders made of plywood or particle boards. The surface of such products is covered with a protective film, which gives the material a representative appearance and prevents the release of formaldehyde.
Veneer or laminating film is used for cladding.
The width of the parts is from 70 to 400 mm. Elements of non-standard dimensions are made to order. Sometimes it is necessary to use planks with varying thickness or width. This approach allows you to compensate for the strong unevenness of the walls.
The correct choice of accessories is based on measurements after installation of the box.
Important! When installing, make sure that the end of the element aligns exactly with the plane of the wall. Otherwise, there will be space between the trim and the platband, and all the work will have to be done again.
If installation of parts on an external door is required, installation begins after the baseboard is laid and screwed.
Door panel installation diagram
Inserting and hanging hinges for a door frame
Let me immediately draw your attention to the fact that without professional tools and experience, you are unlikely to be able to install high-quality mortise hinges. The insertion is done using a manual milling machine, and not with a chisel and hammer, as many people think and are mistaken.
Therefore, I recommend buying overhead loops, as in the photo. They do not require insertion, and their installation does not take much time and effort. The overhead loop consists of two parts that fit into one another and form one plane. The smaller inner part is attached to the door leaf, and the larger one to the frame post.
Mark at the end of the door leaf 20 cm from each edge. Examine the canvas carefully and decide which way the door will open. Here it is important not to make a mistake and place the loops correctly. The hinge hinges should face the direction the door swings.
Place the hinge at the end until the hinges stop. Do not press the hinge too hard against the edge of the canvas. The loop should rotate freely on the hinges without touching the canvas. If, when opening the hinge, you notice that the hinge scrapes along the canvas, leave a small gap of 1 mm.
Place a mark in one of the hinge holes and drill a hole slightly thinner than the self-tapping screws that come with the hinges. There is no need to drill all four holes at once. You can make a mistake in the markings, and the loop will lead to the side. After tightening one self-tapping screw and making sure that the hinge has not moved and sits straight, drill the remaining holes and secure it. Do the same with the second loop.
Now we’ll screw the mating part of the loop to the box post. For convenience, it is better to place the door leaf on the floor and place the frame post next to it. In order for the hinges to lie evenly on the frame, the door needs to be raised slightly, adjusting the height with wedges. By leaning the box stand against the end, make sure that it protrudes slightly above the length of the canvas, which after assembly will allow the required gap of 3 mm to form. Then drill holes to secure the hinge. Now you don’t need to completely screw the hinges on, because you still need to assemble the box, and it’s more convenient to do this without a canvas.
Do-it-yourself wooden doors: step-by-step instructions, diagrams
A door frame is basically a frame that contains bars and folds. The box is reinforced with special bolts or steel plates are used.
You can assemble the door frame yourself using wooden blocks and fasteners.
To prevent unevenness when setting the box, use a plumb line and level. In the case of stone walls, the frame is attached to wooden plugs using nails. If the walls include slabs, the structures will only be supported by brackets.
In order to understand how to make a door frame with your own hands, you need to familiarize yourself with some aspects of the work itself.
To begin with, measurements are taken. There are 2 ways to retrieve data:
- along the doorway;
- on the installed door.
For example, calculating data on an operating door. First, measure the sides and add 5 cm on all sides of the door. Next, measure the threshold and the upper part of the system, leaving room for allowance. Then they calculate the footage and begin sawing.
Next, lay the bars on the floor; they will be needed when installing the side box. They should lie level, with the grooves on top. Mark the upper and lower boundaries of the future door, while adding the thickness of the threshold. Certain notches are made from the bars that are applied to the threshold and crossbar so that the sawing line is visible.
Scheme for taking measurements of a doorway.
Then the prepared materials are sawed for collection. After cutting the workpieces, it is necessary to adjust them to the appropriate size. A slot for future loops is made in one of the blanks using a chisel and hammer. Before you start, you need to know the necessary side of opening the structure.
To continue self-assembly, you must use screws and nails to strengthen the future structure. Next, hinges are hung and the doorway is strengthened. Even out the gaps.
The necessary tools to help assemble the door are:
- construction knife;
- square;
- roulette;
- pencil;
- hammer;
- screwdriver;
- plane;
- hacksaw.
Use a set of screwdrivers of different configurations, use pliers, a crowbar, and small nail pullers.
To punch a hole in concrete, you need a hammer drill. A miter saw can prepare materials for the door. An electric router also does quite a lot. Using it, holes for the necessary locks and hinges are made in a short period of time. If you have a large set of cutters, even better. If you need to make a door frame with special quality, you will also need a woodworking machine.
We invite you to familiarize yourself with Warm floors in a bathhouse under a wooden floor
Door frame device.
The process itself looks something like this. First, a smooth board 5 cm thick (maybe several) is prepared, and 4 identical pieces are made from it. 2 of them are equal to the length, 2, respectively, to the width of the opening.
In this case, the segments have processing on only 3 sides - they must be made very smooth, the 4th is placed near the wall. Based on the width of the board, a cut is made into which the door will be inserted.
When all the necessary workpieces have been prepared, they begin to process the transverse sections. The longitudinal compartments of standard doors are 193 cm, the transverse ones are 90 cm. The cut at the end of the door frame should be 1.5 cm deep and 5 cm wide.
First, you need to attach all the straps located on the top and sides, and only then begin to install the box itself in the doorway. In this case, there must be a space of 2 cm between the door and the wall. This is subsequently used for thermal insulation.
One of the important elements in securing the door is the gash. There are 2 options for sawing boxes: 45° and 90°.
The diagram covered the door frame.
The box is cut at 45° as follows:
- boards are taken;
- the necessary marks are placed on the inside, the unnecessary is removed;
- The sawing angle inside should be 135°, and outside 45°; the length of the vertical boxes should be standard and identical.
The same is done with horizontal small bars. The only difference is that it needs to be sawed off from all sides. The most important thing is not to make mistakes in sizes.
To assemble the box at 90°, place the finished parts of the future door on a flat surface. The corners are carefully connected using self-tapping screws, screwing 2 self-tapping screws into all corners (at right angles).
To keep the door frame in the required position, several methods can be used:
- Strengthening the door frame with small slats. The slats must be secured perpendicular to the posts with small nails (screws).
- Adding wide and hard corners that are designed for fastening. Install all corners, carefully checking perpendicularity and verticality.
The frame is inserted into the door opening and positioned correctly in the center. At the end of all work, be sure to check for cracks, distortions and other irregularities. If necessary, use a seal.
In order for the box to be firmly fixed in those places where it comes into contact with the wall, a sealant is placed.
At the end of all additional operations, the perpendicularity of the elements on the side is checked.
Of course, if you use all the specialized tools and assistants who can supply the parts if necessary, making a door yourself will be quite simple. Therefore, choose the option that is suitable for you. Good luck!
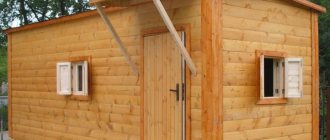
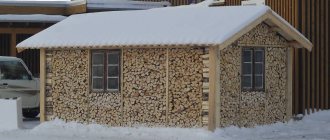
Manufacturers are increasingly using composite materials, plastic, and steel to make doors. However, the tree has not lost its popularity. Durable and warm material is ideal for entrance doors to the house. The boards are used to independently assemble canvas for outbuildings and baths. Making a wooden door with your own hands is not difficult. You just need to have a good board and a set of tools.
When producing wooden doors, you need to know the advantages and disadvantages of the material. The final result depends on this. The main difference between wood is its hardness. Soft woods are easy to work with, but are less resistant to moisture. This material is suitable for interior doors. It is difficult to process hard wood with hand tools, but the material is more resistant to moisture. This wood is suitable for making entrance doors.
When talking about wood species, it is worth considering the resin content of the material. Larch takes first place in this regard. A product made from it will withstand dampness for a long time. Resin protects against rotting.
The following requirements apply to choosing a board:
- minimum number of knots;
- wood moisture content no more than 15%;
- perfect evenness.
For outbuildings, used material taken from the dismantling of old buildings is suitable. It is better to make beautiful doors to the house from a new board.
Hardwood
- Birch is quite hard and difficult to process, but has an attractive texture.
- Beech is characterized by increased strength, but deforms when humidity changes.
- Alder is soft and rots quickly in high humidity.
- Oak is hard, tends to split, but is resistant to dampness and beautiful.
- Walnut has an interesting texture, is easy to process, and is not afraid of moisture and mechanical stress.
- Maple is moderately hard, can be processed well, and has moderate resistance to moisture.
For the manufacture of wooden entrance doors, oak or beech is most often used.
Conifers
- Of the coniferous species, pine is considered the most popular. Soft wood is easy to process, but does not withstand moisture well. The material is best used in the manufacture of wooden interior doors.
- Larch is characterized by a beautiful texture and high resin content. Solid wood perfectly resists moisture, which makes it possible to use the board for assembling entrance doors.
- Spruce is knotty, lighter and softer than pine, and slightly inferior in strength.
We suggest you read How to make a door frame yourself
Tools
In production, special machines are used to make wooden doors.
- Thicknesser is necessary for processing the board. The most productive are double-sided planing machines, which clean the workpiece in one pass.
- Without a milling machine, manufacturing wooden doors is impossible. It is used to make locking joints on boards, select chamfers, and process shaped workpieces.
- When gluing overlays to a wooden frame, a press is used.
- Use a circular saw to cut the board to the desired size.
To make wooden interior doors with your own hands at home, no one will buy expensive machines. An electric circular saw is suitable for unraveling the board.
You can select grooves and process the surface of the workpieces using a manual milling machine.
Additionally, you should have on hand:
- drill;
- screwdriver;
- wood hacksaw;
- grinder;
- chisels, mallet, corner, level, tape measure.
To paint the door leaf, it is advisable to use a compressor with an air gun.
To make a wooden door with your own hands you will need the following materials:
- dry tongue and groove board;
During the purchase, the thickness of the boards is selected taking into account the installation location of the door leaf. For an interior door, 25 mm thick wood is sufficient. For the front door, use a 50 mm thick board. After purchasing, it is advisable to dry the wooden blanks by laying them on a flat surface using pads.
Additionally, a mortise lock, hinges, handles, and a viewing peephole are purchased for the wooden entrance door. For an interior door, it is enough to take hinges and a handle with a latch.
When assembling a simple wooden door with your own hands, a drawing or complex diagram is not needed. It is enough to measure the height and width of the door leaf. The dimensions of the sash are calculated so that it fits into the grooves of the door frame, leaving a gap of about 5 mm around the perimeter. When making a wooden door, the main elements are prepared: a tongue-and-groove board with a tongue-and-groove lock for the door leaf and a crossbar made from edged blanks.
The step-by-step instructions for assembling a wooden door with your own hands consist of the following steps:
- the boards are sawn to the height of the future canvas and laid out on a flat surface, observing one direction of the pattern of annual rings;
- the tenons with grooves are lubricated with wood glue, all the boards are connected, tightly squeezing the canvas with a clamp;
- After the glue has dried on the outermost plank, the tenon is cut off from the end of the product, and the entire surface of the shield is milled and polished.
- To prevent the sash from falling apart, the structure is secured with cross members. The edged board is shaped into a trapezoid, grooves are made on the canvas to a depth of 1/3 of the thickness of the wooden piece and they are lubricated with wood glue. The crossbars are inserted into the recesses by tapping with a mallet. For reliability, you can fix it with self-tapping screws.
- To make the sash last longer, it is treated with antiseptic impregnations. If it is necessary to install a double-glazed window on a wooden door, a window is cut out in the panel using a jigsaw. A board is nailed to the center of the end of the entire perimeter of the opening - a stop for two glasses. After installing the double-glazed window, the edges are framed with glazing beads or decorative strips.
Twisting or assembling a door frame
Lift the door leaf from the floor and set it aside, thereby making room for the door frame. It is also more convenient to roll the box on the floor, as you will soon see for yourself. To begin, the following preparations are required. Take the top part of the box and in the cut plane, perpendicular to it, drill two holes on each side for self-tapping screws, about a centimeter from the edges, as in the photo. In the uprights of the box, make one hole in the middle, also perpendicular to the plane.
Now, having correctly positioned the elements of the box , one by one, continue drilling to the adjacent part, and then screw them together with self-tapping screws. No need to look for any special screws. Any type will do, for example those that are used to secure drywall to metal profiles. The most important condition here is the clear connection of the sawn ends.
To ensure that the parts fit snugly together, place plywood under them. If you have a very flat floor, then you can do without it. I repeat that the most important thing here is to keep the plane from sliding at the moment of twisting. If you have strong hands, you can avoid skewing by simply holding the box with one hand while tightening the screw with the other.
Please note that it is not wood screws with a large thread pitch that are best suited for this twisting, but self-tapping screws for screwing drywall to metal profiles. Or other similar ones, that is, with small steps. A large pitch moves the parts away when twisting. Check it out on ordinary wooden blanks and make sure I’m right.
Assembling and installing a door frame is a monotonous task that requires precise calculations and actions. One small mistake can cost you days of work or even the purchase of a new box. There are 2 main types of door frames: with and without a threshold. Recently, the second option has become more popular. In addition to the slats themselves, the boxes have several holes and fastening devices. The most important are door hinges, which perform a load-bearing function. Manufacturers have several options for boxes in terms of readiness for quick assembly and installation. The assembly itself comes in 3 main types: baguette joint, tenon (ridge) and right angle. The second option, in a broad sense, implies a labor-intensive and complex process, while the others leave the opportunity to do everything from start to finish with your own hands and without much difficulty. To understand how to assemble a door frame, you need to know the nuances of taking measurements, preparing parts and fastening them.
Tools and materials for installing an interior door
When installing an interior door, you will need the following tools:
- Hammer;
- Drill for a hammer drill 6x160 mm;
- Screwdriver;
- Screwdriver bit;
- Building level;
- Fine-toothed wood saw or electric jigsaw;
- Square;
- Pencil and tape measure;
- Gun for polyurethane foam;
- Chisel;
- Hammer;
- Stationery knife;
- A crowbar (a.k.a. a crowbar, a.k.a. a mounting tool).
Materials and fasteners for installing an interior door:
- Polyurethane foam;
- Dowels 6x60 or 6x80 mm;
- Wood screws, black with large threads, 90 mm long, for assembling the door frame;
- Yellow self-tapping screws, 30 mm long, for attaching hinges;
- Nails with a narrow head for platbands;
- Wedges.
Components and equipment of the door frame
The door frame is 2 vertical beams installed on the sides of the opening. The elements are complemented by a top attached to the upper part of the passage and a threshold located below. The latter may be absent due to the characteristics of the flooring or personal preferences. The door frame is supplied with additional timber. Its task is to thicken the box, which is necessary in some situations.
Platbands are also attached to the door frame to decorate and hide flaws. They are mounted to the box with small nails with small heads, from the side of two adjacent rooms. The door frame is complemented by a slot for the lock tongue. It is decorated with a counter plate with the required holes. The frame also includes hinges for installing and controlling the canvas. The frame of a double-leaf door requires slots for the lower and upper fixation of the leaves.
Box installation procedure
This is necessary if the box was made independently or purchased together with the sash in disassembled form (this only applies to wood products).
Before starting work, it is advisable to check the presence of all elements, the degree of their fit, as well as the composition of the installation kit prepared for installing the door. All this is easy to lay out in the hallway or on the landing. The components of the box, even if it is factory-made, will still have to be adjusted to the location. You need to make sure that the cuts are exactly 45º. If necessary, the required cut can be made using a miter box.
Since the joints of the box bars are made with self-tapping screws, holes are drilled for them. This will prevent the appearance of cracks in the wood, as well as the deviation of the fastener leg from the desired direction during the screwing process.
- After it is ready, it is necessary to mark the places where the canopies are attached. If it is a wooden jamb, then you will need a chisel to remove the material.
- The hinges are immediately screwed to the frame.
- Depending on the system for fixing the block on the wall, fastening strips with drilled holes are screwed to the frame (in accordance with the drawn up drawing). They allow you to fix the door structure on the base without damaging its front part.
- The first “approach” is a test one. Monitoring the position of the frame will allow you to determine where there are large gaps between it and the base, and, therefore, decide how to eliminate the defect. Wedges, bars, planks cannot always correct the situation; in some cases it is advisable to carry out concreting.
- Re-installation of the box. Basically, almost all wooden jambs do not have a threshold, and therefore, in order to achieve the correct geometry, a spacer is placed at the lower level, exactly the size of the upper plank of the frame.
Checking the opening parameters. And only after making sure that it has the correct shape can you begin attaching the box.
Fixing the block
Recommended system - at least 6 places; 2 points at the top and sides. And the more massive the frame and sash, the more of them there should be, for reliability.
Installation of spacer wedges. They are placed evenly around the perimeter of the structure, providing additional stability in the opening. The nuance is that it is necessary to constantly monitor the unchanged shape of the box, otherwise, after installing the canvas, difficulties will arise with its opening/closing.
- Drilling. Through the holes in the planks, channels are drilled into the base for the anchors.
- After fixing the door frame to the wall, you can further strengthen the structure. If the door is metal, then pins are driven in in advance, to which the frame is “attached” from the inside by welding. Then this place is masked with plaster and platbands.
All that remains is to hang the sash and check its position relative to the frame. If necessary, make simple adjustments. In terms of finishing - installation of platbands or another method of decorating the opening.
The polyurethane foam used to process the cracks should not be considered as an element of the box fastening system. It serves only to improve the sound and heat insulation characteristics of the opening, nothing more. If there is a significant load on the door, the foam will not hold it from longitudinal displacement.
When installing doors, several techniques are practiced. In order not to make a mistake in choosing the optimal one, you should follow the manufacturer’s instructions. Only competent installation of the structure is the guarantee that there will be no problems with it for a long time.
The upper parts of the racks must be cut using a hacksaw (it is better to take a saw with small teeth) and a miter box. This operation is easier to do if you have a miter saw. Measure the required length along the inside of the post (it consists of the bottom gap, the height of the door leaf and the top gap).
The bottom gap is usually taken to be about 1 cm, the top - no more than 0.4 cm. Prepare the second rack in the same way.
Now you start processing the lintel. Measure the desired length along the inside.
The required length will include the width of the door leaf, a small (about 0.4 cm) gap on the side where you will put the lock on the door, and another gap on the hinge side. You get the length (internal) of the lintel. Note - absolutely accurate.
Installation of interior door posts
We suggest you read: How to cut a door frame at 90 degrees
Now you can saw off the ends of the lintel with your own hands (again, with a miter saw or miter box). This procedure is done at an angle of 45°. Next we work on the door hinges.
Their installation should be done as carefully as possible
Now you can work on the box and trim.
You have completed a difficult task on your own. Now you can work on the box and trim.
Material selection
It is selected taking into account the weight of the canvas. It is the door frame that will take the entire load - from the doors and its own weight. The stability margin must be large. The materials most often used are wood, microwood fiber (MDF boards), and metal. Preference is given mainly to wood.
The material is popular due to such qualities as strength, naturalness, environmental friendliness, presentable appearance, ease of processing and processing. However, most of the nuances depend on the specific type of wood. It is preferable to make frames of interior doors from pine. The frame of the entrance doors needs to be made stronger. Common oak is suitable as a raw material. Door frame parts are also sold ready for assembly. After purchasing them, all that remains is to install them.
One of the most popular materials, common oak, also has other names:
How to take measurements correctly
Removing dimensions from a door frame is done in 2 ways: by taking the dimensions of the opening and the parameters of the door leaf. In the first case, 3 indicators are measured. The height and width of the passage, the thickness of the wall on all three sides (right and left sides, top) are measured. You also need to measure the diagonal, since this indicator acts as a control during the manufacture of the door frame. The thickness of the box depends on the walls. The second option involves taking dimensions from the door.
First of all, the sides are measured, and 5 cm are added to the results, and then the threshold, taking into account allowances. It must be remembered that there should be a gap of 2-3 mm on both sides between the closed door and the leaf. The margin between the wall and the frame is ideally 1 cm on each side. This place will be filled with polyurethane foam. Thus, the door frame is made 2 cm narrower than the opening.
Installation of extensions and platbands
We nail the trim around the perimeter of the door frame using small nails with a narrow head. The platbands should be sawed at an angle of 45 degrees, using a miter box or a square. If the thickness of the wall is greater than the thickness of the door frame, then additional strips should be installed.
Installation of door frames
Additional strips are installed as follows:
Installation of additional strips
First, a U-shaped frame is assembled from the extensions, as shown in the figure. Then the rail is screwed onto the screws around the perimeter from the inside. The length of the screws should be such that they do not come out on the other side (the thickness of the extensions is usually 10 mm). After the frame is assembled, we screw it to the door frame using self-tapping screws through the rail. Having mounted the frame from the extensions, we foam the gap between the extension and the doorway. After an hour, we cut off the foam and nail the trim.
Scheme for attaching additional strips to a door frame
That's it, the installation of the interior door is complete. In the next article I will teach you how to install a door lock with your own hands.
Required Tools
You will need tools such as a spatula, hammer, chisel, drill, saw, level, tape measure. A spatula is necessary for applying and leveling plaster when finishing a doorway. A hammer will be needed to adjust the elements of the side of the frame and fix the trim. A chisel is used to remove material when cutting into door hinges. A drill is needed to drill holes: in the wall for subsequent installation of opening details and in the canvas for fittings. A saw will be needed to cut parts of the box, platbands, and extensions. In the case of metal elements, it is replaced with an angle grinder. The correct position of elements horizontally or vertically is determined using a level. A tape measure is used as the main measuring device. In the process you will also need a plane, a square, a screwdriver, a pencil, and a construction knife.
- wire cutters;
- construction mixer;
- plaster trowel;
- jigsaw
Box assembly options
There are not many of them. Basically, only three are distinguished: using a tenon joint according to the tongue-and-groove principle, using baguette fastening (at an angle of 45°) and connecting elements at a right (90°) angle. In the mid-price category, door frames are usually sold disassembled; like semi-finished DIY products.
The box consists of 3 profiled wooden blocks, covered with a film in the color of the door or veneer. Vertical bars usually have a length of 210-220 cm, horizontal - 100-110 cm. Preparedness for installation varies among products from different manufacturers. Some of them have boards already cut at 45°, taking into account the size of the canvas, and are completely ready for assembly. However, most door frames are sold unprepared.
Before starting assembly, it is necessary to carry out a number of preparatory measures:
- All parts are placed on the floor, separately from each other.
- The goods are inspected for completeness.
- Parts of the product and fittings are checked for defects. After installation, faulty items cannot be returned.
Baguette connection
First, two vertical beams are taken. If the door leaf has a length of 2000 mm, and the finishing coating is 30 mm high, then the length of the short side of the block should sum these indicators (2030 mm), and with the clearance between the finishing coating and the door, the final result will be 2040-2045 millimeters. A mark is placed on the inner surface of the beams according to the required length of the door. Then the excess is cut off at an angle.
On the inside, the cutting angle should be 135°, which is the same as -45° on the outside. The two vertical boards must be the same length. The same actions are performed with a short bar for horizontal placement. In this case, you will need to cut on both sides. You need to make sure the sizes are correct. Before performing the work directly, you need to carefully double-check the measurements.
The clearance between the frame and the door should be 3 mm.
Tenon connection
This option implies the presence of grooves in the vertical planks and tenons (ridges) in the horizontal one. When folded, a hole for a self-tapping screw passes through these alternating elements. With enough experience, you can make this tongue-and-groove system yourself. For this you will need construction timber; MDF materials will not be suitable. Regardless of whether you purchased semi-finished boards or made them yourself, measurements are first taken to process them to the required length.
The doorway is measured in several places. The result less is taken as a basis. You need to know the dimensions of the door itself and add gaps for its movement, 3 mm on both sides is enough, but you can increase the figure to 5 mm. At the top of the vertical planks, grooves are made for connection to the horizontal bar. The length of the latter is calculated taking into account these recesses. The difference in the thickness of the timber and the size of the groove should be subtracted from the width of the entire box.
Right angle
This is the easiest option for DIY assembly. This method involves removing the box porch from the vertical posts of the assembled frame to the thickness of the vertical beam. The horizontal board is sawn smaller, taking into account the thickness of the vertical ones. All prepared elements should be placed on the floor. All parts of the frame are connected with self-tapping screws. Each side requires 2 pieces. The corner joints of the structure are connected with fasteners; 2 screws are needed for each corner.
In frames sawn at 90 degrees, they are screwed in at the same right angle (at 45° - at an angle also 45°). To maintain the parallelism of the vertical posts and the correspondence of the distance between them, the door should be placed on the not fully assembled frame as it will stand, and the gaps should be secured with wedges. Narrow holes are also created to prevent the wood from cracking. The caps of the fasteners should be inserted into the material.
Do-it-yourself door frame - step-by-step assembly and installation process
The complete door set includes the door leaf, frame and hinges.
It can be difficult to purchase a ready-made complete set, so there is nothing left to do but make a door frame with your own hands from profiled timber or entrust this task to specialists. The box, most often, has to be selected separately, and it is not a structure ready for installation, but several elements that need to be adjusted in accordance with the size of the opening, the necessary cuts made and assembled.
It is not so easy to assemble a door frame with your own hands, so in addition to tools, it would be nice to have at least a little carpentry skill.
Wood MDF
The frame serves not only as a frame for the door leaf, but also as a load-bearing base. The strength of the entire structure and its durability depend on the quality of the material and installation of the product. The choice of material depends on the purpose of the door and the material of the leaf itself. Metal-plastic and metal doors are usually supplied fully equipped, so we will consider only those cases when the door frame has to be manufactured independently. As a rule, in this case we are talking about two types of material: wood and MDF.
- Natural wood has different densities and is graded into soft and hard. The cheapest and most popular product is pine, but when it comes to installing entrance doors, you should focus on a harder and more expensive type of wood, for example, oak. It will ensure durability, strength and reliability of the structure.
- MDF is used exclusively for interior doors. If you are going to assemble a box from this material, you should treat all cut edges with nitro varnish to ensure protection from moisture.
The door frame consists of several slats: two side, top and bottom, if the design includes a threshold. If the depth of the doorway exceeds the corresponding parameters of the timber, your kit must be supplemented with extensions that will increase the depth of the box.
Standard door block sizes vary in width and height. The correspondence of the parameters of the door leaf, block and opening is indicated in the table.
Do-it-yourself door frame assembly is carried out taking into account the following points:
- There should be a technological gap of 3 mm wide between the inside of the frame and the door leaf along the entire perimeter.
- The gap between the wall and the top of the box must be at least 20 mm.
- The gap between the side planks and the wall is 10 mm from each side. When installing on polyurethane foam, it is necessary to increase the gap to at least 20 mm.
- The gap between the bottom of the sash and the frame or floor depends on the material and location of the structure. For dry rooms, these parameters can vary between 5–15 mm, for wet rooms, in order to ensure ventilation, - 50 mm.
The main difficulty in assembling door frames is the process of connecting individual elements. The joining of horizontal and vertical strips of the product can be done in two ways:
- I washed it down at an angle of 45 degrees. This process is best done with a miter saw, but in the absence of one, a miter box will do.
- At a right angle of 90 degrees. To cut the workpiece you will need a saw with fine teeth.
The joining of the planks is carried out using tenon joints or galvanized self-tapping screws. The figure shows options for tenon joints, which clearly show how to assemble the door frame yourself to ensure high strength of the joints.
When calculating the parameters of the length and width of the profile slats, it is necessary to take into account that the length of the tenon should be equal to the thickness of the box beam. The tenon joint provides sufficient strength to the finished structure, but if desired, additional reinforcement of the joints can be made with zinc-coated nails.
Let's look at how to properly assemble a door frame. As a starting material, we will need profiled timber made of natural wood or MDF.
The box is assembled in the following order:
- We check the parameters of the width and height of the opening. To install the box, you need to leave a gap of about 3 cm. Using a hydraulic level, we control the horizontalness of the floor covering in the corners of the opening.
- The canvas and timber of the frame must be laid out on a horizontal surface so that the outer part (the vestibules) is turned upward. The sash must be in the same plane as the beam. If the depth of the slats is greater, then it is necessary to level the planes by placing several layers of cardboard or books under the canvas.
- To ensure an even gap between the canvas and the timber, cardboard or pieces of old linoleum can be laid around the perimeter.
- Use a sharp pencil or awl to mark the control points and saw off the extra section of the crossbar in accordance with the chosen pattern.
- Since you have to work with profiled timber, the convex elements of the vestibule will interfere with the transverse joining. To get a smooth plane, you first need to mark the edges of the cut with a sharp object. Accuracy of measurements and careful work are very important here, since the slightest mistakes can ruin the appearance of the structure. The cut is made with a tool with fine teeth. Once the desired depth is reached, the remaining excess material is removed with a chisel.
- Now we lay out the prepared bars around the canvas to mark the location of the loops. To do this, measure 203 mm from the top and bottom of the vertical beam. This is the standard hinge mounting height, plus 3 mm for the gap.
- Next, we attach the hinge card with two screws in accordance with the markings, and mark the shape of the fastening. Now you need to make a recess corresponding to the thickness of the card.
- We fix the hinge flags with self-tapping screws in the prepared recess. Installation of the lock strike plate is carried out after installing the box and hanging the door leaf to prevent discrepancies.
- Now all that remains is to make sure that the structural elements are perpendicular and fasten the top crossbar to the side posts.
- If the design includes a threshold, it is customary to attach it to the sidewalls at an angle of 90 degrees. Here, too, it is necessary to carefully remove the quarter to prepare a smooth surface for the joint of the crossbars.
- Before attaching the threshold, you must once again ensure that the entire structure is assembled correctly. Place it on a flat surface, put the canvas in place, make sure there is a gap, move the racks to the desired position, if necessary.
- Now all that remains is to fix the lower cross member and the self-made box can be installed in the opening.
We suggest you familiarize yourself with How to properly line a bathhouse with clapboard from the inside with your own
To secure the assembled frame in the opening and install the doors with your own hands, you need to perform the following steps:
- Install the frame into the opening. To keep it in place, insert temporary spacers made of cardboard or foam plastic between the box and the wall.
- Prepare wedges that will be necessary for final installation and alignment of gaps. For them, you can use waste beams sawn at different angles.
- We begin to wedge the product. First, place the wedges directly under the hinges. They will prevent deformation of the beam when we screw it to the wall. Drive one wedge into each upper corner. To prevent the structure from moving, two wedges will be required from each corner. They are inserted from opposite sides so that the narrow parts intersect.
- Next, we check the position of the frame and each of its elements with a level. The box should be flush with the wall.
- We fasten the sidewall.
- We carry out the final installation of the cover part after we hang the canvas on the hinges. To ensure that the frame holds firmly while we screw the hinges and install the sash, we can partially foam the gap along the fixed side and in two or three places on the hinged part.
Tip: Before foaming, you need to clean the surface from dust and moisten it with water from a spray bottle. These measures can significantly increase adhesion.
- While the foam dries, we install hinges and other fittings on the canvas, then put it in place.
- We wedge the hinged part of the door when the door is in the closed position. Then we secure it and foam the cracks around the perimeter.
Another important condition in order not to disturb the geometry of the frame during the installation process is the use of spacer wedges that correspond to the width of the box and are inserted across it.
The final stage of installation of the frame and door is the decorative design of the opening with platbands.
Step-by-step master class for installing a box without a threshold
- Apply marks.
- Cut the workpieces.
- Mill the space for the hinges.
- Assemble the door frame.
- Mount it in the opening.
First of all, markings are drawn on the material for subsequent sawing. This is a very important step, because with a slight deviation the workpieces may turn out to be unusable. In order for the door to last the entire promised period, it is important to make the hinges correctly. If you have a manual router, then it is necessary to ideally set the width and depth of the cut, taking into account the parameters of the door hinge.
Before assembling the door frame, it is recommended to drill narrow holes in the places for the screws. This technique significantly reduces the likelihood of damage to the integrity of the product. The parts of the box are assembled very carefully: even minimal deviations are unacceptable. At the same time, considerable effort is required to ensure reliable results. The door frame should be installed without haste. The process uses small elements to pre-fix the frame. The side gaps are filled with polyurethane foam.
Features of installing a box with a threshold
Such a frame is required for bathrooms and toilets and to a lesser extent for other rooms. The floor level in bathrooms is often higher than that of the adjacent room, so installing a box with a threshold is necessary, among other things, to protect against water getting on the parquet, linoleum or other covering. Fastening the parts of the box to the threshold should be done with galvanized self-tapping screws. The gap for opening the door leaf is made an additional 4 mm larger than that of the option without a bottom strip.
Door frames with a threshold are more durable, so they can be installed in places where there is a high level of vibration, for example, next to railway tracks. Installing a frame with a bottom strip may be required in rooms with high levels of noise pollution. In addition to the soundproofing function, the threshold can act as a seal: prevent the outflow of air and, as a result, heat loss.
Advantages of door frames with a threshold:
- partially solve the problem with drafts;
- protect from dust and smoke.
Useful tips and mistakes to avoid
Due attention should be paid to fastening the door frame on the side where the door is hung. You should not increase the number of screws or dowels more than two, because the entire load will be transferred through the hinges. No matter how many screws are attached between them, they will not change anything. There will only be extra holes in the box, sometimes very noticeable. Fastening hardware can be hidden. It is only necessary that they are securely installed. Even the most minor fluctuations must be corrected immediately.
The fact is that foam holds lateral load well, but is practically useless when compressed. It is not a problem if some of the fasteners are longer than necessary and come out slightly on the wrong side. This will not affect the strength of the fastening. If no cracks have formed on the frame, then everything is in order, all that remains is to slightly disguise the defect if it catches your eye. However, it may not be visible at all.
If the box is made of natural wood, then the screws are used with large pitches, and if they are made of microwood fiber, with small pitches.