How to sew up a roof gable: types of materials for sewing
Pediment-end wall of a house under the roof eaves
The roof is done, the gables can be sewn up.
How to sew up the gables of the roof so that they last a long time, so that they do not require annual maintenance or repairs, and so that the appearance is attractive?!
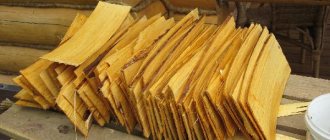
First, let’s remember what gables were sewn up with in the old days:
- unedged board
- edged board
- clapboard
The last option was the most scarce in Soviet times, and people with good salaries and great connections could afford to cover the gables with clapboard.
In the villages, no one bothered with beauty and design: they covered it with a simple unedged board or slab. The attic space is closed from wind and snow, which means everything is fine.
The lining with boards was done vertically, horizontally or diagonally. The herringbone looked good: short boards diagonally towards each other.
It is clear that over time the wood turned black from moisture and lost its natural color, so the townspeople who looked after the appearance of a house or bathhouse tried to paint wooden surfaces. But previously there were no special antiseptic compounds, so it was often lime or oil paint, which needed to be updated from time to time.
Now, with the advent of modern wooden and plastic materials, as well as new various painting compositions for wood, various options for lining gables are possible:
- edged board
- wooden clapboard
- block house
- plastic lining
- vinyl siding
Finishing the gable with siding
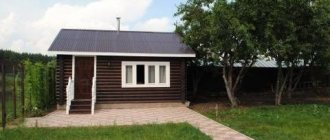
The pediment, finished with siding, reliably protects the wall structure and is undoubtedly a decoration of any facade. Wooden siding is being used less and less; it is being replaced by its artificial counterpart - vinyl siding, the advantage of which is the imitation of any natural material, a variety of textures and colors. It is durable, moisture and heat resistant, does not fade or rot.
Metal siding is more expensive and is rarely used for residential construction. The popularity of exterior siding is explained, among other things, by the presence of a large number of additional elements. This greatly simplifies the installation of the cladding and increases the decorativeness of the finish.
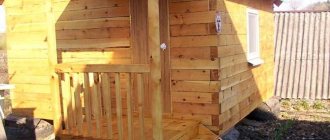
You can sew up the pediment with a lining made of PVC material
Plastic materials (lining or siding) are attractive because once you do the siding correctly and then forget about it. Covering the pediment with PVC clapboard guarantees the absence of any further painting work, which is usually necessary for wood every one to two years to maintain its antiseptic properties. PVC materials under normal operating conditions do not lose their attractive appearance for many, many years.
Correct installation of PVC materials is:
- mandatory gaps for linear expansion of PVC elements in hot weather
- mandatory gap between the sheathing and the main wooden structures for ventilation
But PVC lining or siding are afraid of open fire. Therefore, you cannot place a barbecue close or carry out any work using a gas burner: the siding loses its shape, melts and shrinks.
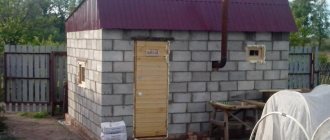
This is an extreme case due to negligence. And under normal conditions, PVC materials have proven themselves to be excellent. Their use is especially popular when renovating old buildings: country houses, baths. Old buildings receive a second youth. Their appearance improves by an order of magnitude.
If you choose between plastic lining and siding?
Plastic lining is intended for interior finishing work. But it has long been used in the outer cladding of old country houses and bathhouses, as the most acceptable budget option.
Considering that it is not intended for facades or for constant exposure to precipitation and ultraviolet radiation, then its “good behavior” has already been proven by many years of practice.
Indeed, compared to siding, the financial costs for materials will be 2-3 times less.
It’s just that the lining is narrower (115 mm) and has a smooth surface. And the siding is wider (244 mm) and has a certain surface relief. Including, there is siding in the form of a block house. By the way, from a distance you can’t tell it from natural wood. Only up close you can see that it’s plastic.
Covering the pediment with PVC clapboard in the vertical direction
A slight disadvantage of these materials is that they are too light and thin compared to their wooden counterparts, so they require a more frequent frame or solid base.
The range of wooden products for cladding is extensive enough to choose the appropriate material for covering gables in accordance with the design of a house or bathhouse.
For example, if a wooden frame made from logs does not require any special chic, then it is enough to simply sew up the roof gables and eaves with an edged board. Careful and high-quality work and the boards will look good. If the boards are also coated with an antiseptic composition with protection from ultraviolet rays, then they will serve for a long time without losing their attractive appearance.
Wooden lining is preferable to edged boards because of the quarters it has. If the lining is dry, then the lining will be of better quality due to the tight joining of the lining to each other. The result is a dense, gapless gable wall that will not be blown by the wind.
If the lining has not been sufficiently dried, then later, as it dries out, cracks will appear.
And yet, when covering the pediments with clapboard, the look will be much more attractive compared to an edged board, because the clapboard still has relief and a rhythmic pattern is obtained on the pediment.
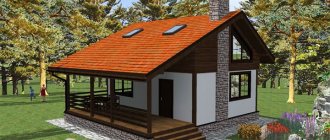
If the appearance of a wooden building is subject to increased requirements such as European standards, then it would be more natural to sheathe the gables of the block with a house block.
The pediment from the block house will look like a continuation of the log house.
By the way, if finances allow, then the best option is to immediately make the gables when assembling the log house from the same material as the log house itself: logs or timber. Then you won’t have to decide how to sew up the roof gable...
Actually, a block house is a type of lining, only thicker and more voluminous in shape, imitating the surface of a rounded log. And the pediment from a block house looks very beautiful, in the same style as a log house.
Covering the gables of a bath house with a block house
The choice of material for lining the gables of a bathhouse or house (any building) depends on:
- appearance of the log house
- purpose
- developer requirements
- financial opportunities
Based on the cost of purchasing the material, you can arrange the materials discussed above in the following order (from lower price to higher):
- plastic lining (115-140 rub/m2 with components)
- wooden eurolining pine needles (150-240 rub/m2 depending on the grade)
- vinyl siding (200-300 rub/m2)
- edged board dry needles t=20mm (360-450 rub/m2)
- wooden block house (460-550 rub/m2)
You can calculate the costs required for the gables and finally choose what to sew up the roof gable, depending on your financial capabilities.
Any of the options considered has its advantages:
- plastic lining is the cheapest
- vinyl siding - easy to install and versatile
- block house - magnificent appearance
How to line a bathhouse inside: principles for choosing material
When the question arises of how to finish a bathhouse and sauna, and what to cover it with, not everyone understands that the question is not the simplest. It is believed that wooden finishing is the most optimal, but this is when it comes to the interior lining of the steam room. In all other cases, you can use the huge variety that the market offers today.
For example, a locker room can simply be plastered and partially finished with facing bricks or tiles. Exterior decoration, in general, is not limited by anything. Of course, if baths and saunas were built from logs or timber, then there can be no talk of any kind of cladding. The frame of a bathhouse or sauna is simply varnished and treated with protective compounds. Rarely painted.
And yet there are finishing materials that are suitable for any bathhouse for finishing both outside and inside. This is clapboard and block house finishing. Let's look at these finishing materials and determine why they are so popular today.
So, lining is a material made from different types of wood. It got its name because it was used for covering carriages. Although in America this material has been used for a very long time for cladding houses.
Today, they are increasingly separating this material, like regular lining and eurolining. How are they different from each other? First of all, the quality of the raw materials used. Eurolining is dry planks with precise dimensions without defects and flaws (knots, resin stains, etc.).
If we talk about technical characteristics, then the differences are significant, especially in the sizes of the boards. For example, the thickness of the usual version is from 12 to 40 mm, width 70-120 mm, length 0.2-6 m in increments of 20 cm, tenon size 4-5 cm.
For eurolining, the thickness has certain exact indicators: 13, 16 and 19 mm. The width also has precise indicators: 80, 100, 110 and 120 mm. The length varies in the range of 0.5-6 m in increments of 20 cm. The dimensional indicators of the tenon are 8-9 cm. That is, if you choose Euro lining, then this is a guarantee of exact dimensions. In the usual version, there are certain errors; for some manufacturers they reach 1 cm.
Why is there such a large variation in length?
- Firstly, it is an opportunity to choose the right size for specific needs.
- Secondly, it saves money when pruning.
- Thirdly, this is the direct purpose of the lamellas: the long ones are usually used for finishing walls, ceilings and other large surfaces, the short ones are used for finishing the overhangs of roofing structures.
Typically, eurolining is not divided according to any characteristics. Its main difference is the wood used. But ordinary material is divided into several grades.
- Grade A. The presence of knots with a diameter equal to 30% of the width of the lamella is allowed. There may be cracks, only non-through ones with a length of up to 10 cm. If through, then only at the ends and no more than the width of the board. Resin pockets should be hidden. By the way, their size should not exceed 3x20 mm, and their number should not exceed two per meter of length.
- Grade B. There is a fairly large list of allowed defects. But there are certain restrictions: the presence of rotten knots, as well as stitched knots, may be present, there may be resin pockets, but not more than 50 mm.
- Grade C. In principle, this material contains all the defects of wood. That’s why this kind of lining costs a penny, and it’s rarely used anywhere, well, if only for sheathing a barn.
It should be noted that several variants of this material are hidden under the name block house. It can be a block house made of wood, metal, plastic, vinyl. Since the topic of our article is the finishing of baths and saunas, there are no polymer or metal materials, everything is about wood.
The word itself is translated from English as a block house. And if in Europe it justifies itself, then in Russia this name hides a board, one side of which is flat, the other convex, imitating an ordinary log. That is, the finishing of a block house imitates a log structure. Like lining, a block house can be made from different types of trees.
Let's move on to the technical specifications.
- Currently, manufacturers offer two types of block houses: wide 190 mm and 45 mm thick, narrow 140 mm and 27 mm thick. It should be noted that there is no GOST for this material (as well as block house finishing), so these are only standard sizes, which are not guaranteed by all manufacturers, which allows you to find boards in other sizes on the market.
- The length also has no standards, so its range is 2-6 m.
- But there is a special requirement for block house panels - this is the humidity of the material itself. It should not exceed 12%. The whole point is that the finished product is dried in special chambers. That is why the block house is not a cheap material.
By the way, as in the case of lining, the block house is divided by grade. Here, almost all the same flaws and defects in wood. True, the block house has a super grade called “Extra”. It is defective only by hand, this is the complete absence of knots, cracks, resin inclusions, and so on. The most expensive variety. Expensive baths and saunas are finished with such a block house.
Wood for steam room
So, today a steam room can be covered with either clapboard or a block house. But both of these elements today are made from different types of wood, which may not all be suitable for rooms with high temperature and humidity. Let's look at some of them.
- Linden. It makes beautiful boards that do not change color when exposed to steam. At the same time, the steam room itself is filled with an extraordinary aroma. But linden has increased thermal conductivity, that is, in a steam room, such finishing with a block house or clapboard will also become very hot, which can lead to burns if it comes into contact. In addition, a thick layer of insulation will have to be laid under the linden finish, which leads to a waste of money.
- Aspen in the steam room is nonsense. It quickly turns gray under the influence of high humidity, becomes damp and cracks. In all respects it is very similar to a linden tree.
- Alder. This tree is one hundred percent suitable for a steam room. Under the influence of temperatures, the color of the wood and its cognac aroma only become more intense. Does not change its properties under any load. The only problem is finding even wood, which is why lining and block houses made of alder are rare, hence the high price of the product.
- Ash is also a good option. Its dense and elastic structure can withstand both high temperatures and high humidity. By the way, ash is a valuable wood species.
- But only dry rooms can be finished with birch. It is afraid of humidity and quickly loses its appearance, and its strength characteristics are sharply reduced.
- Oak is a magnificent tree in all respects. But lining and a block house made from it are not a cheap pleasure. They are usually used to decorate an expensive bath or sauna.
- Larch. This is the most affordable option for finishing a steam room in a bathhouse. Its structure is dense, heavy, larch is not afraid of anything. The only problem is the difficulty in processing, therefore the production process is not easy, and the installation of lining and block house from this wood is very difficult. Let us add that larch does not have good thermal insulation qualities, so a good thermal insulation layer will have to be laid under its finishing.
- Spruce and pine. Products made from them are not used for finishing steam baths and saunas. Under the influence of high temperatures, both trees begin to cry tears of resin. In addition, under the influence of humidity, wood becomes loose and therefore quickly fails. But these are the cheapest options of all offered by the market. Therefore, most often, clapboards and block houses made of spruce and pine are used for lining locker rooms and rest rooms. Although it should be noted that German and Finnish manufacturers began to offer lining and block houses made of spruce, which are pre-polished using a special technology. These products require the highest quality, defect-free raw materials, especially for knots and resin pockets. Such materials can be used to decorate a steam room; a special pine aroma appears inside the room, which immediately relaxes a person.
We suggest you familiarize yourself with: Which insulation for a bath should you choose?
There is still a large amount of wood that can be dismantled. The breeds here are mostly expensive, often exotic. For example, abashi, Canadian cedar and others.
And just a few words about how best to decorate the outside of the bathhouse. In principle, there are no restrictions on finishing materials here. Everything will depend on the technology used to build the bathhouse. If this is a log house, then, in general, it is not worth finishing. Two or three layers of protective impregnation and a layer of good paint, or better yet varnish.
If the bathhouse is built of brick, then the same lining or block house is perfect for these purposes. By the way, it is not necessary that the exterior decoration of bathhouses and saunas be carried out with wooden products (block house or clapboard), here polymeric or metal materials will perfectly cope with the tasks assigned to them. You can line such a bathhouse with facing bricks.
So, you now understand that not just any finishing materials, even wooden ones, can be used in steam baths and saunas. But the main thing is to choose the right material both in terms of texture and wood structure.
The original Russian bathhouse was always made of timber. Today, the following can be used for these purposes: brick, cinder block, aerated concrete, foam block and other, sometimes cheaper, lightweight and durable building materials. And to maintain environmental cleanliness and unity with nature, you can always carry out the appropriate finishing.
In this article we will look at how to line a bathhouse inside and outside to achieve the best effect.
Photo of the interior decoration of the steam room
Choosing material
When asked what is the best way to line the inside of a bathhouse, there is only one answer – wood. And if other materials can still be used for the relaxation room, then the steam room should be equipped only with wood paneling. Let's look at the most suitable tree species for such purposes.
The bathhouse is a special type of building for which difficult operating conditions and safety rules apply. Insulation of the bathhouse outside, as well as inside, is mandatory. Since we are talking about high temperatures and high humidity, the bathhouse is in dire need of proper internal treatment, that is, all thermal insulation work should not be ignored. This applies even to those cases when the bathhouse is built from blocks.
How to trim (sheath) gables
Although the outer cladding is often called decorative, first of all, of course, it is needed to reliably protect the structural elements of the building. I'll tell you how we sheathed the gables of our bathhouse.
In late autumn, having completed the installation of the metal tile roof, they decided not to start covering the gables, since this work is delicate and quite labor-intensive, and besides, the materials for it had not yet been purchased. However, I didn’t want to leave the roof overhangs unlined underneath for the winter: there was a high probability of snow getting under the roof during a snowstorm. Although the insulation on the roof slopes is protected by a durable waterproofing film, when the snow that has fallen under the roof melts, excess moisture will damage the sheathing.
According to the rules, it would be necessary to first sheathe the gables, and only then hem the overhangs so that the gaps between the sheathing elements on adjacent surfaces are minimal. But we decided, based on the current situation, to deliberately deviate from accepted building codes and prepare at least the overhangs for winter. 16 pre-painted tongue and groove boards were stored under a shed for this purpose.
Finishing the pediment with planken
Finishing the pediment with a facade board, which is also called planken, will last longer than the lining, as it is made of hard wood. This is actually a profiled board that is given different shapes.
We suggest you familiarize yourself with How to make a stove for a bath
Its installation differs from other types of finishing with wooden parts in that a gap is left between the boards. This allows you to avoid creating stress when the wood is deformed, provides additional ventilation to the wooden parts, and also makes it easier to replace damaged boards.
The first stage - waterproofing the gables
It wasn't until the following summer that we returned to the gables. It would be possible to first dismantle the tongue-and-groove boards from the eaves, and then begin cladding the gables, but this path seemed to us to be unnecessarily troublesome. Therefore, we immediately began installing the waterproofing of the gable from the outside. For this purpose, we used vapor-permeable Tyvek film, which is also needed for reliable wind protection in the attic space. The film was attached to the plank gable with wide staples using a Novus electric stapler. We started with the bottom fabric cut with an allowance. Having nailed its upper edge in the middle, they began to fix this edge with staples,
TOOLS FOR HOME AND GARDEN, HANDCRAFTS, ETC. PRICES VERY LOW
gradually shifting first in one direction and then in the other. The lower edge of the canvas was nailed to the log of the second crown from the top to close the joint of the pediment with the frame, after which the allowances of the canvas were cut in place.
The second canvas was attached above the first so as to provide an overlap of 15 cm. The lower edge of the second canvas was glued to the first using double-sided self-adhesive tape, after which it was also nailed to the base with staples.
When the installation of waterproofing on the gable was completed, the free ends of the films protecting the insulation under the roof were glued to the gable waterproofing, thereby creating a closed protective “cap”.
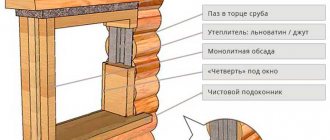
Features of the installation of an insulated attic gable
When the attic space is used as a living space, the gable sheathing is done simultaneously with insulation. The pediment frame and/or sheathing is mounted and tied to the roof rafter system. The vertical or horizontal arrangement of the sheathing depends on the method of installation of the cladding. The design of the sheathing, counter-lattice and the sequence of insulation layers depends on the material chosen as insulation. It is best to continue insulation in the same way as internal roof insulation.
1. Laga. 2. Inner layer of vapor barrier. 3. Insulation. 4. Lathing. 5. Wind protection. 6. Sheathing (block house)
The thickness of the sheathing timber must correspond to the thickness of the insulation. In this case, a gap of 3 cm is left on the outside of the facade for ventilation of the wooden elements of the pediment structure. Between the sheathing bars, insulation of the required thickness is installed, which depends on the climatic region of construction.
The most commonly used mineral wool board. It is better to choose a semi-rigid basalt slab (density 80, 100 kg/m3) for stability. On the inside, the mineral wool is protected by a vapor barrier membrane, and on the outside, a moisture- and wind-proof membrane is laid.
The next stage of the gable wall installation will be interior and exterior decoration. All wooden parts must be treated with antiseptics. The width of the mini-slab is taken to be slightly larger than the distance between the sheathing parts for better stability of the insulation due to the expansion.
Pediment cladding “imitation timber”
From the tongue-and-groove boards (“imitation timber” 150 mm wide) pre-painted with Pinotex, we chose the smoothest one for the lower base sheathing element. We sawed it down to length so that it would certainly cover the ends of the sheathing boards at both side overhangs. Having secured the support bars under the boards of the side overhangs, we laid this basic element on them with the tenon facing up and marked the areas on it that needed to be sawed off.
Based on the length of the upper edge (with the tenon) of the fitted first sheathing element, we determined the length of the next element and measured it on the edge with the groove. Using a small tool, the bevels of the ends were marked on it, which should exactly correspond to the slope of the roof slopes. To make the cut as clean as possible, a circular saw was used when cutting.
When marking the boards (“imitation timber”), 10 mm gaps were provided between the finished sheathing elements and the gable roof overhangs on each side. Otherwise, it will simply not be possible to place the next element on the tenon of the previous one without damage.
If the next element of the sheathing turned out to be not very smooth, it was pressed with a nail puller in the area of fixation with self-tapping screws on the sheathing. The support beam was attached to the sheathing above the sheathing element in such a way that a lining could also be used to protect the tenon of the element. A sheathing element was attached to each sheathing board with two self-tapping screws, and the top ones were screwed in completely only after installing the next element - this makes it easier to join adjacent elements.
Main pros and cons ↑
- aesthetics,
- ensuring the uniformity of the facade,
- no need for additional finishing.
- Their main drawback lies in the frequently used expression: “led.” Let's figure out the cause of this problem and how to eliminate the hanging of the profiled timber on the pediment.
Due to the natural shrinkage of the profiled material, the size of the rows decreases by about 20 mm/m. In this way, the height of the structure is also reduced, which increases the pressure on the upper rows of the log house. This is fraught with destruction of the roof structure, and in extreme cases, even the house. The problem could be resolved if it is possible to concentrate the weight of the roof structure on the ridge crossbar, from which the load will be distributed to the gable walls.
It should also be taken into account that the rafters almost do not change in length, that is, if you install a system with a rigid fastening of the upper point, then the opposite one “crawls” down and, conversely, if the lower point is rigidly fixed, the ridge beams will “hang” in the air.
The problem is solved as follows: instead of a rigid classical rafter system, a special roof with a sliding rafter system is needed. The latter differs in the way the rafters are attached to the mauerlat - direct fastening is completely eliminated, they are placed on sliding fastenings. In the area of the ridge, the rafter legs are fixed with an overlap, allowing the angle between the slopes to change. At the same time, the slides allow the rafters to lie smoothly along the walls.
On a note
A gable roof of this design resembles a tome, the spine of which is a ridge. When it shrinks, it acts like a big open book.
The gaps between the crowns are eliminated with caulk. A twisted linen rope will look more attractive. As for the leading corners, jute is placed in the right places. Since the formation of cold bridges is possible, the corners must then be carefully sheathed.
Future plans
We will someday cover the remaining gaps at the junction of the sheathing with the gable overhangs with wooden corner profiles, but even now they are not at all noticeable. And the likelihood of snow and rain getting into these gaps is low. In addition, behind the sheathing they are covered with sheathing boards.
Sheathing the pediment with the window would not have been much more difficult if we had not decided to build a canopy on it, which should cover the planned porch and the main entrance to the bathhouse (we are currently using a temporary entrance with a plywood door). But making a canopy is another story.
Preparatory work
Before proceeding directly to the installation of metal siding, it is necessary to carry out some preparatory work. First of all, it is necessary to calculate the required amount of finishing material. Today, many sites selling metal siding have online calculators that make it easy to calculate how much material will be needed. At the same time as the panels, you should purchase all the necessary additional elements.
If, after purchasing metal siding, its installation will be carried out some time later, you should prepare a place for its storage.
Important! To avoid damage to the top decorative layer of siding, when storing it, it is strictly forbidden to place anything on top of it.
Next, you need to prepare the surface of the pediment, clearing it of dirt and vegetation, and remove the old cladding and existing other structures. When the preparatory work is completed, you can begin cladding the pediment.
The boards must be painted before installation.
Most often, in order to speed up work and save paint, wooden cladding is painted after installation. But after some time this leads to increased warping of the boards. In addition, when the wood dries out, the tenons come out of the grooves and their unpainted areas appear. Paint applied to the assembled skin glues the tenons in the grooves, which complicates subsequent repairs. Therefore, you need to paint tongue and groove boards before installation.
Long tongue-and-groove boards (for example, “imitation timber”) are best painted in an open space. To work, you need a container to pour paint into. By carefully cutting off the bottom of a strong plastic canister, for example, from a car windshield washer, we get a good device that can be placed on a horizontal surface (if there is no strong wind), convenient to hold by the existing handle, and during a break in work there will be somewhere to put it brush.
You will need a lot of boards for the sheathing. Finding a place to dry everything painted is not easy. But if you make supports for them by driving nails into the stands in two rows at a slight angle (the length of the nails and the pitch between them are chosen depending on the width of the boards), then the painted boards will take up very little space.
Facade vinyl siding
The desire to use laminated or profiled timber in construction and financial capabilities coincide closely. Covering a pediment with imitation timber is practically no different from the real thing, but it is much cheaper. In addition, you can do the finishing yourself.
- Sheathing is done by laying panels on the sheathing from bottom to top. Installation begins with the guide strip. It is installed level, since strict horizontality is mandatory for it, otherwise the casing will be beveled when fixed.
- The imitation timber is fastened with the locking joint facing downwards. Firstly, it’s more convenient, and secondly, less moisture and dirt gets into the locking joint.
- When laying the panels, leave a small gap (about two to three mm). Otherwise, the next element will most likely be damaged when attached to the tenon of the previous one.
Tools
The part of the outer wall of the house, limited from below by the ceiling of the building, and from above by the planes of the pitched roof, is called the pediment
The part of the outer wall of the house, limited from below by the ceiling of the building, and from above by the planes of the pitched roof, is called the pediment. At the same time, gables will inevitably appear when installing a sloping, gable or single-pitched roof, as well as a half-hip roof. In the latter case, this structural part of the building will not have a triangular shape, but a trapezoidal one. When using a sloping roof on a house, the pediment will be polygonal, and if a vaulted roof is installed, the shape of the pediment will be round.
Before deciding how to sheathe the pediment of a house with your own hands, it is important to understand which group this design belongs to according to technological characteristics:
- The cheapest option, suitable for doing it yourself, is a pediment built using frame technology. In this case, the insulation is laid between the frame posts, and the gable wall itself is sheathed along the frame. This method of arranging a pediment is actively used in private construction as the simplest option for arranging a light roof.
- You will have to sheathe a solid gable wall if the house is being built from aerated blocks, bricks, cylinders or timber. This method of arranging a pediment is more complex and requires the performer to have at least basic knowledge in construction. In this way, the gables of buildings that are undergoing major repairs and reconstruction are sheathed. Although this method can be used to sheathe a house built from ordinary brick or cellular concrete, after which it will acquire a beautiful and respectable appearance.
The main function of the pediment is protection from the wind.
Main functions of the pediment:
- Wind protection. Since the pediment is exposed to wind, it must be sufficiently strong and airtight.
- This structural part of the building supports the pitched roof. Although the rafter structure rests on the walls of the house and the mauerlat, the pediment additionally supports the slopes. This is especially true for roofs covered with slate or natural tiles.
- If there is a residential attic floor under the roof, then the gable is assigned the function of preserving heat in the room. In this case, before sheathing the gable of the house, it is important to provide high-quality insulation of the walls.
- To protect the walls of the house and the roof space from moisture, the pediment should be finished with moisture-resistant material, which will increase the tightness of the structure.
- The cladding layer on the pediment also performs aesthetic functions. How beautiful the whole house will look depends on what you cover the pediment with.
The pediment frame must be fastened around the perimeter of the house. A wooden beam with a cross section of 50×100 mm is used. It is attached to the roof sheathing, often with the removal of the outermost elements of the roof.
The purpose of the resulting foundation is to support the frame of the house sheathing. There are several important points to consider before getting started. If the frame is made of wood, it is treated with antiseptics against insects and rot. When choosing a metal profile, there is no need for processing. Installation of the metal profile proceeds by analogy with the method presented above.
It is necessary to fasten the pediment frame around the perimeter of the house
Installation of sheathing around the perimeter of houses is necessary near openings, windows and where the siding joins the roof. The purpose of the sheathing is to become a reliable base for the panels. If it is necessary to install the lamp on the pediment, a block should be installed under it, to which the lamp is attached.
You will also have to install additional profiles with your own hands, giving the structure a finished look. Take three profiles - finishing, starting, connecting. The fittings are mounted on the sheathing using special perforated holes.
You may also be interested in an article in which we talk about the features of choosing a material and the step-by-step finishing of windows with siding.
You can install vinyl siding yourself in a relatively short period of time. There are many textures and colors of the material, and the product is inexpensive. Siding cladding protects the house from adverse weather conditions, and when installing insulation, heat loss from the roof is reduced.
Doing siding with your own hands is cost-effective; the material is durable and does not fade under the influence of sunlight. Siding can be easily attached to various materials:
- brick;
- tree;
- reinforced concrete blocks;
- stone.
You can install vinyl siding yourself in a relatively short period of time.
Siding is subject to linear expansion along its length due to temperature changes. A three-meter panel, installed at an ambient temperature of 50, lengthens by 12 mm in summer. These features of vinyl must be taken into account when cutting. The manufacturer indicates possible changes to the parameters on the packaging.
We invite you to familiarize yourself with: The gable of a house - how to cover it? 110 photos of worthy options
Calculating the required size is not difficult when decorating a cornice with your own hands. So that the siding can expand and contract without hindrance, the strip is measured 1.5 cm less than the size of the pediment. A gap of at least 1 mm must be left between the screw head and the siding. You need to install the hardware in the middle of the hole that is used to fix the panel. Failure to comply with these instructions leads to deformation of the house's cladding.
Fastening siding panels
Advantages and disadvantages:
- siding is able to maintain color and integrity for a long time. Its service life reaches 40 years;
- when installed correctly, the panels do not deform under the influence of temperature changes;
- does not corrode under the influence of the environment;
- resistant to fire;
Vinyl siding for facade - wide color palette and low price;
- ease of installation and maintenance.
The disadvantages include:
- instability to mechanical stress;
- no gaps during installation, which leads to deformation under the influence of temperature changes.
For installation you will need:
- ordinary siding;
- starting profile for attaching the bottom of the first row panel;
- J-profile for installing siding around window and door openings;
- H-profile for joining siding panels along the length;
- corner elements for high-quality and aesthetic design of corners;
- finishing strips to complete the design of the structure, covering ordinary siding panels at the ends.
The pediment is the front part of the building between two roof slopes and a cornice. The original purpose of its existence is to protect the roof from premature wear. Today, residential attic floors are often installed in this part of the house, therefore, the pediment requires doubly protection. It can have different shapes.
Most often it looks like a triangle or trapezoid, but it can be multi-stage or even semicircular. The size of this part of the house varies from half a meter to two meters in height if the attic space is not used as a living space, and more than two meters if living quarters are arranged there. The eye is always drawn to this part of the house, so in addition to its protective properties, the finishing should be aesthetic.
Unusual decorative design of the pediment
Siding
Characteristics of facade material
In general, homeowners choose vinyl siding, which is easy to install and resistant to precipitation. This option will not even crack when exposed to ultraviolet radiation. At the same time, the protective characteristics of the siding are high, and the attic wall can be easily repaired if desired.
Another advantage to choosing siding is the variety of color and texture options for this material. Therefore, such a coating can imitate almost any finishing material made from natural components, for example, tiles or natural stone, which, by the way, cannot be used for houses with a weakened foundation.
Metal siding is rarely used for gable finishing, which is only due to its cost, while its performance characteristics are significantly better. In particular, it is stronger, and therefore is able to protect the pediment from mechanical damage.
Profiled sheet is also a good solution for cladding the facade of a brick house. This material is made on the basis of high-quality galvanized steel and, due to perforation, it takes the required shape. In particular, stiffening ribs appear on the sheet, which has a positive effect on the strength of the structure.
No need to worry about additional load on the foundation of a private house
Cutting out the sheathing elements
Having fitted the first sheathing element made of painted tongue-and-groove boards into place, we tightly joined the blank for the next element to it. Using the beveled end of the finished element as a base surface, the markings were transferred using a ruler, first to one edge of the workpiece, then to the other. A guide bar for the circular saw was attached along the marking line applied to the workpiece. The correct installation of the tire was additionally controlled by a tuned small scale.
The edges of the workpiece were filed with a circular saw to make the cut even and smooth. In addition, on the working edge of the guide bar there is an anti-splinter clamp made of elastic plastic, thanks to which no unnecessary processing marks remain on the front side. All cladding elements were manufactured using this technology, starting from the second. It turned out pretty quickly.
Materials and techniques for insulating a bathhouse from the outside
- Preparatory work
- Finishing features
The block house has recently become very popular among finishing materials for bathhouses. It is environmentally friendly, durable and easy to install. It is produced in different modifications and colors, and therefore you can choose the most optimal option for the internal and external cladding of the bath. A block house is a type of eurolining; it imitates the surface of rounded logs, so a building with such finishing looks like a real log house.
Based on manufacturing technology, block houses are divided into several varieties: acrylic, vinyl, metal, wood. The last option is used much more often. Wooden block houses are especially in demand for finishing baths. However, it requires treatment with a fire retardant and antiseptic every few years.
According to the quality, a wooden block house is divided into four classes: A, B, C and the highest - “Extra”. In a class C block house there may be knots or holes from them, chips, cracks, and bark residues. Class B material is distinguished by higher quality processing; the presence of knots, cracks, and darkening of the wood is allowed.
In class A, the surface of the block house is planed with high quality, and mechanical damage is not allowed. Only bitches can be found. The “Extra” class is usually used exclusively for the interior lining of a bathhouse. Its surface is perfectly polished. For exterior finishing, you can use material of any class.
During production, the block house is dried to at least 15% humidity. This increases its strength characteristics and prevents deformation. Pay attention to the moisture content of the wood when purchasing; do not purchase wet or overdried material.
It is also important to choose a block house according to the type of purpose. The steam room can only be sheathed with hardwood material (linden, larch). Ash, oak, and white acacia are suitable for finishing auxiliary rooms. Aspen and conifers are mainly used for exterior decoration.
To cover the outside of a bathhouse with a wooden block house, a panel 4-6 meters long and 10-20 cm wide (from 650 rubles per m2) is optimal. Buildings made of any materials can be sheathed with a block house - brick, foam block, gas silicate blocks, timber. The class of block house for exterior finishing should be selected based on your own financial capabilities.
In this article we will look at how to line a bathhouse inside and outside to achieve the best effect.
Photo of the interior decoration of the steam room
Choosing material
When asked what is the best way to line the inside of a bathhouse, there is only one answer – wood. And if other materials can still be used for the relaxation room, then the steam room should be equipped only with wood paneling. Let's look at the most suitable tree species for such purposes.
It is worth noting that the insulation of the bathhouse inside and the insulation of the bathhouse outside are equally important for this type of structure. This is the only way to achieve a good result and get a high-quality bath that will retain heat for a long time. Moreover, proper exterior finishing makes it possible to protect the structure from contact with the external environment, so the bathhouse will last a very long time. Everyone knows that precipitation has a negative impact on any building material.
Experts recommend paying special attention to the foundation; it also needs to be insulated. To do this, you need to use the highest quality materials, otherwise the building will crack. Depending on the type of material used, insulation will be more complex or simple. For example, if the building is built from gas silicate blocks, the insulation of the bathhouse foundation from the outside must be done with particularly high quality. Otherwise, the moisture that rises from the soil will destroy the blocks.
It is imperative to insulate a bathhouse built of brick. This is necessary because such a material has excellent thermal conductivity. In the case when the bathhouse is built of expanded clay concrete, it does not require serious external treatment. Log buildings also do not need to be insulated with special materials.
Bathhouses made of timber, as well as frame buildings, should be additionally insulated. Although here a lot depends on the thickness of the walls and the region in which the area with the bathhouse is located. If the winters are not too severe, you can limit yourself to simple and inexpensive finishing materials. Insulation of a frame bathhouse from the outside with thin walls is necessary. This will extend the life of the structure and prevent the steam room from cooling down very quickly.
This is the simplest option, since the log does not require major investments in thermal insulation. Logs are a classic material that is ideal for building a steam room, which is why it is often used in the Russian Federation. In this case, it is very important to carry out thermal insulation at the construction stage.
In such a situation, there is no need to further insulate the bathhouse after its construction is completed. As a rule, jute insulation is laid between the logs. It retains its tightness well, but over time, when the wood dries out somewhat, cracks may appear in this layer. They need to be caulked periodically.
It is advisable not to use a log bathhouse for the first six months after the start of construction. During this time, the log house will “settle” and cracks will appear in its walls. They are sealed with insulation made of flax and jute. These are suitable materials for a bath. Jute does not burn and holds heat well. However, it tears quite easily, so it requires strengthening, which is what flax serves.
We suggest that you familiarize yourself with the Mortar for laying cinder block proportions
You need to caulk the walls very carefully and carefully. Otherwise the building will be skewed. If you don’t have the skills to do this kind of work, you can purchase a special sealant that can be used to fill cracks and crevices using a syringe. This material is very easy to use, but is much more expensive than jute and flax.
If the owner of the bathhouse decides to use additional finishing materials, then they should be used only after the finished bathhouse has been standing for more than two years. All this time, the structure may shrink, and the cladding will not allow access to new cracks. As for finishing materials, they are absolutely not needed for a log house. If you want to use them, you can take lining, block house or imitation timber.
If you purchase a frame structure with ready-made insulation, it can be very expensive. However, it is impossible to do without thermal insulation of a room of this type, especially when it comes to a bathhouse. The walls here will be quite thin, so they will not be able to maintain the desired temperature for a long time. Loss of heat for a bath is a very big disadvantage.
To avoid such problems and not go broke, you often do the insulation of a bathhouse from the outside with your own hands.
If you properly insulate your bathhouse, you can save on fuel consumption. The better the room maintains its temperature, the less firewood or electricity will be needed. Insulated steam rooms heat up quickly and cool down very slowly, and this is just what you need for a bathhouse.
A special advantage of insulating a frame structure is that it will extend the service life of not only the room itself, but also the stove. The less often you have to use it, the longer the heating structure will last. External thermal insulation is also important because it will prevent the wooden frame from rotting.
It is advisable to pay special attention to the environmental friendliness of the insulation.
Nowadays, manufacturers are trying to do everything to ensure that work on insulating the walls of a bathhouse from the outside is carried out easily and simply. Insulation materials last a long time and perform their functions perfectly, but this only applies to high-quality materials, the cost of which can be quite high.
When choosing insulation for a frame bath, it is important that it is light enough. If we are talking about a block bathhouse, for example, made of expanded clay, then you can choose almost any material for exterior decoration. For a frame bath, which has rather thin walls, weight is very important. If the load is too high, it will negatively affect the condition of the structure over time.
In addition, when choosing thermal insulation materials, you should pay special attention to their susceptibility to high temperatures, since the walls of the steam room can become very hot during the use of the bath. Also, the insulation must be environmentally friendly and non-toxic.
When working with any type of insulation, you will need lathing. Thermal insulation and external finishing materials will already be attached to it. A lightweight frame bath can be insulated with both natural and synthetic materials.
The first category includes inexpensive, but fairly light and high-quality reed slabs. They do not burn and have high thermal insulation properties. The thickness of the blocks may vary. For a block bathhouse, you can take larger reed blocks, and for frame buildings, 15-centimeter blocks are quite sufficient.
Synthetic materials are much more popular in construction than natural ones. For example, insulating a bathhouse from the outside with mineral wool is excellent for a frame structure. This material is non-toxic, holds heat well and is very easy to use.
Synthetic boards made of polyurethane foam or expanded polystyrene (foam plastic) can be used for thermal insulation. It is good because it is low cost and can be easily mounted on the wall. However, when insulating a bathhouse with foam plastic from the outside, you need to take additional care of fire safety. The thing is that this material melts very quickly when heated and begins to release substances harmful to humans. To avoid such a nuisance, it is worth separating the foam from the wall itself with an air space.
Do-it-yourself cladding of bathhouse gables photo
- We hemmed the roof overhangs - side and gable - in the fall. The free ends of the protective films were temporarily secured with staples so that the wind would not fray them.
- By spring, the gable boards turned blue, but this had virtually no effect on their strength. However, the sight of them did not please us.
- First of all, the pediment needs waterproofing, and the entire structure, especially the bathhouse, also needs wind protection.
- The vertical lathing will allow moisture, for any reason formed on the surface of the protective film, to flow down unhindered.
- Heavy sheathing will hold securely on a strong sheathing.
- The lining of the side overhangs and the lower inserts of the sheathing were adjusted to each other.
- When installing the first sheathing element, a bulge in the bottom board of the gable frame became evident. I had to pull it out with bolts and fix it with metal corners, attaching it to the upper crown of the frame.
- The sheathing elements were attached to the sheathing with anodized screws. To ensure a tight connection, the elements were tightened with a nail puller using a temporary stop.
Rules and features of connections of additional elements
For ease of installation of panels, it is necessary to take into account the rules for connecting additional elements. Missing panels can sometimes be ordered in a store; many manufacturers work according to drawings, taking into account the size of the panels and their shape. When considering additional elements, the main part is a perforated strip, some call it a nail part.
It is located only on one side of the panel and is intended for fastening accessories. During installation, the gap between the self-tapping screw and the perforated strip is taken into account. To make the connection secure, locks are used that look like protrusions. Manufacturers on the market offer planks of interesting shapes; you can always try something new for finishing.
If we consider window techniques, completely different additional elements are used. It is important to take into account the length of the protrusions; in this case, the bar is inserted into the recess. When working with door techniques, there is no need to achieve tight joining of panels. The element is fixed using self-tapping screws that are attached to the nail strip.
If the panel fits tightly to the sheathing, such a structure cannot be called stable. It is recommended to leave a small gap, namely one millimeter. This will allow the panel to move freely in the event of mechanical impact.
Thus, cases of rapid deformation of elements are excluded. During installation, you should always be prepared to trim the nail strip in order to control the width of the gap. Separate fasteners are used for different types of siding. When considering the vinyl metal type, galvanized fasteners are suitable.
How to make a gable for a bathhouse roof yourself
Gables are the part of the roof located between the two parts of the gable structure. This element plays an important role when finishing a bathhouse, since how well it is equipped determines how long the roof of the building will last and what it will look like in a few years.
Types of pediments
A special feature of a gable roof is that it allows you to equip an additional room under the roof, so the quality of the gable affects the convenience and visual appeal of the resulting living room.
There are several types of pediments:
- keeled. This name is not accidental: the pediment looks like an inverted keel of a ship. By choosing this type, the bath attendant will give his premises the sophistication of the ancient Russian culture of house building;
- onion. The pediment is shaped like a bow;
- circular It turns out if you enlarge the segment of the circle of the arched pediment;
- semicircular. Pediment obtained by dividing the circular in half;
- torn. Outwardly, it resembles a circular pediment, but at the top the arcs do not converge, as a result of which there is space for placing some object, for example, a horseshoe;
- uninhibited. Pediment having convex elements;
- male. The pediment is made of logs and the crown end wall finds its continuation in it;
- trapezoidal. The pediment has the shape of a trapezoid;
- triangular. This roof element is presented in the shape of an isosceles triangle.
How and why to make a pediment
Building a pediment is not an ordinary whim of a bathhouse owner. Most often it is erected by bathhouse attendants living in middle climatic zones. This element is quite practical, however, with all its advantages, the pediment cannot be mounted under conditions of a pitched roof. Plus, if the region is characterized by frequent hurricanes, it will have to be abandoned.
It is not difficult to build a pediment if you calculate in advance the angle of inclination of the roof, what distance should be between its edges and what material to choose for covering this element. The load-bearing capacity of the house will also have to be taken into account.
The advantage of building a gable is that, unlike other roof elements, it can be built at almost any time. If it is equipped in advance, then there will be no problems with the construction of the roof. However, if the rafter system is attached to the pediment, then in any case it will have to be installed first.
If the owner erects this element when the roof is almost ready, then its finishing will take place with some difficulties, since the attic is already ready. However, this also has a significant advantage: errors in calculations are eliminated.
Construction of the pediment
The pediment is a functional element that provides an attractive appearance to the bathhouse, so a variety of materials are used for its cladding: wood, plasterboard, metal profiles, siding, brick.
In order to avoid problems during the construction of this roof element, it is necessary to determine the sequence of actions. So, many builders determine the following plan:
- calculate the height and shape of the pediment;
- calculate the size of the ends using the formula: S=(h*a)/2, where h is the height of the end, and its width;
- when fixing the pediment, install a mast located vertically at its top;
- tie a nylon cord to the mast, secured along the roof slopes;
- build a pediment.
The height of this element depends, of course, on the wishes of the bathhouse owner, but such luxury is possible if the roof has not yet been installed. If the roof is ready, the height will depend on the dimensions of the attic. Since the bathhouse is a room that is not intended for permanent residence, the height of the pediment should not exceed 0.7 m. In order to give the additional room solidity, you can equip it with a roof window and use it as a recreation room.
When erecting a pediment, it is important to remember that it must be strong and durable, since you have to experience the impact of:
- roof weight;
- wind speed and strength.
Therefore, before starting construction, it is important to take into account the characteristics of the region in which the bathhouse is located, the altitude above sea level, etc.
In order to determine the permissible loads on the pediment, it is important to take time to calculate it and calculate the indicators of the entire bathhouse. It is worth noting that the constructed bathhouse must have an aerodynamic load coefficient of 0.7. This indicator is relevant for buildings with a gable roof; for a four-slope roof it can reach 1.6.
Self-construction
The construction of a pediment is carried out in several main steps:
- Frontal or cornice boards are fixed to the end side of the rafters;
- When hemming the cornice, it is important to leave a gap for air to penetrate into the structure;
- the material is fixed to the sheathing, it is better if these are elements treated with varnish or special paint;
- Upon completion, it is recommended to install a grille that will create an obstacle to the penetration of insects into the structure.
Gable area calculator
Calculating the area of the pediment is not difficult if it has a triangular shape. In this case, it is enough to remember the formulas from geometry and calculate the required area, using two values - height and width. These data are read already at the design stage in order to obtain data on the amount of material for cladding, and at the same time calculate the permissible load on the foundation. Alternatively, you can use a special online calculator that will help you quickly make more accurate calculations even for a pediment with a complex shape.
What to consider when making calculations
You can also calculate the area of the pediment yourself. To do this, we divide the area into simple geometric shapes - their total area will need to be calculated. How to calculate the area of a pediment. To do this, it is enough to know a few formulas:
- The area of a triangle is half the product of its height and the length of its base. We take into account that the height of the triangular pediment is calculated from the height of the roof, that is, from the ceiling to the ridge beam, while the length of the base is the length of the wall under the pediment. Even if the triangle is asymmetrical, this will not affect the accuracy of the calculations.
- The pediment-trapezium is also calculated without any particular problems - use the formula: the area is equal to the product of the height and half the sum of the bases.
- When calculating the area of the pediment, the shapes are too complex, you should not calculate this value per square centimeter - if the number of triangles and rectangles into which you have to divide will be too large.
We take into account that the height of the triangular pediment is calculated from the height of the roof.
The gables of the walls under the cornice are getting wet.
House made of 300 mm gas silicate block, lined with brick with an air gap, 2 floors (2nd floor - attic under an insulated roof). Roof pie - rafters 200 mm, insulation - isovol 200 mm, inside - vapor barrier Izospan V, outside - Izospan AM, counter lath, lathing, metal tiles. Finishing: walls are plastered, ceilings are plasterboard. The essence of the problem: in December 2012 the heating was started, after some time wet spots with efflorescence appeared on the gables along the eaves line and below. The previous winter there was no heating and there was no such problem either. From the inside, all junctions between the roof and the walls were insulated so that there would be no heat leakage to the outside. We opened the soffit cornice; there are drops hanging on the waterproofing membrane from below (which probably fall onto the facing brick). Vapor barrier and waterproofing were installed according to the instructions. Time passed and the problem remained. What to do? Who knows, please tell me.
This problem can be solved simply. You need to remove the soffits and use a knife to cut out the vapor barrier film above the rafters and lower it down to the wall. Make sure that the passage of air from the eaves through the under-grid space is free, it will remove and freeze out all the vapors that are now simply freezing from the bottom on the film , and during the thaw it flows downwards and along the soffits onto the brick. The film should have been laid not AM but simply isospan S. Everything can be fixed! Take action! Good luck!
Frame gable wall cladding
Laying triangular walls made of bricks or foam blocks is difficult for an inexperienced mason to handle. Without skills, it will be difficult to build an even male - a type of pediment over a log house.
But a gable wall made of boards or timber will not cause any particular difficulties. The wood is easy to process. Gables made of lumber are the least likely to burden the building structure, which is why they are the most popular.
Pediments covered with lumber are arranged using frame technology. Those. First, the frame of the gable wall is constructed, onto which a block, edged or tongue-and-groove board is then sewn. Often, gable racks serve as the basis for the installation of sheathing, on which corrugated sheets, siding and similar materials are installed.
Roofs with frame gables are erected not only over Canadian-type buildings. They successfully complete stone, brick and concrete boxes, provide stability to the rafter system, and, due to their lightness, do not require pre-strengthening the load-bearing structures.
Rules for the construction of frame gables
Depending on the material from which the walls of the box being constructed are made, the frame gables rest on the top frame, mauerlat or floor beams. In the case of overhangs up to 30 cm wide, they are formed by removing the sheathing.
And in the case of constructing overhangs larger than 30 cm, they are arranged by installing short cantilever beams located perpendicular to the rafters.
The design and construction of frame gables of low-rise buildings must meet the following requirements regulated by SP 31-105-2002:
- The installation step of the pediment wall racks above the frame box should be equal to the distance between the racks of the main wall. They should be placed one above the other. The gable elements are attached to the top frame of the frame structure.
- The installation step of gable racks over a brick, lumber, foam concrete stack depends on the wind load in the region. It varies mainly from 60 cm to 1 m.
- When installing the gables of warm roofs, the distance between the gable supports is determined by the width of the thermal insulation slab or mat, which must be placed in the space between the support posts.
- When thermal insulation is used, its outer side is equipped with a waterproofing material, and the inner side is equipped with vapor barrier protection: a membrane or polyethylene.
- The outer rafters are used as the upper elements of the gable frame, associated with an overhang of up to 30 cm. For reliability, paired rafters sewn from two boards are installed along the edges of the roofs.
- A strapping beam is used as the top trim of gables connected to wide overhangs. It is mounted parallel to the rafter legs in the same way, but lower. It is necessary to move the strapping beam down so that the upper edge of the cantilever beam installed on top is flush with the conventional plane of the rafter system.
- The cladding of the gable wall with an overhang of up to 30 cm is carried out flush with the outer edge of the rafter legs.
- The sheathing of a gable with a wide overhang is made flush with the outer outline of the auxiliary beam installed to fasten the sheathing.
In the construction of frame gables, nail connections predominate. To strengthen critical components, for example, when attaching supports to the Mauerlat, staples, toothed plates and angles are used.
Overview of work technology
Sheathing the frame gable of a house under construction can be done both before and after the installation of sheathing for the roof. Home craftsmen often choose the first option, because sheathed gable walls:
- They increase the rigidity of the building structure, providing convenience to roofers.
- They reduce the windage of the roof being constructed, which is very valuable in areas with high wind activity.
- They set the geometric parameters of the rafter system, allowing flaws to be identified and corrected in a timely manner.
An important argument in favor of installing gables before laying laths is to increase the level of safety when working at height.
In order to properly seal the frame pediment, you must first arrange the sheathing. It can be built from a metal profile or angle, but priority is given to a block of 40×50 or 50×50 mm due to ease of processing, affordable cost and compatibility with sheathing materials.
Proper use of material
Let's consider each material separately:
- Using foam plastic . Polystyrene foam is a popular and common material. But polystyrene foam is not fire resistant and also releases some toxic substances. Also, polystyrene foam cannot be used in rooms where there is high humidity. That is, this material is not suitable for the pediment.
- Application of glass fiber. At the moment, glass wool has lost its relevance. The advantages include: low cost and fire resistance. However, glass fiber has a low level of thermal conductivity. It is difficult to carry out installation work with this material.
- Use of mineral wool. This material is best suited for thermal insulation of the attic gable. Mineral wool has excellent soundproofing properties and does not cause any harm to the resident’s body.
- The use of penoplex. Penoplex is an excellent material that is quite easy to install. Penoplex is an environmentally friendly material. This material has excellent moisture resistance. It is used for thermal insulation of absolutely any surface. You can insulate the outer and inner parts.
- Using fiberboard. This material is a plate. Fibrolite is resistant to fire, easy to carry out installation work with, and perfectly absorbs moisture. Fibrolite cannot be used in a room that is damp. Otherwise, in the future the surface will be affected by fungus or mold.
- Application of spraying. This insulation material is a liquid substance. It foams, is applied to the insulated surface, dries, and a high-quality thermal insulation layer is formed.
How to insulate a pediment using these materials? To insulate the gable, you can use any of these insulation materials. However, to achieve the best quality, penoplex or mineral wool should be used, since these materials have better parameters.
If the pediment is made of bricks, then it is necessary to carry out insulation from the outer part. If you insulate the attic gable from the inside, the wall will freeze. Due to the moisture that can form between the masonry and the thermal insulation layer, mold and mildew will appear.
If the pediment is wooden, then thermal insulation must be carried out from the inside using mineral wool or penoplex. For thermal insulation of the pediment of a wooden house, it is better to use mineral wool.