Hello! I want to decorate the ceilings and walls of the dressing room and sink with plastic panels. Before there was lining, I got tired of it. Please advise - is it possible?
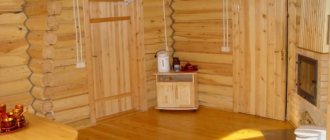
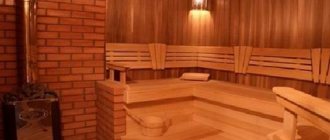
PVC plastic panels are an inexpensive, but quite worthy alternative to worn-out and boring lining in your bathhouse. Unlike the steam room, the dressing room and washing room do not have too high temperatures, and therefore the main requirement for the finishing materials of these rooms is hygiene, that is, they must be easy and quick to wash. Plastic panels fully meet this requirement and also have other useful properties.
Norms and requirements
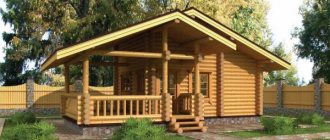
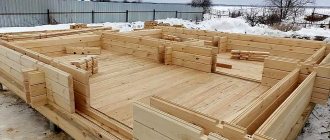
For the interior decoration of a brick bath, you need to use materials that will cope with the effects of high temperatures and moisture. Therefore, the use of plastic and ceramic mixtures that emit odors and become covered with condensation is excluded. Metal and brick are excluded for the interior decoration of the steam room, as it gets very hot and can be dangerous due to burns. It is best to use wood that has low thermal conductivity and is ready to last a long time even under difficult operating conditions.
The materials used when finishing a brick bathhouse with your own hands must have not only an aesthetic appearance, but also good breathability so that condensation does not accumulate in the layers, which will certainly cause the occurrence of fungus and mold. In rooms where there will be high temperatures, it is not recommended to use coniferous wood, linoleum, fiberboard and chipboard. The last two options quickly become unusable and absorb moisture well.
As for conifers, the lining of them releases resin when heated. Therefore, when finishing a brick bathhouse from the inside, this grade is not used. When choosing materials that will come into contact with hot surfaces, their fire safety should be taken into account. A distance of 0.5 m should be maintained from the wood-burning stove to the wooden elements of the walls and floor. To save space, when choosing a place for a heating device, a corner is usually preferred, and the walls there are protected with heat-resistant materials. For example, you can use mineralite or stainless steel, the latter of which is represented by protective screens.
Separate washing area
In this case, the list of possible materials significantly expands. Just as in the previous case, you can use wood. The technology for performing the work remains the same. Three more options are added to the lining:
- ceramic tile;
- natural or artificial stone;
- plastic panels.
When choosing a cladding method, it is important to consider several material requirements:
- moisture resistance;
- resistance to high temperatures;
- environmental friendliness;
- safety.
Types of materials
For the interior decoration of a brick bath, you can use several types of materials, here are some of them:
- lining;
- porcelain stoneware;
- ceramic tile;
- PVC panels.
The first has the advantages of a pleasant texture and naturalness, as well as the ability to combine the material with other solutions. The disadvantages of lining are the complexity of maintenance and installation, fragility and a high degree of fire hazard. As for porcelain stoneware and tiles, they are reliable and resistant to chemical influences. Available for sale in a wide variety of textures and shades.
Tiles and porcelain tiles are strong and durable, fireproof and environmentally friendly. But when installing such products, you must follow the installation rules, which is not always possible for a novice mason. The main disadvantages can be with
Floor finishing
It is not recommended to use synthetic materials as floor coverings. In this case, ceramic tiles or wood are used. The texture of the tile should be chosen so that it prevents slipping. You can also lay wooden gratings on the tile floor to avoid injury.
Wooden floors must be treated with an antiseptic composition and protected from moisture. To increase water-repellent characteristics use:
- wood varnish (renewed every 5-7 years);
- tinting (every 2 years);
- oil (once a month).
To extend the service life of walls, floors and ceilings, it is worth taking care of ventilation. If natural ventilation is not enough (when using tiles, plastic, stone as cladding), a forced system (exhaust) can be used. This option will require additional financial investments, but will ensure a comfortable microclimate and prevent frequent finishing repairs.
- Baths
Installation technology
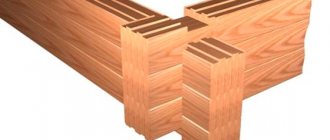
The walls of a brick bath can be finished by installing lining. It can be installed vertically or horizontally. The first method is most widespread due to its high speed and ease of use. At the first stage, you need to install the sheathing, under which the insulation is laid. Air will circulate between the layers, which will help remove condensation. The sheathing is made of timber, which is coated with a primer. It is recommended to avoid using galvanized profiles.
A 40 cm distance is maintained between the slats. The two outermost elements are nailed at the corners, and a rope is stretched between them. If necessary, shims can be placed under the slats for more precise alignment. Before installing the lining, it is necessary to mark the first row. Fastening is carried out with nails that are nailed to the slats. The last row of trim is cut at an angle. When deviations in height do not exceed 1.5 cm, it is recommended to trim in the bottom row; subsequently, this place is decorated with a plinth.
We insulate the floor
At the first stage of thermal insulation of a brick bathhouse, boards need to be nailed to the wooden beams, the distance between which is one board. Next, the surface of the joists and the floor is covered with windproof film. It is fixed on the protruding elements with a stapler. There is a layer of insulation on top. It is better if it has a foil layer, which will speed up the thermal insulation process. Otherwise, you can use a vapor barrier film, which will protect the layer from moisture and will cope better with the task due to its heat-shielding properties. At the next stage, you need to nail a sheathing consisting of 3 cm bars to the logs. They will also provide ventilation. Now you can begin laying the final coating. They can be wooden boards.
We insulate the walls
When thermally insulating the walls of a brick bathhouse, a frame is formed on the load-bearing surface. Next, the insulation is laid, followed by the waterproofing material. This can be a plastic film or a foil layer. The material is covered with an overlap, and its joints are covered with thin slats. The top needs to be covered with clapboard or boards. An alternative option is PU foam boards.
We insulate the ceiling
The first layer will be a vapor barrier, the main role of which is to prevent the penetration of vapors into the thermal insulation. For these purposes, you can use roofing felt or parchment. Modern geosynthetic coatings, thermofol and membranes also performed well. It’s good if you purchased a foil vapor barrier, then it will also shield the heat, effectively returning it inside.
The next layer will be thermal insulation. It is better to choose the lightest possible material so as not to create unnecessary load on the structure. The layer must be non-flammable and resistant to moisture. An additional selection criterion is ease of installation.
Next, waterproofing is installed. It will be located on the roof side and will act as an additional barrier. It can be a membrane or film. One side must be completely waterproof, and the other must be able to allow steam to pass through. If the bathhouse does not have an attic, thermal insulation is carried out only from the inside.
Installation work
- First of all, the sheathing is attached to the wall; as mentioned earlier, it allows you to avoid additional costs for preparing the surface.
- Afterwards the corner elements and the starting profile are installed. It should be remembered that there should be a gap of 5-7 mm between the horizontal planks, and the corner panels are mounted at a distance of 6-10 mm from the cornice. The pitch of the hardware is no more than 40 mm.
Reminder! Covering a bathhouse with siding with your own hands is a fairly simple process if you follow the stages of work and all the rules. Therefore, remember all the features and operating points.
- Before the siding installation begins, all vertical profiles are installed, for example, the H-profile, which is required at the junction of horizontal panels.
- The siding panels are first inserted into the lock until it clicks, after which they are fastened with screws or nails. This sequence is necessary for reliable fixation.
A few additional tips: Work at temperatures of -20 degrees and below should be suspended, unless the siding is stored in a warm room, then that is where it is cut to size. This reduces the number of damaged panels. Heat loss in a bathhouse depends entirely on the insulation materials used and the improper design of the floor and walls of the building, but not due to the siding. When purchasing finishing material, compare the thickness of the products in the package: if you are purchasing vinyl siding, and its thickness is more or less than normal (standard 3 mm), then you should pay attention to this from suppliers. Most often, this is due to the use of low-quality equipment in production workshops.
Detailed technology for fastening to various types of surfaces
Well, now you know how to cover a log house with siding without using any tricks or expensive specialists. With the money you save, you can buy a mobile sink that will help you easily wash dust and dirt from the surface.
Just in case, a video is attached to the article: finishing a bathhouse with siding, to make it easier and clearer for you to install the facing material.
Other buildings on the site
Not only the house and the bathhouse are covered with siding, as you may have already noticed - the material has many positive qualities that, at such a low price, it would be a sin not to take advantage of.
For example, if you need to decorate a garage with siding, then for the work process you should purchase all the same components as for a bathhouse. Only in this case, you can save money: if the garage is separate from the house and has heating installed, insulation is not placed under the siding. Extra costs that will take a long time to pay off.
And the garage can be sheathed so that it fits into the “wooden” interior of the site
Siding is a universal material that can embellish any structure and create coziness on the site. If there is a most practical product, it has not yet been invented.
How to properly insulate a steam room in a brick bath
In order to avoid errors when insulating a steam brick bath, you should choose the right material. For example, mineral wool will provide high-quality thermal insulation if installed outside. When heated, harmful substances can be released, so you should not place the layer inside. But foil materials and pure foil are perfect for insulating a steam room. By installing such a layer, you will ensure that the temperature is maintained at the desired level for a longer time. You should not choose polystyrene foam, which is a fire hazard. When heated, it can be harmful to humans, so it should not be used for thermal insulation of a steam room in a brick bathhouse.
Providing the wash room with water
- heating water with a gas heater, if it is possible to supply gas to the bathhouse;
- using an electric boiler.
Thus, if it is possible to connect to the central water supply, then solving the issue of providing water is not difficult.
But if no communications are laid near the bathhouse, the required amount of water for washing all visitors to the bathhouse must be prepared in advance so that everyone can collect the required volume of water for themselves in a separate container.
Therefore, the calculation of the approximate volume of water must be made in advance. Considering that on average one person needs about 7-10 liters of hot water at 80-90 ºС and 3-4 times more cold water, it turns out that each steamer will need about 45 liters of water.
By multiplying the resulting value by the number of visitors to the steam room, you can determine how much water is required. Hot water is prepared in a large vat, leaving it on a stove, which is usually heated with birch wood.
Thus, if it is possible to connect to the central water supply, then solving the issue of providing water is not difficult.
Therefore, the calculation of the approximate volume of water must be made in advance. Considering that on average one person needs about 7-10 liters of hot water at 80-90 ºС and 3-4 times more cold water, it turns out that each steamer will need about 45 liters of water.
Advice from the experts
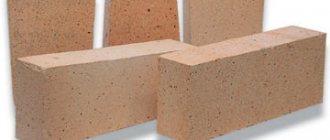
There are no high temperatures in a brick washing bath, but the materials are affected by moisture. Therefore, the walls can be finished with tiles. The surface is first leveled with plaster. The layer is applied with a thickness of 15 mm. Once the ceramics have been laid, the solution is removed with a rag if it gets on the surface of the cladding.
The foundation, floor, walls, windows - all these are parts of a single whole - the baths. Therefore, for its finishing it is better to use materials that combine with each other. For cladding walls, for example, you can use clinker tiles for interior work, and for arranging the foundation, clinker for difficult operating conditions.
Ceramic tile cladding
Finishing the washing area in the bathhouse with tiles is done only for the walls. The advantages of this material include high strength, durability and resistance to high humidity. Now manufacturers offer a wide range of different colors and textures, from which it is easy to choose the right option. The disadvantages will be the complexity of the work and the large volumetric weight of the tiles.
Wall tiles are used in both brick and wooden baths. Before starting work, you need to carefully select the adhesive solution. It must be designed for wet areas. When choosing tiles for a wooden building, you should carefully consider the load-bearing capacity of the walls. If they are thin, it is recommended to choose a lighter cladding.
The work is performed in this order:
- Preparation of walls, caulking, leveling, treatment with antiseptic compounds.
- Covering walls with waterproofing material. For this, roofing felt is often chosen. You can also consider more modern analogues, for example, linochrome or hydroisol. The waterproofing is attached with an overlap of at least 10 cm using a construction stapler.
- A fine mesh netting is sewn on top of the waterproofing. A layer of cement mortar is applied on top of it. It should completely cover the mesh.
- Installation of tiles begins from the lightest corner. To clad the walls around the perimeter at floor level, a wooden beam or metal profile is nailed. Its evenness is checked using a building level. This beam will become the support for the first row of ceramics.
- The tiles are laid from below using glue, which is applied to the back of each element. To ensure evenness of the seams, special crosses are used.
- After finishing is completed, all seams are rubbed with a hydrophobic compound.
Tiling is recommended only up to a height of 1.8 m. Everything higher is plastered and covered with water-based paint.