Home / Wooden / Types of ceilings / Features and procedure for installing a ceiling made of tongue-and-groove boards
Wooden ceiling structures not only have not lost their popularity, but have also become one of the options for environmentally friendly repair of floors even in ordinary city apartments. At the same time, it is easy to assemble a ceiling from a tongue-and-groove board even with your own hands, and the cost of the material will not be too high.
Pros and cons of wooden ceilings
The ceiling made of wooden boards has its positive qualities and disadvantages.
Disadvantages of wooden ceilings:
- If in a house or non-residential premises where a ceiling of this design is installed, the air humidity exceeds the norm, then deformation of the material is possible.
- High-quality lumber is much more expensive than synthetic finishing materials, so with a large surface area, lining the ceiling will cost a pretty penny.
- Sudden changes in temperature can also cause the ceiling board to warp.
- Low fire safety.
Advantages of a wooden ceiling:
- Has excellent sound and thermal insulation.
- You can install it yourself.
- Has high strength.
- Has an attractive appearance.
- Environmental Safety.
- Aesthetic appearance.
There are much more positive qualities than disadvantages, which can be successfully combated by treating the material with special compounds that protect natural wood from destruction and deformation.
? Methods for laying floorboards
Installation of the floorboard depends on the type of base used for the floor. There are several installation technologies:
- On a concrete base (on joists or plywood);
- On load-bearing wooden structures;
- On existing wood floor.
Laying floorboards with hidden fastenings
The most common method of all is laying on concrete floors. This type of work occurs during the construction of new houses, as well as during major renovations of premises.
Wooden ceiling installation
One of the most common materials used for ceiling cladding is clapboard. A ceiling made of this material has high aesthetic values, and the cost of lumber will be significantly lower compared to parquet boards.
Installation of clapboard boards is carried out in several stages:
- Preparing the base.
- Ceiling markings.
- Installation of the frame.
- Fastening the lining.
Each stage must be carried out in accordance with the technical requirements for installing wood flooring.
If a wooden ceiling made from edged boards is installed on a concrete base, then before starting installation work it is necessary to thoroughly clean the surface. If there is an old finish, it must be dismantled, and if there are cracks on the surface of the base, the ceiling must be puttied.
The surface, leveled and free of dirt and dust, must be treated with antiseptic compounds. This treatment helps prevent damage to wood by various bacteria and fungi.
Correct marking of the ceiling surface allows you to make the ceiling perfectly flat. Marking is carried out using a building level and a painting cord, which is installed in perfectly even parallel lines at a distance of up to 10 cm from the concrete floor.
The ceiling is finished with lining using metal or wooden profiles, which are installed along the marking lines. The optimal distance between profiles for finishing the ceiling with boards is 30 cm. This arrangement of the frame completely eliminates sagging of the finishing material. Fastening to the base is carried out using dowels or screws.
Regardless of the level of humidity in the room, it is recommended to use a galvanized metal profile, and when installing wooden support structures, the material must be treated with antiseptics.
Installation of the lining can be done in different ways, but the most aesthetic and practical way is to use special clamping brackets that are attached to the underside of the board and sheathing.
Installation of the lining begins from one of the corners of the ceiling. When installing a wooden ceiling, be sure to leave a technological gap between the end board and the wall, which should be about 10 mm.
The first ceiling board is installed using a furniture stapler, the next one is attached to the grooves of the previous one and fixed to the sheathing using staple clamps. In this way, the entire ceiling is hemmed, and one should not forget about the placement of lamps and the installation of electrical wiring, for which it is necessary to make holes in the ceiling.
Upon completion of the installation of a wooden ceiling, it is recommended to treat the entire surface with special compounds that give a matte tint to the wood and protect it from damage by fungi and weevils.
Important Installation Steps
For rough ceiling flooring, unedged boards are most often used
Even if the goal is not to equip a bathhouse or sauna (as rooms are definitely wet), the tongue-and-groove ceiling boards or bars (slats) laid on the sheathing must be pre-dried and impregnated with special means - in order to protect the future coating from dirt, swelling and deformation. Lumber is prepared in stages for a series of actions.
Lathing
The insulating layer is fixed with rough ceiling boards
At this stage, perfect alignment will not be required, but stripping will be useful. We are talking about removing layers of plaster and rough protrusions. The next step is related to communications. For serious electrical projects, you will need an electrician. You can handle the rough finishing of the ceiling with unedged boards yourself, but a couple of specialists will do it better and more reliably.
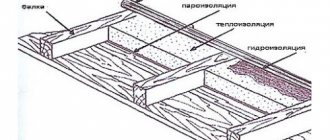
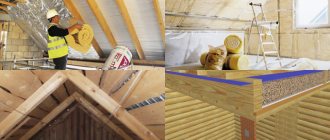
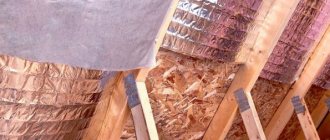
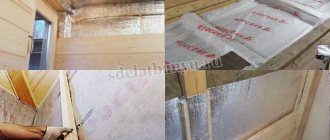
Thermal insulation
An unedged board is quite capable of “fitting” into a stylized interior
Insulation is not a mandatory step in the described chain of manipulations. But if there is a cold, unheated superstructure overhead, this phase will turn out to be very pressing. A layer of insulation (often in parallel with a soundproofing liner) is applied to the ceiling separating the attic and the living space below. The gasket is nailed, secured with twine or glued to the attic beams.
Binder
Design solutions for false ceilings delight with variety
Finishing cladding is a critical segment. The classic longitudinal styling is solid and impressive. The combination of slats, boards or lining in dark and light colors is also interesting - it is preferred by the owners of country mansions and bathhouses. And the virtuoso carpenter will arrange one type of board effectively: checkered, trapezoidally or fan-shaped. If his hands are golden and his taste is excellent.
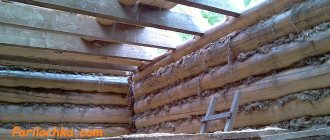
Wooden ceiling in the bathhouse
Not every home craftsman knows how to make a ceiling in a wooden bathhouse, so before you go buying material for these purposes, you should study this section in detail.
To organize the ceiling in a room with high humidity, it is not recommended to use coniferous wood. When heated, such a board releases a large amount of aromatic resins, which can spontaneously ignite under certain conditions. The ability of wood to change volume when wet should also be taken into account when covering the ceiling with boards.
Wood is much more susceptible to rotting at high humidity, so when a board for the ceiling in a bathhouse is selected, it must be properly processed and installed.
The bathhouse can have a ceiling made of unedged boards. In this case, the financial costs of purchasing the material will be significantly reduced, but the consumption of the antiseptic that will be used for application to an untreated wooden surface will be significantly increased due to the greater roughness of such material. If you use planed boards, you can also significantly reduce costs. You can plan unedged wood yourself; for this purpose you can use special machines or use a grinder.
Regardless of the type of lumber used, the ceiling must be reliably insulated and waterproofed from the surface of the cold attic. In this case, the likelihood of condensation forming on the back of the wood will be minimized. Liquid is always undesirable for wood, but if the surface of the board can be dried on the outside, then the moisture formed on the inside will have a destructive effect for a long time.
You need to know how to properly install a vapor barrier layer, as well as install ceiling insulation in accordance with all the rules. Modern materials used for thermal and waterproofing of wet rooms include foil vapor barriers and stone wool. Glass wool is of little use for insulation due to its high hygroscopicity. In order to reliably protect the wooden ceiling from the penetration of moisture from the outside, as well as from the leakage of humid air from the steam room, it is recommended to use a double layer of waterproofing, where the outer material can be ordinary white polyethylene film.
Typically, such double waterproofing is used to protect the insulation, which is placed in the ceiling sheathing, but when insulating an attic space with bulk materials, one layer is sufficient, which is placed under the ceiling. To insulate the ceiling, you can use the old-fashioned method. In ancient times, a mixture of clay and straw was used to insulate the ceiling in the bathhouse.
Once the ceiling insulation is complete, the boards are secured to the sheathing using finishing nails. If lining is used as a material for the bath ceiling, then fastening is carried out in the manner described above.
How to do
The peculiarity of blanks made from unedged lumber is that their edges have uneven outlines. Therefore, it will not be possible to fit adjacent parts tightly together. There will always be a small gap between them. To prevent all components of the floor or the base plane to which the coating is attached from being visible through it, the parts are attached in two layers. They are laid in a checkerboard pattern and the gaps formed when laying the first layer are closed with parts of the second.
The covering components can be attached directly to the floor beams or to a pre-assembled sheathing. This option is used when the surface to which everything is to be attached is uneven or for other reasons it is impossible to fix the boards directly on it. Fixation is carried out with galvanized nails or self-tapping screws.
Wooden ceiling in the attic
For the installation of an attic wooden ceiling, the use of lining is most preferable. Considering the complex geometry of the room, the use of this material can significantly reduce labor costs. In the attic it is necessary to make high-quality insulation and waterproofing.
Tile mineral insulation is used as insulation, which is installed in pre-prepared profiles made of boards. The heat-insulating material is subject to reliable waterproofing on both sides to eliminate the possibility of moist air entering the room. The lining is installed on the sheathing using staple clamps. If other lumber is used for finishing, then ordinary wood screws can be used to fix it.
A ceiling made of wooden materials makes the room more comfortable, but you should remember about the high flammability and the possibility of damage to the wood from moisture. High-quality processing of the material with special compounds can significantly reduce the risk of wood fire, and antimicrobial protection minimizes the likelihood of wood being damaged by various microorganisms.
Selection principles
When purchasing lumber, you need to consider some parameters:
- Hardness. The wear resistance of the product depends on this indicator. If the bathhouse is used frequently and has many visitors, you need to choose wood with a high hardness index. The best option is larch.
- Stability. Responsible for the rate of tree shrinkage. Stability depends on the quality of drying, cutting, and additional processing. Shrinkage occurs faster with constant changes in temperature and humidity. If the shrinkage process is rapid, cracks appear on the surface of the wood, which are difficult to repair.
- Oxidability. The shade of wood changes when exposed to light. You need to study different types of wood to understand which one will change visually more slowly.
- Wood color. Conventionally, different types of wood are divided into dark, light, pink and red. Dark shades visually make the room smaller, while light shades make the room larger. It is important to find a middle ground between the gradients.
We need to inspect the boards. It is important that they are smooth, equal in thickness, without chips, cracks, or large knots. The wood must be dried and sanded in order to immediately begin working with it.