Any professionally made building made of wood in the form of a log house always attracts attention; properly tinted and sanded wood amazes with the beauty of the natural texture of the material. But few outside observers know how much work and effort is required to maintain the structure in all its glory. Folding a chopped wooden box is only half the battle; after construction is completed and the shrinkage processes are completed, finishing operations to protect the wood and interior finishing of the log house must be carried out. The decoration of the house will have to be updated every 3-4 years.
Sheathing and finishing of a log house from the inside: choosing the optimal material
Designers working in wooden architecture are conventionally divided into two categories: the first are in favor of leaving log walls in their natural form. The latter consider the natural texture of wood boring and monotonous, and therefore insist on various options for cladding and finishing the inside of the log house:
- leveling the wall profile using a gypsum fiber sheet;
- painting;
- wallpapering;
- clapboard cladding;
- laying ceramic tiles, etc.
Which of them is right is up to the developer to decide. A real, open log is beautiful and aesthetically pleasing in itself. Plus, wood is pleasant to the touch, has a unique resinous smell, soothes and pacifies. Therefore, it is better not to rush into covering the walls. At least for the first few years after construction, you can live in a new house without covering the walls of the rooms with anything. We are talking specifically about finishing materials. The use of protective and glazing agents is mandatory; and these works are not considered finishing work. When building a house from a log, one of its three types is used:
- debarked;
- planed;
- rounded.
The first two are preferred by followers of traditional wooden architecture and connoisseurs of handmade work. “Cylinderization” is chosen by those who love the “ideal” picture. But no matter what the construction log is, it requires mandatory sanding both outside the house and inside. A polished log looks very attractive: smooth, clean, with a clearly defined texture. However, its surface is sanded and polished not only to remove all burrs, burrs and visible flaws in the wood, but also to further protect the material. A forest is a living organism. Not only destructive insects such as the wood-boring beetle, but also various types of fungi, mold, etc. settle on the bark and under the bark of trees. There are also those that continue to develop on cut down, already dead wood. For example, white house mushroom and filmy mushroom. If you do not stop their development immediately after building a house, then in a short time the log house will rot. During sanding, the top layer of wood along with these dangerous pests is carefully removed. This procedure “kills two birds with one stone”: it gives the log a smooth, light surface and extends its service life.
Walls treated with a sanding disc noticeably change the appearance of the room; it becomes truly beautiful. After completing the work, the remaining wood dust is removed from the logs, after which they begin to apply antiseptic, tinting and fire retardant compounds; and, precisely in this sequence. Wall tinting in a log house is most often done in light colors. So the room seems even more sunny and cozy, and the log itself gives a feeling of real Russian “homeliness”. To tell the truth, not everyone likes walls with such a pronounced relief, so they are often subjected to additional finishing. Guides are nailed on top of the logs and wall material is installed on them, creating a perfectly smooth surface, for example, plasterboard. Drywall sheets are the basis for further wall decoration - painting or wallpapering. The best option for a wooden house is fire-resistant gypsum board grades. The technology for painting a plasterboard wall is as follows:
- seal the joints of adjacent sheets using reinforcing tape and putty;
- cover the surface of the walls with gypsum putty;
- polish;
- primed twice;
- complete surface preparation with finishing putty;
- Using a short-haired roller, apply paint of the selected shade in 2-3 layers.
It is worth recalling that the paint should be environmentally friendly and friendly to the health of the inhabitants of a wooden house. For lovers of designs and patterns, wall decoration with wallpaper is more suitable. Their choice is endless, so you can always choose a color, texture and ornament that matches the taste of the owner and the style of the living space. Preparing drywall for gluing is exactly the same as for painting. Old wallpaper should be removed with special care so as not to damage the gypsum board base. It is customary to moisten worn-out wallpaper with very hot water. You need to remove strips of old wallpaper quickly, but not with sharp, but with careful and smooth movements. With this approach, the cardboard underneath will remain intact. Another popular option for leveling log walls is to “camouflage” them using wooden lining. The golden color of the “slats” seems to add sunlight to the house. If the lining is installed vertically, it will visually raise the ceiling, if horizontally, it will move the walls apart. Lining is a favorite material among the people. Its distinctive characteristics:
- versatility in application;
- decent appearance;
- simple, understandable installation technology;
- wide selection of original wood species;
- harmless to health;
- affordable price (classes “Extra” and “A” are more expensive, “B” and “C” are cheaper).
Frankly speaking, the desire to hide logs under the clapboard is difficult to explain and illogical. It leads to considerable additional costs: for materials, for installation work, for the purchase of protective impregnations and paints and varnishes, etc.
If someone does not like the round profile of the log, you can build a house from rectangular timber, which does not require leveling the walls. However, everyone sees their dream home in their own way and builds it according to their own scenario.
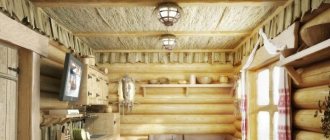
Decorating a house in a rustic style
Initial and ongoing finishing work
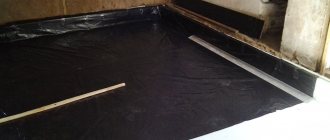
The initial finishing of the log house is carried out at the stage of laying rounded logs or profiled timber. During shrinkage processes, tow made of flax and jute fiber laid between the crowns fills and seals the cracks, thereby preventing warping of the crown joints. After shrinkage is completed, after 15-18 months, only individual fragments will remain of the jute seal laid in the cracks, so the finishing of the log house after shrinkage is done practically from scratch in the following sequence:
- The protective antiseptic coating of wood is restored;
- Using jute rope, flax tow, or even certain varieties of dried sphagnum moss, “wet” caulking of the sealing material is carried out in cracks larger than 1 mm;
- Finishing work of external wall surfaces;
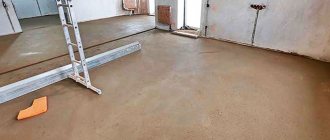
- The subfloors inside the house are removed, the insulation of the underground space of the first floor is restored, and a finished plank floor or parquet is laid.
In this case, not only the crown joints are caulked, but also the gaps and cracks between door and window frames, corner locks and all places where beams or logs are joined. The cracks are sealed with tow or fiber, generously moistened with an antiseptic composition. Sometimes, to increase the durability of jute rope, it can be additionally impregnated with paraffin or linseed oil.
For your information! Most of the initial post-shrinkage finishing of log houses is best done a couple of months before the end of shrinkage and rough acceptance of the building. In this case, with slight shrinkage, the quality of filling cracks on the internal surfaces only increases due to the pressing of the laid material with the crowns.
As soon as the cracks are dealt with, the floors, door and window openings are restored, and thus waterproofing and conditional tightness of the internal space is ensured, it will be necessary to apply a protective coating on the external surface of the walls of the building, and only after this the decorative finishing of the log house inside the room is carried out.
The outer walls of the log house are traditionally tinted to match expensive types of wood and covered with protective varnishes or non-drying linseed oils. Under the influence of solar ultraviolet radiation, an oil or varnish coating turns into a dense protective layer that is resistant to water and air oxygen. Left to its own devices, log wood without a protective coating inevitably fades and acquires a grayish-whitish tint. Sometimes this happens due to an error in the technology of building a log house, and then the walls of a beautiful and warm building have to be covered with exterior finishing made of clapboard or even siding.
Decoration of electrical work - remember the wiring of the 50s of the last century
Retro style is in fashion now. Post-war Soviet films, clothing models of those years, and household items are again popular. The half-forgotten style of the last century is returning to our everyday life. This is especially noticeable in the design of fashionable interiors. Furniture in the style of the 50-60s of the 20th century is increasingly used, and antiques are of increasing interest. Some owners of wooden houses, adherents of retro, went even further. For example, they lay electrical wiring the way it was done before - with twisted wires, on porcelain insulators, in the public domain. This method of laying, in addition to being original, also has undoubted practicality:
- simple installation method;
- convenience for monitoring the wiring condition;
- simplifying repairs.
A more modern way of attaching electrical wires (but still with a hint of retro style) is to use plastic boxes, corrugated pipes, and Euro baseboards. In these cases, the wiring is also located in plain sight, but the wires themselves are hidden in cable ducts. It looks neat, aesthetically pleasing and safer. Retro wiring gives the interior a “zest” and individuality - especially if other things, furniture, textiles, and lamps correspond to this style. In a log house, such an interior does not look out of place at all.
House painting
Painting a house, at first glance, may seem like a fairly simple task, but this is not entirely true. The quality of painting work is greatly influenced by the correct choice of brushes, paint, application method, consistency, color and skill of the worker.
Let's start from the beginning. Your log house has been sanded and caulked. If the technology is followed correctly, before the main coat of paint it is necessary to prime the surface to be painted (deep penetration primer has a liquid consistency and is applied with a brush or spray). The primer is necessary for better adhesion of the paint to the surface of the logs. After you have primed the frame, you need to select paint.
There are a lot of colors now:
- Alkyd (based on white-spirit)
- Glazing impregnations (have a liquid consistency)
- Antiseptic that can be tinted in any color
- Water-based paints (have the consistency of liquid sour cream and can also be tinted in any color)
- Oils and waxes
For exterior applications, we recommend using water-based or oil-based paints. Oils are much more expensive and take a very long time to dry. Water-based (film-forming) paints are more affordable, so we use them most often. If you value quality, then it is better to take oil paint. Painting is done 2 times with complete drying between layers. And we always recommend making large roof overhangs - this is additional protection for your home from slanting rain.
| Name of works | Unit measurements | Cost of work |
| Padding | m2 | 40 rubles |
| Base coat painting | m2 | 60 rubles |
Design styles: choose an economical option without sacrificing quality
Meanwhile, the “Russian hut” style is not the only one suitable for decorating a log house. Virtuosos of wooden architecture - Scandinavian architects and builders - contributed to the popularity of their national style far beyond the borders of their own countries. Scandinavian interior design, which is fashionable these days, is distinguished by its light appearance, ergonomics, a certain modesty and elegant simplicity. The chic of this style is bleached wood, pastel colors, clear geometry of furniture and reasonable functionality of each piece of furniture. Any homeowner can equip their home in a Scandinavian style on a budget; It is not necessary to equip your premises with things from IKEA - after all, many things can be made with your own hands - tables, racks, shelves. As a rule, they do not have complex shapes, but benefit from correctly selected colors and original decorative elements. The materials used in the decoration of Finnish and Swedish houses are always natural, environmentally friendly, and mainly of local origin. We have all this too. Therefore, the style of decorating a wooden estate, which came to Russia from Scandinavia, has taken root in our open spaces. This is truly a beautiful and economical option, without sacrificing quality.
The fashionable “shabby chic” trend also looks organic in a wooden house. Its characteristic feature is the combination of deliberately aged furniture and modern technological advances. This style bears a pronounced imprint of the individuality of the owner of the house. Each item bears a mark left (or seemingly left) by the older generation of his family. An interior in the “shabby chic” style is always unique and unique. It is distinguished by an abundance of white, the presence of scuffs and chips on drawers and cabinet doors, pastel soft colors of textiles, as well as a lot of decorative little things. All this can be created at home without attracting large financial resources. Other design solutions are also suitable for log houses: country, Provence, classicism, modern, minimalism, chalet. Some people like the interiors of a hunting house, with rough finishing of the walls and fireplace with natural stone, with thick carpets on the floor, with an abundance of stuffed animals and weapons hung on the walls. This style is out of fashion: it was and is loved always and everywhere. He has many fans and even female fans. It’s probably possible to inexpensively equip your house in a hunting style, but only on the condition that you are an avid hunter and are ready to “assemble” your interior bit by bit: gradually, and for more than one year. In all other cases, this is a very expensive option, and not everyone can create it in full.
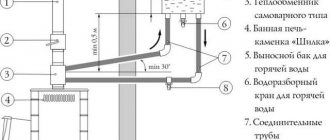
Bathhouse made of laminated veneer lumber. Interior decoration and communications
Our website presents a number of log house projects, for example: Or you can see all prices for log houses. You can calculate the house or bathhouse you need with maximum accuracy using our log house cost calculator. To order and buy a log house, call:
- Vologda
- Moscow,
Comments
No comments yet.
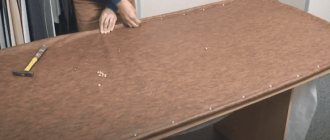
Wooden lining
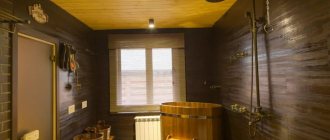
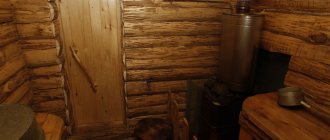
The steam room is usually finished with clapboard. In this case, the inside of the log house turns out to be attractive, while the design of the walls and ceiling looks stylish. There are various options for lining, but you need to take those that are resistant to moisture. The thickness of the board should be up to 220 mm, laying can be done in a vertical or horizontal position. The choice depends on the height of the bathhouse ceiling. If it is up to 2.5 m, then vertical installation can be used. If the ceiling is high, then the horizontal method is suitable, since the standard length of one board is no more than 2.5 m.
Types of lining.
The best option would be to mount it on a wooden batten. It is laid in increments of 50 cm. The necessary communications are carried out under the wall sheathing; they must be protected with special corrugation. The easiest way to attach a board is the tongue-and-groove method; in addition, each board is nailed to the sheathing with thin galvanized nails. The finishing of the log house of the bathhouse begins from the far corner of the room; during work it is recommended to use a building level so that all rows of the boards are level.
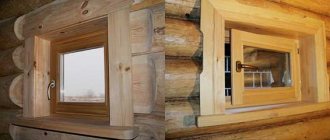
Final result
The flexibility of the corners of vinyl and metal siding makes it easy to use these materials in the process of finishing obtuse and sharp corners of buildings. To cover an obtuse corner, the profile is pressed down, and when working with an acute corner, it is narrowed.
Internal corner
Installation and fastening of the H-profile, which is used for horizontal joining of sheathing elements, is similar to the process of installing corner strips. In this case, an important rule should be observed: the starting strips must be adjacent to the profile, and not vice versa. In addition, when covering with siding, you can do without the H-profile altogether if you arrange the strips overlapping.
The process of installing rows of siding panels occurs according to the following algorithm.
- The first strip is inserted into the grooves of the corner or H-profile, after which it is snapped into the starting lock.
- Fastening to the frame should be done using self-tapping screws exactly in the center of the nail holes. Remember that you cannot screw the siding tightly; you need to leave free space for thermal expansion.
- All subsequent tiers, except the top one, are mounted in the same way.
Siding panels are simply inserted into the H-profile maintaining a gap of 5-6 mm
At the final stage of wall cladding, the top plank is mounted, after which the distance from it to the lock of the penultimate tier is measured. Next, the finishing panel is bent so that its width corresponds to the measured distance, and inserted into the lock.
The process of external cladding with PVC panels is essentially similar to the installation of siding trim discussed above. It uses an identical system of locks and clutches, which may vary only slightly depending on the manufacturer of materials.
Let's hope that our instructions and tips for finishing wooden houses helped you clarify the understanding of the features of this process and made it easier to implement your plans and creative ideas.
Country style wood trim
To learn more about rustic wood façade finishing, check out this article! We also recommend reading about installing window siding strips.
Fiber cement decorative panels
This is a relatively new finishing material. The composite panel has high strength and resistance to temperature and humidity changes. It is quite heavy, so it can only be used in structures that have sufficient load-bearing capacity. There are three types of protective decorative coating on slabs: acrylic, photoceramic, and hydrofilceramic. It can be either matte or smooth. The slabs are mounted using special guide mounting strips secured to the wall with clamps.
Fiber cement decorative boards are a simple and inexpensive alternative to natural stone
Facade paint
This is also a budget solution for cladding a house. For example, paint is perfect for finishing an old brick building that has lost its former luster, but the walls are quite durable.
Facade paint is a composition with the addition of a structuring filler. A ten-millimeter paint layer allows the walls to not only have a pleasant appearance, but also reliable protection from external factors.
A characteristic feature of this coating is that it can be used to process an unprepared base. The unique composition and structure of facade paint will mask all existing defects. In addition, this type of building composition can “breathe,” which has a beneficial effect on both wooden and block/stone walls.
Selection of thermal insulation material
After successful completion of all preparatory work, you can begin to create a thermal insulation layer of the sheathing. Due to the specificity of a material such as wood, the best choice would be to use mineral wool slabs. However, various options are possible.
Table No. 1. Materials for insulating the facade of a wooden house.
| Material | Advantages | Flaws |
| Foam boards | — excellent thermal insulation performance; — ease of installation; - protection from pests. | - poor air permeability, which leads to wood rotting; - not fire resistant; - is not an environmentally friendly material. |
| Penoplex | — excellent thermal insulation; - resistant to fire; - protected from the influence of microbes and pests. | - vapor-tight, poorly ventilated. - Difficult to cut and install. |
| Mineral wool | - well ventilated; - retains heat perfectly; - easy to install; - environmentally friendly; - resistant to fire. | The ingress of moisture if the installation technology is violated leads to a sharp decrease in insulating properties. |
It should be noted that polystyrene foam and penoplex are used extremely rarely for insulating wooden houses, so it is recommended to opt for mineral wool.
Prices for mineral wool
Minvata
Finishing the bath with warm plaster
An alternative option for finishing the facade of a bathhouse is warm plaster, which is a solution based on cement, expanded clay chips, perlite sand, powdered pumice and granulated foam.
Facade plaster has many advantages:
- high sound and heat insulation characteristics;
- good adhesion to any type of base;
- installation without the use of reinforcing mesh. Exceptions include deformed areas of the façade;
- resistance to rotting, burning, mold formation, infestation by insects and other pests;
- does not require preliminary leveling of the surface.
The disadvantages of the material include the following:
- impressive weight;
- high price;
- limitation on the thickness of the decorative layer - permissible thickness no more than 5 cm;
- the need for finishing primer and painting;
- the need to strengthen the foundation of the building.
The plaster is applied to the cleaned surface manually or by machine. Each subsequent layer is applied after the previous one has completely dried.
When using insulating boards that have a sufficiently high density, for example, polystyrene foam, fiber cement or tightly compressed glass wool in mats, which will later be covered with plaster on top, wall sheathing is not necessary.
Approximate scheme for insulating walls under plaster
Most often, this principle is applicable on smooth brick or reinforced concrete walls. In this case, the plating is done as follows:
- On the wall of the house, at the height at which the insulation will be installed, a metal holder profile is fixed, selected according to the thickness of the selected insulation boards. The profile is leveled to a perfectly flat horizontal level;
- the walls are cleaned of dust and, before applying glue, moistened with water for better adhesion;
- then pre-diluted special glue is applied to the insulation boards;
Insulation boards can be mounted with construction adhesive
- the first row of slabs is installed on a metal profile and pressed firmly against the wall;
- the next row is installed on the first according to the brickwork system - in a dressing;
- having secured two or three rows of slabs with glue, each of them is additionally secured with dowel fungi;
- further work continues according to the same system to the very top. Then the insulation is installed on other walls in the same way;
- When the layer of glue under the insulation has dried, it is necessary to glue all corners of the building, window and door slopes with corners with reinforcing mesh. They are fixed with the same glue, its excess is removed with a spatula;
Reinforcing corner
- after the corners have dried, the reinforcing serpyanka mesh must be secured to the entire insulated surface;
- The surface on which the serpyanka sheet will be glued is coated with a thin layer of glue. A reinforcing mesh is fixed on top of it, smoothed with a spatula, and excess glue is also removed;
- when the surface dries well, it needs to be covered with polymer plaster, a layer of 2-3 mm;
- The final stage will be the application of decorative plaster, selected in the appropriate design style of the building.
Plaster prices
Plasters
Conclusion
As we found out, there are several simple and effective ways to insulate a log house. Each of them allows you to make your home more comfortable and economical in terms of energy consumption for heating. However, it is still advisable to insulate the log house from the outside, and at the same time strictly adhere to the technology outlined above.
Additional information on this topic is contained in the video in this article. If you have any difficulties during the process of insulating a log house or have any questions, ask them in the comments, and I will be happy to answer you.
PVC panels
Panels made of polyvinyl chloride are identical in characteristics to vinyl siding, since they represent one of its varieties. However, in terms of creating original design solutions, PVC elements give builders greater opportunities. Such panels allow you to create high-quality imitation of stone, brick and marble surfaces, and are also easily combined with standard vinyl siding, which allows you to give building facades a unique and exclusive look.
Variety of PVC panels for facade cladding