The installation of heated floors in the house is becoming more popular because it allows you to create comfortable living conditions. And the point is not only that it is pleasant to walk on such a surface. It becomes possible to reduce the temperature of the main heating source, significantly reducing the degree of burnout of air oxygen.
Since the maximum floor heating temperature does not exceed 30 degrees for sanitary reasons, and this figure for the main radiator circuit reaches 75 degrees, the need to separate these two types with independent temperature control for each is obvious. Mixing units (collectors) are used for this purpose. In order to install them yourself, it is important to know their structure and circuit.
Why do you need a mixer and how does it work?
First of all, the home handyman needs to understand the operating principle of the heated floor mixing unit. The scope of its use is only the design of water heated floors.
The heating circuit includes a boiler that heats the liquid, heating circuits and radiators. The unit usually heats the coolant to 95 degrees. In this case, the ideal temperature is considered to be no more than 31 degrees, since for comfortable movement on the floor surface it should not be hot or cold.
You should also pay attention to:
- type and thickness of the floor covering;
- the height of the cement screed in which the pipes are laid.
Taking into account the above, it is clear that the most suitable operating temperature for heating circuits is between 35 and 55 degrees. But the liquid in the boiler is too hot. Therefore, to reduce the degree of heating, a mixing unit is used, in which water of high and low temperatures is mixed.
Already in a cooled state, the coolant enters the floor pipeline. Thanks to the presence of a mixer, the heat supply system functions correctly and without problems. By the way, there are heated floors that work without this device. But they are equipped with a mixing unit for the boiler, and then the working environment is heated to the optimal temperature.
general information
It is no secret that the problem of uneven heat distribution in a room often causes a lot of trouble for owners. To get rid of this unpleasant phenomenon and create a comfortable temperature regime, you need to introduce a special device into the heating system - a thermal power regulator or a three-way valve.
The mechanism ensures recirculation of the coolant fluid by mixing a certain amount of cooled treatment with the main current. Currently, tees are installed in hot water supply systems, heating circuits and plumbing systems.
In most cases, three-way valves are installed in heating systems with many components and circuits, which is necessary to stabilize the temperature in all radiators. The use of the device allows you to control the flow of coolant, distributing it to different parts of the room (for example, in the kitchen, garage and living rooms). Among the main advantages of the invention are:
- compact and ergonomic dimensions;
- multifunctionality;
- ease of installation, operation and maintenance;
- high tightness;
- long service life;
- ease of switching between operating modes.
In addition to the advantages, tees also have disadvantages. These include the likelihood of valve jamming if operating rules are not followed and rapid wear of inexpensive products.
This video will tell you how to install a three-way valve correctly:
Thermal mixing unit connection diagram
In order to connect the heated floor covering structure to the boiler, work is carried out according to the diagram of the heated floor mixing unit, depending on the heating system, which can be one-pipe or two-pipe. For a single-pipe version, you need to constantly keep the bypass open, but for a two-pipe version, you do not.
The project can be either elementary or contain a number of additional devices. In any case, thermostats, valves and devices that control the flow of the medium must be installed for the collector group. Mixing of the coolant can be carried out either at all outlets from the collector, or in front of them.
DIY mixing unit assembly
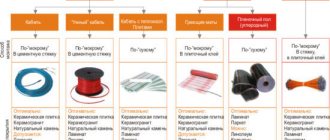
Since their prices are high, many owners find it more profitable to assemble a mixing unit for a heated floor with their own hands. In addition, sometimes it is impossible to find a regulator that has the required number of inputs. In such a situation, you need to purchase combs and install them yourself.
To assemble the unit, you need to prepare:
- two- or three-way valve;
- manual air vent;
- special nuts;
- clamps;
- return valve;
- ball valve;
- tees;
- circulation pumping equipment;
- temperature measuring devices.
The work is carried out in stages:
- Manufacturer manufacturing . It can be assembled by soldering polypropylene tees, or by twisting the tees, and their diameter should be ¾ inch. When using soldering technology, the cost of the collector will be more expensive, since MRN, which has a high price, must be installed on all branches of the comb. The best choice is to use tees - they need to be selected correctly. For a comb, parts with one internal end and two external ends are well suited. They are twisted together using tow.
- Creation of a hydraulic arrow . It can be made without a three-way valve. To do this, it is enough to use the control valve used for heating radiators. You will also need 2 tees as in the case of combs and 2 connecting nipples with external and internal threads, 50 centimeters long. The assembly is carried out on tow: nipples are screwed in on both sides of the tap, and then one tee is attached to them.
- Pump installation . You cannot make a pumping unit for a heated floor with your own hands - you can only purchase it (read: “Why do you need a pumping and mixing unit for a heated floor - operating principle, selection, installation rules”). The pump is mounted at the bottom of the hydraulic needle using the detachable connections included in the kit. It can also be used instead of a hydraulic gun and it will function no worse than it.
- Connection to hydraulic arrow combs . It is advisable to use detachable connections. If the pump is a separate unit, then a pipe is needed. Its length should be equal to the same parameter for the pump. The pipe is placed on the supply, and a manifold is connected to it - it is for this reason that it is more economical to use pumping equipment instead of a hydraulic arrow. Next, the combs are equipped with Mayevsky taps, control valves, or automatic air release.
Then the homemade mixing unit for heated floors is placed in a special cabinet and connected to the heating structure. It is connected using shut-off valves. The connection between the unit and the heated floor is made in the same way. To avoid confusion, you must follow the layout - the supply and return of each segment should be connected in series. You also need to connect the power supply to the pump.
Setting up the mixing unit
When the installation of the mixer is completed, they begin to check its suitability for operation. This usually takes longer than the installation itself.
The sequence of actions is as follows:
- First remove the servo. This must be done in order to prevent its influence on the mixing unit for the heated floor during the setup process. Set the bypass valve to the last division so that it does not accidentally operate during adjustment and is completely inactive.
- Then they begin to balance the contours. First of all, close the radiator circuit, or rather the shut-off balancing valve located on the first line. Remove the cap from the valve and move it clockwise to the end with a hex key. When setting up a mixing unit, the underfloor heating circuits are balanced using special valves. If there is one line, there is no need to perform balancing.
- If adjustments are necessary, the regulators are opened to maximum. The valve is closed in the circuit to the best size, achieving the greatest flow deviation.
- According to this scheme, the heating lines are adjusted as a whole. When the flow data gets lost during balancing, they are adjusted again. If it is not possible to adjust the flow rate with the valves open, then increase the operating speed of the pump.
- Next, we need to link the pumping and mixing unit for the water heated floor with other elements of the system. To do this, slightly open the radiator shut-off valve, which was closed before starting the adjustment. It is opened to an amount that corresponds to the optimal flow of coolant.
- Flow meters are used to control it. In addition, adjustment can be made through a return stroke in the system. Next, the valve pressure is set at the bypass valve. It should be no more than 10% of the highest pressure in the pump. The valve is activated when the unit begins to build up pressure at minimum water flow.
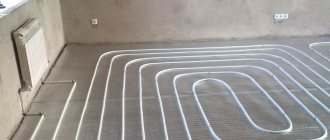
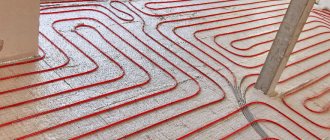
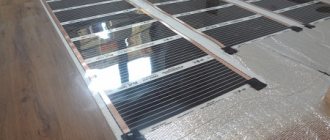
Laying a heated floor pipe
This is the most interesting part of our instructions. There are several ways to install a water heated floor. We'll talk about them below.
Laying method: spiral or snail
The most popular and reasonable way to lay out a heated floor. Allows you to achieve uniform heat distribution in each circuit due to the fact that the pipes alternate according to the principle of one warmer, the other colder. If you look at the design diagrams of a water floor, they most often show a snail.
They unfold quite simply. First, you begin to lay out the pipe around the perimeter of the room (or conditional contour), turning it closer and closer to the center. In this case, you need to leave space in order to later return the pipe from the center to the base of the perimeter and then connect it to the return of the collector.
Therefore, if your laying step is 15 cm, then you start laying out the contour in 30 cm steps to the center, and then return the pipe just between the previously laid out pipes and the step is already 15 cm. It sounds complicated, but the picture reflects the essence more clearly
We recommend sticking to this installation method in most cases.
Snake laying method
This installation method heats the floor less evenly, but is ideal for use in small spaces. It is often used in a situation where you have rolled out a contour with a snail and you need to capture part of a small space with the same contour. Then you already resort to installation with a snake.
There is also a “double snake” method of laying heated floors. This option is close to the “spiral” method in terms of heat distribution. It can also be used in practice
Step of laying the heated floor pipe
The distance between the underfloor heating pipes can be generally any, provided that it is correctly calculated in the project. In some places we have steps of 25-30 cm, and with such a step the room warms up perfectly.
But if you don’t have a heating project (which most often happens), then the underfloor heating pipe needs to be laid in increments of 15 cm in the main areas of the house, and in the edge areas (near the external walls) it needs to be reinforced in increments of 10 cm. In the vast majority of scenarios, this step enough for the eyes
Heated floor contour length
The length of the heated floor pipe can again be any, if this length is calculated in the project. Otherwise, stick to the contour size of 80-90 meters. If the length is exceeded, then it's okay. But it’s still better not to exceed. Also try to calculate the contours of the heated floor so that they are similar in length. Then you won't have to balance them.
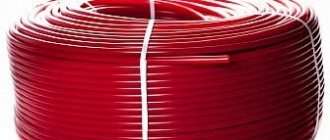
Heated floor pipe diameter
You will be surprised, but you can also use any pipe diameter, but 16 mm is already enough for you. With all this, a small pipe is quite easy to work with. We see no point in resorting to other diameters.
Features of the mixing group device
A simple mixing unit for heated floors in a standard configuration consists of the following elements:
- valves - thermostatic and adjustment;
- thermostatic head;
- temperature control devices;
- pump
Both types of mixers with two- and three-way valves mix cold and hot coolant, forming a constant circulation.
The two-way valve is equipped with a thermal head having a sensor that checks the temperature in real time and, if necessary, stops the water supply from the boiler. The heated liquid begins to flow if it cools down when mixed with the return flow. This type of valve is used for rooms with an area not exceeding 200 square meters.
The three-way valve has a significant flow capacity. It is used for large and spacious rooms, where the heating system has many circuits, and ambient space controllers are also used.
Heated floor connection diagrams
Most often, 4 connection schemes are used. Each of them is used in individual cases. It all depends on the type of heating system, the number of rooms, materials used and other factors.
Directly from the boiler
This scheme assumes the presence of a boiler, from which the coolant is distributed to the heated floor and other heating systems (for example, an additional radiator). Cooling, the liquid flows back into the boiler, where it is reheated. The system also uses a pump that regulates the movement of the coolant.
In this video, a specialist shows a finished system installed directly from the boiler. Gives useful comments on his work:
From three way valve
This type of connection is usually used with a combined heating system. Considering that water comes from the boiler at a temperature of 70-80 degrees, and the warm floor accelerates the coolant to 45 degrees, the system needs to somehow cool the hot flow. For this purpose, a three-way valve is installed.
How it works? Pay attention to the diagram:
- Hot water comes from the boiler.
- At the same time, cooled water flows into the valve from the other side (which passed through the heated floor, heated it, cooled and returned back).
- In the center of the valve, hot water and cooled return water are mixed.
- The thermal valve head regulates the required temperature. When it reaches the required 40-45 degrees, the water flows again through the underfloor heating pipes, heating the room.
The negative point is the inability to accurately distribute the dosage of cold and hot water. In some cases, either too cooled or slightly overheated liquid may enter the heated floor.
But, given that the installation of such a system is very simple and does not “break the wallet,” many agree to this connection option. For example, an excellent option would be a choice where the customer does not have high requirements and wants to save money.
Example of a real circuit:
In this video, a specialist installer talks in detail about the filling of a three-way valve, in which cases it is better to install it and what types there are. The engineer voices possible errors and gives recommendations on how to avoid them:
From the pumping and mixing unit
The scheme is mixed. It has a radiator heating zone, heated floors, and a pumping and mixing unit. The mixing takes place from the cooled water of the heated floor, which came from the “return”, to the heated boiler room.
A balancing valve is installed in each mixing unit. It accurately doses the volumes of cooled liquid (return) to be mixed into hot water. This helps to achieve accurate data on the temperature of the coolant entering the heated floor for heating it.
From the radiator
In many rooms and apartments it is prohibited to use such a heating floor connection scheme. But where this is permissible (permission is taken from the housing and communal services or management company of your home), the circuit is carried out directly through the radiator (battery).
The heated water flows directly from the radiator into the heated floor. The cooled water enters the cassette temperature limiter and returns to the radiator (coolant outlet).
Installation is the simplest and most cost-effective. But this has its drawbacks - the water from the radiator can be too hot for underfloor heating. This results in the fragility of the system and material, and the floor being too hot. In the summer season, when the heating is turned off, the floor will be cold.
The ideal place to use floor heating from a radiator is a bathroom, loggia.
The video shows the installation of a heated floor directly from a common heating radiator. The installer shows in detail how to do this with minimal losses. Installation of 3 circuits: kitchen, bathroom, living room. The apartment is small:
External floor heating sensors
Such devices are used for heating systems to ensure automatic adjustment of the degree of heating of the coolant depending on the weather. For example, when it gets cold outside the house, a signal is sent to increase the water heating temperature.
In case of warm weather, the sensor signals that it is warming and that the temperature parameters should be lowered. The design solution allows for rotation by 90 degrees. The controller has 20 sections and monitors the weather outside the house.
If the liquid temperature does not correspond to it, then the valve turns the required number of divisions. You can do this yourself, but with a weather sensor it is much more convenient to monitor the temperature outside the window.
Advantages of mixed floor heating
When there is a mixing unit for a heated floor, the heating system has many advantages:
- Comfortable stay . This is possible because thermal energy is supplied by radiation rather than by convection. In addition, the floor surface and rooms are heated evenly. There are no cold bridges or overly hot radiators in the rooms. All these circumstances contribute to creating a comfortable and healthy atmosphere and the absence of dust. The floor surface is always dry, there is no feeding environment for mites, mold and other harmful microorganisms.
- Financial benefit . With proper installation of pipes and efficient functioning of the structure, you can significantly save on heating your home. It has been proven that apartments consume about 30% less electricity, provided that the ceiling has a standard height.
- Safe operation . This circumstance is of no small importance for premises in which people are constantly present. Thanks to the functioning of the underfloor heating system and the way the mixing unit for heated floors works, residents do not have burns or other damage that can be caused when using, for example, convectors or oil radiators.
- Hygiene . A water floor system equipped with a mixer allows for periodic disinfection of the finished floor covering. It can be cleaned with detergents and water. This heating system is ideal for rooms with high hygiene requirements. For example, a water floor with a mixing unit can be installed in hospitals and preschool institutions.
- Convenience . For a water floor system, it is not necessary to install additional devices in the heated room. All the elements needed for it are usually placed in storage rooms. Therefore, when planning the interior of the room, no place is allocated for them.
Useful tips
Before starting the heating system, you must make sure that the three-way valve and other components are in full working order, do not need repair or replacement, and also meet operational requirements. It is not recommended to install a tee on a pipeline with a pipe diameter of 40 millimeters or more. When operating in a hot environment, the valve must be opened with extreme caution, otherwise there is a risk of hydraulic valve failure.
The best material for a three-way valve is brass.
Experts recommend placing control devices or a turning handle with a rod so that they are freely accessible. When choosing a suitable faucet model, it is advisable to give preference to products made of brass. They are characterized by a long service life and resistance to all kinds of influences.
As for the control method, the best option would be a product with pneumatic control. Before making a choice and buying a tee, it is better to consult with a specialist, talk about the possible pros and cons of the available models, and also read reviews about them on thematic forums.
Among the huge variety of shut-off valves that are used on the heating system, there is a rather rarely used element - a three-way valve for heating with a thermostat. It is similar in shape to a tee, but it is designed for completely different functions. How a three-way valve with a servo drive works and why it is needed will be discussed in this article.
Features of the arrangement of mixing units
A do-it-yourself mixing group for underfloor heating, in which warm liquid is mixed with cold liquid, is installed next to the heater. If the hydraulic elements of the system are connected using elastic tubes, then the unit must be firmly fixed to the wall.
Before starting installation, you must make sure there is space for unobstructed access to the mixer parts. The control valve should be placed in the area where the coolant enters the heater.
When choosing a pipe material, you need to make sure that it can withstand the temperature of the incoming fluid. Experts recommend purchasing polymer pipe products. It should be remembered that galvanized pipes cannot be used for glycol-water solutions.
It is desirable that the shut-off elements be made of brass and bronze, the tubes made of black steel, and the pumping equipment made of cast iron. Steel products for the system from the outside are primed and painted at the factory.
When choosing the location and connection of the unit, you need to remember about air bubbles that may appear from the outlet of the boiler circuit. It is also necessary to exclude the possibility of water or condensation getting on the system elements that are under voltage.
Taking into account the above information, we can conclude that the mixing unit should be selected individually so as to ensure maximum ease of use of the floor surface heating structure. You can choose the connection diagram yourself or purchase a completely ready-made design.
The mechanism of operation of the node
The mixing device performs not only the functions of regulating the water temperature in the line. He is also responsible for its normal movement along the chain. The device includes a safety valve and a circular injector. The last element ensures normal circulation of the media in the floor heating system at the required speed. This moment is important for complete and uniform heating of the surface.
Related article: Making your own hive
The circulation injector is responsible for the uniform distribution of warm media in the water floor circuit
The safety valve is responsible for mixing the water in the circuit. When boiling water enters the inlet, it opens flows from the return circuit until the hot water is mixed with the cold carrier from it. After this, he stops supplying boiling water.
In addition to the two main components, the manifold may include conductive and shut-off valves, valves for bleeding air and a bypass, which serves as an overload protection device. These items may not always be included in the device. Therefore, a do-it-yourself manifold for a heated floor can be installed using several different methods. Here everything depends only on the result you need.
It must be said that the mixing unit is always mounted in the area before entering the heating circuit. However, its immediate location can be anywhere. In some cases, it is advisable to install the device directly in the same room where the system runs. This is usually done in apartment buildings. Sometimes it is appropriate to place it in a common boiler room. This option will probably be preferable for private cottages. If there are several rooms with underfloor heating, distributors are usually placed in each of the rooms or one common manifold is installed in a suitable location.
When installing the mixing unit yourself, draw up a diagram of its installation
All differences in the operating principle of mixers are determined by safety valves. The most common of them are valves with two and three positions.