More about clay castles
The aged plastic dough obtained by mixing clay with water acquires unique properties after compaction.
A thick layer of the laid mixture forms a waterproof screen that protects the foundation from groundwater and flooding. Oily clay is plastic, it gets wet slowly and takes a long time to dry. Its color has absolutely no meaning, so you should not pay attention to it. Proper preparation of the material for use will help to make reliable waterproofing. To do this, the clay is soaked, covered and left to sit for an indefinite time, making sure that it does not dry out.
Experts recommend preparing material in the fall and leaving it outdoors until spring. During this period, a cycle of gradual freezing and thawing of the clay occurs, which will facilitate uniform penetration of moisture through the interlayer spaces into all particles. The result is a homogeneous, plastic material suitable for use in a clay castle. To further improve the quality, lime is added to the waterproofing mixture, but not more than a fifth of the total volume.
The clay should not be over-moistened or over-dried. You can check the required humidity using a simple folk method. You need to take a handful of “real” rock, and then try to squeeze it in your fist. If the formed lump does not crumble and does not slip through your fingers, then the material is considered ready for use.
Clay does not deteriorate over time and requires virtually no material costs to purchase, since it is found almost everywhere in general use. A correctly made clay castle:
- does not require repairs - cracks do not spontaneously appear in it;
- not washed away by groundwater, but needs protection from storm drains;
- prevents the penetration of water, but allows moisture to pass to the foundation walls, and therefore it is recommended to additionally make surface waterproofing.
When constructing a clay castle, you should pay attention to the type of soil located in the area where the structure is being erected. If there is a sandy or sandy loam layer around the foundation, the expansion of clay during freezing will not play a big role
But for clay and loamy soil, an increase in the volume of the castle as a result of frost heaving can lead to unforeseen situations
In this case, it is important that the vertical surfaces of the foundation are smooth - without protrusions, recesses and expansions in the upper part of the structure. Otherwise, the buoyancy forces created by nature itself can lift the structure, squeezing the foundation upward
Disadvantages of a clay castle
The poor quality of the work performed is due to the fact that people who decided to lay the clay castle themselves do not adhere to the technology.
If the clay is not matured enough, is not mixed correctly, is dry or uneven, it is impossible to achieve the desired plasticity. People do the backfill as is and simply compact it with a mechanical tamper.
As a result, the perched water, which lies in the upper layers of the soil, freezes in winter. The resulting ice, when expanding, puts excess pressure on the rings and seam and leads to a violation of the integrity of the structure. Another drawback is the two-year wait for natural soil settlement. But this problem can be solved with a temporary castle made of compacted sand.
Procedure for carrying out work
If there is no opportunity or desire to use the services of a team of professional builders, all that remains is to make a clay castle for.
- Digging in. A trench is dug along the perimeter of the well to a depth of 150 - 180 cm. As a result, the second seam of the ring connection should be visible.
- All connections must be protected from clay getting into them. Any hydrophobic material that does not rot or decompose will do, for example, polyethylene film.
- Preparation of material. For a clay castle, it is allowed to take clay with a sand content of up to 15%, but the lower the figure, the better. If you follow all the recommendations, the clay is aged before use (usually left for the winter). To add strength to the castle, lime is mixed into the solution so that its content does not exceed 20% of the total mass of the mixture. The more sand there is in the clay, the more lime you need to add.
It is important that the clay is kneaded and not mixed. Previously, this operation was performed with feet, today they use small concrete mixers or use a drill with an attachment
The next step is to create a blind area on top of the castle. And without the recommendations of SanPiN, it is clear that after rains or melting snow, even a tightly compacted clay castle will turn into mud. The “soggy” top layer will get wet and dry, which will gradually lead to a loss of tightness. Therefore, the construction of a blind area is considered the logical completion of the process of creating a protective castle.
The covering material is selected based on personal preferences; both stone and paving slabs are suitable. And the creation technology does not seem complicated:
- the castle is covered with geotextile or other material with similar properties,
- The selected material is laid on top of the screed.
You can assemble a low formwork and fill the castle with cement mortar on top. The main thing is that the slope is maintained, because the task of the pavement is not just protection from moisture, but also its removal.
The construction of a clay castle will not affect the bacterial and chemical composition of the water on the site, but it will help keep it clear and suitable for consumption, if it was so initially. Therefore, in solving the dilemma “for” or “against” clay castles around the well, it is worth tipping the scales towards a positive answer.
Clay castle for a well
An important point is to insulate the well from moisture. This is necessary because drinking water in a well can become contaminated if groundwater enters it. The most common procedure is to create a clay castle around the well.
The whole process is quite labor-intensive; all work requires a huge amount of material. Once all the work is finished, do not forget to clean the well.
Might be interesting
Waterproofing
Foundation waterproofing: optimal choice of technology
Waterproofing
Clean water is the key to health, waterproofing concrete…
Waterproofing
Instructions for waterproofing a swimming pool
Waterproofing
Selection of materials, methods of waterproofing work...
During all work, it is necessary to follow a certain algorithm of actions. Installation procedure:
- There is a long deep ditch along the entire surface of the well shaft. The dimensions of this trench are: width – 600 millimeters, depth – 1700 millimeters.
- The trench is filled with clay. It is important to compact the clay at all times.
- A small waterproof covering is created at the top of the clay castle. This blind area should slope away from the well, and its height should be two hundred millimeters.
Basic properties of clay structures
Clay belt - several compacted layers of clay.
The raw material has a natural ability to absorb and retain moisture, and a possible increase in volume of two or more times is noted.
A simple option for protecting a structure involves accessibility and low cost. The result is a clay strip that creates a strong protective barrier against ground moisture.
The principle of operation of properly installed protection
Additional insulation will need to be installed, otherwise the moisture from the clay will be in direct contact with the concrete.
The finished mixture may contain sand particles that reduce the original properties of the material. There is a change in clay size due to severe frosts. As a result of severe freezing of the protective lock, deformation of the building may occur.
The protective clay line allows you to protect the foundation from constant contact with soil moisture, regulates the outflow of water penetrating from precipitation, diverting it away from the foundation.
However, the structure will not protect underground premises.
How does a proper clay castle work?
The functioning of the lock is determined by the structure of the base material. Clay is a waterproofing agent. Consists of small particles in the form of flakes. Their size does not exceed 0.002 mm. The distance between them is no more than 0.005 mm. The dense structure swells when moistened and blocks the movement of water.
For the structure to work effectively, it is necessary to have well-pressed and compacted clay. When exposed, flat particles occupy a parallel position, and the pores become smaller.
It is useless to build a castle immediately after arranging the mine. Due to soil shrinkage, cavities will form under the structure, into which debris, rodents and contaminants can enter. An incorrect device makes the lock useless and also aggravates the process of untreated water entering the well.
How to make a clay castle: mastering the technology ↑
Clay of natural moisture is used to construct the castle. If it is removed from the ground for storage, it should be soaked by watering it and covering it on top. The clay is ready for use when it can be molded into something: it does not crumble and does not slip between the fingers when it is kneaded. It would not be superfluous to add 10-20% lime to the clay composition, especially if there is a high sand content in it.
If the clay holds its shape: does not crumble or spread, it is ready for use.
The best results are obtained by carefully compacting the clay into the formwork. You can install wooden panels, ensuring the thickness of the castle is 15-20 cm. If the pit is not wide and there is sufficient material available, the walls of the pit themselves can serve as formwork. The clay is compacted in layers 20-30 cm high. Placing a geotextile fabric outside the castle will prevent its gradual erosion by groundwater. While there is no blind area, it is also worth laying a strip of geotextile around the perimeter of the house, making the backfill slope away from the building. The blind area can be made from a mixture of crushed stone and crushed clay, paved on top.
If the pit is not wide, the formwork may not be installed
The clay castle of the well is made similar to a blind area. It should be wide, at least a meter, and not necessarily deep, from half a meter. Better, of course, wider and deeper. If a water pipe runs from a well into a house, it must also be insulated with a lock, regardless of the depth of its installation. The clay can be covered with geotextile on top and paving slabs or cobblestones laid on it.
The clay pond castle is made 8-12 cm thick in three layers. The clay is kneaded to a soft dough, applied to a horizontal or inclined surface, compacted and allowed to dry a little. The surface should become similar in hardness to plasticine, then the next layer can be applied. During drying, including after finishing work, the clay should not be allowed to dry out to avoid cracks. It needs to be covered with film, or with hay. The pond will turn out ideal if you spread a pond film on top of the clay.
The clay blind area should be protected on top with geotextiles or pavedSo, clay is not only a traditional, but also a promising material for waterproofing buildings from ground moisture. It is literally lying under your feet; the work does not require the performer to have qualifications or a complex instrument, although it is quite labor-intensive. European and American technologists continue to successfully develop new clay-based insulating materials; their appearance in Russia should be expected soon.
Stages of construction of a clay castle and its structure
Construction of a clay castle
- Choice of clay. To build a clay castle for the foundation, fatty clay with a sand content of no more than 15 percent is used. It is also possible to use loam, but it requires prolonged soaking in water. To improve the properties of clay, lime should be used at a rate of 15 percent of the total mass of clay. Recently, bentonite clay has been used instead of ordinary clay. It gives fewer cracks and practically does not shrink.
- Preparing the clay mass. 1-2 days before you start making a clay castle, the clay should be filled with water. Important: do not let the clay mass dry out. To determine readiness, it is clenched in a fist. The resulting lump should not crumble. The ideal time to prepare clay is autumn. During the winter it will freeze well, become saturated with moisture and become plastic and homogeneous.
- We are constructing an adjustable formwork. Formwork is done taking into account the depth of the foundation and the thickness of the formwork. With a foundation depth of up to 2 meters, which is standard for most buildings, the width of the lower part of the formwork should be 0.4 meters. Toward the top, the clay castle narrows to a width of 0.25 meters. Instead of formwork, you can use a foundation pit. The height of the clay castle should not exceed the height of the foundation.
- Laying clay. Clay is applied in layers of 5-10 centimeters. The thinner the layers, the easier it is to compact it. Important: during breaks between installations, the clay castle must be covered with moisture-proofing materials (film, etc.). Otherwise, the clay will begin to dry and cracks will form between the layers, which will lead to the rapid destruction of the castle in the future.
- Construction of the blind area. The main purpose of building a blind area is to protect the foundation and clay castle. The blind area should be built a couple of weeks after the construction of the clay castle is completed. All this time, the castle must be protected from rainwater. Therefore, it is covered with a waterproofing film on top. Also during this period, drainage for precipitation should be organized. You can build a blind area from a variety of materials. In essence, it represents the top layer of a clay castle.
Do-it-yourself foundation waterproofing is the most detailed guide to self-waterproofing vertical and horizontal types for any type of foundation.
Find out more about penetrating waterproofing in our article - it is an excellent and very affordable method of vertical waterproofing.
How to lay paving stones or paving slabs?
A blind area made of paving stones or paving slabs is especially durable and aesthetically pleasing. There are a variety of colors available to choose from, allowing you to choose the design you want. There is also a wide variety in shape: from simple geometric to intricate. The material is resistant to temperature changes, and therefore durable. The tiles are easy to remove and install back. They use simple installation technology. Geotextiles are spread over the sand of the soft blind area and sprinkled with a thin layer of dry cement. Place decorative elements. Lightly tap the mallet to level it out. Apply a rail to control the level: all tiles must be in the same plane. After completing the work, water the surface so that the cement sets.
How to make lubricant from clay?
To insulate and seal the ceiling of the cellar, clay lubricant is used. To prepare it, you can use any type of clay. Clay grease is prepared as follows:
- the clay is soaked for 2-3 days;
- to obtain 1 m3 of lubricant you need to take:
- 0.7 m3 clay dough;
- 0.28 m3 lime paste;
- 32 kg of fibrous impurities: chaff, firewood, straw cuttings 5-10 cm long;
- 200 kg of water, to which you can add copper sulfate at the rate of 100 g per 1 bucket;
All ingredients are thoroughly mixed and a clay lubricant is obtained for building a cellar with your own hands.
The video explains how to extract clay:
{lang: 'ru'}
Laying technology
The whole structure resembles a layer cake, where film is laid out first, then sand, and geotextiles on top (if it is necessary to block the germination of weeds) and decorative material.
Subsequence:
- The entire fertile layer of soil is removed (to the depth level of the second ring).
- The film is laid out so that one edge covers the ground near the wall (more than a meter), and the second is placed on the ring itself, covering the seam between the second and first ring.
- The film must be pressed against the well so that it does not slip. To do this, cut out a metal tape and wrap it around the wall of the first ring, pressing down the film. Fixed directly to the concrete with screws.
- You can simplify the task: secure it with tape by wrapping it around the ring several times. However, in the second case, you need to hide the pasting area under decorative material.
- A sand cushion is poured on top of the film with a slope away from the well and a decorative coating is laid out.
With this method, no heaving of the soil will tear the seam, because it is covered with a dense, loosely fitting film that can adapt to soil movements.
Features of waterproofing with a soft blind area
The use of temporary waterproofing in a soft blind area around a well has a number of technological aspects that must be taken into account during the installation process:
- The entire structure is laid at the level of the second ring.
- The materials used are waterproofing film and sand.
- The edges of the film strips are thrown over the well rings.
- Decorative material is laid on top of the film and sand.
In this case, all technological requirements must be met.
Laying technology
Before making a clay castle, you need to dig up the soil to the level of the 2nd ring. The selected soil is no longer used and must be removed and disposed of. A film is placed on the bottom. The size of the area to be closed is at least a meter from the outer wall of the reinforced concrete ring.
One end of the film is placed over the well above the seam. It needs to be secured, for which a metal belt, tape or self-tapping screws are used, which are screwed directly into the concrete. In the case where adhesive tape is used, several turns must be wound. After this, the cavity is filled with sand on top of the film.
Backfilling is not carried out to the very top if FEM or natural rubble stone is used as a decorative coating. When laying, check that there is a slope away from the well of at least 1.0-1.5 degrees. But this is a temporary method, and to ensure the tightness of the well, a clay castle is a necessity. But not every type of clay can be used as a material.
How to choose clay for a castle
To construct the castle, fatty varieties of red clay are used. The deposit doesn't matter. Another thing is the content of impurities. Clay is used that contains no more than 15% sand. Absolute purity is not required, but an excess of solid particles that cannot serve as a binder in an aqueous solution is a factor sufficient to reject the material.
If there is no fatty clay, and there is no place to bring it from, then you can use another type. During preparation, it is soaked and aged. Usually they work like in the old days: they are soaked in the fall and laid in the winter. At the same time, make sure that the clay does not dry out. So it becomes plastic, and all the particles combine into a single mass.
Periodic freezing and thawing is allowed during the soaking process. This is even good, since moisture permeates the entire volume. The main thing is to make sure that the mixture does not dry out or crack. And to improve plasticity, lime is added to the composition in a ratio of 1:5. For one share of lime put 5 shares of clay.
How to lay a soft blind area around a well + video
Some “experts” argue that this type of protection against water pollution is an atavism and a relic of the past. In fact, such statements are justified by two tricks:
- Few people say that you need to wait two years and then start improving the well. This is in order to put the source into operation as early as possible.
- It is beneficial for them that the client contacts them every year. After all, as a rule, the same people are engaged in cleaning wells from dirt, and it is beneficial for them that garbage appears in the water as early as possible.
The technology involves laying a film that covers the soil a meter around the walls of the well. The overlap that is placed over the seam between the first and second ring should cover it. The cavity obtained after excavation of the soil is filled with clay. It cannot simply be filled in and compacted mechanically. It is better to see the installation technology.
Manufacturing
How to make a clay well castle with your own hands? When the clay solution is saturated with water, it increases several times. This increase depends largely on impurities and additives. This solution is the main material for the castle and it must have a dense consistency so that various shapes can be sculpted from it. The solution should not disintegrate in your hands or spread.
The clay castle around the well is made of a greasy consistency, sand in which should not exceed 15%. This is a very important point and you need to check the consistency of the clay for its fat content before making a clay castle for your well. Balls are made by hand from the tested clay and placed in the sun to dry. Then you should visually check their condition. If it is too cracked, it means that the clay solution is too greasy. If it has small cracks, then this consistency has a medium fat content. And if there are no cracks in the clay at all, then it is a thin clay consistency.
You can improve the water resistance of your clay by further processing it. To do this, soak the clay for a couple of days. Keep it under water outside, or in the open air in winter. Then the clay solution will soak and freeze. This is useful. To further improve the quality of the clay, you can mix it with slaked lime up to about 15% by volume.
The clay castle is designed as follows. It is laid horizontally. Such layers have the following parameters:
- bottom width – 0.5 m;
- width at the top – 0.2 m;
- thickness – 1.5 m.
The clay should be laid at a height of no more than 10 cm. It is also possible to lay the clay in separate layers. Such layers are prepared separately, then they are placed in a pit. You can also use a special lubricant that waterproofs the seams. The clay castle is a protection for the water in the well. This lock prevents various contaminants from entering the water.
Waterproofing a well using a clay castle
You can also use a clay castle with a special film, which is used to better eliminate cracks between the rings of the well. It must be taken into account that the clay solution can swell due to moisture and frost. This can negatively impact the water in your well. Therefore, to prevent this from happening, they do the following: they additionally make a sand layer to almost the entire depth of the castle. The width of such a layer should be 10 centimeters. And at the bottom of the castle there should be a layer of clay thickness, which should be from 10 to 15 centimeters. And only then should there be a sand layer.
Popular articles Causes of yellowing lawn grass and methods for solving the problem
You will have clean water in your well all year long. Therefore, if you are going to do it, it is better to do it efficiently and for a long time. Your well consists of concrete rings that are protected by a clay lock. This is a surefire way to keep your water clean and protected from any unnecessary dirt.
Blind area options
- Fill the clay castle with sand and gravel
. - Turf.
Layers of turf can be used as a blind area, but a prerequisite is the organization of a drainage system. - Tile.
Tiles are laid on top of the clay castle along the house. Having previously filled the base layer. - Concrete blind areas.
They are more expensive than the previous one and after a few years they will begin to let moisture through, even with additional reinforcement. Consequently, it will require replacement and additional costs.
To protect the foundation from destruction by groundwater and wastewater, you should organize a drainage system, build a clay castle and cover it with a blind area on top. If additional financial resources are available, it is possible to use additional waterproofing materials.
Foundations and walls of basements require mandatory waterproofing. Today there is a huge range of rolled and coating materials on the market, but once upon a time clay was traditionally used to protect the underground parts of structures from moisture penetration. Modern builders have not forgotten about clay castles built around the foundation, so the technology is still used to this day. But here we should not talk only about the Russian outback, since clay waterproofing is also popular in some European countries. The naturalness and high moisture resistance of the material ensure a fairly high demand for it, especially since the quality of clay castles has long been time-tested.
Properties of a clay castle
The main properties and technical characteristics of a clay castle include the following:
- The construction of a clay castle does not require repair work and lasts a long time;
- Clay as a building material has a good ability to keep water out, but absorbs moisture, so the way out of this situation is to use an additional layer of waterproofing;
- Clay is a mineral material that does not deteriorate and has no shelf life, and due to its plasticity, cracks do not form in the clay layer;
- This building material is inexpensive, so the cost of arranging a clay castle for the foundation is minimal;
- Due to the ability of clay to expand in volume when freezing, it is necessary that the walls of the base of the house have a smooth surface.
Any type of clay with a minimum sand content is suitable for constructing a waterproofing layer made of clay. It is recommended to use fatty clay, in which the sand content is no more than 15%.
Sometimes, in order to increase the performance parameters of clay, lime is added to it in proportion to the total volume.
Arranging a clay castle around the foundation
Like all construction processes, the construction of a clay castle is carried out in several stages.
Material selection
Choosing quality clay
A clay castle is made only from fatty clay, which contains no more than 15% sand. The use of loam is allowed, but this material requires pre-soaking for a long time. Bentonite clay, which practically does not crack and does not shrink, is very popular.
Clay preparation
High-quality clay mass is obtained after soaking the raw materials for one or two days. The readiness of clay for use is determined by compression; the material does not crumble. The ideal raw material is clay, prepared in the fall. It freezes well and is saturated with moisture, which makes the material plastic and homogeneous.
Construction of formwork
It is better to make the formwork of the adjustable type, since the width of the clay castle is arranged in the form of a cone: at the base of the foundation the layer has a thickness of 20-30 cm, and at the top at ground level - 40-50 cm. The walls of a trench dug under the clay castle can act as formwork .
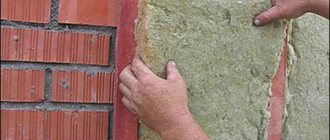
Laying clay
The material is laid in layers, and the thickness of each layer should not exceed 5-10 cm. The clay layer must be compacted and allowed to dry a little. To prevent the top layer of clay from drying out, use a plastic film to cover the clay castle. Neglect of this rule leads to the formation of cracks and subsequent destruction of the castle.
Backfill and blind area
The finished clay castle reliably protects against water, but it itself also needs protection. For this purpose, after about two weeks, backfill with soil is carried out and a blind area is built. Essentially, this structure is the top layer of a clay castle.
How to do it yourself
Scheme of a clay castle for a well made of concrete blocks.
A clay castle for a well from concrete rings should be built after the soil around the hydraulic structure has settled and stabilized. The soil around the reinforced concrete rings is removed to a depth of about 2 m, the width of the pit is 1 m.
The bottom of the trench should slope away from the well walls and be narrower than its diameter at ground level. Before laying clay, the bottom of the trench must be covered with a small layer of sand or pebbles. It is permissible to lay sand on top of geotextiles - it will strengthen the bottom of the trench.
Before placing it in the pit, the clay mixture should be moistened and thoroughly kneaded until it becomes plastic. The optimal moisture content of the material for making a lock is 15-30%.
The prepared mixture is placed in a trench in a layer no more than 15-20 cm thick and intensively compacted. The layers are compacted with a heavy tool with a small sole area. They are laid out one after another until the surface of the castle is level with the surface of the ground. A roller is built around the well above the level of the castle so that rainwater flows away from the walls of the shaft.
Carefully compacted clay does not allow moisture to pass through, but its surface becomes viscous after rains. A nearby blind area or pebble layer around the well will help ensure ease of use of the source.
To prevent clay heaving from affecting the integrity of the well shaft, the concrete rings are wrapped in a layer of non-woven material. In this case, the soil near the walls will be able to move freely up or down without affecting the structure of the well.
How to hide the lining of a decorative pond
In order to hide the pavement and create a solid base, you will have to make an unconventional decision.
First, the paved edges of the reservoir must be secured to a suitable foundation. If the soil is hard, the foundation can be a 15 cm layer of concrete placed on a flat and wide shelf, cut around the entire perimeter of the pond about 30 cm down from the top edge.
- In clay or soft soil, the side walls should extend to the bottom of the pond. You can place baskets for plants at different heights inside the pond.
- In soft soil or clay, this shelf should be located as close to the bottom or foundation of the pond as possible so that the wall can be built and the slabs placed on it. In this case, you need to build a wall of concrete blocks, not reaching approximately 15 cm from the depth of the intended paving.
To build a curved wall, the easiest way is to use half blocks or inexpensive bricks. Once the foundation is completed, the pit should be covered with a dense primer fabric or geotextile, extending to the upper edges of the reservoir, then lay the lining so that the shape of the foundation is clearly visible underneath. If this is not done immediately, then when water appears in the reservoir, it will pull down the lining, and with it the small walls formed from it at the top.
Popular articles Finishing a veranda with siding, step-by-step instructions for do-it-yourself cladding
Depending on the shelf paving material, a low wall of stone, brick or even block can be built to end just below the proposed paving. Under low walls and wherever there may be sharp corners or additional load on the pavement, additional geotextiles should be used. The picture shows how the pavement is raised and passes behind the low wall. Once construction is complete, consideration should be given to a spillway. Without it, the pool will fill to the edge of the pavement, and during a rainstorm, water will overflow the edges. A small pipe inserted directly into the wall and brought out through the lining of the pond under the pavement will help prevent flooding. In clay soil, any walls should be reinforced with sand or gravel to prevent movement. The lining is cut at the upper level of the low wall. In this case, when filling the reservoir with water, its level will have to drop by about 15 cm before a piece of rubber or film appears. In addition, you can stand on the edge of a pond without fear that it will slide down.
How to make a clay castle
The width of crumpled clay waterproofing depends on the depth of the foundation, and the size may be different for the upper and lower parts. With a standard depth of an underground structure of up to two meters, the width of the lock at the lower mark should be at least 40 cm, and at the top – at least 25 cm. Clay should be laid in pre-installed formwork in uniform layers of 5-10 cm with mandatory compaction of each layer. If the openings of the pit correspond to the size of the waterproofing lock, then the formwork can be abandoned.
The film will also be required upon completion of laying the clay waterproofing to the required level. The castle should be left covered for at least two weeks, after which it will be possible to begin constructing a blind area around the house.
The well was made for me by local craftsmen. Half of the wells in our SNT were dug by their hands. So I had a rough idea of what they were capable of, and I had neither the desire nor the time to look for someone on the side - autumn was coming, and I really didn’t want to leave the solution to this issue until next year.
It was clear in advance that there would be shortcomings, but I was ready to put up with this. One such defect was the absence of a clay castle. More precisely, what the workers did by filling the gap between the rings and the ground with clay could hardly be called a castle.
The main argument in favor of their technology sounded something like this: They’ve always done it this way, and everything was fine! They were not ready to create something more in line with the standards. Having come to terms with the situation, I decided not to argue, but to try to tackle the castle myself.
Clay castle. The construction of a clay castle is prescribed by the Sanitary Rules and Norms (SanPiN 21.4544-96, “Drinking water and water supply to populated areas”).
In paragraph 4.3.4. it says the following:
Along the perimeter of the well head there should be a castle made of well-pressed and thoroughly compacted clay or rich loam 2 meters deep and 1 meter wide, as well as a blind area of stone, brick, concrete or asphalt with a radius of at least 2 meters with a slope of 0.1 meters from the well towards the cuvette (tray).
The main function of such a lock is to protect the well from the penetration of surface water (the so-called high water) during rains and melting snow. Verkhodka is not purified by filtration through the soil and should not be used as drinking water. So I never had any doubts about the need for a lock. The question remained: how to do it?
Information on the topic obtained from available sources, primarily from the Internet, somewhat puzzled me. As it turned out, recently there have been many opponents of the construction of the castle.
They put forward as the main argument that in our climate, clay soils that find themselves in the freezing zone become very heaving—the soil that has frozen with the well trunk increases in volume.
This leads to rupture of the barrel, opening of the joints between the rings, and often to horizontal displacement of the rings. This happens almost every year, and in the end it becomes impossible to use the well - dirty water from the surface penetrates into it. That is, the castle not only fails to cope with the task, but also worsens the situation.
In Rus', a clay castle was used, for example, to protect cellars, cellars, and underground areas from water.
They also made a castle around the wells, and it did not seem to destroy the well itself. Why? This question remained not entirely clear to me, but one answer option more or less satisfied me. The fact is that in the old days wells were built in the form of wooden log houses. There were about a dozen interventional seams in the heaving zone, and when they opened evenly, each one accounted for only a few millimeters, which did not lead to depressurization of the well shaft. Today, most wells are made of concrete rings. The rings are most often connected to each other by a weak mortar seam, and in the heaving zone there is usually only one joint, which is not able to compensate for heaving deformations without being damaged.
To somehow reduce the risk of depressurization of the structure, there are various recommendations. For example, connect the rings more firmly (with steel plates, for example). But tightening the upper rings with metal pads, as a rule, does not help. The fact is that the forces acting during heaving are very significant and can deform even powerful fastening structures.
Other recommendations concern measures to reduce heaving forces. In this case, the well is considered as an unloaded foundation, and the same measures are applied to it as to foundations. Namely: replacing heaving soil around the well with non-heaving soil (essentially backfilling), insulating the soil and installing drainage around the well
Why do you need a clay castle?
The difference between concrete well structures is that, unlike wooden ones, reinforced concrete ones are harder to seal. And in order for the water to remain clean for years, you need to build a castle for the well made of clay. Wooden structures are mounted airtight, and the wood, after swelling, additionally seals the gaps. With concrete things are different.
There are special reinforced concrete rings on sale, the design of which has special cavities for filling with water-resistant materials. Seams and joints are coated with mastic.
But clay remains the most popular material because it:
- retains ground and flood waters;
- durable and does not require annual maintenance;
- It is inexpensive and accessible to everyone.
Clay castles around the well are effective protection of structures from melt water in the spring, and rain water during the warm season.
Where are clay castles used?
The technology is applicable to solve a lot of problems, the main ones being:
- Sealing the walls of wells from the ingress of groundwater containing contaminants that enter the upper layers of the soil. These can be mineral fertilizers, products of the breakdown of biological compounds and other harmful impurities.
- Construction of an artificial reservoir. A different problem is solved here. Water from the reservoir does not go into the ground. If it is expected that people will walk along the bottom, then the construction of a clay castle is necessary to make walking on it pleasant.
- When backfilling the foundation. This is necessary so that flood waters do not seep through the soil into the basement and do not insulate the zero cycle of the structure. The technology involves mechanical compaction.
In order for the blind area around the source to last for decades, the work must be completed two years after the installation of the rings. But during this period, you can use soft blind area technology. It involves covering the top layer with an elastic material that serves during the natural compaction period.