With the advent of plastic windows and sealed finishing materials, the problem of room ventilation has become more acute. Stagnant air accumulates dust, carbon dioxide, moisture and causes illness in residents, as well as mold and mildew on the walls and windows of the building.
Ventilation systems are much more effective at improving the microclimate than simple ventilation.
However, the energy consumption of the system can be quite significant, because in winter the frosty air needs to be heated before it reaches people. There are several ways to cut costs. Let's consider the most optimal one - how to make an air recuperator for a private house with your own hands.
The principle of operation of the recuperator
The internal design of the recuperator allows the temperature from the flow leaving the room to be transferred to the cold air entering from the street.
This transfer occurs in various ways, but in any case, through additional heat transfer material, so that the two flows do not mix (or practically do not mix).
How effective the recuperator is will depend on its design, the volumes it pumps through itself and the temperatures outside the window. But in any case, the figures are significant - from 50 to 91% savings.
The recuperator is useful at all times of the year - in cold weather it returns heat to the house, and in the summer, when it gets hotter outside, the flow is cooled and the load on air conditioners is reduced.
Principle of operation
Homemade equipment works by exchanging air flows among themselves. For example, with the onset of cold weather, the internal high temperature of the room affects the air masses entering from the outside. In the summer, with the advent of intense heat, the reverse process occurs. This is the main purpose of the installation called recuperator . The principle of its operation is as follows:
- room air moves along a pipe with a square cross-section;
- inflow air masses overcome their path in the transverse plane;
- there is no open contact between the cold flow and the hot one; they are separated from each other by special plate partitions.
Types of structures
There are several main types of recuperator designs:
- Lamellar.
- Rotary.
- With coolant.
- Tubular.
Plate - consists of assembled sheets of aluminum, which has the best thermal conductivity at an affordable price of the material. Easy to implement, no moving parts, inexpensive. Efficiency – 40-70%.
The rotary one has a rotating shaft powered by electricity and two channels with countercurrents. The air heats up part of the rotor, it turns and transfers heat to the cold flow in another channel.
The efficiency of such devices is usually higher, but:
- energy dependence;
- big sizes;
- difficulty of playback;
- complexity of repair and maintenance;
- and also that the flows are slightly mixed...
...make the rotor not so popular among consumers.
Options with coolant and tubular are even more difficult to reproduce at home.
Helpful information
To save under-ceiling space, you can install a roof-mounted heat exchanger. The structure is located on the roof, so it does not create discomfort for the owners. The efficiency of the device reaches 65%. Low monetary and operating costs will overcome complex installation processes using a fastening system.
Simple ways to improve the performance of the device:
- Aluminum, plastic or fiber filters built into the recuperator channels clean the incoming air from dust. These fragments become clogged quickly, so change the elements regularly.
- To prevent the supply fan from freezing, turn off the equipment from time to time. Frozen plates will thaw due to the escaping warm air.
Modern suburban housing is equipped with all the benefits of civilization, and the ventilation system plays a big role in this. It is she who is responsible for an optimal and healthy microclimate in the room. A self-made recuperator will help you save on energy and ensure a favorable atmosphere.
DIY air recuperator for home
The plate model is the easiest to make, so let’s look at it in more detail.
Pros and cons of a plate recuperator
Pros of the plate model:
- good efficiency;
- simplicity of design;
- availability of materials;
- energy independence;
- There are no rubbing elements, which means it will last a long time.
There are also disadvantages that you need to be aware of right away.
The main problem is icing in severe frosts. This is due to the fact that indoor air is more saturated with moisture than outdoors. Under normal conditions, this moisture falls into condensation, but in cold weather it sets, forming a layer of ice.
Several solutions have been invented to combat freezing:
- Automatic diversion of flow bypassing the plates to allow warm air to warm up the icing (during this period the room is not heated).
- Heating the recuperator to a temperature that does not allow ice to linger (efficiency decreases by 20%).
- Cellulose cassettes that absorb moisture, returning it through the adjacent compartment to the apartment. Humidifier effect + no condensation.
- The easiest way to make a “ground heat exchanger” in your home is to bury the supply pipe below the freezing level of the soil. The length of the underground air duct is up to 50 m. The intake increases efficiency, heats the flow in winter and cools it in summer, and this is an excellent way to combat ice.
We can say that cellulose cassettes are the best solution, because with their use, the recuperator operates in any weather, electricity consumption does not increase, and there is no need to arrange a condensate collector and its disposal into the sewer.
Supply ventilation is more effective than natural ventilation of the room, but the air coming from the street requires heating, which wastes a lot of energy. Supply and exhaust ventilation with heat recovery will help solve this problem. Let's look at the operating principle of this installation.
Read here which option for supply and exhaust ventilation with filtration is most preferable. Types of filters and their reliability.
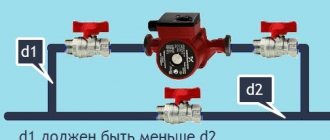
In winter, for the supply ventilation to work, it is necessary to heat the air coming from outside. Electric heating is an expensive proposition. But is there an alternative? Using this link https://microklimat.pro/sistemy-ventilyacii/kalorifer-vodyanoj-dlya-pritochnoj-ventilyacii.html you can get acquainted with such a device as a water heater for fresh air ventilation, which will help you save a lot.
Materials for production
What you need to prepare if you decide to assemble a plate recuperator yourself. Materials:
- Sheet metal (aluminum is best, but you can use roofing iron, textolite, getinax, or cellular polycarbonate). The thinner the metal, the better the heat transfer will be.
- Wooden slats for laying between the plates (technical cork or a simple cord are also suitable). Thickness 2 - 3 mm - the thinner the better. Width – approx. 10 mm.
- Sealant (non-acidic).
- Glue.
- Case material. It can be plywood, metal, MDF or a finished box.
- 4 flanges, the same section as the pipes.
- Mineral wool (4 cm thick).
- Corner.
- Hardware.
- Special fan or cooler.
The parts will be cut using a power tool.
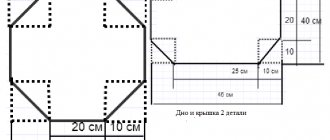
The width of the housing will be equal to the diagonal of the future heat exchanger, and the height depends on how many plates you plan to collect and how thick they will be together with the slats.
We make a recuperator for the home - product drawings
Squares with a side of 20-30 cm are cut from metal. About 70 pieces need to be made. If you cut several pieces at once, it will be faster and smoother.
The slats are dried and cut to the size of a square side (20 or 30 cm). The blanks are glued to two sides of each square and left until the glue dries completely. There is no need to glue slats onto one square.
The upper parts of the slats are coated with glue, and a sandwich is assembled from all the squares. Important! Each subsequent square must be rotated at right angles to the previous one. The channels alternate, lying perpendicular to each other.
Drawing of the heat exchanger of the recuperation unit
The top square is glued, without slats. Using the corners, the structure is pulled together and fixed.
All cracks are treated with a neutral sealant.
Fastenings for the flanges are made.
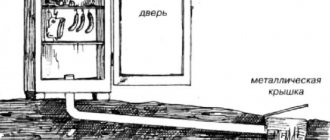
The heat exchanger is inserted into the housing. To do this, guides are made from angles on the walls of the building. The heat exchanger will need to be positioned so that its corners rest against the side walls (you will get a rhombus). Condensation will flow to the bottom. It is important here that two isolated spaces are created, and the air intersects only inside the plate structure.
A small hole is made into which a hose is inserted to collect and drain moisture.
Four holes are cut in the body for the flanges.
Installation diagram of ventilation with recovery
It would be great if there was a place for attaching filters at the entrance.
The walls of the building are finished with mineral wool.
Now you can install the fan and install the unit into the ventilation system.
Mount ready-made devices directly on the wall or in a special niche. The noise level depends on the power of the fans and the material of the air ducts. But, as a rule, it does not exceed the noise from the computer.
Self-production of a recuperator
Today on sale you can find various models of factory-made air recovery systems for a private home, which are distinguished by their build quality, have high efficiency rates, and their installation is not difficult. However, the high price of such equipment negatively affects its popularity on the Russian market.
Therefore, many domestic homeowners make their own heaters, which can be made from scrap materials using simple tools. You just need to think about the type of design, and also calculate the power of the installation, which should match the performance indicators of the entire ventilation system in the house.
The easiest way to make your own is a plate-type recuperator for a private house, which is characterized by its simple design and efficiency. You can find numerous designs for such equipment, which greatly simplifies the work; at the same time, it is possible to accurately calculate the power of a particular installation.
Advantages and disadvantages of a homemade recuperator
The advantages of homemade plate recuperators include the following:
- Long service life.
- Simplicity of the materials and functional elements used.
- Reliability of the design.
- Full autonomy and no connection to the power supply.
- High efficiency.
The only disadvantage of such heaters for the ventilation system is the likelihood of ice formation during severe frosts, which negatively affects the efficiency of the installation, up to the complete cessation of heating the air coming from the street. To solve such icing problems, it is necessary to additionally insulate the recuperator or install it in a warm heated room.
General concept of recovery
This is a process of partial recovery of thermal energy. During recovery, the cold flow entering the room from the external environment (supply) is heated by removing the exhaust warm (waste). Designs in which the designated exchange occurs are very popular today. They are called flow-through recuperators, or supply and exhaust type devices.
It should be understood that the flows removed and entering the room are not mixed. Complete 100% recovery is impossible in principle, even if an ultra-modern and advanced installation is used for these purposes. Typically, warm-up rates range from 60 to 80%.
This video will tell you how to make a recuperator with your own hands: