The floor in a wooden house is always a risk area for high humidity, since it is the lowest part of the structure, which is closest to the underground. Due to the temperature difference in the basement and in the house, condensation often accumulates under the wooden floor, which leads to an increase in humidity levels. And, as you know, moisture is detrimental to wood; damp wood is a potential source for the development of microorganisms, mold and fungi. A vapor barrier for the floor in a wooden house will help prevent such a scenario and extend the life of the structure. In this review, we will look at what materials are suitable for this work, and how to do it correctly.
Why is vapor barrier so important?
The floors of the basement and first floor are especially affected by moisture. Basement floors are often laid directly above the earthen floor, and therefore, during high water periods, they very often end up under water. Floors located on the first and basement floors of the house are exposed to condensation and water vapor coming from the basement. In addition, they are adversely affected by all household operations that increase the concentration of moisture in the indoor air: wet cleaning, washing, showering, etc.
This problem can be solved by laying a vapor barrier, which is a key layer in arranging and insulating the floor. It ensures optimal air exchange and protects the insulation and the floor itself from high humidity and water vapor. Vapor barrier will extend the life of not only the floor, but also the entire log house, but for this you need to choose the right material and do the correct installation.
Why does a floor need a vapor barrier?
High levels of humidity are one of the main factors that have a negative impact on any timber structure. The steam released during wet cleaning, while cooking food, when taking a shower or washing clothes tends to leave the premises. This is due to the fact that the steam pressure is much higher than atmospheric pressure, which leads to negative effects on the floors, ceilings and walls of the room.
If we look at what it is from a scientific point of view, it turns out that due to the temperature difference, pressure is the direct cause of the formation of condensation, which subsequently transforms into water and penetrates through the wood to the thermal insulation layer, thereby destroying it. Due to the fact that moisture gets there, the wood begins to rot, which leads to a significant decrease in its performance indicators.
Vapor barrier materials
The market for vapor barrier materials is quite wide. All of them are divided into three main types:
- Vapor-permeable protective films, which, in turn, can be reinforced or not, anti-condensation and regular, with or without perforation.
- Films with a reflective layer are well suited for wet rooms, basement and attic floors.
- Vapor-permeable membranes that provide effective protection of the floor from moisture and condensation, and do not interfere with air exchange taking place in the wood.
It is necessary to choose a vapor barrier for the floor taking into account the design and location of the floor, as well as the characteristics of the log house.
So, the vapor barrier of a wooden floor can be done with the following materials:
- plastic film;
- polypropylene film;
- glassine;
- diffuse membrane.
Polyethylene film
This is the most budget option.
The polyethylene film itself is fragile and breaks very easily. Therefore, to increase its strength characteristics, it is additionally reinforced with fabric or mesh. But even mesh-reinforced polyethylene film can be deformed during operation. One of the main disadvantages of polyethylene film is that it does not allow air to pass through, which creates a greenhouse effect in the room. Another disadvantage of such a vapor barrier is the flow of condensate drops along the film, due to which moisture accumulates on the floor.
Perforated and non-perforated polyethylene film is available. The first type has small holes through which steam passes; most often this type of film is used for waterproofing. Non-perforated film has low vapor permeability and is a good barrier to water vapor.
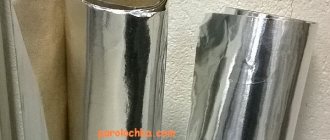
One type of material is polyethylene film with a foil layer that reflects infrared rays. This film provides good vapor barrier and can be used even in damp rooms.
Polypropylene film
This is a stronger and more durable material, which is easy to install and resistant to atmospheric factors.
Modern polypropylene films have an additional anti-condensation layer of cellulose and viscose, which absorbs and retains large volumes of moisture. Due to the good absorbency of the material, condensation does not form drops, and the absorbed moisture gradually dries out. There are polypropylene films on sale that do not have an anti-condensation layer. When they are used, condensation forms on the surface located on the insulation side, so they are not recommended for use on wooden floors.
Glassine
The material is thick paper impregnated with bitumen. Thanks to this impregnation, glassine retains moisture well. The vapor barrier does not interfere with air exchange processes and tolerates low temperatures well. If you are looking for an inexpensive vapor barrier material, you can take glassine into service.
It should be noted that this material is flammable and short-lived, so experts do not recommend laying it near wooden structures.
Diffusion membrane
Without exaggeration, this material can be called a new word in vapor barrier. It is easy to install, has a long service life, high strength and good vapor barrier properties. The membrane is made of non-woven artificial material.
There are two types of membranes:
- one-way, which discharge steam in one direction;
- double-sided, discharging steam in both directions;
Each type can consist of one or several layers, and the more layers, the greater the volume of moisture the material can retain. One of the disadvantages of a membrane vapor barrier is the high cost of the material, which will cost 3-4 times more than polypropylene film.
There are also smart membranes that independently regulate humidity and temperature, and in addition, are a waterproofing agent.
Vapor barrier with liquid rubber
For vapor barrier of the floor, polymer, bitumen material in the form of liquid rubber is used. At the very beginning, you need to open the bucket of mastic, then mix the contents and apply it to the surface with a brush or roller. When the material dries, a rubber film forms on the floor, which is firmly glued and follows exactly the surface relief.
This coating has the property of not allowing moisture to pass through in any form: neither water from above, nor steam from below. To create a vapor barrier layer for a wooden floor, you need to take 1 - 1.5 kilograms of solution per square meter. If you use liquid rubber for waterproofing, then it is recommended to use up to 3-4 kilograms per square meter. A film is formed with a thickness of about 0.7 millimeters.
Which side to lay the vapor barrier
When installing a vapor barrier, it is necessary to strictly adhere to the technology, otherwise the system will not function effectively. And here one of the important points is which side the vapor barrier sheet will be laid in relation to the insulation.
Which side to lay the vapor barrier
Not all manufacturers indicate this on the film or indicate this in the instructions, so you should adhere to the basic rules for installing vapor barriers:
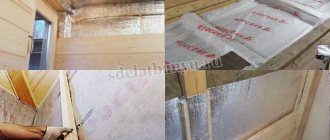
- The smooth side of the double-sided film is always placed on the insulation, and the rough side is on the outside. The fleecy surface absorbs and retains steam and moisture well inside, preventing it from passing to the heat insulator.
- Single-sided laminated polypropylene film is also laid with the smooth side inward and the woven side outward.
- Films with foil coating are placed with the aluminum side facing the room.
- When rolling out any rolled vapor barrier, the outer part is inside the roll, and the inner part is on top.
- If the two sides of the film are different colors, the outer surface will be the one that is darker.
- Conventional polyethylene films have two identical surfaces, so they can be laid on either side.
Which side to lay the vapor barrier on?
After installation of insulation is completed, vapor barrier work is carried out. Surprisingly, not all builders know which side to lay the vapor barrier film against the insulation. What can we say about “home craftsmen” in this situation? There is a general rule - the film is always laid with the smooth side towards the insulating layer, and the rough side - inside the room (attic) or outside.
But you don’t have to bother at all - large manufacturers always supply each roll with instructions. And to make it clear which side is which, they put pictograms. The problem only arises if the film has already been cut from the roll and the instructions have fallen out. But there is a simple solution: take a photo of the instructions from another similar roll on your smartphone.
How to distinguish the inside from the outside
Experienced specialists use other tips:
- the outer side is fleecy, the inner side is smooth. Easily identified tactilely, by touch;
- if the sides are of different colors, the lighter one is placed next to the insulation;
- when rolling out a roll, the inner side always faces the floor;
- the logo is always at the top;
- foil materials are laid with foil facing towards themselves.
If there are no marks at all on the roll, then it is a vapor barrier film, not a membrane. It doesn't matter which way you lay it, as it creates a barrier to steam in both directions equally.
How to check which film you purchased
When purchasing several types of film, sometimes it becomes necessary to find out what type it is. To do this, cut off a piece of material and take two glasses (two mugs). Boiling water is poured into one. The second glass is placed on top of the first, with hot water, previously covered with film. If condensation does not appear on the walls, turn the film over and place the glass again.
A dry surface indicates type B - the classic type of vapor barrier. If the walls of the container got wet only once - type A, one-sided membrane. The appearance of condensation twice indicates that the film is a waterproofing material and has nothing to do with vapor barrier.
Features of laying specific vapor barrier materials
Theoretical recommendations for vapor protection devices are discussed above. Many site visitors are interested in which side to lay vapor barriers of different classes or specific manufacturers:
- “Izospan AM” - laid with the brown (dark) side out, the white side facing the insulation;
- “Izospan B” - the smooth side should fit tightly to the insulation, the rough coating should face the inside of the room;
- polyethylene film is laid on either side;
- foil reflective vapor barrier (“Penofol”) is mounted with the metallized side inside the room (baths, steam rooms, saunas);
- membranes are laid in accordance with the pictogram printed on their reverse side;
- polypropylene with one-sided lavsan coating, the smooth side is laid against the insulation, the wicker side is laid inside the room;
- foil films in rooms with standard temperature conditions are laid with the metallized side facing the insulation.
What happens if you lay it on the wrong side?
Among experts to this day there is no single point of view on the processes occurring inside the insulation when laying vapor barrier material on the wrong side.
Some believe that condensation will begin to form not on the outside of the film, but in the insulation, causing destructive processes in it, while others believe that nothing bad happened and there is no point in rushing to redo the thermal insulation if a mistake was made.
There is generally an original explanation for the rough side - this is the result of joining two strips of vapor barrier film during the production process. It is easier to glue to such a surface, but additionally sanding the second side costs money. To explain this technological technique to customers, a fairy tale was invented about different sides of the film with different functions.
If we take anti-condensation protection as a basis, then those who claim that nothing bad will happen are right. But here the debating parties are missing one important point. The film is called windproof. And here there is a very big difference in how it is laid.
To make it easier to understand what we are talking about, you need to conduct a simple experiment: take a fabric with a pile on one side and alternately on each side, placing it tightly to your mouth, and blow through it. From a smooth side there will be practically no resistance, since the fibers flutter freely in the wind. From the pile side, everything is not so simple. You will have to make an effort, since the villi, pressing against the fabric, clog the pores through which air passes.
A simple experiment shows that it is still worth following the manufacturers' recommendations.
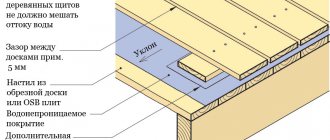
Vapor barrier layout diagram
Vapor barrier layout diagram
The main function of the vapor barrier film is to protect the wooden floor of the log house and insulation from the penetration of steam and condensation. In this regard, the vapor barrier must be located between the insulation layer and the finished floor.
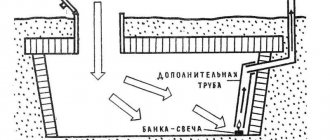
As a rule, two layers of vapor barrier are laid, the second layer is placed between the heat insulator and the subfloor. The bottom layer prevents moisture from the soil from penetrating into the structure. Often, instead of a second layer of vapor barrier, a waterproofing film is laid.
A lower vapor barrier must be done when the subfloor is located in close proximity to the ground or is located above a damp basement.
Installation
How to install a vapor barrier on the floor?
Most often they are laid as already described above: subfloor, waterproofing, insulation, vapor barrier and topcoat. However, sometimes a vapor barrier is placed on both sides of the insulation.
If the coating is installed in a newly built house, then there will be less hassle.
In the case where the old floor is being redone, you will have to disassemble it, remove the old insulating layers, assess the condition of the structural elements and, if they are damaged, replace them.
In both cases, if necessary, the floor is leveled horizontally and uneven surfaces are eliminated.
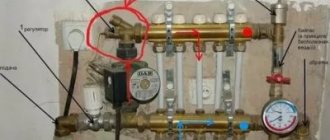
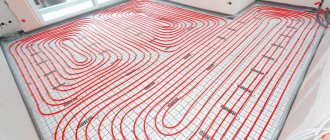
When installing a floor heating system, most experts also recommend laying a layer of vapor barrier between the pipes for water heated floors and the insulation.
Materials and tools for work
In addition to the vapor barrier film, the following materials will be needed to install a vapor barrier:
- double-sided adhesive tape for fixing the film;
- insulation, usually mineral wool is used for wooden floors;
- wooden slats for mounting the counter-lattice on top of the film;
- self-tapping screws for fastening the slats.
To perform the work you will also need tools:
- screwdriver for flooring and installation of sheathing;
- construction stapler for securing film.
Instructions for laying vapor barrier on the floor
Surface preparation
Before laying a vapor barrier on the floor, all wooden structural elements (joists, boards, bars) must be treated with antiseptic agents that will protect the wood from rotting.
If a vapor barrier is laid on an existing floor, you must first remove the finished floor boards and also remove all layers of previously made heat and vapor barrier. Then they remove debris, dirt and dust, carry out an antiseptic treatment of the wooden parts of the subfloor and install them in place.
Laying vapor barrier
Laying vapor barrier
The vapor barrier is placed in the gap between the joists. Before laying, the film must be cut into pieces so that it completely covers the vertical surfaces of the beam.
- The material is secured using a stapler in vertical sections in increments of 30-40 cm.
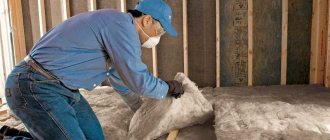
- Mineral wool or other selected insulation is laid on top of the film on the floor. We place the material very tightly so that there are no gaps between the slabs and at the junctions with the joists. The width of the insulation should be 20-50 mm less than the height of the log. This creates a ventilation gap between the heat insulator and the vapor barrier film.
- Double-sided tape is glued along the entire perimeter at a height of 2-3 cm from the floor. The protective layer is removed only from the side on which it is glued to the wall.
- A vapor barrier film is laid on top of the insulation. It is necessary that the pieces of material are approximately 5-6 cm larger than the space they cover.
- The top layer of vapor barrier must be laid across the joists. The edge of the film is fixed to the wall with tape, and the protective layer is removed from it.
- The film is stapled to the joists; it should sag slightly between the beams.
- The second sheet of vapor barrier is laid overlappingly on top of the laid film and glued with double-sided tape. All other sheets are laid similarly.
A counter-lattice is mounted on top of the vapor barrier, on which the finished floor is then laid.
By consistently following the instructions, you can install a vapor barrier yourself, but there are a number of nuances in this work that are known only to professionals.
carries out work on internal and external thermal insulation and vapor barrier of wooden houses. We accept applications from residents of Moscow and the region. The quality of our work has been tested over the years and is confirmed by positive customer reviews.
We are always in touch and waiting for your messages and calls, you will find our contact information on the “Contacts” page.
Calculate the cost of painting and insulating your home right now
Select types of work:
Select materials:
Laying vapor barrier material
There is no need for special knowledge when installing a vapor barrier floor. To install a vapor barrier with your own hands, they usually use film materials, which are an Izospan membrane, or Izospan V floor vapor barrier is used. The insulation is applied to the supporting frame, and it is worth making sure that the film sheets overlap each other. The width of this overlap should be about 15 - 20 centimeters.
To attach the vapor barrier layer, you must use galvanized nails or construction staplers, but if you follow the recommendations of experts, then it is better to use special adhesive tape. It allows you to create a coating that is completely free of any cracks.
If there are hard-to-reach areas, such as parapets, then it is best to treat them with bituminous coating materials, because it is very difficult and difficult to achieve high-quality and reliable installation, as well as fastening of film insulation in these places. After the insulation layer has been laid, it is necessary to secure the insulation over it. The insulation can be any thermal insulation material: for example, mineral wool or polystyrene foam. The main feature when choosing this material should be that it should fit tightly to the joists, and there should be no gaps or cracks between the insulation and joists.
After the first layer of insulation has been laid, it is necessary to lay another layer of vapor barrier membrane in the same way; this stage is needed to prevent moisture from penetrating into the insulating material inside the room. It is imperative to ensure that the floor vapor barrier is overlapped. After the process is completed, you can glue the joints and then begin the process of laying the main floor. When the installation of floorboards begins, it is necessary to take into account that a gap of about 1-2 centimeters must be left from the vapor barrier to the floor.