Making decorative items yourself is a creative and interesting process. It’s not at all difficult to make wall lamps with your own hands, which can beautifully complement the interior of the room, giving it, in addition to additional lighting, comfort and homely warmth. The convenience of making such crafts also lies in the fact that it does not require large material costs for the purchase of material. So, for example, you can make a wall sconce with your own hands even from improvised means that can be found in every home. In our article we will look at examples of independent design of wall lighting fixtures with examples of photos of finished samples.
DIY wall lamps: what you need to make
In order to make a sconce with your own hands, you need tools, a base, an electrical wiring system with a base and a bulb, and materials for the lampshade.
As for the tools, we will not list a huge number of everything that may be needed in one case or another, but will only talk about the basic ones that will come in handy one way or another, namely: office supplies (pencil, rulers, eraser, possibly a compass);
- roulette;
- jigsaw or fine file;
- a drill with drills to install a wall sconce with your own hands;
- a heated glue gun (it glues a variety of materials much more firmly than any other);
- scissors;
- paint or colored spray can.
DIY wall lamp: making a frame
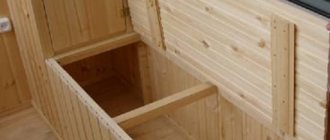
The basis for the lamp will be a round or square board cut from an MDF sheet. It should have the dimensions of the future sconce with your own hands (photos are presented in the article). It is also necessary to make slots in the base for installing light bulb sockets. Their number will depend on how bright the lighting should be. When making slits, be sure to take into account the thickness of the bulbs in order to correctly calculate the distance between them.
It is also necessary to cut out the sidewalls for the perimeter of the base, and make a small gap in the bottom of them in order to pass the electrical wire. The sides are fastened with self-tapping screws, the places of the caps are covered with putty. It is advisable to use sandpaper to ensure even grouting. DIY wall lamps can include color design. The entire frame can be initially coated with a primer, which will ensure a long service life and painted in the desired color.
Fasteners or hooks are installed on the back of the side parts, with the help of which the lamp will be mounted to the wall.
Night light on the wall
Sconces are not always used for reading; sometimes this lamp plays the role of a night light in a children's room or bedroom. In this case, the light from it should be diffused and not directed. In this case, instead of a lampshade, you need a screen to block the light source.
It can be made from any sheet material: fiberboard, plywood, acrylic glass and even thick cardboard. The most interesting thing in making such lamps is the choice of screen shape. It can be any geometric figure, a flower, the sun, a cloud, or even the figure of a cat or other animal.
Sconce "Cat"
You can make your own drawing or find a picture you like on the Internet, enlarge it and print it. And then trace along the contour on the selected material. For example, let's take a simple cloud shape that will fit perfectly into a nursery.
Sconce in the form of clouds
| Step by step photos | Description |
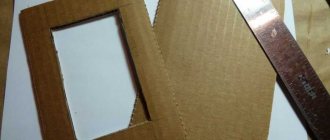
Step 1 | In addition to the cartridge with a wire and plug and the material for making the screen, you only need universal glue, paint and brackets for attaching the structure to the wall. |
Step 2 | We cut out the drawing or its printout, put it on plywood or fiberboard and trace it along the contour. |
Step 3 | The design transferred to plywood must be cut out with a jigsaw, and then the edges must be carefully sanded with sandpaper and painted on the front side. |
Step 4 | Metal or wooden corner brackets can be glued to the back of the cloud. Or come up with your own way of attaching the screen to the wall. |
Step 5 | A socket with a light bulb and an electric wire is also attached to the wall using a bracket. |
Step 6 | All that remains is to install a screen opposite the light bulb, and the lamp can be used. |
Advice. This design can be slightly changed by drilling through holes in the screen, and hiding the mount and the light bulb behind the walls glued along the perimeter. Instead of a regular light bulb, you can use a rechargeable LED lamp, a garland or an LED strip.
Wooden sconce with LED lighting
We equip the lamp on the wall with our own hands with electrical wiring
For electricity supply equipment, you will need a power cord with a plug and a switch (you may have to buy one or use one left over from a non-working lamp). The socket can also be removed from obsolete lighting fixtures.
DIY wall lamps, or more precisely, their lampshades, are often made of flammable materials such as fabrics, paper, threads, etc. In order to avoid fire, it is worth using energy-saving fluorescent light bulbs, which have high luminous efficiency with low heating.
Light bulbs with sockets are attached to the finished frame, the wire is routed through the equipped hole. At this point, we can assume that the DIY wall lamp is half ready. Now it’s time to start making the lampshade.
In what interior should I use it?
Homemade lamps can transform the interior of any room and emphasize the high taste of the owners of the room. Depending on the purpose of the room, its size and interior features, it is necessary to choose the appropriate type of lampshade.
In the bedroom
Every person spends a lot of time in the bedroom. This part of the room is considered a personal comfort zone, where people relax, communicate with loved ones or do what they love. Therefore, the issue of interior decoration must be treated with full responsibility.
When it comes to choosing lamps, the first thing you need to consider is the style of the room. If the bedroom is designed in high-tech style, it is better to decorate homemade floor lamps with monochromatic elements in a minimalist design.
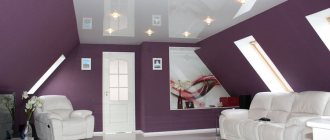
In the living room
The living room is a room where you invite your guests and spend time with your family. To emphasize the elegance of the interior, you need to use beautiful homemade lamps. The body is painted in light colors, and the top is covered with an interesting pattern. In the design of floor lamps, you can use contour or aerosol coloring compositions.
In the hall
The hallway is deservedly considered the calling card of every home. Its interior reflects the taste preferences of the apartment owners and influences the overall idea of housing. If the room is not large, it is better to decorate it with light decorative elements. A few wall lights with a minimalist design will look beautiful when paired with light colored walls. They will give the interior airiness and additional comfort.
There are many options for creating beautiful lamps from improvised materials. And if you show a little imagination, effort and time, you can make a stylish and original decorative element that will transform the interior beyond recognition.
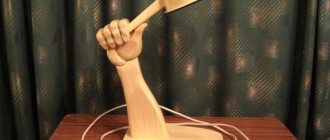
DIY wooden wall lamp
After pruning large trees, various branches and snags remain, which can be successfully used to decorate wall lamps with your own hands. The photos show how a seemingly ordinary piece of driftwood turned into an elegant sconce. To do this, all I had to do was cut and sand the points, and make a hole inside for the electrical wire.
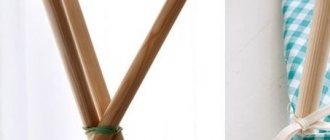
Another way to make a spectacular sconce out of wood with your own hands is to decorate it with grapevine branches, arranging them in different sequences. This lamp will become a real decoration for a room in eco style.
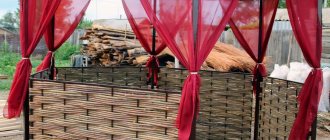
Beautiful DIY wall lamps (photos below) can be made from wicker. They can be made in different weaving methods, but for beginners it’s worth starting with simple designs.
DIY sconce with thread lampshade
It is quite easy to make such a lamp for the wall with your own hands. To do this, you need to have a thick thread of any color (you can take white and paint the finished structure in the desired color), PVA glue and a balloon. The technology is very simple. First of all, we inflate the ball to the size that the lampshade should have and tie it tightly. We first soak the threads in glue, and then, having attached the tip to the base, we begin to wrap them around the ball in a chaotic manner. The winding density can be anything, it all depends on how bright the lighting should be emitted by the DIY wall sconce.
Having finished the winding, you can once again coat the entire workpiece with glue with a brush and hang it to dry. We remove the ball from the completely dried workpiece - to do this, it must first be burst. The lampshade is ready. If necessary, it can be painted in any color using spray paint. It is noteworthy that with such a do-it-yourself sconce (photos are presented in the article) you can emphasize any interior style, depending on the color of the lampshade: white will suit minimalism, black will highlight high-tech, bright yellow or red will complement modernism, etc.
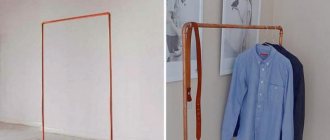
Sconce in loft style
The next option is for real men. Since for the manufacture of this brutal lamp you will need steel or copper water pipes, threaded fittings, valves and flanges. Although ladies can also quite cope with its creation if they are not afraid to get dirty.
Copper pipes and fittings
First, you need to come up with the type and shape of the lamp, decide on the number of arms and select the necessary parts for the intended design: bends, tees, elbows, couplings, etc. It is best to take ½ or ¾ inch fittings, and use inch adapters to attach the cartridges.
Retro loft sconce
Sconce from a water pipe
Step 1. Degrease the prepared parts using acetone or white spirit, wipe dry and dry.
Make sure that the parts match the threads
Step 2. Cut the wires of the required length in an amount equal to the number of lamp horns.
Wires run through pipes
Step 3. We weld to the bracket, which will serve as the lamp’s leg, a coupling for attaching it to the wall.
Lamp base
Bottom view
Step 4. We twist the fittings together in the intended sequence, wrapping FUM tape around the threads for strength and evenness of the connections.
Step 5. Pass the wires through the cavities. If the sconce will consist of several horns, it is better to do this at the initial stage of assembly and separate them after attaching the tee.
Socket and lamp
Step 6. Adapters for a larger pipe diameter are screwed last onto the ends of each branch. It is advisable to immediately select suitable cartridges for them so that there are no problems later.
Step 7. Paint the finished structure with metal spray paint and leave to dry.
Step 8. If desired, decorate the lamp with bronze or gold paint, applying it with light strokes in one direction and shading with a sponge.
Lamp assembly
Step 9. We strip the ends of the wires protruding from the adapters and attach them to the sockets. Depending on the type and diameter, the cartridges can be screwed or glued into the threaded part of the adapters.
Step 10. Screw in the light bulbs, hang the sconces on the wall and connect the wires with external wiring to the switch.
Sconce made from water pipes
Video – Lamp in LOFT style
Using the same principle, you can make not only sconces, but also table or ceiling lamps.
Table lamp
Ceiling chandelier
DIY wall lamps made from ribbon
In order to make such a lampshade, you first need to make a frame from strong wire with a large lower and smaller upper ring. Having secured one end of the tape to it, we begin to wrap it around the entire frame in a circle. In this case, the fabric is wound tightly so that there are no gaps. You can decorate a finished wall lamp with your own hands with various small elements: make a pattern of buttons, attach paper butterflies, etc.
If desired, the lampshade can also be covered with fabric. It is better to use an opaque material such as cotton, taffeta, dark silk, etc., so that the wire frame is not visible.
There are many ways to make sconces with your own hands from scrap materials. In addition to those listed, there are also products made of wire, lampshades made of beads, knitted, etc. In this process, you can use almost any material, you just need to use your imagination and creativity.
Stages of lamp manufacturing
Tools
As a standard, to make your own wall lamp you will need the following list of tools:
Depending on the type of sconce, the list varies, something is added, but it is better to always have these items on hand.
Frame
First you need to make a frame. Of course, its dimensions must correspond to the dimensions of the future sconce. Everything needs to be calculated and outlined on preparatory drawings. It is worth making holes in the frame for cartridges.
It is necessary to calculate the thickness of the cartridges and the distance between them down to the millimeter. The more cartridges, the brighter the lighting will be.
Assembly
In addition, you need to make side parts for the perimeter of the base. The wire will pass through the hole in the bottom side panel. It is best to attach these parts to the frame with self-tapping screws. At the back of the sides there are hooks or other fasteners for hanging the lamp on the wall.