Pros and cons of homemade lanterns
A DIY bottle lamp has several advantages over purchased analogues:
- It's simply cheaper.
- Raw materials that need to be recycled are used and given a “second life”.
- Making a lamp is not as difficult as it seems. All you have to do is not deviate from the instructions.
- Your own design vision is realized, in all the details, instead of searching for the right lamp in stores.
The disadvantages are also not a revelation:
- Glass should be handled with extreme caution.
- Cutting yourself with plastic is also much easier than it seems.
- Any deviation from the manufacturing algorithm may result in the lamp simply not turning on.
Master class No. 3: Table lamp from a bottle
How to make an inexpensive table lamp for the living room or bedroom, watch the next master class.
We will need the following:
- Glass bottle;
- Patch;
- Diamond drill;
- A small lamp on a long wire with a switch;
- Shade;
- Protective gloves, glasses and mask;
- Unnecessary towel;
- Screwdriver.
Lamp manufacturing process
- We mark a hole on the bottom of the bottle for wiring . We put a patch on this place and put on protective clothing.
- How to drill a hole for a cord: put the bottle in a towel and start drilling a hole with a diamond drill. Drilling can take up to half an hour.
- Peel off the patch and labels by soaking the bottle in hot water.
- Using a screwdriver, carefully disassemble the lamp, being careful not to damage anything.
- We insert the wire into the hole in the bottle and stretch it to the neck. We put the lamp back together and attach the lampshade to the neck.
The economical original table lamp is ready!
Choose a craft you like, call the kids and give them unforgettable creativity lessons, when it would seem that you can create something incredibly interesting from seemingly unremarkable individual objects!
Even more Master classes: how to make a table lamp with your own hands - see the link!
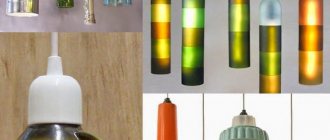
Types of bottle lamps
On the table
Most often, the bottle plays the role of a table lamp. This does not only mean a floor lamp with a lampshade. Sometimes the container itself is enough. If you place a garland, LED strip or something like that inside, you get a finished table lamp. The main difficulty in manufacturing is to properly make a hole for the wire.
Here the bottle serves as the basis for the lampshade.
On the floor
Plastic is usually used for floor lamps. This could be, for example, petals from a bottle forming a lampshade. In addition, fragments of plastic containers themselves can become the “legs” of a future lantern.
To the ceiling
A wine bottle chandelier is an original and stylish solution for any room design. Moreover, there can be not one container, but several. The main thing is to hang the lamp securely to minimize the risk of glass falling.
On the wall
It will be extremely difficult to make a complete sconce, so it is better to get by with a lampshade from an ordinary glass bottle. The traditional green color of glass works well. The lampshade is installed on a frame from an old sconce.
Outside
Beautiful lamps for the street.
Outdoor lamps made from bottles with your own hands, unlike store-bought counterparts, are more resistant to the sun and constant precipitation. A good life hack is to equip such a lamp not with a lamp socket, but with an LED flashlight. It will charge from the sun and turn on automatically when it gets dark.
Advice. It is better not to paint bottle lanterns for the street, and if you paint them, then use a material that is highly resistant to moisture and the sun.
How to make a chandelier (master class!)
The main lighting fixture of the house is the chandelier. You can make it from an ordinary glass bottle. The main thing is that it will be exclusive.
To create such beauty you will need:
- bottles (size and quantity depends on the preferences of the owners);
- protective equipment (goggles, mask and gloves);
- glass cutter and sandpaper;
- screwdriver and wire.
Necessary materials
Having the necessary tools and materials at hand, you can begin the actual production of the chandelier:
1. Soak the bottle in water . This will make it easy to remove labels and debris. After cleaning, the container must be thoroughly dried.
We wash bottles and remove labels
2. Make a cut of the bottle . The glass cutter is installed at the required level. Cutting is carried out slowly, which will allow you to get an even cut line. When working with a cutter, you must wear protective clothing only. If you don’t have the necessary tool at hand, cutting a glass bottle can easily be done with thread. The video below clearly demonstrates this.
We cut the bottle
3. Now the bottle is placed under the tap . Turn on the hot water and keep the workpiece under it. Hot water is alternated with cold. As a result of sudden temperature changes, the unnecessary piece will fall off exactly along the cut line.
Processing glass under water
4. The cut area is treated with sandpaper. The cut should be even and smooth.
Related article: How to make wedding cards yourself: gift and invitation cards
Sand the edges with sandpaper
5. Use a screwdriver to disassemble the lamp. The wire must be carefully pulled out and passed through the neck, put the lamp back together and check its operation.
We stretch the wire through the bottle
6. All that remains is to decorate the lighting fixture. For this, ordinary wire is used. Starting from the neck, we wrap it around the bottle. Any material is used for this. This can be regular black or colored wire.
Decorating the bottle
The chandelier pendant is ready. All that remains is to install it. If desired, the product can be painted and given any design. The main thing is that it blends organically with the interior of the room.
Chandelier made from glass bottles is ready
A good solution would be to use glass stone. It should be taken into account that the light transmittance of the product will decrease slightly. Stones of various shades are used for decoration. You can combine several shades. The main thing is that the lamp looks organic.
Bottle decor with glass stones
The stones are attached to the glass using glue. The lamp can only be used after it has completely dried. This will take no more than a day. Complete drying of the glue will ensure reliable adhesion of the stone to the surface. It is better to use an adhesive composition that can withstand temperature changes.
Video: how to cut a glass bottle with thread
7 interesting lamps made from bottles: step-by-step instructions
Desktop
The diagram for making a table lamp from a glass bottle is as follows:
- Determine the place on the workpiece for the wire, mark it with adhesive tape or other adhesive material.
- Place the bottle lying down and make a hole with a diamond drill.
- After this, the container should be kept in water (preferably warm) to remove all remnants of the label and dirt.
- Carefully pull the wire through the hole to the neck, and then bring it to the cartridge.
- Securely attach the lampshade to the neck. That's it, the bottle table lamp is ready.
Loft style
There are many options for industrial-style bottle lamps. You can, for example, hang a rectangular frame divided into many sections, and in each of them place a bottle with a lamp inside, of the same color or different.
These same containers can be attached to the platform.
Another option is to install a bottle-shaped lampshade on the pipe structure. The main thing is that the same adapter is selected for its thread.
Chandelier
An original and stylish hanging chandelier from a wine bottle is not difficult to make - just follow the algorithm of actions.
- Soak the workpiece in water, remove fragments of labels, then wipe thoroughly dry.
- Use a glass cutter to make a cut line on the bottle. The cut is made transversely. The work must be carried out without haste, so as not to disturb the evenness of the line.
- In order for the unnecessary half to disappear, the workpiece should be placed under water and alternating hot and cold temperatures. The bottle will split clearly along the line.
- To give additional smoothness and evenness to the cut, its edges are treated with sandpaper.
- A wire is pulled into the neck and connected to the cartridge.
Plastic lamp (MK)
Plastic bottles are also widely used to make lamps. The peculiarity of this product is its ease of fastening and lightness. It’s easy to make such a lamp from plastic bottles with your own hands. Today, there are several technologies that are used to create original lighting devices. Let's start with a simple method.
To make a lamp you will need:
- 5 liter plastic bottle;
- stationery knife;
- glue;
- disposable spoons.
1. Using a knife, cut off the bottom . The cut should be smooth. This will make decorating easier in the future.
2. The handles are cut off from the spoons . Using glue, the convex parts are glued to the workpiece. You need to start from the neck. Each subsequent row should overlap somewhat with the previous one.
3. The neck is closed with a ring of spoons, or for this purpose you can use parts from an old chandelier.
4. Next, a light bulb is placed . The DIY lamp is ready. All that remains is to secure it.
There are other options for making a lamp from bottles with your own hands. Bottle bottoms would be a good option. They look like 5-leaf flowers. The blanks are fastened together with nylon thread or rope. For this, bottles of various colors are used. The main thing is that the product looks organic and fits easily into the interior of the room.
Plastic bottles can be used to make shades for table and floor lamps. Using a stationery knife, the bottoms are cut off and fastened together with nylon thread. The result should be a ball with a hole for the cartridge. Finally, the joints are carefully sealed with silicone. This will close all the cracks. Lampshades are made in various shades. This will allow you to create a lighting device and decorate your home with it.