Main material: chipboard
Wood in its pure form is practically no longer used in cabinet furniture; solid wood is considered an expensive luxury material.
Now wood is being replaced with a cheaper material - laminated chipboard (abbreviated laminated chipboard). Most often, these boards have a thickness of 16 mm; chipboards with a thickness of 10 and 22 mm can also be found on sale. 10mm sheets are typically used to fill wardrobe doors, and 22mm sheets are used for bookcases and shelves where high bending strength is required. Also, sometimes the structure is decorated with elements made from 22 mm laminated chipboard.
Almost all furniture parts are made from 16 mm laminated chipboard (except for doors and facades).
Laminated chipboard
Laminated chipboard is cut on special machines along guides. Of course, you can saw it off at home using a jigsaw, but then there will be chips and wavy irregularities on the edges. It is almost impossible to saw off chipboard evenly with a jigsaw at home.
Edges
The most vulnerable place of laminated chipboard is when it is cut down. It is the easiest way for moisture to penetrate inside, so if the protection is poor, the ends may soon swell. Therefore, the ends are closed using edges; there are several types of them.
- Melamine edge is the cheapest, but of poor quality. You can stick it on at home using an iron.
Melamine edge
- PVC edge 0.4 and 2 mm is the best option. It can only be glued on a special machine, so it is done immediately when ordering a cut. To save money, 0.4 mm is glued to the invisible ends, and 2 mm to the external ones, which will experience constant loads and friction.
PVC edge 2 mm
- ABS edge is similar to PVC, but made from environmentally friendly material.
- Mortise T-shaped profile - inserted into a groove previously made with a milling cutter. Rarely used.
Mortise T-profile
- Overhead U-profile - can be easily glued to liquid nails at home. The main disadvantage is that the edges will protrude a few millimeters, so dirt will get stuck under it. On the other hand, this drawback allows you to hide a poor-quality cut.
Overlay edge
Article on the topic: edging laminated chipboard.
DIY furniture: drawings and diagrams for making a durable and beautiful product
To make furniture with your own hands at home, you will need a drawing. You can develop it yourself or look for a ready-made solution among publicly available documents. The first option is preferable, as it allows us to produce a unique product adapted to the needs of a specific family and the conditions of future use.
A ready-made drawing will allow you to quickly make a chair
Making furniture with your own hands can be done in different ways. It all depends on the material used and the method of connecting the individual elements. The dimensions and configuration of products are directly dependent on the location of their installation. Operating conditions also determine the type of finish used and the required level of protection from external factors.
An individual approach is required
Many people find interesting ideas for making furniture with their own hands on specialized forums and in social networking groups. Beautiful pictures are often accompanied by a detailed master class, which can be easily adapted to produce a product of the desired shape and size.
A detailed master class will facilitate the process and improve quality
No idea? Studying photos of wooden furniture with your own hands
It can be quite difficult to start making furniture with your own hands from wood. Especially in the absence of a sample. In this case, it is worth looking for an analogue that will be easy to adapt for certain operating conditions.
Possible idea for subsequent implementation
When deciding how to make wooden furniture with your own hands, you should decide on the place where it will be installed. For the garden you will need one bench, which is not at all suitable for a children's room or kitchen.
The chair is too big for an apartment
For your information! By paying attention to detail, you can get a beautiful product that can last a long time.
Can't do without decor
We make garden furniture from wood with our own hands
It is customary to use inexpensive furniture to furnish a country house and the surrounding area. If desired, it can even be made from scrap materials. These can be pallets that are quite large in size.
Pallets are an ideal material for making garden furniture
Such products are usually left over from building materials, such as blocks, and can become a suitable blank for a table or sofa. Pallets are often sold in specialized stores. Their cost is much lower than the cost of solid wood, and therefore such a purchase can safely be called profitable.
The garden should be cozy
The surface of the pallets is not continuous. They consist of boards nailed to the frame at intervals equal to half the width of the board. The height of the side can vary from 10 to 14.5 cm. The size of the pallets may vary. Dimensions depend on the place of manufacture. The European standard prescribes the use of pallets measuring 0.8 by 1.2 m. Very often a solid board is attached. Domestic analogues are slightly wider: 1 by 1.2 m.
The appearance of the pallets may vary
Pallets should be treated before furniture assembly begins. To do this, after removing all contaminants, the product is dried and sanded.
Advice! To avoid accidentally driving in a splinter during operation of the finished product, all pallet boards should be coated with paint and varnish. Typically this is done after assembly.
Pallets need to be painted
If you decide to give preference to solid wood, you should choose hard rock. To make supports, it is better to use rounded pine. The remaining surfaces can be formed using boards. The finished product is sure to last quite a long time.
Solid wood products look expensive
According to the drawings, garden furniture made of wood is made by hand, taking into account the features of landscape design. Attention should be paid to the configuration of future products. They must fit harmoniously into the surrounding space.
To increase the service life of DIY wooden garden furniture, all elements should be treated with special compounds. The antiseptic will prevent wood rotting and abrasion in the event of mechanical impact.
Advice! To make the use of a chair or bench comfortable, the seat should be secured with a slight slope towards the back.
The tilt of the seat will make the chair comfortable to use
Related article:
In our review we will find out how to construct a garden bench with a backrest with your own hands . Drawings and detailed photos will allow you to make the best design.
Video: DIY wooden garden furniture
Options for making children's furniture from wood
Products that are planned to be installed in a children's room are subject to increased safety requirements. They should also look nice to attract the child's attention. As a rule, do-it-yourself children's furniture made of wood is made from solid wood. This allows us to obtain high-quality products with excellent technical characteristics.
A car-shaped bed is every boy's dream
There are always a lot of dolls in a girl's room. To accommodate them, you can make a unique house, which will undoubtedly become one of the main decorations of the interior.
A dollhouse is every girl's dream
Options for making your own wooden gazebo furniture
Using solid wood to make a table and benches, you can create a beautiful set of gazebo furniture.
Matching gazebo kit
If the square of the building is relatively small, and you want to manage it wisely, you should pay attention to folding products. When assembled, they take up little space. When unfolded, it allows you to sit comfortably.
Folding furniture is a suitable solution for a gazebo
Bench configuration and color may vary.
Dark tone is always relevant
Options for making your own wooden garden furniture
It’s easy to make a country house cozy. To do this, it is not necessary to purchase new material. You can use wooden boxes. By purchasing additional accessories, you can make a stylish coffee table.
It’s not difficult to make a stylish table
To have a place to sit, it is worth making upholstered furniture. The frame of the sofa should be cut from durable wood so that it can withstand the operating load.
Upholstered furniture will be durable and beautiful
When making your own wooden country furniture from a photo, you should pay attention to the possibility of choosing upholstery and finishing. In this case, the finished chair can become a serious competitor to expensive products from elite manufacturers.
The type of upholstery is very important
Options for making your own furniture for a wooden bathhouse
Considering the special operating conditions, it is better to use hard wood for the manufacture of such products. You should immediately discard coniferous varieties, as resin may appear on the surface of the finished product during use.
A wooden pad will make washing more comfortable
To store things in the dressing room, you can make a bench with drawers. The standard height will be enough to accommodate most bath accessories.
A slight slope at the boxes is required
After the bath, many gather in the relaxation room. By making a bench, table and hanging shelf from high-quality wood, you can relax comfortably after bathing procedures.
The furniture set must be suitable
Advice! Apply a special protective compound to slow down the rotting process in conditions of high humidity and significant temperature fluctuations.
Options for making kitchen furniture
A kitchen set must have a number of properties. On the one hand, it should be beautiful, on the other – functional. For those who do not like ornamentation and sophistication, you should definitely make kitchen furniture from wood with your own hands without any finishing. This set would look appropriate in a private or country house.
Simple and functional solution
If this option seems too simple, you can transform the set by decorating the kitchen façade made of wood with carvings yourself. What pattern will be formed is not important in this case. In any case, the finished product will turn out beautiful and non-standard.
Option for decorating the kitchen facade
If the room area is limited, it is worth considering the option of making a desktop with a special niche for the table at which the family will have lunch.
A special niche will allow you to rationally manage space
Facades
Kitchen fronts and furniture doors are usually made of more elegant material. But if you are making a drawer door inside a sliding wardrobe that no one will see, you can use regular 16 mm laminated chipboard with a 2 mm PVC edge for it. But the cabinets in the kitchen should look more presentable.
The facade is a separate furniture element. It is usually made to order. If the dimensions of the facades are non-standard, their production may take several months.
You can easily navigate the standard dimensions: usually the facades are made 2 mm smaller than the cabinet itself on each side. Therefore, for a standard 600 mm cabinet, a 596 mm façade is used.
The height of the kitchen cabinet also depends on the facade and ranges from 715 to 725 mm for floor cabinets (without legs) and low wall cabinets, and 915-925 mm for high wall cabinets.
Standard front sizes for kitchen cabinets
Types of facades
Since facades serve mainly a decorative function, the choice is huge; they differ in appearance and material.
- Facades made of laminated MDF. This is a pressed material, more moisture-resistant and dense compared to chipboard. Most often, the surface is laminated to look like wood. But no matter how strong the film is, over time it can come off at the edges and crack. The main advantage of this material is its low price and fast production.
MDF facades
- In addition to standard blank facades, there are also options with figured cutouts for stained glass. The glass is attached to the cover on the reverse side.
- Softforming - such facades are similar to ordinary MDF, but have a characteristic two-color layout with relief on both sides. They can only be used in dry rooms, bedrooms or living rooms.
Softforming
- Postforming – even higher quality and durable products. Thin plastic at the edges is wrapped 90° or 180°, thereby eliminating unnecessary seams at the corners. Chipboard or MDF boards are used as the base. Typically, postforming is done in a strict form, without unnecessary pretentious decorative elements.
Postforming
- Plastic facades are of high quality, but expensive. They consist of a base (chipboard/MDF) lined on both sides with thick plastic. They always have a strict design and a flat surface, glossy or matte. The edges of the slab are sometimes protected with ABS edges or aluminum profiles. Super-glossy acrylic plastic has been especially popular lately.
Plastic facades in aluminum profile
- Facades made of wood and veneer are suitable for lovers of natural materials, but they are expensive. In addition, there is a long debate about environmental friendliness: there is an opinion that there is so much varnish and impregnation that there is only one name left for the tree.
Wooden facades
- Painted facades to resemble enamel. They have a significant drawback - the surface is vulnerable to scratches and deformations, and has low chemical resistance. They used to be popular due to their rich color, but with the advent of glossy acrylic plastic, everything changed.
- Aluminum facades with glass are suitable for a high-tech kitchen. They look modern, but are difficult to manufacture and install. Non-standard fittings are used for their fastening.
Master class on making simple models
Anyone can make furniture with their own hands. If you have the necessary tools at home, you can try to make an unusual shelf, table or sofa. , diagrams, drawings, list of materials and tools are freely available If you follow all the recommendations and take a responsible approach to the implementation of the idea, the homemade design will turn out no worse than the factory one, but will cost much less. The advantages of making furniture with your own hands are the ability to choose the size, type of material and color so that the finished product fits perfectly into the interior of the room. If you use your imagination, you can realize any model with an exclusive design. But how long it will take to make furniture with your own hands depends on the complexity of the chosen design and the level of skill of the home craftsman.
Below are fairly simple master classes with a step-by-step algorithm of actions. After familiarizing yourself with them, even novice furniture makers will be able to make a beautiful and stylish product with their own hands.
Shoe rack with soft seat
Shoe racks are an organized storage system for shoes, boots and boots. In the factory they are made from various materials. The model range of this furniture is also represented by a huge range of products: from shelves and cabinets to banquettes and whatnots. To create a homemade product you will need the following blanks, consumables and available materials:
- wooden blocks;
- stands made from old furniture legs;
- wooden layers;
- foam rubber and fabric;
- glue, screws;
- paint or varnish.
After preparing the materials, you can begin to work. It is important to ensure that there is enough free space in the room for design and assembly. Making furniture with your own hands will be much faster if you strictly follow the instructions:
- Carefully study the finished sketch, and then, guided by the diagram, cut out the base, side and back parts, and the shelves themselves from wooden layers. At this stage it is better to use a jigsaw.
- Sand the edges of the workpieces with sandpaper.
- Assemble a frame from bars and furniture legs.
- Provide supports for shelves. It is better to fix it with self-tapping screws when the entire basic structure is assembled.
- Using wood glue, glue the sheets to the frame, additionally securing them with self-tapping screws for reliability.
- Cover the entire resulting structure with paint or varnish.
- Cut the foam rubber; the piece should be the same size as the top cover. Coat the base with glue, attach burlap to it, and then foam rubber. Secure the resulting “pie” with a stapler for reliability.
- Cut a piece of durable fabric with a seam allowance, stretch it over the foam, fold the edges and staple again. If necessary, decorate with ties.
The described model of a homemade shelf provides the opportunity to sit on it while putting on shoes, which means that the frame must be very durable. If desired, you can further strengthen the structure.
Step-by-step instructions for making your own cabinets from chipboard, MDF
Tools
Cutting parts
Grinding
Attaching the legs
Screed with self-tapping screws
Painting
Drying
Fixing foam rubber
Covering with fabric
Ready product
Chipboard table
You can assemble any table model from chipboard. It’s easy to work with the material; it’s freely available on thematic resources and you can select drawings for structures of the required configuration and preferred level of complexity. Dimensions are chosen so that the furniture fits well into the interior. To work you need to prepare:
- circular saw;
- electric drill;
- screwdriver;
- milling cutter
Additionally, you will need an iron to glue the edge tape. Self-tapping screws, corners, dowels and wood glue are used as fasteners. When preparing parts and assembling, you can use a detailed plan:
- Select a drawing.
- Prepare the details. In accordance with the diagram, cut the chipboard sheets. Cut out the tabletop, frame elements and supports.
- Place the tabletop panel horizontally on the floor or wide table. Attach strips around the perimeter, creating a frame. Tighten with self-tapping screws. Drill holes to attach the frame.
- Clean the surface and side parts from dust and dirt. Using an iron, attach the edge tape. Cut off the excess with a sharp knife or blade.
- Insert fasteners into the holes and assemble a reinforcing frame. Build side parts (legs) from chipboard strips. Attach them to the frame supports. Install plastic elements at the bottom of the legs.
- Attach the frame to the tabletop. Close all holes with decorative plugs. The furniture is ready, all that remains is to wipe it from dust.
When purchasing chipboards, it is better to choose high-density modifications. They are smoother, cut easier, and in this case the product itself will be stable. All work must be carried out in a dry, warm room to avoid delamination of the material.
Tools
Drawing
Sawing
Manufacturing of a reinforcing frame
Assembly
Ready product
Sofa made of pallets
Making an inexpensive, easy-to-care sofa is possible from pallets. They weigh on average up to 20 kg and can be standard or euro size. You can purchase both used and new pallets. If you study thematic forums, you will be able to save money: warehouse owners often give away pallets for free. Tools and consumables you will need:
- nails, screws, corners;
- paint or varnish;
- rollers, brushes;
- primer for garden furniture;
- furniture stapler;
- foam rubber
From available materials you can assemble not only simple furniture on one pallet, but also complex structures. Using the finished pattern, we make the base, then the legs, decorate with pillows and other decorative elements. Step-by-step algorithm on how to make furniture:
- 8 pallets must be laid out in the shape of the letter “L”, then another row must be laid on top. It is advisable to glue the pallets together with wood glue.
- Use nails and self-tapping screws to secure the back; it will be the cut-off lower part of the three pallets.
- Sand the surface with sandpaper, then coat it with a primer for garden furniture. After drying, apply protective varnish or paint.
- Place soft pillows on the seat - you can sew them yourself or buy them ready-made in the store.
You can’t skimp on primer and varnish - if the sofa is going to be placed outside, it must withstand any weather conditions.
Most often, home furniture is assembled from scrap materials. To work in this case, you will only need a carpentry kit, a little patience and accuracy. If you follow the instructions, the chosen design will be strong and durable.
Tools
Dismantling
Sanding boards
Assembling the lower part of the frame
Backrest fastening
Painting
Installation of wheels
Cutting foam for pillows
Making cases
The sofa is ready
Back walls and bottoms of drawers
The back wall and bottom of the drawers are most often made of HDF. The smooth side of the sheet should face the inside of the cabinet/drawer. The thickness of the sheets is 3-5 mm, the color is selected to match the chipboard.
Some people prefer to attach HDF to a furniture stapler, but this cannot be done. Over time, the brackets will become loose and the structure may warp. It’s not worth talking about the bottom of the drawers - a stapler is clearly not suitable for fastening.
Furniture LDVP
Sometimes it is inserted into a groove prepared with a milling cutter, but all dimensions must match down to the millimeter.
Most often, HDF is attached to nails or self-tapping screws. It is better to use self-tapping screws with a press washer, but before screwing them in, you must drill a hole, otherwise the product may crack.
In rare cases, for example, to create a “stiffener” in a tall cabinet or in drawers with high loads, fiberboard is replaced with laminated chipboard. These materials can also be combined.
Tabletops
A tabletop is a horizontal work surface on which you can cook, eat, read, write, etc.
Most office and desk tables, as well as cheap dining tables, have a tabletop made of the same chipboard as the main parts. The thickness is 16 or 22 mm, it is necessary to frame it with a 2 mm PVC edge.
Special countertops are used for the kitchen. They are a sheet of chipboard 28-38 mm thick, which is covered on top with durable plastic using postforming technology. Moisture-resistant countertops are green when cut, while regular chipboard is gray. A proper kitchen countertop should have a drip tray that will prevent dripping liquid from getting onto the fronts and drawers.
Cutting a regular and moisture-resistant countertop
The weak point of such countertops is the cut edge. They are usually covered with a simple melamine edge, so they become unusable within the first year of use. To avoid this, it is recommended to protect the edges with special aluminum profiles (end strip), and to protect against moisture, pre-coat the cut with silicone sealant.
There are also other types of profiles: corner and connecting strips, which are needed for joining several cabinets with different countertops.
Corner, connecting and end strip for table top
Another element is a decorative corner that closes the gap between the wall and the tabletop.
Skirting board for table top
A wall panel is sometimes used to finish the apron. Unlike tiles or mosaics, it is more practical due to the absence of seams and is inexpensive compared to glass splashbacks.
The tabletop is attached to the cabinets from below using short self-tapping screws to horizontal spacers so as not to spoil the smooth front surface.
Scheme of fastening the tabletop to the cabinet
Countertops made from natural or artificial stone are higher quality and more durable than others. Natural stone is heavy and requires special care due to its high porosity. But artificial stone does not have such disadvantages; it can be given any size and shape. The main disadvantage of stone countertops is the high price; for a small kitchen they cost from 40 thousand rubles. and more.
An alternative option is a countertop made of tiles or porcelain stoneware. You can make it yourself, but the tiles cannot be mounted on regular plywood or chipboard. The base must first be covered with cement-fiber sheets.
Location of parts
A detail is any element of cabinet furniture: lids, tabletops, walls, facades, shelves. Each part can be either nested or invoice. Choosing the right type of location is very important.
Let's look at examples of two kitchen cabinets: one of them will stand on legs, and the second will be hanging.
Base cabinet:
As can be seen in the photo, the operating stress in the floor-standing cabinet is directed downwards from the lid and in the first option is naturally transmitted through the parts to the cabinet legs.
Correct and incorrect options for assembling a floor cabinet
In the second, incorrect option, the load is transmitted through the confirmat (furniture screw), and because of this it will be torn out of the part at a fracture.
Wall cabinet:
In the second example, the opposite is true: the load will go to the bottom shelf, and the attachment point will be on top.
Correct and incorrect assembly of a wall cabinet
If we use the same fastening scheme here as in the floor cabinet (option 1), all 4 bolts will be constantly under the load of being pulled out of the wood. Therefore, it is better if the confirmations experience stress on the fracture (see diagram “correctly”).
Furniture fasteners
Furniture fasteners are hardware (metal products) that are used to connect parts. Most often, connections are made at right angles.
- Wooden dowels - inserted into pre-drilled holes in both parts. They are used for preliminary fixation and increasing the shear load, then the parts are fixed in a more reliable way.
Dowels
- Furniture corners are a popular, but outdated type of furniture fastening. Among the disadvantages: appearance, loosening over time and bulkiness.
Furniture corner
- Euroscrew (confirmed) – furniture screw. This is the main fastener for parts in modern furniture. Furniture makers almost never use ordinary self-tapping screws. Confirmats have a larger thread, so they stay inside the chipboard much better.
Confirmat
The holes for them can be drilled directly on site. To do this, use a special drill that makes a hole with different diameters for the thread, neck and head of the Euroscrew. The most commonly used confirmats are 7*50 mm. When drilling, special attention should be paid to the perpendicularity of the drilling, so as not to spoil the coating of the part with a through hole.
Drill for euroscrew
Furniture screws are tightened with a hex key or a screwdriver attachment. The caps for a Phillips screwdriver cannot be tightened tightly until the end.
The main disadvantage of this type of fastening is that screwed-in caps remain visible. To hide them, use plastic plugs matching the color of the chipboard.
- Eccentric ties are a modern and correct method of fastening. It leaves a hole only on the inside of the product, but requires very precise drilling.
Eccentric coupler
To obtain the required holes, use a Forstner drill. There's not much point in going to the trouble of using them to assemble items that will be hidden, but they work well for attaching drawer doors.
Forstner drill
Article on the topic: DIY kitchen assembly.
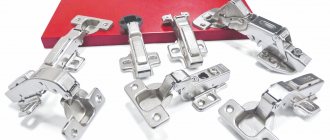
Furniture fittings
- Handles - everything is clear here. They are usually attached with screws.
- Legs are convenient in rooms where wet floor cleaning is often done, for example, in the kitchen. Any wood, especially chipboard, will quickly deteriorate from daily contact with water. In addition, the legs can be used to level furniture on uneven surfaces.
- A silicone damper is a cheap but very useful part that can reduce the noise of impacts from cabinet doors. It is glued to the top and bottom of the cabinet door or end to soften the impact.
Silicone damper
- Furniture hinges. Round cutouts for them (additives) in the facades can be made in any furniture workshop, if the manufacturer has not made them in advance. The hinges differ in the degree of door opening. Standard hinges have an opening angle of 180° and a closed angle of 90°. The hinges have a special mechanism that allows you to adjust the doors in height and seating depth. Separate hinges are sold for glass doors; you can clamp the glass into them without drilling a hole.
Furniture hinges
Among the inexpensive manufacturers of accessories, we can recommend the Chinese Boyard, and among the serious global manufacturers, the Austrian Blum.
Minimum set of tools
Making glass furniture with your own hands is an extremely complex process. All actions are performed manually using a diamond glass cutter on a table without deflections or bumps. Movements must be perfectly smooth and precise. Cuts along the edge of the glass are treated with an emery block, occasionally wetting the canvas with water. To drill holes you will need to select a cylindrical crown.
It is much easier to work with plastic pipes; it will require the material itself, plugs, glue, and connecting parts. A hammer drill, a screwdriver, a hacksaw and scissors will come in handy. A soldering iron for polypropylene pipes will also be useful, as it will make working with the material easier.
To process wood, panels, MDF, chipboard, you need a rotary miter box and an electric jigsaw. A sanding machine will help to process the wood for later cutting. It is necessary to purchase in advance a router with cuts for different grooves and holes. For fastening, use a screwdriver, glue, and nails. This is a standard set; certain furniture models will require additional tools.
Basic rules for rearranging furniture in an apartment, difficulties and mistakes
Creating furniture with your own hands using a master class is not difficult. Typically, the videos list the necessary tools, show how to cut and process the material, how to correctly use furniture edges for the end part, plus offer a detailed algorithm for assembling a table or cabinet.
To eliminate the possibility of error, it is better to entrust the construction of the drawing, cutting and edge cutting to experienced specialists.
Drawers and slides
There are many ways to make furniture boxes. The simplest of them is to assemble a perimeter from laminated chipboard. If a beautiful facade is required, it is screwed onto the main frame from the inside (like the tabletop). The façade can also be secured to eccentrics as the fourth wall of the drawer.
But the main thing is not to assemble the drawer, but to secure it correctly.
Drawer guides are divided into roller or ball guides.
- Roller guides are usually attached to the bottom of the drawer. He will ride on them on two rollers. A pair of such guides costs about 150 rubles, but it is highly not recommended to use them. The main disadvantage is that they do not allow the drawer to be pulled out completely; a heavy drawer in the more than half-open position may simply fall.
- Ball guides, or as they are also called, “full extension telescopic guides,” can exactly double the length. They have many balls inside, like bearings, so they provide a smooth ride.
Roller and ball guides for drawers
- In addition, Blum has metaboxes and tandemboxes. These are ready-made side walls of drawers with installed guides. All that remains is to install the façade, back wall and bottom.
Non-standard materials
First, a couple of general tips:
- All wooden surfaces should be sanded and varnished.
- Ready-made decor for every taste is easy to find in stores. However, in some cases additional decoration is inappropriate (for example, if the natural grain of the wood can be emphasized).
Old furniture can be transformed thanks to your ideas.
Do not rush to throw away old broken furniture. In most cases, you can breathe new life into it. And there is no need to rush with other things that have outlived their time.
Use old furniture to bring your original ideas to life.
Some interesting options for using second-hand items:
- Stylish chaos. With a slight movement of the hand, a mountain of broken furniture turns... into an elegant storage system. The algorithm is simple: measure, saw off what is unnecessary, combine the rest, install, starting from the bottom tier, sand, coat with a single-color varnish. Unusual, original, interesting.
- Sofa from an old bathtub. You don't even need to measure anything. Just cut off the excess and put on the mattress.
- Chairs from... magazines. The biggest difficulty is making the bases.
- Did you inherit the complete works of Marx, Engels and Lenin from your grandfather? So this is an almost finished sofa! True, you will have to get a little confused with installing books on the same level. You will need a lot of glue. Finishing is varnish.
- An original mini-table made from a flower stand and... a vinyl record.
You can implement interesting ideas yourself with a little effort.
And a few ideas for DIY furniture made from pallets, SIP panels and plastic pipes.
Pallet furniture
The fashion for furniture made from pallets was introduced by the architectural studio “MOST Architecture” from the Netherlands. In 2010, the designers were commissioned to design a temporary office in the center of Amsterdam... and did it all using only pallets.
The trend in recent years is creating furniture with your own hands from wooden pallets.
Literally everything is made from them, from stairs and tables to podiums, partitions and wall cladding.
Furniture made from pallets can be installed in the country house.
Furniture fantasies made from pallets look unusual, stylish and original. The main thing is not to forget to clean the pallets and coat them with varnish.
SIP panels in the interior
Are there any unused SIP panels left after construction? Let's put them to work and give free rein to our imagination!
Making furniture with your own hands is a fascinating, creative process that brings stunning results.
The resulting original furniture will have all the advantages of the material: environmental friendliness, good insulating properties, resistance to fungi, mold, and ultraviolet radiation.
From plastic pipes
There are no less original ideas for using plastic pipes.
You can make a shoe rack from plastic pipes.
You can use them to make an unusual coffee table (you will need organic or impact-resistant glass for the tabletop), a shelving unit (all you have to do is take care of the shelves) and even a bunk bed.
Wicker furniture
The passion for weaving can easily be satisfied by making home or garden furniture from wicker and rattan.
It is not necessary to weave small interior items and accessories. Designers have learned to create wicker furniture with foam rubber, including sofas.
It is not necessary to make armchairs or a sofa. You can limit yourself to a hammock and a canopy.