History of fabric panels
The history of the appearance of the first decorative paintings dates back to the Middle Ages. Unlike paintings that were created on canvas, all kinds of materials were widely used to make panels: scraps, paper, wood or various types of fabrics. Moreover, by combining several seemingly completely incompatible materials, skilled craftsmen managed to create canvases of extraordinary beauty.
Since ancient times, in order to properly highlight the decoration of a house and emphasize the unique image of the interior, various types of panels have been used. Therefore, decorating surfaces with drawings and voluminous fabrics was considered the best way to decorate a room or facade.
Nothing beats a job done with your own hands. A fabric panel will be an excellent decoration for your interior.
Having passed through the centuries, the art of creating tapestries and paintings from fabric has not lost any of its appeal.
Therefore, nowadays, thanks to the painstaking work of craftswomen, it will not be difficult to do it yourself or mass-produce a real masterpiece. And an excellent result is guaranteed if a person has a wonderful imagination and is sincerely interested in this decorative needlework.
Types and techniques of fabric paintings
Textile paintings are very diverse in appearance: some resemble stained glass windows, painting on natural silk, others look like tapestries, three-dimensional appliqués. As an art, the manufacture of such products first appeared in Japan, later in England and America. In Russia, the countries of the “former union”, fabric sewing is one of the popular hobbies available to almost everyone.
There are many techniques for creating flat, three-dimensional textile panels:
- "kinusaiga";
- "osie";
- "patchwork";
- "quilting";
- "string art";
- from lace;
- from felt;
- "wet cloth";
- from jeans;
- volumetric options.
You should start with a pencil sketch on paper, and then choose the most suitable technique.
"Oshie" - an ancient Japanese form of needlework
The handicraft art of oshie originated in Japan sometime in the 17th century, but has not lost its relevance to this day. The pictures are made from pieces of thick cardboard wrapped in scraps from old kimonos. Later, special plastic paper made from mulberry fibers began to be used for “osie”. Traditional pictures here include children in national clothes, samurai, geisha, as well as story panels based on Japanese fairy tales. Pieces of fur, leather, various laces, and beads are often used as additional decoration.
Japanese technique "Kinusaiga"
Japanese culture is different in that almost any activity there turns into real art. Historically, materials for the Kinusaiga technique were taken from old kimonos that were a pity to simply throw away. The peculiarity of a kind of “patchwork without a needle” is that there is no need to sew the parts together. Silk fabric used for sewing kimonos is a fairly durable and expensive material. The traditional theme of "kinusaiga" - landscapes, including village ones, portraits, and still lifes - are done much less frequently.
Instead of expensive silk, it is permissible to use any other fabric.
Patchwork, quilting
Patchwork has been known to mankind since about the tenth century AD, but became widespread in North America in the 17th and 18th centuries. In Russia, during times of total shortage, all scraps were “put to use” - they were not only sewn as patches to clothes, but also made into highly artistic bedspreads and wall paintings. Fragments of different shapes had their own meaning - different in all countries. In this creativity, it is permissible to use both ordinary woven scraps and parts of knitted fabrics connected with a hook or knitting needles.
The quilting technique was originally used to create multi-layered clothing. The difference between this technique and patchwork is that the latter is done in one layer and is a purely patchwork technique. Quilting is voluminous, multi-layered, it involves a huge variety of stitches, appliqué, and embroidery. To add softness and volume, padding polyester is used here, sandwiched between two layers of patchwork fabric.
Products made using quilting and patchwork techniques will perfectly decorate interiors in Provence and country styles, and due to the filler, they have a 3D effect.
From old denim
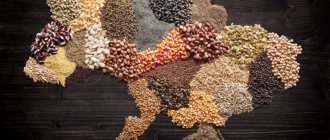
Jeans is an easy-to-sew, always fashionable material that comes in a wide range of shades. Thanks to the variety of tones and abundance of denim stitches, it is possible to create incredibly realistic panels from such textiles, completely different from traditional patchwork. Most of the paintings are made using the “denim on denim” technique, and fragments that have faded with time are used most often, as they have beautiful undertones. Popular themes here are urban, maritime, and abstractions. Denim lettering looks most beautiful on a dark or light background.
In parallel with jeans, it is permissible to use other materials with a similar texture; the best color combination is with yellow and white.
Using the wet cloth technique
Most fine fabrics can form a beautiful drape, especially when wet. To make the textile look wet, but not lose its shape, it is impregnated with glue, and crumpled newspaper is placed under the bottom. PVA slightly diluted with water or freshly brewed paste will do. This technique is usually used to create views of nature, images of trees, birds, fish, animals, ancient buildings, etc.
Felt applique
Felt is used in sewing and shoe production, in the form of abrasive material, and its waste is used for needlework. A flat or voluminous felt composition is very easy to make and comes out bright and original. Such products are usually used to decorate a children's room; popular motifs include leaves, flowers, trees, fairy-tale cities, landscapes, and still lifes. Less common are stylized animal figures and portraits of people. The thickness of the material is from 1.3 to 5.1 mm, it is optimal for cutting out shapes with clear contours. Its different types are used in different ways: woolen - for voluminous decorations, half-woolen - for small decorations, thin acrylic, as well as viscose, polyester - for appliqués.
To work with felt, you will need scissors, punches for eyelets of various diameters, tailor's chalk (for marking), colored threads, and beads for decoration. If you plan to make three-dimensional pictures, you will need a padding polyester.
Sewing stores often sell entire sets of multi-colored felt in one package, including up to a dozen scraps of different colors and thicknesses.
Volume options
To make the picture three-dimensional, a number of techniques are used:
- filler – its role is played by foam rubber, holofiber, various textile residues, cotton wool;
- crumpled paper soaked in paste, placed under the fabric;
- ribbons, textile balls, bows, flowers, made separately and sewn to a plain background;
- starched elements attached to the stretched fabric only partially;
- use of parts on a wire frame.
When working, you need to do everything carefully - cut out the parts strictly along the contour, glue them so that the glue does not smear. You will need a background - a plain fabric stretched over cardboard; if desired, some of the elements are drawn on it manually. Using this technique, three-dimensional insects, birds, bouquets of flowers, wild herbs, sailboats, and entire villages are created.
Made from threads - string art
The string art technique is an original way of creating images using hundreds of nails driven into a board and threads stretched across them. To create such a work, first familiarize yourself with the options for filling the main elements - corners, circles. It is permissible to use any thread, but it is strong - you will have to pull them tightly, otherwise over time they will sag and the product will lose its appearance. Carnations are packed at a distance of 0.6-1.2 cm from each other. The product comes out transparent, so it requires a contrasting background.
Such a product, made on a round board or ring, can represent a colorful “mandala” or “dream catcher”.
Made from lace
Each nation made lace differently - each element meant something. In modern times, not many people put meaning into them, but such patterned material is used very widely as decoration. Lace patterns are made from purchased fragments or crocheted by hand using a crochet hook.
To make a panel with lace, you will need a frame, a base in the form of thick cardboard or plywood covered with textiles. Gluing is done using PVA glue. As an option, textile material is stretched over the frame, and a lace napkin is carefully sewn onto it.
To prevent the picture from collecting dust, it is placed under thin transparent glass.
How to make a New Year's panel from fabric correctly
New Year is a special holiday when everyone congratulates each other and gives gifts. Therefore, on this day, a self-made New Year's panel will be a great surprise.
For example, an unforgettable gift would be Santa Claus depicted on the canvas carrying a Christmas tree.
To make such a panel you need:
- Special frame with dimensions 12x17 cm.
- Blue chintz fabric.
- Skin of different colors. For clothes and Santa Claus's hat - red, and for the face - pink. In addition, you will need white, green and golden fabrics.
- Regular cardboard 12x17 cm.
You need to cover the cardboard with chintz fabric. After this, you need to make a three-dimensional silhouette of the future Santa Claus out of cardboard.
A New Year's panel made of fabric is an ideal option for decorating your room for the New Year.
Using red fabric, the clothes and hat are cut out. For mustaches, beards, and “fur”, white material is used. By the way, the “fur” should be cut to create a fringe. Silver fabric is used to make sleighs. And the Christmas tree should consist of separate parts and have several shades.
To give volume to individual parts of the figurine, it is recommended to hold them briefly over a candle fire.
Having taken care of the blanks, you can start gluing all the details of the future panel. To make a high-quality canvas, the master needs to show imagination and try to express all his feelings on the fabric. A properly made New Year's applique will be an excellent gift that will not leave anyone indifferent.
Christmas decoration
Decorative panels made of fabric for the wall can be made in different styles and have different themes. Children will help decorate the house before the New Year with the help of panels, since this exciting activity requires minimal costs.
New Year's panel
The master class suggests creating a simple but cute panel. The wall can be decorated with your own hands with a canvas depicting Santa Claus carrying a Christmas tree or riding a sleigh (photo).
New Year's fabric panel
To make such a panel, fabric and a frame are used. The cardboard is covered with a piece of chintz. This fabric is most often used to create panels. Next, a template is created and the silhouette of a fairy-tale character is cut out. Such decorative panels are suitable for decorating any room in the house. With their help, a wall in a nursery, bedroom, or living room is decorated. Children will be happy to participate in the process of decorating the house. In addition, such a panel can be an excellent gift for loved ones for the upcoming holiday.
Set for panels
How to make a fabric panel on the wall
A decorative panel made of voluminous or regular-sized fabric will become an interesting piece of furniture. Moreover, thanks to the existence of a huge selection of such paintings, everyone will be able to choose the best option.
Some craftswomen prefer to create wall panels themselves. Moreover, the entire process of making such a product is quite simple, and people who have never done handicrafts manage to create beautiful products.
An old frame is suitable for making a decorative panel; you can also use a sheet of thick cardboard or chipboard.
Woven fabric can be made in several ways:
A fabric panel does not require large material costs and is easier to make than you think
- The prepared fabric is stretched over the base, after which it must be wrapped on the reverse side and secured well with glue. All that remains is to attach the resulting base to the frame.
- You need to make a frame from wooden slats. Next, the selected fabric is cut taking into account the allowance and stretched onto a wooden blank. It is important to secure the material well on the reverse side with a stapler or nails.
- To make panels from fabric, you can do without a frame; instead, you will need plywood. Foam rubber or padding polyester should be attached to the front side. The resulting base is covered with prepared fabric and fixed well on the reverse side.
To decorate the resulting canvas, you can use different materials. Some people trim the product with colored beads or buttons. In addition, you can make beautiful and colorful flowers from scraps; the panel will look good and become the highlight of the room.
To make a children's wall panel, craftswomen specially create pictures or drawings taking into account the child's preferences. A similar decorative detail in a nursery will make the room bright and colorful.
DIY panel made from pieces of fabric. Templates. Master class with photos
Master class with step-by-step photos. Applique made from waste material
Panel "Funny Quartet". Master class with step-by-step photos
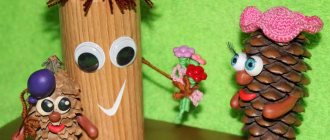
Author: Vera Aleksandrovna Orekhova, teacher of MBDOU “General Developmental Kindergarten No. 125”, Voronezh Description: this master class is intended for children from 6 years old, educators, additional education teachers and simply creative people. Purpose: interior decoration, gift. Goal: making panels from waste material Objectives: • To teach how to use waste material, in this case, scraps of denim, to make interesting crafts; •Cultivate a desire to make a beautiful and unusual craft with your own hands; •Cultivate the habit of working carefully, bringing the work started to its logical conclusion; •Develop fine motor skills of the hands and eye; •Develop aesthetic taste and compositional feelings; •Develop creativity, imagination, fantasy; •Cultivate interest in arts and crafts Materials required for work: 1. Cork; 2.Denim (from old jeans); 3. Twine; 4.Felt (you can use household viscose napkins); 5. Scissors; 6. PVA glue; 7.Buttons; 8.Decorative elements for decoration.
Rules for safe work with scissors:
Keep your work area tidy;
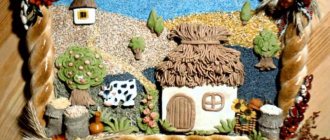
Do not use loose scissors; Use scissors only at your workplace; Place the scissors with the rings facing you; Feed the scissors rings forward; Don't leave scissors open; Don't play with scissors, don't put scissors near your face. Use scissors as intended. Perhaps the most popular clothing in the world is jeans. You can see people in jeans in any country and almost anywhere. They are worn not only for a walk, but also to the office, to the theater, on a date, to a party, and so on. Denim clothing is ideal for traveling, it is neither hot nor cold, it is wear-resistant, washes well, in other words, ideal for everyday life. However, the time comes - and your favorite jeans lose their appearance. New ones are bought to replace them, and the old ones are either thrown away, or they begin a second life. Don't throw away your old jeans - you can make a lot of unusual and useful things out of them! Did you know that you can make a lot of useful things from old jeans for your home, children, or as gifts for friends? Let's see what original ideas you can bring to life with your own hands. Step-by-step process for completing the work: Let's start by making the base. We take a cork covering (I have a size of 30 cm by 30 cm), glue it onto thick cardboard for strength. Using twine, divide the base into four parts.
Glue denim strips along the edges. Our base frame is ready.
Mouse. Mom is running in circles, Grandma is running in fear.
Dad is shocked: - That's it! The mouse wandered in to visit! Only little Seryozhka claps his hands loudly. (Nadya Hilton) To make the mouse we will use the following templates.
Cut out the necessary details from denim fabric.
From felt (or viscose napkins) we cut out circles of different colors and sizes.
Cut a small piece of twine and put on the beads. It turns out to be a tail for the mouse.
Let's assemble our mouse.
Elephant. An elephant walks along the road.
Why is he barefoot? He couldn't find a boot for his big feet! (A. Alferova) Templates for making an elephant.
Cut out the necessary details from denim fabric.
Making a ponytail.
We collect the parts and we get an elephant.
Fish. Flying fish, Flying fish, could you fly to our kindergarten?
Fly quickly, the whole group is waiting for you: A living corner has appeared with us. (Yu. Kapotov) We will use the following templates to make the fish.
We cut out the necessary parts from denim and felt.
We assemble the fish from the resulting parts.
Decorate with twine and felt strips.
Bunny. Stop, little bunny, don’t run along the narrow path.
You better take care of your little little tail. The fox sneaks along the path. It’s unlikely he’s looking for mushrooms! (I. Tokmakova) For making a bunny, I offer the following templates.
Cut out the necessary parts.
We assemble the bunny using the resulting parts. Cut out the mouth and nose and glue it on.
We make mustaches from threads.
Using twine, we add elements and this is what we got.
We decorate the corners of the frame with strips of denim.
I think such a panel will be a wonderful and unusual gift, and will perfectly decorate any interior. Thank you for your attention!!! I wish you creative inspiration and good luck!!!
We recommend watching:
Do-it-yourself twine panel on DVD. New Year's toys made of denim. Master class with step-by-step photos DIY New Year's toys made from denim. Master class with step-by-step photos DIY newspaper painting. Master class with step-by-step photos
Similar articles:
Inlay technique. Patchwork
Application on the theme Summer for children
DIY fabric collage
Application on the theme Autumn. DIY autumn tree
Fabric applique on the theme of Autumn
A panel with fabric flowers is an unusual room decoration
Before making a more complex panel, you should familiarize yourself with the technology of its creation. Today there are many master classes with step-by-step instructions that allow even a beginner to surprise others with a real masterpiece.
For a canvas with flowers, it is important to prepare in advance all the materials necessary for the work and make a blank. Thanks to the use of a special scheme, the result of painstaking work will be a high-quality product.
Making a panel with flowers from fabric will take you 1.5-2 hours of your time, but the result will exceed all your expectations
To make beautiful flowers for the panel you will need pieces of bright fabrics. You should cut out circles of different sizes; here, pre-prepared templates will help. After this, you need to collect all the resulting circles together (the smallest piece will be the last one on top), and then sew them together. A bead is attached to the center - this will be the final stage of creating a flower.
To make the edges of the product have a wavy shape, you can burn them a little with a candle flame.
A good solution for decorating a future canvas with flowers would be a spring theme. Using a sewing machine, you can separately make bright green blades of grass that will have different sizes.
Upon completion of the manufacture of all parts of the planned canvas, all that remains is to correctly attach them to the base. For very thin parts, it is recommended to use glue, and flowers and blades of grass are sewn on.
The flower does not have to be round. After all, its creation completely depends on the imagination of the author.
DIY flower panel
Panel made of fabric and yarn “Blossoming meadow”.
Master class with step-by-step photos Author: Ksenia Aleksandrovna Gest, physical education teacher, Municipal Educational Institution “School No. 53”, Oktyabrsky village, Lyubertsy district, Moscow region.
Goal: - development of creative abilities, imagination, taste. Objectives: - develop creative abilities; - cultivate patience and accuracy; - to form aesthetic taste. Purpose: This master class is intended for children in grades 5-8, teachers, parents and creative people. This panel will be a wonderful interior decoration and a good gift for any occasion. Necessary materials: - sewing machine - yarn (of different colors) - fabric (of different colors) - frame covered with burlap - candle - Moment glue - scissors - pencil - templates No. 1, No. 2 - buttons - needle and thread Work progress: Panel ( French panneau from Latin pannus - a piece of fabric)
is a pictorial work of a decorative nature, usually intended to permanently fill some sections of the wall (wall panel). 1) In order to get a bright and interesting panel, we need to prepare individual details and decorations. First, we cut out several circles from different fabrics of different sizes (template No. 1).
2) Then we burn the edges of the fabric on a candle flame so that the edges become wavy.
3) Collect all the circles from largest to smallest.
Sew it together. Add a button. The flower preparation is ready.
4) Now we need grass. We will make it from fabric. You will need a sewing machine. On the fabric we draw blades of grass of different sizes and follow the line of the drawing with a zigzag seam.
Then we cut out the finished parts along the edge of the seam. This is what we should get. The more varied the color of the fabric, the brighter the finished picture will be.
5) We already have most of the blanks ready and, therefore, you can try laying out the resulting drawing on white paper. This way it will be clear and visible what is missing for our panel. 6) We begin to compile our picture. Using Moment glue we glue yarn of different shades and shapes to the burlap base.
7) Then we sew the finished blades of grass with large stitches in the middle. Thread color may vary.
 Then you can glue more yarn in several places (empty places will be visible). We distribute the flowers over the entire surface of the panel and sew them on. You can also simply pin them with needles and change their position from time to time.
You can add more flowers without foliage. It looks even more unusual this way.
Or you can make flowers of a different shape. For this you will need template No. 2. We transfer the details of the template onto the fabric.
Sew the edges of the flower using a machine using a zigzag stitch and cut along the edge. We burn the middle of the circles with candles and collect them into a small flower.
Such a flower can be added to our panel...
...or make something new... Good luck!
Template #1
Template No. 2 Using this technique you can make brooches for clothes in the shape of flowers.
We recommend watching:
DIY silk flower. Master class with step-by-step photos DIY flowers made from mesh fabric DIY fabric flowers DIY dandelions from threads. Master Class
Similar articles:
Fabric flowers. Master Class
DIY gift for mom
Making panels from scraps of fabric with your own hands
For lovers of abstraction, you can independently prepare an unusual wall decoration from scraps. Such a unique picture will help to favorably emphasize the interior of the room and will become the pride of the hostess-craftswoman.
To work, you will need a frame with equal sides and several types of contrasting material. To avoid confusion in the future, it is better to draw a diagram of the future product in advance and number all the stripes.
Why throw away leftover fabric when you can make a fabric panel with your own hands, which will become an original decoration or gift
The shreds are cut into the required quantity and attached to the base, strictly following the specified order. To make the composition interesting and bright, it is important to alternate colors correctly and take care of reliable fastening of parts. For this, it is recommended to use special hot melt adhesive.
A picture made from scraps will look very good on the wall. Therefore, upon completion of the work, it is necessary to secure the resulting product in a frame.
When choosing fabric for a panel, you need to take into account its color, as well as its structure. Silk material will stand out perfectly and expensively on the wall. And the fabric, which has a dense structure, is very convenient for work.
To avoid sagging of thin shreds, it is recommended to insert cardboard into them. In addition to this purpose, such tabs will help prevent the material from showing through.
If you need to make an abstract spiral from scraps, it is better to make the template in the opposite direction. And then lay out all the stripes strictly according to the scheme.
Foam option
For manufacturing you will need the following tools and materials:
- Textile;
- Styrofoam;
- Cutter's scissors;
- Satin ribbon;
- Loop for attaching a picture;
- Glue;
- Pins.
Using the finished polystyrene foam, we cut out the fabric. We glue the fabric onto it.
Related article: Large paper snowflakes: diagrams and templates for cutting
The side parts also need to be made to match the picture. To do this, take a satin ribbon of the required size and glue it to the sides, as shown in the photo:
In order for the completed picture to be attached to the wall, we attach a loop for fastening to the back of the foam.
Using this manufacturing technique, you can make several paintings for one composition.
The painting can be of any size and shape. Imagine and experiment.
One option is to create a modular picture. As an example, such a picture is shown in the photo below.