Materials and tools
When they talk about making an electric fireplace with their own hands, they first of all mean independent design and assembly by the user of the portal. In most cases, the hearth is purchased in a store.
Necessary materials
As already mentioned, a portal is simply a box with decorative lining. It is not exposed to high temperatures, even if the electric fireplace is equipped with heaters, so almost any sheet material can be used as frame cladding:
- drywall;
- plastic;
- aluminum panels;
- steel sheets in a polymer sheath or painted with powder paint;
- glass;
- particle boards and fiberboards: chipboard, fibreboard, OSB, MDF (can be produced in laminated form);
- plywood;
- board: solid or parquet (multilayer).
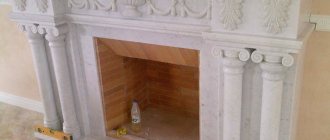
The portal can also be made of piece materials - brick or stone, but due to their massiveness and high cost, these options have not gained popularity. Usually a frame is constructed, and plasterboard is used in most cases for sheathing. This is a fairly rigid material, it holds its shape well, at the same time it is easy to process, has a low weight and, most importantly, allows the use of quite impressive-looking cladding.
Decorative gypsum stone for portal cladding can also be made at home
Another useful feature: if you make a perforation in the cardboard using a needle and moisten the gypsum core through it, then you can make a curved surface from a rigid flat sheet, for example, an arched vault.
As for plywood and solid wood, these materials should be used with caution. Constantly circulating warm air can cause them to dry out with subsequent deformation. This also applies to the frame if it is made of bars and slats.
All wood must be at least well dried. But it is best to assemble a frame from a special metal profile designed for installing partitions and plasterboard ceilings.
Factory production is not the only option. In a simple version, you can reproduce it yourself, although, of course, the homemade product will look less attractive.
Using candles in the fireplace you can create a real live fire
Instead of an electric fireplace, you can install in the portal:
- Electronic photo frame with a picture of a flame. A more interesting option is a photo frame with the ability to reproduce primitive animation, into which you need to load a “cartoon” with dancing flames.
- If the costs don’t bother you, you can go even further: install a small TV in the portal that plays video from a flash card, and record a video for it with a real fire.
- The image of fire is combined with a system of mirrors, thanks to which the observer sees a three-dimensional illusion of flame.
Tools
What tools do you need to prepare:
- plumb line and building level (for installation without distortions);
- metal scissors or grinder with a thin cutting disc;
- stationery knife;
- spatulas;
- sandpaper;
- screwdriver or screwdriver.
DIY cold fireplace
Hello, dear readers and DIYers! In this article, Danya Kraster, author of the YouTube channel “SuperCrastan,” will tell you how he made a cold fireplace. Materials. And he will make it from what he has lying around in his workshop, and not from any special materials, pure impromptu. - Half a wooden barrel - Remains of epoxy resin molded parts - Arduino - Yellow LED strip - Power supply - Ultrasonic fog generator - Acrylic paints - Black spray paint - Small plastic container - Wires, solder.
Tools used by the author. — Band saw — Screwdriver — Drilling machine — Orbital sander — Airbrush with compressor — Hammer, chisel — Soldering iron.
Manufacturing process. First, we need to decide on the height of the stand; Dani had pieces of barrels left over after building one of the projects.
A part of the electronics is already assembled on the breadboard, which powers the blinking LEDs through field-effect transistors, and the fog generator is also powered through the boost board.
The generator has its own height, plus 3-4 centimeters of water should be above it for the fog to be produced well. Let's throw it in a mug and see how it feels there. It's seething there.
The power of the generator can be adjusted using a tuning resistor for the step-up dress. The main thing is not to overdo it, because it runs on 24 volts. The board is also powered by a regular cooler, its power can also be adjusted using the same PWM via a field switch. At the beginning of the project, Danya proposed exactly this as a smoke supply device, but more on that later. The steam can be illuminated with yellow or orange LEDs to create a flame effect.
The author will use this larger piece of the barrel as a base. He wants to cover the top with a small layer of epoxy, to create the feeling that the barrel is full of coals, and even sticks out of it a little. This epoxy has been sitting on the shelf for a year and will come in handy for a project.
Danya will cut out the top on a band saw, setting the table at an angle. Epoxy cuts well, but chips that accumulate static are a complete mess, they fly apart and stick to everything.
Now you need to drill with a Forstner drill of the maximum diameter that Dani has. It would be better, of course, with a crown, so as not to unwind the thickness of the epoxy over all surfaces. You need to select the material in the middle of the workpiece; steam will escape through this place.
Then each stone will be filled with a dense black color; they should not glow from the outside, otherwise there will be no feeling of heat in the center.
The stones are painted with the necessary colors, now we move on to black. The stand on the sides will also be black, because the fire burns only in the center. Here the author did not calculate the paint supply; the black color in the center is not needed, since it can be quickly removed. Now we need to paint the crystals themselves, creating smooth transitions from red to black. It seems to the author that the layer from the airbrush will transmit light, so now you can cover the stones with masking tape and apply several layers of regular aerosol paint.
Wait until it dries and you can remove the paint.
At this stage it is good to check each stone against the light. The colors change a lot and in general it’s very clear how black will behave.
He drills the barrel, hammers in the top layer, and lays out the stones.
He wanted to add a center stone, but it didn't allow steam to escape well, so he ended up abandoning it.
This is how the LED flickers, it is given random values. Some fireplaces use special fireplace bulbs, but an arduino can make a cool flickering filling out of any LED.
Cuts sections of LED strip into three LEDs, guided by the scissors symbol. Then he solders the wires.
Installs the fog generator and covers it with the housing. With a fan you get the effect of a wet fire.
This is not exactly what is needed. No flame effect.
That’s why Danya abandoned the fan; it creates a turbulent flow, which, no matter how you light it, doesn’t look like a slow, hot flame. To make the flame a flame, we will raise the steam with an ascending flow of hot air, and at the same time we will illuminate it. To do this you will need a halogen lamp with a yellow filter. Danya simply painted it with yellow paint. I drilled a hole in the liquid container and installed a pipe like this with an outlet. Then I glued it together with hot glue.
And here is the finished result!
Good luck and good mood to everyone!
Source
Become the author of the site, publish your own articles, descriptions of homemade products and pay for the text. Read more here.
Preparatory stage
Before you start making a false fireplace, you need to think about its installation location and power supply.
Selecting a location
Work on creating a homemade electric fireplace should begin with choosing a place for it, since the shape of the portal will depend on this. The following options should be considered:
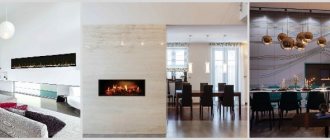
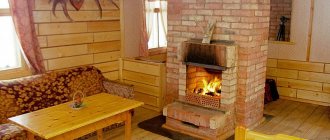
- Wall-mounted location: this is the most preferable option - it is the wall-mounted electric fireplace that is most similar to the real one. But such an installation is possible only under one condition: the room must be quite spacious. In the wall-mounted version, the electric fireplace is made rectangular.
- Corner: this method is used if the room is of modest size. The corner is usually the least used area, so installing a false fireplace here has almost no effect on the amount of free space. The corner portal will no longer have a rectangular, but a triangular base.
A corner electric fireplace will not take away useful space from the room
- Wall-mounted option: as you know, a floor-mounted fireplace is considered classic. But the mounted option will look good, provided that the space in front of it, at least a few steps away, is not cluttered with anything.
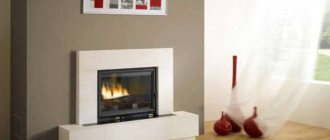
- Built-in fireplace. This option will significantly save space.
An electric fireplace built into the wall is ideal for small rooms.
If the problem of lack of space is so critical that none of the above options are suitable, an electric fireplace can be built into a partition or furniture. Especially for such tasks, “ultra-thin” fireplaces with a depth of only 7 cm are produced. By the way, it’s worth considering that perhaps such an almost flat fireplace could be made wall-mounted.
When choosing a place for a fireplace, take into account the position of the window: it is advisable that daylight does not overshadow the backlight.
Some users are faced with a problem: no matter where they place the fireplace, it always ends up close to one or another piece of furniture - a table, sofa, pouf, etc. The way out of this situation is to create a wall-mounted fireplace located at a certain height. In this form it will not lose its decorative qualities. At the same time, at any distance from the wall and even under the fireplace itself, it will be possible to place a low piece of furniture.
Hanging electric fireplace significantly saves space
Electricity supply
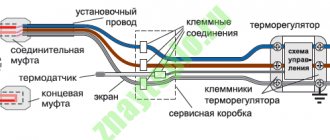
An important point: at the preparation stage, you should think about the power supply to the fireplace. To prevent the impression of the decoration from being spoiled by an extension cord stretched across the entire room, you need to attach an electrical outlet to the wall near the installation site of the portal. In this case, it is useful to listen to these recommendations:
- You should not install the socket so that it is inside the portal, although this option seems to be the most successful from an aesthetic point of view. A false fireplace, like any other electrical device, is potentially dangerous, and the user should be able to quickly unplug the power cord if something happens.
- It is better to install an outlet with a switch. After installing the fireplace in the portal, the standard power button will most likely be difficult to access, and it will be inconvenient to constantly pull out and insert the plug into the socket to turn the device off and on.
What kind of care do electric fireplaces with steam require?
If desired, a steam fireplace can be mounted in furniture sections, and nothing is subject to burning or arson, since the fire in it is not real.
For a long service life of a fireplace with the effect of a real fire, with constant use, you need to clean the internal parts at least once a week, especially those that are in water.
In those tanks where water and steam are located, various deposits appear, if the water is, of course, untreated. Disassembly is carried out without complications, since everything is fixed on rotating plates and special cleaning products and tools are included with this fireplace. It is very easy to organize the maintenance of a water fireplace with your own hands. If you doubt your efforts, we recommend watching training videos.
Calculation of parameters and design
At the portal design stage, you need to pay attention to the following points:
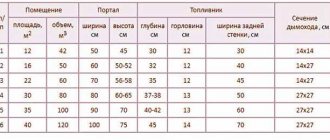
- Dimensions. The portal should have such dimensions that it and the hearth look proportional. Usually the body is made twice as wide as the hearth, and 1.5 times higher in height. Thus, if the width and height of the fireplace are 50 and 70 cm, then for the portal these same parameters will be equal to 100 and 105 cm. If you intend to install the fireplace not near the floor, but at a certain height, you should choose a wider model - with this placing the fireplace will look better. In this case, the width of the portal should not be doubled, but slightly smaller.
- Dimensions of the combustion hole. This hole should be such that its edges do not block the fireplace’s own frame. This rule should be followed regardless of whether the frame is neutral or made in any genre. If the electric fireplace is stylized, then the design of the portal will have to be made accordingly. If you want to maintain creative freedom, look for an insert hearth - a model that has no frame at all.
- Structural elements. The main structural element of the portal is the vents that ensure air circulation. If there are none, the heating element of the electrical fire may overheat.
It is also advisable to provide the portal with a shelf or hooks from the inside to secure the power cable.
It is better to start designing the portal after the purchased hearth is in your home. The fact is that the picture published on the website or in the catalog is often somewhat different from the device being sold and, if you rely on it, the portal will most likely have to be redone.
Drawing
Although it is difficult to imagine a more primitive design than an electric fireplace portal, it is better not to limit yourself to abstract design and sketch out a detailed drawing of the product.
When designing, the drawing indicates all the executive dimensions of the future structure
Firstly, it will be easier to develop a specification - a list and quantity of all necessary materials down to the last screw. Secondly, the drawing will immediately reveal minor errors and shortcomings that were overlooked when designing in the mind.
Heating with a steam fireplace
An imitation of fireplaces can simply be an imitation of fire, or it can simultaneously serve as a heating device that will also heat the room. Naturally, heat will come from such a fireplace using electricity, converted by a heating element built into the fireplace into thermal energy. Thus, you get not just a beautiful “light”, but a real beautiful electric heater. The power of such an electric fireplace is the same as other heating devices - about 1.5-2 kW. It is sometimes expensive to heat a room with such a fireplace, so think about it and do some small calculations. If electric heating is acceptable for you, then instead of a conventional heater it is quite possible to install an electric fireplace.
Making an electric fireplace: step-by-step instructions
After all the preparatory work has been done, you can begin making the electric fireplace itself.
Making a pedestal
The pedestal is a tabletop laid on a frame made of a metal profile about 50 mm high. The tabletop can be made from various materials:
- thick plywood or several thin plywood sheets glued together;
- solid wood or a shield made from several boards;
- chipboard.
The most attractive look are countertops made of laminated MDF (the board is enclosed in a plastic shell). Such a product can easily be found on sale.
The pedestal for an electric fireplace can be made from chipboard
The tabletop for a wall-mounted fireplace has the shape of a rectangle, for a corner one - a pentagon. In size it should be several centimeters larger than the dimensions of the portal. A plinth of the same color as the table top is installed as side walls around the pedestal.
Assembling the portal frame
As already mentioned, the frame is best made from a metal profile specifically designed for the installation of plasterboard structures. It comes in two types:
- rack-mount (for a portal you will need a variety with section dimensions of 50x50 mm);
- guide (use standard size 50x40 mm).
To fasten profile sections together, you should use special short self-tapping screws 11–13 mm long, which are popularly called “bugs” or “seeds.”
Installation of the frame is carried out in the following sequence:
- The section of the wall that will be covered by the portal is covered with a fire-resistant screen. For this purpose, it is better to use a sheet of tin with a basalt cardboard lining; a less successful option is an asbestos layer (has carcinogenic properties).
- According to the drawing, markings are applied to the wall and table top, while the vertical/horizontal lines are controlled by a plumb line and level.
- Using dowels (to the wall) and wood screws (to the tabletop), a guide profile measuring 50x40 mm is attached according to the markings.
- A 50x50 mm rack profile is screwed to the guide profile using self-tapping seed screws, so that the result is a parallelepiped.
It is better to mount the electric fireplace frame from a metal profile designed for plasterboard
- The frame is strengthened by installing ties from the same rack profile in each side face in increments of 20–25 cm.
On the front side, sections of the profile are attached that limit the opening, and inside there is a frame on which the hearth will be installed (if one is provided for in the project).
Video: making an electric fireplace portal
Assembling the chimney frame
A false fireplace will look much more realistic if a box is laid from the portal to the ceiling, simulating a chimney. The frame of this box should be constructed from a profile with dimensions of 100x50 and 100x40 mm, then it will be enough to attach it with only one side to the wall. You need to do this:
- A 100x40 mm profile is attached to the wall using pre-applied markings using dowels.
- At the same time, ribs from a profile measuring 100x50 mm are brought out to the ceiling.
To make a false fireplace look believable, you can make an imitation of a chimney
The frame is strengthened by installing crossbars from a 100x50 mm profile in each face in increments of 50 cm.
Covering the frame with plasterboard
We cut drywall sheets using a stationery knife according to the project. Remember that the parts must be of such dimensions that the seams between them fit on the frame elements. Drywall is screwed with metal self-tapping screws measuring 25x3.5 mm, black in color. The screw must be tightened so that the top edge of its head penetrates 1 mm into the sheathing.
Drywall is screwed to the frame with metal screws
Take your time to completely screw in the trim pieces. First, secure each of them with one or two screws and check if the hearth is working well. After making sure that everything is in order, or making adjustments if necessary, the parts can be screwed “tightly”.
After checking that all the vents for air circulation have been cut out, you can begin puttying work. They include the following steps:
- First, the seams between the sheathing parts and the screw heads recessed into the cardboard are puttied.
- A perforated corner is placed on the putty mortar, with which the sheathing is framed at the corners.
- Then the entire surface of the portal is puttied.
Before finishing the portal, it should be puttied
- After the putty has dried, it is treated with sandpaper, which will eliminate all unevenness.
Finally, the entire portal is treated with a primer and allowed to dry completely.
Fireplace finishing
A false fireplace can be covered with tiles or artificial stone, and the bottom, for example, can be lined with brick. Decorative plaster also looks very impressive. You should use a gypsum composition, for example, Vetonit or Rotband brands. By making it slightly thicker than the recipe on the packaging requires, you can use your fingers or a special tool to create a decorative relief that imitates:
- brickwork;
- clay modeling;
- a natural stone;
- wood.
Venetian plaster on the portal of an electric fireplace looks elegant
Plaster needs a protective coating with varnish or paint, which will prevent cracks from occurring during significant changes in temperature and humidity conditions.
The top of the portal can be covered with plasterboard, but a tabletop of the same type as that installed as a pedestal will look much more interesting.