- Foundation - standard size of the structure
- With analysis of floors
- Mounting tank assembly
- Advantages of the prototype with a remote channel
- Installation
Steam room stoves are very popular among many homeowners. The market offers a large list of various modifications with different characteristics and sizes. But before installing a metal stove in a bathhouse, you need to know all the fire safety provisions in order to prevent a fire. Let's consider the main points of choosing and installing a heating unit with all the requirements and nuances.
Varieties
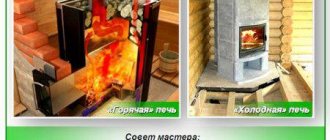
The model should not only warm the room, but also not pose a danger to people who will visit the bathhouse. There are several design options that differ in the location of the heating chamber door:
- The firebox opens directly in the steam room - this is the most common scheme. You can not only regulate the burning of wood, but also admire the flame if the prototype is equipped with fire-resistant glass. There are also negative characteristics - dirt, debris, and wood debris accumulate on the floor.
- Installing a stove in a bathhouse with a firebox in the dressing room is the safest option: it saves space, eliminates litter in the washroom, and allows you to warm up all rooms at once.
- The firebox is vented outside - an excellent solution for buildings with a minimum area, but not entirely comfortable - to maintain the desired temperature you will have to run out of the room and systematically add firewood.
There are several design options for devices:
- horizontal;
- vertical;
- oval;
- square.
Modern models have a water tank and a compartment for stones.
Installing a stove in a bathhouse - step-by-step instructions
To save energy and time, you should divide the work into phases. Installation is carried out in five main stages:
- choice of location;
- pouring the base or laying the podium;
- heater device;
- chimney outlet;
- securing a screen that will protect from temperature.
Let's consider each point in detail.
How to choose the right location for assembly
Traditionally, steam rooms are a wooden structure with appropriate finishing. Before you begin installing an iron stove in a wooden bathhouse, it is important to choose the right zone.
Criteria for choosing a fulcrum during construction
You will have to take into account the material of manufacture of the heating device, its power, the design of the combustion chamber and the exit point of the chimney (the usual height is up to 1 meter from the roof to the end point of the chimney). It should be remembered that the heater must be located in a place that is safe for visitors so that no one gets injured. Also key is the proximity of the device to flammable surfaces.
There are rules that must be taken into account during installation.
SNiP requirements for installation
- distance to flammable surfaces – at least 80 cm;
- parameters to the ceiling from the heater - at least 80 cm when it is plastered and 1.2 m if it is made of wood;
- the wooden flooring is protected with a screen, but the height of the firebox is at least 13-15 cm from the floor;
- from the door to the opposite surface – up to 1.25 m.
Ventilation. Its location and process of work
Before proceeding with the final installation of the stove installation, make sure that there is supply and exhaust ventilation into the steam room. The channel through which air is supplied is mounted below floor level. The stove is equipped with legs that will raise the structure above the floor, then the ventilation hole can be located under the stove. The optimal cross-section of the supply channel is 100 cm2, and its outlet must be covered with a metal grill.
The outlet of the exhaust duct is usually located at the farthest point of the steam room relative to the stove (under the ceiling). The cross-sectional diameter of the exhaust duct is also 100 cm2, and its outlet must be covered with a plastic or iron grille.
It is advisable to equip both supply and exhaust ventilation outlets with valves; in this case, you can regulate the operation of the system manually. There is no need to lay a foundation for the stove, but it is simply necessary to prepare a special foundation for the hot surface of the stove.
Preparation is carried out in two ways:
- the surface is sheathed with centimeter-thick asbestos, onto which a metal sheet 4 mm thick is attached;
- a brick platform is laid out, which is covered with a metal sheet or filled with concrete.
Ultimately, the resulting base will be at least twice the area of the furnace base.
Stove base
Before correctly installing the stove in the bathhouse, you need to decide which base to mount under the heating device, taking into account the features of a particular model and the type of soil at the construction site. You cannot build shallow foundations if the soil is prone to swelling in winter; it can simply be squeezed out in cold weather.
Foundation - standard size of the structure
Everything will depend on the specific gravity of the heater and the type of soil on which the bathhouse is built. There are several varieties:
- monolithic, deep;
- pile-grillage;
- shallow slab.
Each type has its own positive characteristics and different arrangement methods.
Pouring a monolithic slab base
The algorithm of actions is as follows:
- dig a pit with a height of vertical walls of 50 cm. Compact the bottom, leveling the horizon;
- arrange a cushion of crushed stone and sand, in a layer of 25-30 cm. Sprinkle with water, level and compact well;
- to make a concrete base, for this purpose a liquid solution is mixed. Pour over crushed stone and allow to harden;
- lay a layer of waterproofing - roofing felt glued with bitumen or mastic;
- install formwork from old boards or panels so that the walls are strictly vertical and the angles are 90 degrees. Secure a plastic film on the inside of it so that the plywood does not deform from moisture;
- make reinforcement - the frame should be 10 cm smaller than the formwork on each edge, install a reinforced frame;
- distribution of the solution - you can prepare it yourself or order ready-made. All layers of the mixture are well compacted by piercing them with a sharp iron rod.
After pouring the concrete mixture to the level of the finished floor and allow it to harden for 3 weeks. After this time, the formwork is dismantled and backfilling is carried out - the distance between the base and the walls of the pit is filled.
If you plan to install a brick sauna stove with a firebox from a dressing room, then the installation of the base occurs by deepening it to the freezing line of the soil.
Pile-grillage
This method of arranging the foundation is much simpler and not as labor-intensive compared to the one described above. But it is ideal for unstable, water-logged soil. The execution technology consists of the following stages:
- make markings on the surface, first removing the turf layer;
- in the corners of the future foundation for installing a metal stove in the bathhouse, dig pits 10-15 cm deep;
- screw in piles with a diameter of 10 cm. Be sure to check the vertical;
- cut the posts with a grinder along the bottom line of the subfloor;
- weld a corner channel of the optimal size, arranging a place for pouring the solution;
- place a steel sheet on the beam and secure it with a weld;
- dilute the concrete mixture and pour it into the prepared frame.
Once the concrete has gained the required strength, installation can begin.
Shallow base
This is a simple foundation option for installing an iron stove in a wooden bathhouse.
The algorithm of actions is as follows:
- mark boundaries;
- dig a ditch 50 cm deep;
- fill the pillow with 20-25 cm;
- make a footing;
- arrange waterproofing;
- install formwork;
- pour 30 cm of concrete mixture and compact.
As soon as the concrete sets and dries, you can remove the formwork and lay a layer of insulation - the foundation is ready.
Note: if the base is below the planned level, you can lay 2 rows of brickwork on top of the roofing material. Such a podium will serve as additional thermal protection for the floor covering.
Technical requirements
The foundation for the heating element can be isolated or connected to a common foundation, but regardless of this, it must meet a number of technical requirements:
- Immobility - the foundation must be stable and not move under heavy loads.
- Resistant to sudden temperature changes. The foundation should not change its integrity when freezing or heating. Even with thermal insulation, concrete is heated by hot stove bricks.
- High strength. The structure must withstand heavy loads so as not to deform from the mass of the stove or its own weight.
If the base is isolated from the foundation of the building, it should be deepened by more than 50 cm. An additional base under the stove must be laid at the design stage of the bathhouse. A number of factors need to be taken into account:
- terrain;
- dimensions, weight of the heating element;
- degree of soil freezing;
- ground water level;
- properties of the top layers of soil.
Taking these factors into account, it is possible to make a durable base that will not collapse under its own weight or the influence of external factors.
Preparing a Wooden Floor
Installation is not an easy process, especially if the floor is already covered. There are 2 options for solving this problem, let's consider them in detail.
Without disassembling the boards:
- mark lines along the dimensions of the structure directly on the surface. Back off 5 cm and draw an outer quadrangle;
- take a sheet of steel and fit it to the outlined square;
- prepare a layer of mineral wool;
- install a heat insulator on the floor (for example, a mineralite slab or non-flammable drywall), then metal and screw it on;
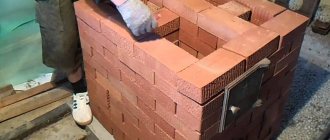
- soak a brick (preferably fireclay) in water and lay a podium out of it using fireproof mortar strictly horizontally.
Once everything is dry, you can begin further work. The platform can be left open or plastered. After this, you should begin installing a wood-burning sauna stove in a bathhouse with an external firebox on a wooden floor.
On the side of the door you need to screw a steel sheet, part of which will extend onto the brickwork.
With analysis of floors
This is a very labor-intensive process in which the podium for the device and the floor will not be interconnected. If the covering is already laid, it will have to be dismantled or a quadrangle cut to fit the size of the future pedestal.
Masonry is built on the foundation, 2-3 bricks above the floor. Next, actions are taken to isolate from overheating.
Classification of foundations
Foundations for stoves for bathhouses are classified depending on various factors: depth level, type of structure, material from which the foundation is made.
By depth level
Types of foundations:
- Large stoves must be installed on massive foundations. When installing the foundation, the depth of soil freezing, groundwater level, and type of soil are taken into account. Minimum depth - 50 cm.
- Shallow base. The maximum depth for this type of foundation is 70 cm. Suitable for stoves whose weight does not exceed 1500 kg. At the bottom of the pit you need to fill up a sand cushion consisting of gravel, crushed stone, and sand. The optimal thickness is 15 cm.
Foundation pit
By type of design
Types of foundations by type of construction:
- A strip base is suitable for small-sized heating elements. The trench must match the dimensions of the furnace.
- A concrete base on which supporting pillars are installed. This type of foundation is suitable for clay and sandy soil types.
- If capital construction is being carried out, the best option is a monolithic layer of concrete, which is reinforced with reinforcement.
- The base is made of concrete, which is installed on several screw piles.
By material
When making the base, you can use different materials:
- Rubble stone. Foundations for buildings and furnaces are made from it.
- Brick. This material is suitable for making bases for small heating elements.
- Concrete is the most common material, popular due to its low price and durability.
Brick base
Which option is better to choose?
Several factors influence the choice:
- Steam room size. If the room is large, you need to choose a monolithic base.
- Soil type. For bulk, marshy types of soil, it is better to choose a pile foundation.
If small equipment is used, 2-3 rows of fire bricks can be laid on the concrete floor. This will be enough for the stability and reliability of the stove.
Experienced builders recommend making a monolithic base from concrete. In terms of overall costs, this material will be more expensive than a brick foundation, but the strength of a concrete foundation is higher. The main advantage of brick is easy dismantling. If the base is made from rubble stone, the empty spaces must be filled with concrete mortar. The strength of such a foundation is no greater than that of concrete.
Walls - preparation
If the load-bearing fence is made of wood, then the distance will be at least 50 cm. For a unit with an external firebox, you will have to cut out a niche.
How to protect partitions from fire:
- apply the plaster composition to a metal mesh previously screwed to the surface;
- install an iron screen with a non-combustible insulator;
- clad with artificial stone or porcelain stoneware;
- make a brick layout;
- adjust factory thermal insulation.
The best option is to lay the masonry on the side of the adjacent surfaces; it will not only protect them from fire, but also accumulate heat.
Possible errors and recommendations
The main mistake that beginners encounter is uneven row placement. To avoid this, each row must be checked with a level. Professional recommendations:
- We must not forget about tying the rows. It will make the structure more durable.
- You can line the wall with completely white brick. The top can be decorated with various colors.
- It is important to take the calculations wisely in order to perform fewer trims.
If you don’t want to spend extra time on masonry or are afraid of failure, you can order the services of experienced builders.
Modern metal stoves do not look beautiful if they are not covered with natural stone. To improve the appearance of the device, you can assemble a homemade portal. It will help decorate metal surfaces.
How to install a heating device
Many home craftsmen ask how to properly install a sauna stove on an already poured foundation.
There is no need to attach the heater to the foundation, but sometimes experts advise attaching the legs to anchor bolts.
If you are installing a model with a protruding channel, then it is important to well insulate the portal from fire - this can be done using polyurethane foam or other material that does not ignite.
Setting up a chimney
You need to understand how to build a chimney so that carbon monoxide does not enter the steam room.
The furnace pipeline gets very hot and can cause a fire, so the place is prepared especially carefully:
- make markings in the ceiling and cut a window measuring at least 50x50 cm;
- install a passage unit with mineralite into it with a hole equal to the diameter of the pipe + 3-5 mm;
- secure the polyurethane foam with special fasteners and attach it to the ceiling;
- insert a pipe into the protective box and cover it with kaolin wool to a depth of 5-7 cm, no more, so as not to create the opposite effect of overheating;
- After completing the work, use a stainless steel protective screen to increase fire safety, as well as for decorative purposes.
Advice: no matter how well the installation is done, you need to know how to properly ventilate the bathhouse, otherwise the balance of air exchange will be disrupted.
Below is a link to a video where you can learn more about this system:
Mounting tank assembly
This mandatory element can be attached as follows:
- fixed on the side wall of the stove;
- placed on top of a single-wall chimney;
- at the end, the heat exchanger is connected to the tank for uniform circulation of liquid.
You can study the issue in more detail and visually examine the process in the video:
Installation of stove, tank and chimney
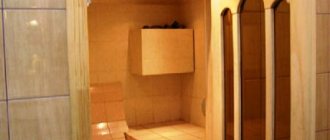
The sauna stove is installed on an equipped fireproof base without fastening to it.
If the firebox is remote (opens into the adjacent room), then a brick is laid in the wall opening, and there should be a gap between the masonry and the metal walls necessary for laying heat-resistant sheet insulation. The gaps between the masonry and the wooden wall are foamed with mounting foam, and fire-resistant mastic (sealant) is used to seal the joints between the metal stove and the brick portal.
Steel sheet in front of the firebox
Brick portal
Protective screen made of porcelain stoneware
Installed heater with water tank
Firebox door on the other side
Kindling
If the firebox is located in a steam room, then the wall behind the stove is covered with solid brickwork (half a brick) or covered with a stainless steel sheet 3-5 mm thick. In this case, the stove must be at least 10 cm away from the wall.
Note! Preliminary lighting of the stove before installation is a mandatory procedure prescribed by manufacturers of solid fuel units. This is necessary to completely harden the body paint and eliminate the appearance of odor in the steam room from chemical fumes that may appear during heating.
Next, the water tank is installed. It can be welded onto the chimney, hung on the wall of the furnace, or can be connected with flexible hoses to the heat exchanger of the furnace (threaded connections).
Heat exchanger
Threaded connections for connecting a remote tank to a heat exchanger
Video – Furnace water tanks
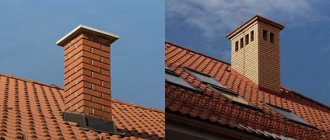
Chimney sandwich. Installation
Layout options for sandwich chimneys
Sandwich chimney pipes are easy to install and are characterized by increased heat saving due to the mineral wool insulation between the outer and inner walls. Such a chimney provides good draft, and soot and condensation do not accumulate on the inner surface. For the production of sandwich chimneys, only acid-resistant stainless steel with a long service life is used. Therefore, such a chimney is considered the best option for a sauna stove.
Chimney diagram
Prices for mineral wool
mineral wool
During installation, it is important to observe fire safety measures to avoid spontaneous combustion of the wooden sauna floors (wood ignites at a temperature of 170-270 degrees).
You must not make mistakes during installation and try to save insulating materials!
Dependence of the temperature of the flue gases on the type of furnace to which the chimney is connected
Fire protection is provided by galvanized sheets and asbestos fiber laid between the chimney walls and the ceiling. It is important to choose the length of the chimney so that a pipe joint does not form at the location of the ceiling. If the chimney pipe is longer than 6 m, then additional fixation is carried out with brackets and clamps.
Fastening the chimney section with brackets and a clamp
Step 1 . On the ceiling above the installed sauna stove we make markings for installing the cutting pipe.
Step 2. According to the markings, we saw the ceiling.
We apply fire retardant impregnation to wooden elements.
Step 3. Insert a cutting pipe (a metal box with a hole for a pipe) into the cut hole.
We fix it with self-tapping screws at the corners. Between the ceiling and the steel walls of the pipe we insert sheet asbestos or basalt insulation.
Laying insulation
According to standards, the thickness of the insulation should be 7-7.5 cm (that is, this is the distance between the walls of the box and the ceiling). The minimum distance from the pipe walls to the beams is 130 mm. And from the chimney to the walls of the bathhouse there must be a distance of at least 380 mm.
Chimney passage through the ceiling
Step 4. Directly to the stove pipe we connect (by welding or with a fire-resistant sealant) a section of an uninsulated single-circuit pipe. You cannot connect the sandwich chimney directly to the stove pipe - the insulation will burn. It is necessary to install a damper (smoke valve) on the same section of the chimney.
We apply sealant and put the chimney pipe on the stove pipe
Step 5. Connect the single-circuit pipe to the start sandwich (adapter). All connections are sealed.
Applying heat-resistant sealant to the chimney
Step 6 . We connect the first section of the sandwich chimney to the adapter. We connect the sections of the sandwich chimney in the bathhouse not “by condensate”, but “by smoke”, that is, the walls of the upper element must overlap the walls of the lower section of the pipe (see figure).
Chimney diagram
We additionally strengthen the straight sections of the chimney at the joints with wide metal clamps.
Fastening two sections of pipe with a clamp
When the chimney is brought out through the cutting pipe, we put on a rectangular steel sheet from the attic side. We fasten the sheet with self-tapping screws to the floor boards.
Installing a chimney is a responsible matter
Fixing the steel sheet
Chimney. The hole in the ceiling is covered with a steel sheet
Step 7. We bring the chimney to the roof. We cut a hole in the roof. To pass the pipe through the roof, a special element is used - a roof groove. This is a pipe with an aluminum sheet soldered to it. We lubricate the aluminum sheet with fireproof sealant, and then fasten it to the roofing material (for example, metal tiles) with self-tapping screws.
Chimney passage through the roof
The roof trim will prevent the chimney from coming into contact with the roofing pie materials. From the inside (under the roof), we seal it with basalt insulation and cover it with a steel sheet. Sheet in advance, i.e. Before the pipe comes out through the roof, we put it on the chimney.
Passage through the chimney roof. Fixing the steel sheet
Step 8. The last stage is calculating the elevation of the chimney above the roof of the bathhouse. This indicator can be clarified in the table.
| Conditions | Chimney length above roof |
| Flat roof | 500 mm |
| The roof is pitched, the chimney is located at a distance of less than one and a half meters from the ridge/parapet | >500 mm |
| The distance from the ridge to the chimney is within 1.5-3 meters | The height of the pipe is equal to or slightly above the top point of the ridge |
| The chimney is installed at a distance of more than three meters from the ridge | Visually draw a line from the ridge down at an angle of 10 degrees and find out the height of the chimney |
Chimney height
All that remains is to secure the deflector cone. Installation is complete.
How to install a stove in a bathhouse
This process is a little more complicated than installing a conventional heating device - creating a niche in the wall to access another room.
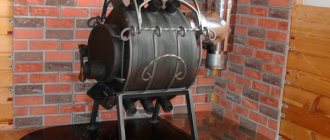
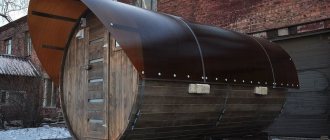
It will be easier to purchase a ready-made design, for example, the Atmosphere sauna stove, made of high-quality cast iron.
Advantages of the prototype with a remote channel
Models with take-away fireboxes are becoming more popular, as they have many more advantages:
- safety - there is no risk of gas poisoning from burning wood;
- comfort – two rooms are heated at once;
- cleanliness - there will be no chips, sawdust or dirt from the firewood. This is very important, since people usually wear it without shoes;
- space saving - as a rule, the oven takes up 1 m2 of space, and if the washing room is small, then this is significant;
- good, saturated steam - the firebox burns out oxygen, which makes the air dry, which has an adverse effect on health;
- there is no need to install a special ventilation system, which saves money and time.
Safety rules when designing a bathhouse
When organizing a plan for the construction of a steam room, it is important to immediately take into account the placement of the heater, using all recommendations and protective measures that prevent fire.
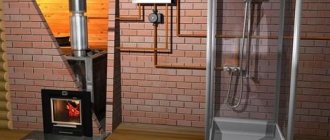
If the building is made of non-flammable material, then the partitions do not need to be thermally insulated; it is enough to protect the floor with a metal sheet.
If a metal heater is installed in a wooden structure, then carefully insulate the niche without fail - it is better to lay out the brick.
Installing a home-made system requires special attention - the distance from adjacent structures is at least 50 cm, if high-quality insulation from heat is provided, for example, with brickwork. Otherwise, the distance is increased to 1 meter.
It is important to understand that the distance from the firebox door to the opposite plane must be at least one and a half meters.
Installation
The main feature of installing a wood-burning stove for a bathhouse with an external firebox is the presence of a through hole in the wall between the steam room and the dressing room. A capital brick structure will require a lot of labor and expenses for the purchase of material. In addition, it is quite difficult to install such heating yourself - you need to have certain skills. Let's look at the step-by-step preparation instructions developed by experts:
- a niche is cut out, which should be 26 cm larger than the combustion channel;
- the floor is covered with a fireproof slab - this is done in the steam room and in the dressing room in front of the chamber door;
- lay metal sheets on top and screw them with self-tapping screws;
- the firebox is installed flush with the wall or with a small recess (it all depends on the thickness of the partition);
- insulate surfaces adjacent to the heating unit with metal screens;
- After the structure is completely installed, the distance between the heating chamber and the wall must be tightly sealed with any fire-resistant material. The ideal solution would be brickwork - it not only protects well from heat, but also has a beautiful appearance that does not require further processing;
- small gaps between the layout and the walls can be filled with polyurethane foam or basalt fiber.
Once the main work is completed, the metal screens should be decorated in accordance with the overall interior of the room.
Chimney installation
This is the last stage in assembling the structure by a professional; for this you need:
- Prepare the pass-through unit.
- Arrange holes for the pipe; they should be 25 cm wider than the chimney.
- For maximum insulation, take polyurethane foam with mineralite produced by FERRUM and fill it inside to 5-7 cm with kaolin wool, leaving the distance between the pipe and the sheet empty.
- Insert the assembly into the box, having previously protected it with mineralite sheets, fix it to the ceiling from above, and attach the base of the assembly to the lining only after finishing.
- When installing, make sure that the hole coincides with the pipe, because it is strictly forbidden to tilt the system (the maximum permissible error is 1 mm).
- To prevent the pipe from being covered with snow in winter and rain from getting into it in summer, a cap is attached.
Installing a stove in a bathhouse with an external firebox is not difficult; the main thing is to strictly follow the instructions and observe all safety measures, especially for a model made of metal. And if you have no experience in construction at all, then you can watch detailed video instructions.
Fire Safety Basics
If the partitions inside the bathhouse are made of flammable material, then fire safety requires the following conditions to be met:
- the section of the wall located in close proximity to the fuel channel and the opening itself, hidden behind the stove body, is lined with asbestos cardboard. It, in turn, is covered with a metal sheet more than 4 mm thick;
- the distance from an unlined wall or partition to the stove body should be at least 32 cm. If the surfaces are covered with asbestos cardboard and metal sheets, then the distance can be reduced to 26 cm.