Everyone perceives a dacha differently, for some it’s a way to relax after a day of work in the garden, for others it’s a reason to get together with friends, for others it’s just a Saturday tradition. But in any case, a bathhouse at the dacha is a real miracle that every summer resident dreams of. Therefore, this article is devoted to how to make this dream come true, i.e. build a bathhouse yourself.
Bathhouse at the dacha
Choosing material for an economy bath
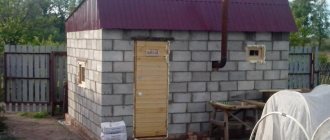
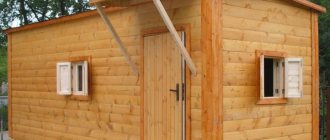
A small bathhouse can be built using frame technology, laid out from foam/gas/cinder blocks, bricks, or a frame made of logs or timber. The most environmentally friendly material is wood, but bricks and blocks are more durable, reliable and fireproof.
Small bathhouse in the country
Table. Comparative table of prices for materials for the construction of bath walls
| Material | Make/model/type/grade | Size/section, mm | Price in rubles |
| Solid ordinary building brick | M150 | 250*120*65 | RUB 16.90 per piece (240 pieces on a pallet) |
| Spruce or pine timber | First grade | 100*100*6000 | Price per 1 m3 from 5500 to 6700 rubles. |
| Spruce or pine timber | First grade | 150*150*6000 | 5500-6900 rub. for 1 cubic meter. |
| Pine edged boards | First grade | 40*100*6000 | 7500 rub. for 1 m3 |
| Edged board | 2.3 grade | 40*150*6000 | 5500 rub. for 1 m3 |
| OSB-3 | — | 9*1250*2500 | 548 |
| OSB-3 | — | 12*1250*2500 | 802 |
| Gas silicate block | — | 60*250*50 | 40 rub. per piece (133 pieces in one cubic meter) |
Prices for foam blocks
foam block
Walling
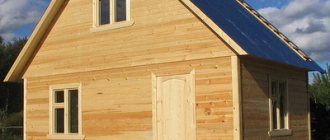
If we are building a frame bathhouse, after the foundation is prepared, we can begin building the walls. Before doing this, make sure that the wood is well dried. The type of wood used is not particularly important, with the exception of birch, since it will quickly rot. The main thing is that the wood has low thermal conductivity.
When choosing materials for external cladding, preference should be given to pine and larch, while aspen is best suited for interior finishing. After completion of construction, the outside of the building is covered with an antiseptic, for example, Texturol. It is necessary to monitor the quality of the work performed so that repairs to the bathhouse are not required too early.
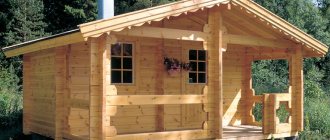
Economy bath project
Having looked at the prices for materials, you will notice that it is more profitable to build a bathhouse from blocks or using Canadian technology. Moreover, the latter will be more profitable if some of the materials are used or low-grade (for example, instead of an edged board, you can use an unedged one, adding color to a country bathhouse). More accurate data on material consumption can be obtained after drawing up a project and estimate.
Before starting construction, it is extremely important to think through the design of the bathhouse, calculate the amount of materials, note all dimensions and at the same time plan not only the location of the premises, but also the furniture in them.
Installation of a shelf in a steam room
Selecting a bath size
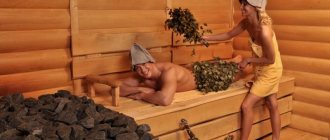
The main room in any, even the smallest bathhouse is the steam room. There must be two or three floors of shelves and a heater. Even if the dacha plot is small, and the bathhouse is planned to be very modest, the steam room cannot be made with an area of 3-4 square meters based on the simultaneous stay of two people (visitors should be comfortable steaming with brooms, sitting and lying on the shelves at full height). Such standards are determined by safety considerations (in a very cramped steam room it is easy to get burned on a hot stove or scald your skin with hot steam).
Steam room, interior
Also, if the entire stove is located entirely in the steam room and fuel is loaded from the same room, it is worth increasing the usable area of the room by another 1-2 meters to make it convenient to store and add firewood to the firebox. Directly in front of the stove, a pre-furnace sheet measuring 1x1 m must be laid, which is also noted on the plan diagram of the future bathhouse.
The bathhouse certainly includes water treatments, so you should think about a small shower located in a separate room or adjacent to the steam room. The second option, when the steam room and washing room are combined, allows you to save space and reduce the cost of installing sewer drains and interior partitions.
Bathroom layout
The last important room of the bathhouse is the dressing room or dressing room. There should be benches and hangers for visitors, a cabinet for bath accessories, and possibly a small table. It is also possible and preferable to have the heater located in the steam room, and the loading door opens into the dressing room, which allows you to save on heating.
The photo shows a small dressing room with a slatted wooden floor
In an economy bath you can do without:
- plumbing system. But you will have to equip a stove with a tank and bring water in buckets manually;
- separate bathroom. These amenities can be taken outside or into a country house if the bathhouse in the country house will be used only in the warm season.
But you won’t be able to do without electricity and sewerage, so it is advisable to order or build a septic tank/cesspool/drainage pit, as well as extend a power line to the site where the bathhouse is being built, because steaming by candlelight is very inconvenient.
Bath drain
Be sure to indicate on the plan diagram:
- dimensions of the building and each room separately;
- ceiling height and overall height of the bath;
- furnace location;
- the sides into which the doors will open, including the firebox;
- location of windows (in the steam room the window is located at a height of 185 to 195 cm from the floor and not above the shelf);
- location of the socket and switch, shield and lamps (only products with a moisture protection level higher than IP54 are used).
Below are several projects of small one-story country baths.
3x3 m
Bathhouse project 3x4
Project of a 6x5 bathhouse with a terrace
Bathhouse 4x4
Video - Designing a bathhouse
Video - Bathhouse project. Compilation
Installation and insulation of floor coverings
Bars with a cross-section of 5x5 centimeters are nailed to the bottom of the logs in the main rooms of the bathhouse building. Rough coating boards are mounted on top of them, then roofing felt (for waterproofing), followed by mineral wool slabs 10 centimeters high or expanded polystyrene. Before laying the final finishing material for the floor, glassine is laid (to provide a vapor barrier).
The floors in the washing area can be arranged differently:
- To ensure that the floor surface is warm in any weather and dries quickly, a separate foundation should be created around the perimeter of the room.
- The soil is removed to a depth of 50 centimeters and a 10-centimeter layer of gravel and sand is poured into the resulting trench. If water enters such a drainage hole, it will go into the ground and a pit will not be required.
- For this floor, it is advisable to use asbestos-cement pipes with a diameter of 10 centimeters. They are laid directly on the foundation and filled with concrete so that they do not move.
- Then a 4-5 cm thick edged round board is laid on the pipes, maintaining a gap of 6-7 millimeters and using rubber gaskets, which are fixed with nails.
- Then the floor material is pressed down with baseboards.
Construction of a small frame economy bathhouse at the dacha
Let's start with the base of the bathhouse - the foundation. Since the bathhouse will be small and relatively light, there will be no need to pour a monolithic slab or make a buried reinforced tape. For a one-story bathhouse, a columnar foundation made of blocks or asbestos pipes with concrete poured into them is sufficient.
Stage 1. Marking
Marking
This stage is required for any type of construction. We choose a place on the site where the bathhouse will be located.
Take 4 pegs and a plumb line. We drive the first stake into the soil strictly vertically, that is, we mark the first corner of the house. From this point we set aside the length of one of the walls and drive in a second stake. We tie both pegs with a cord.
We place the third and fourth stakes in the same way. We check the equality of the marking diagonals and, if necessary, adjust the stakes and cord.
We also use a cord to mark the places where the interior partitions will be located.
We arm ourselves with a shovel and remove the top layer of soil along with the grass inside the cast-off. We level the bottom of the resulting base horizontally and compact it.
Video - Marking the foundation
Stage 2. Foundation
Let's consider the option of arranging a columnar foundation made of concrete blocks measuring 20*20*40 cm. Their price ranges from 45 to 60 rubles per 1 piece. You can use ordinary bricks (13-16 rubles per piece), including used ones.
Columnar foundation made of concrete blocks
We take a drill or a shovel and start digging holes measuring 50x50 cm for blocks or 35x35 cm for bricks. The distance between the holes is no more than 2 m, the depth of each is approximately half a meter. The holes should be located in the corners of the house, under load-bearing walls and interior partitions.
To install foundation pillars, dig holes of the required depth with slopes
We tamp the bottom of each hole, fill it with a layer of sand and crushed stone (each layer up to 10 cm) and repeat the compaction process again.
Fill the crushed stone with liquid cement laitance. We stick one steel rod strictly vertically into the center of each hole.
We lay out bricks or blocks around the rod, 2 pieces at a time. in every row.
Block laying
The posts should rise 20-30 cm above the soil. We check the horizontalness of the entire base by pulling the rope and using a bubble level. If necessary, we compensate for unevenness with a layer of cement mortar.
Columnar block foundation
foundation column
We cover each column with a piece of roofing felt.
Stage 3. Economy bath frame
For the frame, you can use timber 100*100 cm or 150*150 cm. There is no need to skimp on load-bearing elements. It is also advisable to impregnate the wood with a fire-retardant composition.
The lower harness consists of 4 beams.
Columnar foundation with bottom frame
Columnar foundation with bottom trim, diagram and explanations
Connecting corners using the “claw” or “half-tree” method.
Connecting the beams of the lower trim
Connecting corners
We cut threads on the reinforcing bars protruding from the corner posts (the pins on the intermediate posts can be cut off). We drill holes at the ends of the beams for these pins. We cut out the ends of the beams according to the diagram shown.
We assemble the lower harness by putting the bars on the pins. Tighten the nuts and locknuts from above.
Bottom harness
Next, we assemble the wall frame. Using perforated fasteners (angles), we fix the vertical beams to the bottom frame.
Perforated fasteners
Perforated fasteners
Between the vertical beams we nail or fasten with self-tapping screws horizontal jumpers from a 50x50 mm bar. We strengthen the corner posts with jibs made of 50x100 mm boards.
First wall
Second wall
Third wall
All perimeter walls are installed
Strengthening the bath frame
Frame supports. Fastening
All that remains is to make the top trim. To do this, we use a 50 mm thick board, which we screw to the ends of the vertical beams with long wood screws.
This is how the corners of the frame bath were designed
The bars of the top trim are joined exactly above the wall stud. In the photo the frame is already insulated with foam plastic
Installation of notches for ceiling beams
Floor assembly using perforated fasteners
Overlapping in a frame bath
Prices for wooden beams
wooden beams
Stage 4. Gender
Let's look at an example of arranging a leak-proof floor in a bathhouse. In order not to waste time cutting lumber, we take fastening perforated corners, self-tapping screws and assemble the floor joists. We place boards 50x100 cm between the beams of the lower frame on the edge, maintaining a distance between the logs of 40-45 cm.
Assembling the floor from the board in the “on edge” position for greater rigidity
Installation of subfloor
The floor joists can be covered with OSB-3 sheets (approximately 480-550 rubles per sheet 1250x2500 mm and 9 mm thick) or use the same wooden boards from which the joists are made. A hole must be provided in the subfloor for installing a drain from a washing room or steam room.
Installation of subfloor
Be sure to stretch Izospan or other vapor barrier film under the wooden subfloor.
To insulate the floor, we again attach logs on top of the subfloor, between which we lay expanded clay, sawdust or red moss, cover the entire “pie” with waterproofing film and assemble the finished floor from boards or moisture-resistant plywood (from 260 rubles for a sheet of 4 grades measuring 1525x1525 mm and 4 mm thick). The use of polystyrene foam as insulation, including packaging, is possible only in the dressing room.
An example of floor insulation with packaging foam
Prices for Izospan
isospan
Stage 5. Roof
Before making the roof, we assemble the top floor (ceiling). We use the same fasteners and boards that were used when installing the floor joists.
It is better to make a gable roof for a frame economy bath. It will make the bathhouse more attractive in appearance, and the space under the roof can easily be converted into a sleeping area or a storage area for brooms. On the other hand, a lean-to structure will require less materials.
Example of roof slope calculation
Templates for cutting rafters, racks, floor joists
Table. Types of roofs, diagrams
| Roof type illustration | Advantages | Description |
| Flat or single slope Rafter system of a pitched roof Slope angle of a pitched roof Scheme of the rafter system of a pitched roof | Saving of materials, ease of assembly, ability to use the roof. | For baths up to 6 meters wide, it is permissible to arrange flat roofs with a slope of 10-25 degrees and sloping rafters. The ceiling is made from coniferous bars from 100x100 to 150x200 mm. The laying step is from 40 cm to 1 m. On top of the beams, a continuous, gap-free lathing is assembled from edged boards or OSB, then a lathing for insulation is installed - expanded clay with a layer of 10 cm, mineral wool or polystyrene foam. Several layers of roofing material or other moisture-proof material are laid on top of the insulation. The roof itself can be made from corrugated sheets, antiseptic-treated boards, etc. |
| Gable. Suitable for baths with an area >12 sq.m. Gable roof design Roof slope Gable roof units | Possibility of using the attic for household purposes or for overnight accommodation. The roof is stable and durable | The roof angle is selected from 30 to 45 degrees depending on the type of terrain. To install such a roof, the top trim and the Mauerlat must be made of timber. Rafter trusses are isosceles triangles with a jumper between the ribs (crossbar). The rafters rest on the Mauerlat and can hang a maximum of half a meter. The rafters are cut according to a template and assembled into trusses using metal fasteners and long self-tapping screws. The outer trusses on the gables are attached first, followed by the remaining rafters at intervals of up to one and a half meters. A sheathing of slats or boards is placed on top of the rafters, a vapor barrier is stretched, after which the roofing material, for example, corrugated sheets, is secured. |
Installation of the first roof trusses
Installation of intermediate trusses
Installation of crossbars
Lathing
Installation of corrugated sheets on the roof
Installation of corrugated sheets on the roof
Video – Roof construction
Stage 6. Interior and exterior decoration
Table. Brief description of the stages of insulation, insulation and finishing of an economy bath
| Work order | Scheme | Description |
| Attaching the insulation from the outside | Attaching the insulation from the outside Attaching the insulation | Polystyrene foam will provide the walls of the bathhouse with additional rigidity and retain heat. For installation we use polyurethane foam and PSB-S-15. We cut out pieces of foam plastic according to the distance between the frame posts, insert foam plastic between them, and foam the cracks. It is recommended to cut out the foam 0.5-1 cm larger in size than the existing openings to avoid gaps. |
| Lathing for insulation inside | Lathing for insulation inside | We use 2x5 cm slats. We fasten them horizontally. Fixation is carried out using wood screws. We take the distance between the slats equal to the width of the insulation. |
| Insulation of a bathhouse from the inside | Insulation of a bathhouse from the inside | We lay mineral wool slabs between the lathing slats. We stretch a polypropylene cord over the mats and secure it with small nails or a stapler. |
| Bathhouse cladding outside | Bathhouse cladding outside Frame covering | The outside of the bathhouse can be covered with OSB-3 sheets, which can then be plastered or painted. Finishing with unedged boards or siding would also be an acceptable option. |
| Vapor barrier and wind protection | Vapor barrier and wind protection | On the outside of the bath, under the layer of finishing material, we attach an overlapping windproof film (you can use glassine). On the inside of the walls and ceiling we stretch foil vapor barrier with a thickness of 80 microns. We fix the overlaps of the strips with metallized tape. |
| Internal lining | Interior decoration | The traditional material for interior decoration is lining. Economy option - aspen. It is better not to use pine lining in a steam room. In the dressing room, the walls can be covered with PVC panels or moisture-resistant plasterboard, and then painted. |
| External skin | Shingles | Many interesting materials are used as external cladding, such as shingles or shingles. These are thin wooden planks that are fastened with nails to the walls, and the rows are fixed with a slight overlap (top to bottom). An environmentally friendly and economical solution. |
Stage 7. Ventilation
An economy bathhouse is probably a compact room, but this does not exclude the need for ventilation.
Forced ventilation
The hole for air flow is traditionally installed near the heater, closer to the floor, and the installation of the ventilation valve is carried out simultaneously with insulation and finishing of the walls. The air flow from the supply ventilation duct must reach the heating element of the oven. It is especially important to arrange effective ventilation if the firebox door does not open into the dressing room, but into the steam room.
The exhaust vent should be located closer to the ceiling. The hood must be equipped with a damper. The air is exhausted through a ventilation pipe to the roof; the head of the pipe is covered with an insect net.
Exhaust hood in the steam room
Natural ventilation can be organized through a small window located at a height of 185 cm above the floor level. Ventilation will occur with the windows and doors of the premises open.
Window 40x60 cm
Video - Ventilation in the bathhouse
Prices for bath fans
bath fan
Stage 8. Equipping the bathhouse
Having assembled a bathhouse with your own hands, make a metal stove with a heat exchanger and an external water tank. The main thing is to lay asbestos cardboard on the floor and wall behind the stove during installation, and cover it with a steel sheet to prevent spontaneous combustion of wooden surfaces.
Stove for a bath Installing a stove on a tile
It is not necessary to calculate the load on the floor and rafters for a single metal stove; a floor structure made of 150x50 mm joists in increments of 45-50 cm and a 5 cm thick floorboard will perfectly withstand a heater.
Electrical wiring in the bathhouse is laid either before the finishing of the walls (hidden type) or after (external). Lamps and sockets are purchased and installed that are strictly moisture-proof, class higher than IP 54. Installation of a separate electrical panel and protection of all cables from moisture is required.
Wiring in the bathhouse
Open wiring
Approximate electrical diagram
Prices for asbestos cardboard
asbestos cardboard
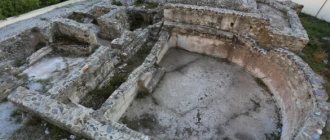
Strip foundation
Such a foundation is installed when there is heaving soil on the plot.
The work on its construction is carried out step by step:
- Markings are made on the site and a trench is dug, the width of which is 40 centimeters and the depth is approximately 50 centimeters.
- The hole is filled with sand layer by layer until the ground level is reached, compacted each time and watered with water to ensure compact shrinkage.
- They construct formwork 50 centimeters high and 30 centimeters wide. For greater strength, it is reinforced using rods and metal pipes.
- Pour the concrete solution in several approaches (without allowing the previous layer to dry) or at a time.
- Roofing felt is laid on top of the concrete to waterproof the frame walls.
Other interesting projects of economy baths
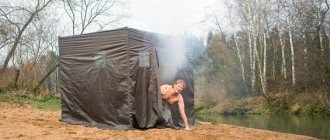
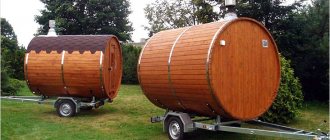
A very unusual, but no less comfortable barrel sauna is a cylindrical wooden structure on two supports, internally divided into 2-3 compartments, the farthest of which is a steam room. The sauna is mobile, takes up little space, is economical and economical (very little fuel is needed to warm up a small steam room).
Barrel sauna
Sectional view of a bathhouse barrel
Turnkey barrel baths cost from 35 to 220 thousand rubles. In practice, to assemble such a bathhouse yourself, it takes half as much money and not a lot of effort and time.
Barrel sauna project
Assembly and disassembly of the bathhouse is possible due to the boards used 45x90 or 50x90 mm with a tongue-and-groove connection. The length of the barrel, depending on the boards used, is 2.5-5 meters. The structure is secured with metal hoops. Additionally, the bathhouse can be equipped with a porch, roof, and canopy.
The water in the barrel bath is drained through holes in the floor. If you plan to install such a bathhouse at your dacha, you should remove the layer of soil, fill it with crushed stone, compact it, and install the bathhouse itself on a pair of stable, massive concrete blocks. The rules for installing a stove and laying electrical wiring are standard for any type of wooden bathhouse, including economy class.
Fastening elements for sauna barrels
Do-it-yourself barrel sauna
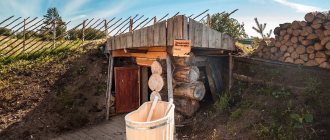
Creating a wooden base
Self-construction of a small frame bathhouse, as a rule, does not require the construction of a foundation due to its lightness. But to prevent the walls from becoming damp, you need to make a foundation.
In the case where you plan to build a bathhouse no larger than 3x4 meters in size, and the walls and roof are light, then it is enough to create a simple wooden foundation, which is secured along the edges with stakes. Such a foundation is considered a particularly good solution when carrying out construction on clayey, seasonally mobile soils that do not have excessive levels of moisture.
Exterior wall decoration
As practice has shown, the construction of frame baths is best done from OSB boards. The fact is that they are multi-layered and do not move or warp, as happens with natural wood. But a bathhouse made of OSB or other materials needs external finishing. One option is plastering or painting.
The modern construction market offers a huge selection of finishing materials, and therefore it does not matter how simple the design of the bathhouse is from the outside, since it can be given an expensive appearance.
The most popular and in demand of them now are:
- Lining. This decorative finishing material is the most accessible and easy to install for external upholstery of frame baths. Such buildings look very solid. On the external wall, the lining is placed horizontally after waterproofing has been made from glassine, the sheets of which are fixed overlapping and the edges are taped. If the work is done efficiently, unnecessary moisture will not be able to penetrate inside the bathhouse.
- Thermal panels. Often the construction of a frame building requires wall insulation, which can be done with their help. Thermal panels have a three-layer structure. It contains thermal insulation material (mineral wool or polystyrene) between two polyvinyl chloride layers. The surface of thermal panels, as a rule, looks like masonry and is sprinkled with compressed stone chips on top. The panels have mutual grooves, and after they are laid, a monolithic pattern is obtained, reminiscent of brick or stone walls. The finishing of the façade of the bathhouse is carried out using ordinary self-tapping screws - they will fix the material to the profiles.
- Facing brick. Brickwork fits perfectly into the landscape of any garden or summer cottage on which a frame bathhouse is being built. An even row always looks beautiful on a bathhouse building. The cost of facing a frame structure with brick will be much cheaper than building an entire bathhouse from it. In addition, additional insulation can be laid between the brick trim and wooden walls.
- Vinyl siding. This is the most popular modern cladding material used for cladding frame bath buildings. Siding has an affordable price and is easy to install. In addition, the market offers a wide selection of textures, colors and thicknesses of products.
- Block house. A frame bathhouse, the façade of which is lined with this latest material, looks like a log structure. It is almost impossible to distinguish such a building from a real log house.
Construction of the truss structure
Typically, boards with a section of 15x5 centimeters are used for floor beams and rafters in frame baths. They are placed on the edge and fastened together. As a result, a distance of 10x12 centimeters is obtained between the rafters. In a vertical position they are fixed with “kerchiefs”, and on top they are combined with a ridge beam of a similar section.
The beams extend outward approximately 40 centimeters. The sheathing is made from boards 25 cm thick, it is laid in the direction from the ridge.
To fasten the rafter forms, special metal plates are used. It is much easier to assemble such a structure on the ground next to the building, and then lift it up and install it there ready-made.