How to make a wooden bucket with your own hands in the form of a small cylinder, we will consider in this article.
The figure shows a sectional view of the bucket design:
1.
Stacked bottom.
2.
Typesetting board.
3.
Metal hoop.
4.
Eyelet for attaching the handle.
5.
Handle.
It is assembled using glue from boards and slats. Boards measuring 20 x 45 x 225 (mm), in which we mill grooves measuring 5 x 7.5 (mm) in the center of the side surfaces. Planks measuring 5 x 15 x 225 (mm). We compress the assembled shield with clamps and wait until the glue dries completely.
Using a jigsaw, cut a circle from the assembled shield. The end of the bottom is ground around the circumference to size 10 (mm), as shown in the drawing.
Let's make it from a wooden plank with a cross-section size of 20 x 45 (mm), grind the side edges at an angle of 10° with an inclination to the center of the bucket. We end all the planks at the same size 350 (mm) and mill a groove from the bottom 4 (mm) deep and 12 (mm) wide. We will make chamfers on the sharp corners of the end faces.
The number of strips in the example under consideration is 18 pieces. Let's calculate the angle of inclination of the side faces: 360 / 18 / 2 = 10° The angle is an integer; there will be no problems with setting up the processing equipment.
We will make it from hot-rolled tool strip 3 x 30 GOST 4405-75. Drill holes for M5 threads along the edges of the strip. Screw the corners and insert the tightening screw as shown in the figure.
Using a nut, compress the edges of the strip to the required size and weld them. Unscrew the screws and remove the device. Finish the seam and smooth it with an abrasive wheel.
Before welding, we prepare a one-sided joint with beveled edges of the following dimensions:
• joint width 2 (mm) • joint depth 1 (mm) • joint edge angle 60°.
HANDLE EYE
We will make it in the form of a loop from highly alloyed corrosion-resistant wire Ø 5 (mm) GOST 18143-72.
We will make it from the same wire as the ear.
Assembly order
, or how to make a wooden bucket with your own hands:
1.
Let's assemble all the planks around the bottom so that the bottom fits into the grooves of the planks.
2.
Compress the assembled structure with twine.
3.
Squeeze and weld the hoops.
4.
We will weld ears to the upper hoop for attaching the handle.
5.
Insert a pen into the ears.
6.
Let's lower the product into the water.
After some time, the wooden boards will swell and all the cracks will disappear.
Do you have a bucket in the bathhouse for pouring cold water? If not, then you don’t have to buy it, but make it yourself. The process is simple, but requires attention.
Buckets for pouring into the bathhouse. Photo: gazteplo.com.ua
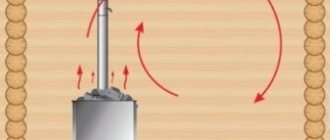
Features of using a dousing bucket in a bathhouse
The list of bath pleasures is incredibly wide. A place of honor among them is occupied by the process of cooling a hot body in a cold body of water, a snowdrift or under an invigorating dousing bucket. All these procedures not only provide physical pleasure and intense sensations, but also provide invaluable benefits to the body: they accelerate blood circulation, tone the skin, and cleanse it of toxins. In a word, they strengthen and rejuvenate the body.
It’s good if there are objects with cold water for immersion in or near your bathhouse. Otherwise, we recommend that you make a dousing bucket and enjoy all the delights of the original Russian bathhouse.
The shower bucket for a bath is a modernized, improved version of a wooden bucket, movably mounted on the wall of the washing room. This is a kind of container of significant size that instantly throws cold water onto the head of a visitor who pulls a cord or chain. Due to its functional purpose and similarity of shape, such a device has acquired several more popular names. For example, a waterfall bucket for a bath or an upside-down bucket.
On a note! For the first time, the primitive form of such a bucket was invented by ancient Russian bathhouse attendants. At that time, birch bark or a solid log was used for manufacturing, from which the middle was hollowed out. Only over time, coopers began to create them, using smoothly planed dies and metal rims.
DIY wooden bucket
Hello DIY lovers, this time we will look at how to make a bucket out of wood with your own hands. This homemade product will be useful for those who have a bathhouse or simply for those who like such things. Of course, in comparison with modern plastic or metal buckets, this wooden bucket is heavy and not durable, but how does it look! You can also ferment cucumbers, tomatoes, apples, and so on in such a bucket. The author used fairly modern tools for manufacturing, so the assembly process turned out to be quite simple. If the homemade product interests you, I suggest you study the project in more detail!
Materials and tools used by the author:
List of materials:
- boards;
— iron plates for rims; — screws with nuts; - thick wire (for the handle); - wood glue. List of tools:
- band cutting machine; - Miter saw; - a circular saw; - hammer, chisel; - masking or other tape; - hacksaw for metal; - pliers; - welding machine; - drill; - sandpaper; - plane. Bucket making process:
Step one. Cutting materials
Let's start looking for the necessary materials, we will need boards of the same thickness, the author used different trims.
To get all the boards of the same thickness, the author ran them through a surface planer. Step two.
Bottom We make the bottom for the bucket; to obtain the material you need, we glue together two or more boards.
Well, then we draw a circle with a compass and cut it out. For cutting, the author used a band cutting machine. The edges of the circle need to be ground down so that they are narrow and fit into the groove; here the author works with a plane. Step three.
Assembling the bucket To assemble the bucket, we need to do some calculations, and then cut the boards at the desired angle of the desired shape. The point is that after assembling the bucket, all joints have minimal gaps, only this will ensure the seal of the bucket.
We make grooves in the blanks for the bottom, and now the bucket can be assembled. For this we need masking or other adhesive tape. We simply assemble the bucket first flat on the table, gluing the boards together with tape, and then lift it, roll it up and have a finished bucket.
At the end, all that remains is to glue the bottom, here we will need carpenter's or similar glue; to increase the strength and tightness of the connection, we add small sawdust to the glue. We tighten the bucket and let the glue dry.
Step four. Headbands
We make rims for the bucket; they will hold the boards and also compress them, eliminating gaps at the joints. Here we will need iron plates, and we will bend them by cold forging. We take a hammer and hit one edge of the plate; it immediately begins to twist due to uneven internal stresses. Thus, we get the rims of the required sizes, and weld the ends.
We carefully press the made rims onto the bucket, now we have it strong and airtight, and when water gets into it and the wood expands, the structure will become even more airtight and strong.
Step five.
Pen and tests First, we will make two ears, to which we will hook the pen. They need to be cut from an iron plate. We will attach the ears to the bucket with screws and nuts, drill holes in the bucket and screw them on. All that remains is to make a handle; here we will need thick iron wire. We also grind directly the part of the handle that we will grasp with our hands; we use wood as the material. If you don’t have a lathe, don’t worry, such a part can be made with a drill or even hand tools.
We bend the wire and install the handle on the bucket. Now it's ready for testing! We pour water into the bucket, it holds it without any problems, and everything looks like a masterpiece! If the wood is not treated with anything, it will darken over time and will look even more interesting, but this is not for everyone. At this point the project can be considered finished, I hope you liked the homemade product. Good luck and creative inspiration if you decide to do this again. Don't forget to share your ideas and crafts with us!
Source
This post may contain affiliate links. This means I earn a small commission from links used at no additional cost to you. See my privacy policy for more information.
bucket, homemade, tree
Design of a shower bucket for a bath
Regardless of what material was used to create the pouring mechanism, its design will always be the same. A bucket for pouring into a bath consists of the following components:
- Brackets for securing the vessel to the wall;
- Wooden or other container for water;
- Systems for monitoring the level of water supplied from the water supply;
- Rope, with which the bucket is tipped over if necessary.
In fact, the design is both ingenious and simple.
Even a novice master can create one. There are many design options, among which making a bucket from wood is considered the most problematic. The finished product will require special care, but at the same time it will look more aesthetically pleasing than all other options. Some inconveniences of a wooden bucket are associated with the need to fill it with water in advance. The bucket must swell, otherwise cold water will simply seep through the cracks. However, you cannot regularly leave the container filled. Over time, the wood will become covered with mucus, and the water will become cloudy and begin to stink. A solution to the problem can be a plastic insert mounted in a wooden vessel. It will help to avoid unwanted hassle of caring for the system, while leaving the appearance of the structure completely presentable.
Requirements for installing a dousing bucket in a bathhouse
If the size of the dousing bucket can be chosen personally by the owner of the bathhouse (large and tall or small and wide), then its location must certainly meet special requirements.
In most cases, the upside-down bucket is installed in the washing room: water is supplied there and the drainage system is set up. Although the presence of running water is not at all a prerequisite for the functioning of the “Russian shower”. Water can be brought to the container using a flexible hose or simply poured manually while standing on a bench. Sometimes a dousing bucket is installed directly on the street near the bathhouse. This option allows you to collect and use healthy rainwater for good purposes. But it is worth remembering that drainage on the street is no less necessary than inside.
The most difficult stage of installing a bucket in a bathhouse is correctly determining the required height. For people of average height, the recommended height is 2 or 2.2 m. For tall owners, it is worth setting the mark at 2.6–2.8 m. In any case, a person should be placed under the dousing bucket with their arms extended to the top. Do not forget that the vessel will turn over. Therefore, it is worth adding the height of the bucket itself to the planned mark.
Calculation of the level for a person with average height will look something like this: 170 cm (height) + 40 cm (at arms length) + 40 cm (tank height) = 2.5 m.
Regardless of the choice of location for installing the bucket, the mount must be strong enough and durable. Keep in mind that the fasteners must be able to withstand at least 60 kg! In the traditional version, the container is secured to the wall using metal brackets (even better, stainless steel). To create a movable connection, special ears can be welded to the barrels of the container. And it’s even easier to install a stainless steel rod that passes right through the wooden boat.
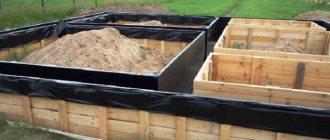
Material and manufacturing
You can use any material that holds water in the slightest degree, for example, even raincoat fabric. I had a piece of high-density PVC (1x1 meter in size), which was left over from making a pool. I also had the idea of using an old, unusable Intex mattress.
So, we mark and cut the bead. The net height will be 230 mm. I leave two centimeters to glue the bottom. You still need to have a margin of 5 centimeters on top in order to make a flange (I already had it).
Considering that my piece of PVC is a meter long, I calculate the radius of the bottom. The bucket will have a diameter of 300 mm. I find a suitable template, outline it with a marker, and cut it out.
Now you need to make a notch on the sides, which will help to make gluing along the radius. I make A-shaped cuts approximately every 20 mm.
Can be glued. The glue you need is one that is designed to work with PVC. By the way, if you have a hair dryer available, then PVC fabric can be boiled and rolled with a rubber roller.
We degrease the contact areas, for example, with nail polish remover.
Apply glue to small (10 cm) areas with a brush, press/tear off and spread some more. We press again - this time as hard as possible (I tapped the glued area with a hammer).
The petals are easily bent and placed on the bottom. I also thought about applying glue to the inside, but the joint between the side and the bottom turned out to be literally airtight (which is actually not necessary).
The next step is to glue the seam of the side. We first make markings; my overlap was planned to be 30 mm.
The bucket has already been created, but its top does not hold its shape at all. To edge the edges, you need to insert something rigid inside the flange. You can use a cable or a thin metal-plastic pipe. I used elastic steel wire with a cross section of 2.5 mm. We push it around the circumference, make small holes with an awl and hide the ends.
All that remains is to build the handles. I liked the idea of making the carrying device removable, so that when you stuff the feeder into the bucket, the leash won’t get caught on anything.
The household had a handle with an adjustable length from the bag - it worked. For carabiners, I make oblong holes near the very top (under the wire). The only tool that did the job one hundred percent was a soldering iron.
Bath bucket with plastic liner
You can make a doused bucket in the most primitive way, accessible even to people who have not previously had anything to do with wood.
To do this, it is not necessary to become familiar with the basics of cooperage and learn to use special tools. A couple of simple steps will help you quickly make a wooden container that costs a lot of money on the market:
- To begin, select an ordinary plastic bucket of the most successful color. For example, white or azure blue. Water in such a container will look very advantageous.
- Next, remove the handle and any other parts present from the bucket. You don't need them at all. Don’t rush to throw them away; perhaps they will come in handy in the future.
- Prepare 25–30 not too wide sanded wooden planks. Their exact quantity depends directly on the size of the plastic bucket.
- Using super-resistant glue, attach the strips to the outer walls of the plastic container, imitating a wooden bucket. Coat the joints with transparent silicone.
- Cover the “wooden” container with a suitable varnish and strengthen it even more firmly with metal rings.
The wooden dousing bucket with a plastic liner is ready. Externally it is difficult to distinguish it from natural, but internally it meets all the requirements.
All about buckets for wells
Since we are talking about unforeseen situations related to buckets falling into a water well, we will also tell you how to avoid this and which buckets are generally better to use.
Well equipment
To prevent the bucket from falling, it must be securely fastened. How and with what to do this:
- Use a chain, one end of which is attached to the collar with staples, and the bucket handle is threaded into the last link at the other end.
- Buy a metal cable with carabiners at the ends.
Steel cable in PVC braid
Rope is not reliable, as it quickly becomes unusable. It is also important to make sure that the bucket handle fits well in the lugs. It is better to immediately purchase a high-quality stainless steel bucket for a well with a reliable handle. It is advisable to equip the head of the well with a convenient platform on which you can place a full bucket so as not to hold it suspended, risking dropping it.
Which bucket is better
Of course, it is best to give preference to metal buckets made of stainless steel or galvanized:
- Plastic buckets are very light. They most often do not drown when they fall, but it is also more difficult to collect water with them.
- Wooden buckets can only be made from certain types of wood (for example, larch), and they must always be kept in water so that they do not dry out.
It is not always possible to scoop up water from a well with a bucket if you lack the skill - to do this you have to throw it in a special way. True, if a heavy chain is used to lower it, it itself turns the bucket in the water with its weight, you just need to lower it deeper.
Advice. To prevent the bucket from floating when it gets into the well, but from turning over to scoop up water, you can attach a sinker to its handle on one side.
But the easiest way is to use a special bucket with a valve for the well. There are holes in its bottom, closed on the inside with a rubber valve. Water flows freely through them into the container, and when a full bucket begins to move upward, the valve, under the weight of the water, is pressed tightly to the bottom, preventing it from spilling out.
Valve diagram for a well bucket
You can buy such a bucket - it has been on sale for a long time - or you can make it yourself, using soft rubber 1-1.5 mm thick and securing the valve to the bottom with a screw and a wide metal washer.
Wooden sauna bucket
This method of creating a wooden bucket will be more to the taste of those who have previously dealt with the processing and use of wood.
For a high-quality pouring device, you will need a piece of iron strip for two rims (about 3-5 cm wide) and a board of the 1st grade 1 cm thick. As a result, we get a 10-liter bucket with a height of 40 cm. The manufacturing process is a little more complicated than the previous one method, but the result is correspondingly much better and more aesthetically pleasing:
- Prepare a template for the bottom parts and rivets (side strips).
- Cut the existing board into pieces that match the stave pattern. Treat them thoroughly with a plane and sherhebel.
- Bring each detail to a state similar to the template. That is, carefully cut off the excess, giving the rivets a slightly trapezoidal shape.
- Mark the outside of each stave. Cut the ends at an angle of 3 degrees so that when connecting the planks together, you get a circle.
- Also, on each rivet, make a 4 mm indentation at a distance of 4 cm from the bottom edge. This recess is necessary to install the bottom of the container.
- Do your first fitting. Gather all the parts into a pile, holding them with metal wire. Number all rivets. Determine the size of the bottom part.
- Using the template, cut out the piece for the bottom. Cut off the top and bottom of the ends, forming a circle, so that the diameter is 1 cm less than the originally measured one.
- Measure to excess and cut a piece of metal strip for the bottom rim. Use a hammer to give it the desired rounded shape. Make holes at both ends and rivet them (with wire in fives).
- Make two tight clamps from pieces of metal strips.
- Attach two opposite rivets to the rim, securing them with clamps. Next, insert all the other parts, trimming them as necessary. Thus, completely fill the entire clearing on one and the other half of the bucket.
- Place the workpiece in its natural position and install the bottom piece.
- Measure the top circumference of the bucket and make a second rim at a distance of 10 cm from the top.
- Sharpen and file the product if protruding areas are visible anywhere.
Supplying water to a dousing bucket in a bathhouse
A factory-made drenching bucket is usually sold already equipped with a water level control system.
In most cases, the principle of its operation is identical to the system in the cistern. In fact, the system for supplying water to the dousing bucket is as simple as the design of the mechanism itself. The pipe is brought into the room at the height of the container. The crane cuts in at a level of one and a half meters from the floor. A rubber, plastic hose or stainless steel braided tube is connected to the pipe itself. A water level control system (if available) is connected to its second edge. In most cases, it is similar to the mechanisms installed in toilet flush tanks. This completes the simple process of supplying water and connecting the dousing bucket.
The technology for making a wooden bucket for a bath is presented in the video:
The shower bucket for a bath is ready! You can ignore small cracks, as the wood will swell upon contact with water. All that remains is to supply water to the selected place in the bathhouse.