Preparatory stage
In the question of how to sew a lambrequin with your own hands of a narrow sample, detailed instructions will help, you should immediately notice the fact that even a beginner can cope with the work.
First of all, a pattern is created, the algorithm of actions is simple, it looks like this:
- On a sheet of paper you need to draw a horizontal line, which will be fixed to the cornice and will serve as a guide.
- The width and footage of the swag are calculated.
- Then we move on to calculating the arc length.
- Attention is paid to the cascade; the visual design of the folds and their drapery will depend on this decision.
- Start cutting out the blanks.
With some types of fabric, you need to be as careful as possible at the preparation stage, because awkward movements will inevitably stretch the thin structure or cause damage.
DIY hard lambrequins: figured bandeau
First, you compare the width of the future figured bandeau with the size of the room. To do this, you can take a sheet of plywood, where the contour of the figured bandeau will be marked. After this, make a pattern for two fabrics - interlining and lining. Take into account one and a half centimeter allowances on the sides of the template.
To work you need:
- Wooden plank;
- Rings for fixing the bandeau;
- Fabric for covering the base of the lambrequin and its lining;
- Cord with braid;
- Special glue for fabric.
All work is being built in stages. First you reinforce the lining fabric to the interlining material. Then combine both fabrics in the middle. From each edge, cut the lining to the seam allowance line.
These cuts will give you the ability to more easily wrap each edge of the pad around corners and curves. After this, coat the bar and material with special glue. The cuts are folded over on each edge and glued with strong hand pressure. You process the gasket on each side in the same way.
Tooling and stitching material
Among the basic accessories for creating a lambrequin with your own hands for beginners, it is worth highlighting:
- Sharp scissors.
- Centimeter tape for measurements.
- Enough paper to make a pattern.
- Chalk or small bar of soap for tailoring.
- Large square.
Once all the pieces are cut, you need to trim the edges with bias tape, otherwise the appearance will be ugly. The prepared table should be well lit; it is better to allocate as much free space as possible for the convenience of the process.
The components of the future masterpiece are laid out on the surface and the planned folds are highlighted. The formed elements must be “baited”; after control fitting, all blanks are sewn together and attached to the rail.
A classic of the genre - a real hard lambrequin
Those for whom a model based on adhesive bandeau fabric is not enough can make lambrequins with their own hands on a plywood frame. For this purpose, you need plywood 1.5-2 cm thick and wood screws. Cut out the details of the box (sides, top bar, front wall and back). Connect the frame parts with self-tapping screws.
Prepare the fabric by cutting out a rectangle 15 cm longer than the total length of 2 sidewalls and the frame facade, and 5 cm wider than the facade. Make a gasket and padding polyester of the same size. For the lining, you need to make a rectangle 5 cm shorter than the front fabric.
Glue the padding polyester onto the box along the facade and sides. Sew the lining and front fabric. Using a furniture stapler, first attach it along the bottom border of the box. Pull the front part of the fabric onto the facade. Bring the edges to the top of the box and shoot with a stapler. Cover the sides.
Turn the box over, place the lining on the inside, and secure with staples. To decorate the top, cut the fabric of the required size with a hem allowance of 1.5-2 cm. Secure it with staples in the center and in the corners, then tuck the sections inward and secure them. Install hangers on the backdrop, mark their location on the wall, install fasteners and hang them.
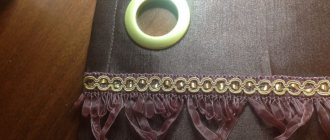
Such a lambrequin can be decorated with cord and fringe, hanging elements, applique, etc. You can attach additional draperies by laying the gather and shooting it with staple gun staples. There can be a lot of design options, you just need to use your imagination.
A rigid bandeau lambrequin, even the most elaborate one, can be easily made with your own hands. The main thing when creating it is the clarity and accuracy of edge processing. You can decorate a rigid base in different ways.
Save
Common materials for work
Looking at numerous photos of self-made lambrequins, the question arises as to what raw materials are best used in the process.
The purchase of material should be approached seriously, because decorative elements should not lose their shape and become a decoration, and not cause surprise from the unsuccessful design of the home.
Flowing foundations such as:
- Veil.
- Semi-organza.
- Linen.
- Curtain fabrics.
For decorative work in the living room, experts advise using denser types of fabric; such additions much better emphasize the status of the owner. At the time of purchase, it will not be superfluous to pre-lay out the folds; this will help you avoid miscalculation in size.
When choosing a fabric with a pattern, you need to pay attention to the shade; it should be combined with the rest of the contents in the room.
Important! Professional tailors do not recommend purchasing ordinary organza for such decorative purposes. The material is very hard and it will not be possible to create smooth lines, which will certainly spoil the final appearance.
How to perform sewing steps
You should follow the instructions:
Related article: Options for decorative plaster in the bedroom with photos
Pattern of a rigid lambrequin.
- Apply a special pattern prepared in advance to cut out the base of the bandeau.
- Iron the fabric with a warm iron.
- The fabric is glued onto the bandeau with a warm iron.
- Excess fabric from the edges is trimmed to 5 cm.
- Next, the fabric is placed on the lining.
- Using pins, pierce three sides without the top.
- Sew one centimeter from each edge of the bandeau.
- Next, the excess fabric is trimmed.
- After this, the product is straightened to the front side.
- The upper edge is turned right side out, pulled taut, and pinned with a pin.
- After this, you need to pin the Velcro on the hard side to the cornice.
- After this, the Velcro is fixed with machine stitching.
- Next, you need to trim the material exactly next to the adhesive tape.
- After this, the adhesive tape is unscrewed and pierced with a pin.
If this method of making a rigid lambrequin is too complicated, then the panel is made without a special lining, cutting off the fabric exactly where the edge of the adhesive base passes. Using a glue gun, reinforce the finishing material along all edges. The decoration can be cord, braid, fringe.
In the process of making a rigid lambrequin yourself, you should follow a few simple steps:
To sew a lambrequin you will need a roll of thick fabric.
- Make a regular pattern. First, for the template, exactly all the dimensions of the future gang lambrequin are taken. It is first necessary to determine exactly how the product will look, covering the entire cornice. The shape of the bandeau can be strict or have shapes and teeth.
- You will need to buy a frame, that is, a finished bandeau-pro product in a roll. This is a dense fabric, which is non-woven or dublerin, perhaps also a material for decoration.
- According to the pattern, it is necessary to cut out the frame, taking into account all seam allowances (5 - 6 cm on all sides).
- Prepared pieces of fabric need to be glued to the bandeau panel (you can use a steam generator, which is ideal for appliqués).
- The edges of the bandeau are treated with Velcro, which is glued at a distance of about 3 cm from the edge so that it is invisible.
- The decorated lambrequin should be placed on a special cornice where it was planned.
Using a veil
The raw materials are quite popular, which is why it is better to find out as much existing information as possible about such lambrequins for curtains with your own hands, long before starting work on the creation.
- The material is quite light and folds can be draped without any problems; it is important to correctly calculate the volume of the fabric; at this stage it is worth considering the type of curtain and how many sections it will contain.
- A simple type of product will require adding 15 to 20 cm to the length on each side. Elements with one section when created should have a value multiplied by 1.5 times.
- The pattern begins only after cutting the paper blanks, the dimensions must fully correspond to the natural size, taking into account all the small nuances it will be possible to create ideal proportions.
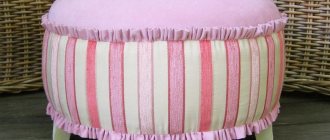
Hard lambrequins
Similar decorations appeared in the Middle Ages, but at that time they were made of wood. Now they are made of fabric - decorated, elegant, light.
The product holds its shape because the main fabric is glued to the bandeau. It can be made from the same textiles as curtains. But it is possible to choose other fabric colors and textile quality. The main thing is that there is harmony.
Types of textiles for rigid lambrequins
All types of textiles are suitable for this decor. The only thing that remains unchanged to create this decor is the bandeau. It is this that gives rigidity to the structure. Bandeau fabric is a non-woven material (analogue of felt) impregnated with a special adhesive composition. There are two types of bando:
- on a self-adhesive film - the protective coating is removed;
- on a hot-melt adhesive basis - the main fabric is placed on top of the bandeau and ironed.
There are also gangs:
- made of foam rubber, creating pomp and volume of the decor;
- transparent, for tulle, organza;
- with Velcro tape.
Sewing
To sew a rigid lambrequin, prepare:
- main fabric;
- lining for the wrong side of the bandeau;
- padding polyester;
- accessories;
- bandeau;
- Velcro tape;
- wallpaper for pattern.
First, draw the pattern, as usual, on lined paper in a reduced form, then transfer it to a large sheet. The length of the finished product should be equal to the length of the cornice, plus allowances - 2 cm at the top, 1.5 cm on the other sides.
You can make double lambrequins that overlap each other, and even triple ones. Then a separate pattern is made for each part, transferred to the fabric and bandeau, and all the elements are connected at the end.
The upper part of the product is usually always flat, and the lower part is openwork, figured. When transferring the pattern to a bandeau, no allowances are made. Connect the main fabric with the bandeau and iron.
Sew the lining fabric along the bottom to the main fabric, turn it inside out and sew the bottom again with a neat seam. Iron the lining fabric with the bandeau. Fold the seam allowance at the top to the wrong side and sew it too.
To make the product look more attractive, the stitching can be made from a contrasting thread, or the edge can be trimmed with braid.
There are so many variations for sewing that it is simply impossible to describe everything, but the basics for beginners were outlined in this article. Use our instructions and the saying: “Measure twice, cut once.”
Working with hard fabrics
The process is more complex; before you start making openwork lambrequins with your own hands, you should practice on light samples.
- But if you have the right pattern, there shouldn’t be any problems; thanks to such auxiliary materials, beginners can feel more confident. Do not forget about the allowance for tucking the fabric; it is left on both sides of the cornice when measuring; 10 cm will be quite enough for further manipulations.
- At the top, the base is created smooth, and the bottom is designed in one of the styles, which you will be able to familiarize yourself with while viewing master classes or photos of finished structures.
To transfer the pattern, fabric with an adhesive base is purchased, at this point allowances of 2-3 cm are left, then the two elements are fastened with pins or small needles to give strength.
Recommendation! When forming the base, fabric allowances are not needed; such manipulations are performed only with the outer fabric in order to make the appearance attractive by tucking.
How to sew a rigid lambrequin
So, you have decided to decorate your interior with this decorative element. The operating procedure will be as follows:
- Take basic measurements.
- Draw a diagram of what you want to see.
- Prepare materials in the required quantities.
- Draw a pattern on paper and cut it out.
- Place it on the bandeau, trace around without allowances and cut out.
- Place the non-woven fabric template with the adhesive side on the inside out of the fabric, which is best secured to a table or ironing board. Leave an allowance of 2 cm on top, 1.5 cm is enough for all the rest. For the best gluing, you should turn the product over and run the iron along the front side.
- Make the lining for the bandeau from the same fabric. To do this, fold the flap with the right sides inward so that the fold line runs no closer than 5mm to the most protruding element of the bottom edge.
- Pin both layers along the allowances so as not to damage the adhesive base.
- Sew the side seams and the bottom edge at a distance of 3mm from the bandeau. The value depends on the thickness of the non-woven material. Do not stitch the top edge.
- Cut off the excess fabric, leaving 0.5 to 1 cm to the seam.
- On the arched parts, carefully make notches with scissors, trim the corners so as not to damage the stitching.
- Turn the product right side out through the top edge.
- Run a finishing stitch along the outline.
- Iron the top edge allowances inward.
- On the wrong side of the lambrequin, sew a Velcro strip, the other part of which is glued to the cornice.
By following all the steps in sequence, you can make a beautiful hard lambrequin (photo above) of any shape.
Final stage
To ensure that the fabric sticks to the base as reliably as possible, use an iron heated to a certain temperature and iron the surface with it.
Using step-by-step instructions, you can avoid a lot of awkward situations; such manuals should be studied in advance, and the diagrams should be placed in front of you while working.
It is necessary to cut out the lining material according to the sample, all layers of the decorative element are assembled into one masterpiece, and stitched on a sewing machine.
It is important to remember that specimens with a rounded shape must have notches, otherwise the canvas will begin to form unplanned folds. This technique is performed from the inside of the device, which performs a decorative function.
Openwork lambrequin bandeau
One of the design options for such a lambrequin could be openwork appliqué. For it you need to choose a fabric of a contrasting color in relation to the base. This way the openwork weaves will be better visible. The fabric for the base can have an unobtrusive pattern, but a plain base will look good.
You may also be interested in: How to make a curtain without sewing - throws and draperies
You can draw the pattern for the openwork yourself, to suit your taste. Intertwining stems and leaves, an ornament on one of the interior details, or a vignette you like on a box of chocolates - everything will be appropriate if you do not overload the bandeau with decorative overlays. The openwork must first be made on paper in full size, and then cut out and transfer the pattern to the prepared fabric.
There are also no particular difficulties in how to prepare material for appliqués. You will need non-woven fabric and web to connect the layers of the openwork element. Iron the fabric for the front side with a dry iron to the adhesive part of the interlining. On its reverse side, lay out an adhesive web, and on top of it a lining of synthetic padding polyester, quilted with a thin fabric. The padding polyester should be inside the multi-layer cake.
To create clear, melted contours of the openwork, you need an electric burner. You can buy a tool in craft stores or borrow it from friends if you only need it for one time. Having redrawn the pattern on the wrong side of the glue cake, carefully cut it out with the heated tip of the burner. Place the openwork parts on the base of the lambrequin and attach with a hot glue gun. Add rhinestones and sparkles, hanging elements, etc.
Photos of homemade lambrequins
3333333