Purpose and advantages of suspended ceiling
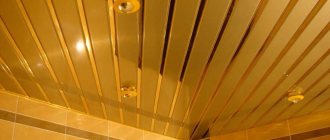
The main function of the Armstrong suspended ceiling is to hide various types of defects and irregularities underneath it. In addition, they are a good decoration. The panels have a beautiful appearance and design, so they will fit well into the interior of the room. The richness of colors and the ability to integrate lighting elements into them are all advantages of using pendant systems as decoration.
Armstrong suspended ceiling with built-in lighting
And due to the specifics of the installation, communication means can be hidden behind the ceiling tiles. This is a pretty good solution, since you don’t have to mask the wiring in baseboards or walls.
It is also worth mentioning the properties of ceiling panels. They are an excellent way to soundproof. Their installation will save you from noisy neighbors on the upper floors.
Advantages and disadvantages
Most often, Armstrong is found in offices, in production - in workshops, as well as in commercial organizations in various fields of activity. Today, the appearance of such a ceiling has improved compared to the original version. The design is stylish, you can create different images using light sources. Other benefits:
- reasonable cost: when compared with other types of suspended ceilings, Armstrong will win based on a number of factors, including cost;
- variety of choice: a large number of slabs and their fastenings are on sale, which will help you create a suitable structure with your own hands, there are matte and glossy elements of the system, with a film coating, mirrored ones “like wood”;
- simple installation: the system elements are connected to each other thanks to fastening in the form of hooks, the profiles are attached using self-tapping screws;
- board material – most types are environmentally friendly;
- The Armstrong design is very light, since the profiles are made of high-strength aluminum alloy;
- the wires are not visible under the ceiling; the ventilation shaft is a huge plus if there is nothing to disguise them with.
The Armstrong ceiling also has disadvantages. Thus, they note:
- appearance: the design of the structure is most suitable for offices, industrial premises; for residential buildings and apartments this system is chosen less often;
- Armstrong suspended ceiling helps reduce the height of ceilings; you can try to maintain it by reducing the length of the suspensions and removing some of the wires that should pass behind the ceiling.
Armstrong suspended ceiling installation
The suspended ceiling is created from a multi-component frame on which the slabs themselves are installed. This design is very reliable and will last a long time.
The frame is created from a variety of metal profiles, longitudinal and transverse. It is attached to the ceiling using a fastening unit and a suspension, which consists of a hook and a rod.
Armstrong suspended ceiling installation
The most massive and strong elements of the metal profile stand on the sides of the structure, forming a rectangle. The remaining beams are placed on it in accordance with the future number of slabs. It consists of a load-bearing profile of 3700 mm, a perimental profile of 3000 mm (required if you need to install trimmed slabs), a longitudinal profile of 1200 mm and a transverse profile of 600 mm. As a result, this all forms a frame for the suspension system.
Installation of suspended ceiling Armstrong
Armstrong suspended ceiling panels are most often produced square, with dimensions of 600x600 mm. It is not always possible to fit exclusively equal slabs onto the entire ceiling. For this reason, they can be trimmed without compromising overall reliability.
Mineral fiber slabs are divided using a mounting knife or its analogues. Cutting them is quite easy. With hard materials things are more difficult. For example, to cut a glass ceiling tile, you will need a tool with a diamond base.
If necessary, suspended ceiling slabs can be trimmed
The design of the Armstrong suspension system itself is extremely simple. And its main advantage is considered to be the possibility of installation on a ceiling with defects. Various irregularities, chips, dilapidated paint - all this is not a hindrance to the suspension system. After all, its panels are not installed directly to the ceiling, but are attached to a pre-installed frame. And thanks to its reliability, the design will last for many years.
Ceiling installation Armstrong
Assembling the Armstrong ceiling is simple: you will need a drill, suitable fasteners (dowels or self-tapping screws, depending on the ceiling material), it’s nice to have a laser level, but you can get by with a water and bubble level. To cut profiles, you can use metal scissors, or you can use a grinder with a cutting disk or a hacksaw with a metal blade.
The Armstrong suspended ceiling installation technology looks like this step by step:
- We mark on the walls the level at which the suspended ceiling will be located. It’s easier to do this with a level, more difficult with a bubble level.
- We fasten the wall profile along the intended line. There are profiles with different shelf widths; do not mix them up when installing - the shelf must be the same size as the profiles. Fixed to the walls with suitable fasteners every 50 cm. Fastening wall profiles
- Having attached the wall profiles, measure the required length of the supporting profile and cut off the required number of pieces. Please note that the dimensions of the room are not always multiples of 60 cm. In most cases, the outer slabs have to be trimmed. There is nothing wrong with this, but you need to correctly develop a plan for placing the slabs on the ceiling - the “undercut” must be dispersed on both sides. But this must be done so that there are no narrow strips along the edges (see the picture). It’s better to draw a plan, and then start installation
- On the ceiling we mark the fastening lines of the guide profiles. They are installed every 120 cm, that is, there will be fewer supporting profiles than cells. We install hangers along these lines every 50 cm. Installation of hangers
- We hang supporting profiles cut into pieces of the required length onto the installed hangers. The profiles have perforations. We insert a hook into one of the holes and press it to hold it tighter. We insert the edges of the supporting profiles into the already installed wall profile. We hang the supporting profiles and fasten them to the hooks
- We take transverse profiles 120 cm long and install them by inserting the protrusions on the edges into the cutouts on the supporting profile. The result will be a grid of rectangular cells 120*60 cm.
- We take short transverse profiles of 60 cm each and insert them so that we get a mesh with a cell of 60*60 cm. The fastening is the same - the protrusion is inserted into the cutout. Assembling a grid from profiles
- We set all the hangers so that the ceiling is in the same plane. A level (laser level) can again help here, but you can get by with an ordinary construction level.
- We insert slabs into the resulting system. We turn them sideways, carefully wind them up, then lower them into place. You need to work with clean hands - the slabs get dirty. If necessary, they are cut with an ordinary stationery knife (place them on a flat, clean surface, apply a ruler along the cutting line or, as a rule, draw them along with a stationery knife, pressing well on it).
Installation of slabs in the Armstrong suspended ceiling system
Here are step-by-step instructions for installing Armstrong. It's really not difficult. You just need to first think through the layout of the slabs and understand for yourself where and at what distance from the walls the load-bearing profiles will pass. Then everything is assembled like a constructor.
Fastening
The suspension system is built in using a suspension. For this purpose, there is a system of many fastening units that are located in the base ceiling, as well as hooks on the structure itself. The length of the pendant can be adjusted. Thanks to this, it will be possible to change the final height of the Armstrong suspended ceiling.
The suspension elements are attached to the supporting metal profiles of the frame. Their installation step, according to standards, is 1.2 meters. There is one more condition: the suspension units should not be located further than 45 cm from the walls. But this is not always feasible. For this reason, it is possible to arrange the suspension units along the length of the room according to the principle of chess pieces. As a result, they will move back and forth during installation.
Armstrong suspended ceiling mount
In some places on the longitudinal and transverse profile, additional fastening units are provided. They are used to support concentrated loads.
Features of installation of suspension units
The rules for constructing the Armstrong suspension system provide for the suspension of load-bearing profiles. This is subject to the following conditions.
- The supporting profiles are attached to the base of the ceiling in increments of 1.2 m.
- The maximum distance from the wall to the nearest hangers should not exceed 0.45 m. If this condition cannot be met, the hanger units are placed in a checkerboard pattern.
- In places where equipment is attached (lights, elements of ventilation systems), it is necessary to provide for the installation of additional hangers (diagonally from the nearest main one).
- Heavy equipment (air conditioners) is mounted closer to the wall at all four corners.
- Please note that the suspension hook may become an obstacle when installing additional equipment. In this case, the suspension is shifted to the required distance.
- There is no need to be precise when marking the installation locations of the hangers: if they deviate to the side, they change the height, thereby compensating for the deviation.
In order to better understand how Armstrong ceilings are assembled, here is a video for your attention.
Installation of suspended systems
The entire installation process can be divided into four main parts: preliminary calculation, preparation of the room, installation of the frame and assembly of the ceiling system itself. It is quite possible to cope with everything on your own, without resorting to the help of specialists. But the entire process of placing an Armstrong suspended ceiling will take a certain amount of time and require many special tools and skills.
Calculation
One of the first preliminary steps is to calculate the Armstrong suspended ceiling. In this case, measurement accuracy is very important. Small deviations towards the larger side are not critical; the material can always be trimmed. However, if the calculated dimensions turn out to be smaller than the actual ones, then the volume of the slabs will not be enough to occupy the entire space of the ceiling. In this case, installing a suspension system will lose any meaning.
Measurements must be taken at the wall joints themselves. The result should be length and width indicators. Next comes the calculations. It is necessary to calculate the required number of slabs, taking into account their size and shape. For example, a room has dimensions of 3x4 m. The width will require five slabs (5x0.6 m), and the length - six whole and one trimmed (6x0.6+0.4 m). Then it remains to find out their total number. For a ceiling with a length of 4 meters and a width of 3, you will need 35 whole slabs, 5 of which will have to be cut by 20 cm.
Armstrong suspended ceiling calculation
Along with the number of hanging panels, you should calculate the dimensions of the frame for their installation. It should contain the same number of metal profile cells as the calculated number of plates. For rooms with an aspect ratio of 3x4, per square meter of ceiling you will need: 80 cm of load-bearing and transverse profiles, 160 cm of longitudinal and 50 cm of perimental, as well as 0.6 units of suspension. In case of discrepancies in sizes, larger numbers than necessary should be taken into account.
Preparation of tools and premises
After all the calculations have been carried out, and the ceiling slabs and materials for the frame have been ordered, you can proceed to the second stage. Now you need to prepare all the necessary tools and clean the room. The room in which the Armstrong suspension system will be installed must be free. It is necessary to remove all furniture and other things that will interfere with installation. After all, during assembly, the frame will take up most of the floor.
List of required tools:
- Hammer. It will be used to make holes in the walls and ceiling for fastening units. Suitable for concrete or stone walls. If they are wooden, then you can use a drill or a powerful screwdriver to replace the hammer drill.
- Level. Used to determine the angle of inclination or evenness of a surface. The best option would be a laser level, it is more accurate. But the classic version, with an air bubble, is also suitable. It is recommended that this level exceed one meter in length.
- Phillips screwdriver. It will be needed for screwing in self-tapping screws during the assembly and installation of a frame made of metal profiles.
- Hammer. It will help when aligning metal profiles in a frame or fixing them in wooden walls.
- Construction pencil. With its help, you can make the necessary notches on the walls and ceiling.
- Roulette. Used for measuring room dimensions and when cutting slabs or metal profiles
- Pliers. You can use regular pliers to replace them.
Tools for installing Armstrong suspended ceilings
During the installation process, various connecting elements will also be needed: screws, dowels, nails, and so on. Additional tools may also be required. But above is a list of the seven most necessary ones.
Frame installation
After completing the preparatory stage, you can begin directly installing the frame into the ceiling. The main action should begin with the installation of the perimeter. To mark its height, according to construction standards, it is recommended to use a laser or classic level. Moreover, its length must exceed a meter. But level markings can be replaced in a non-standard way. It is possible to change the height of the perimeter the other way around. That is, first mark the floor level and mark vertical dimensions in the corners. And then beat off the outline with a chalked cord. But this method will require three people, but it is much faster.
Markings for installing the Armstrong ceiling
The next step is to cut the perimental profile to the required size. After that you can start attaching it to the walls. The self-tapping screws are screwed into pre-installed dowels. This method is suitable for concrete and brick walls. If the suspended ceiling is not planned to be particularly heavy, without a lot of concentrated loads, then it can be secured to wooden ceilings using nails. This will be faster, but the entire structure becomes difficult to disassemble.
Ceiling frame suspension units
After the necessary marks have been made on the ceiling along with the perforation of the holes, you can begin to prepare the 3700 mm load-bearing profile. It must be cut to the required size obtained at the calculation stage. Next on the floor it should be combined into strips of the required length. And then lay the structure within the perimeter.
Installation of support rails
When these actions are completed, you can move on to the next stage. Now the supporting profiles should be extended along their length and the required number of hanging elements should be placed on them. The installation step is 1.2 meters. For greater reliability, each supporting metal profile is aligned with the sag using a tightly stretched cord or rope.
Installation of cross bars
The final stage of installing the Armstrong ceiling frame is the installation of longitudinal and transverse profiles. But first you need to cut the elements to the required size. There are two installation schemes: parallel and cross. The first is easier to implement, but less reliable. Placing the second one in the frame will be a more difficult task. But the cross pattern of installation of longitudinal and transverse profiles provides greater reliability. For this reason, it is used for places with additional load, with insulation or where communications pass. In terms of material consumption, parallel and cross circuits are almost identical.
Ready-made suspended ceiling frame Armstrong
All stages of installation should be carried out as competently and efficiently as possible. Errors in the process can lead to unreliability of the suspension system and its rapid failure. In some situations, the frame can become dangerous for people in the room. After all, if he falls, injuries are possible.
After installation, all that remains is to connect the wiring and various communications where necessary. The location system should be thought out in advance. It will depend on the number of concentrated loads and built-in elements.
Installation of lamps
Assembly
After these steps, the frame is securely fixed to the base ceiling. Now you can move on to the final stage - the final assembly of the ceiling. First of all, you need to trim the panels. And then post them.
Panels or concentrated blocks should be placed at an angle behind the frame, and then installed in the profile cell. Now they will hold securely.
Installation of Armstrong ceiling panels
You should start by placing concentrated blocks in the cells of the frame, as well as connecting communication means to them. After placing them, you can move on to the lamps. They must also be connected to electrical wiring. The last elements will be the ceiling panels themselves.
If the slab is crooked in any way, for example, at an angle, then it should be leveled. It is very important not to put pressure on it from above, but rather push it from below in the lower corners. In this way, it will be possible to arrange the slabs among the cells of the frame as evenly as possible. Thanks to this, the suspended ceiling will look aesthetically beautiful.
The words of a famous foreman:
The entire installation of a suspended ceiling, from measurements to assembly, can be done independently. With the right approach, you won’t need the help of experts. Carefulness is important in this matter. Errors in calculations can lead to insufficient panel materials or metal profiles along with fasteners. And poor-quality installation and assembly will negatively affect the service life. However, complete adherence to construction instructions and standards will allow you to install the suspended ceiling as competently as possible.
How to install the structure
Installation of the Armstrong suspended ceiling, according to the installation instructions, is divided into three stages:
- preparatory;
- installation;
- finishing.
Marking and preparation for installation
Preparation
Installation of the Armstrong ceiling begins with measurements. Instructions for installing a suspended ceiling Armstrong recommends:
- If the floor is flat, then measure the height of the room in the corners. The smallest height indicator will become the main one. If the floor is uneven, it is recommended to use a building level when working;
- in the selected corner, measure 15 cm from above (if the installation of the Armstrong suspended ceiling is accompanied by additional laying of communications above it, for example, ventilation, then the distance should be increased);
- Apply level marks in other corners of the room. It is recommended to use a laser level, which allows you to make the most accurate markings in order to correctly install Armstrong suspended ceilings with your own hands.
Mark the level on all walls
Having decided on the height, you need to determine where the Armstrong ceiling hangers will be mounted.
To do this you need:
- calculate the center of the room. The easiest way is to stretch 2 diagonals from the corners, and the intersection point will be the center.
We find the center of the room and make subsequent markings
- A line is drawn across the room through the resulting point. It should form a right angle with the wall;
- 1.2 m is measured from this line on both sides and a mark is placed, then the distance is measured again and so on until the end of the wall. The load-bearing profile of Armstrong suspended ceilings will be fixed to these marks.
Profile installation diagram based on measurements
The step-by-step description of marking work before installing the structure seems very long, but in fact, marking is done quite quickly. If you neglect to accurately carry out this stage, the installed Armstrong system may be unevenly fixed, distortions will occur, and the installation of suspended ceilings will be of poor quality.
Installation stage
It is very important that the Armstrong ceiling installation diagram be fully followed. Step-by-step implementation of all points of the instructions guarantees that you can install the Armstrong ceiling with your own hands with high quality.
Complete diagram of the frame assembly for Armstrong panels
You need to do the following:
- mount the spokes for fastening. To do this, holes are drilled according to the measurements applied to the wall and spring-loaded spokes are attached to them with self-tapping screws or dowels. To simplify the work, it is recommended to fasten the knitting needles with hooks in one direction. Attach the supporting metal profile to the hooks;
- assemble the frame. To assemble the ceiling, Armstrong himself provided special markings on the supporting and transverse profiles. Installation recommendations recommend fixing 5-6 main elements to the wall, mounting crossbars on them, and only then attaching the remaining main beams. This method of assembling Armstrong suspended ceilings will save time and promptly identify distortions that have arisen due to errors when applying marks. If the misalignment is slight, it can be adjusted using spring-loaded fastening spokes. The last metal profile is always fixed close to the wall, regardless of the distance to the previous beam;
- After all the elements are installed, you need to snap the locks into the grooves. This is the simplest stage - if the base is mounted correctly, the locks will snap into place without difficulty;
- Now you can install the corners. They are necessary to ensure that the tiled square is placed evenly.
If you plan to install lamps, then the base for their installation must be reinforced with additional crossbars and a plumb line. The more massive the lamp floor lamp, the greater the strength enhancement should be.
But it is not recommended to hang massive chandeliers, although the Armstrong ceiling installation technology provides for this type of lighting. A heavy chandelier can only be suitable for an individual project; standard materials of Armstrong slabs will not fit well with a massive lamp.
Finishing
How to install decorative tiles? Perhaps this is the easiest step in the instructions on how to make an Armstrong ceiling yourself.
To do this you need:
- wear clean gloves. Most tile materials are very easily soiled and stains from sweat and grease easily remain on them;
- a square of tiles is taken and inserted diagonally into the finished metal cell;
- in the pre-ceiling space, the tiles are turned horizontally and lowered face down;
- these actions are repeated the required number of times.
Panel installation
That's all, now you can admire the work done. But in order for the finishing to be flawless, the craftsmen recommend:
- carry out work when the humidity in the room is no more than 70%;
- carefully monitor the coincidence of the pattern. If a relief option or a convex pattern is selected, then the match should be 100%. If an error occurs, you should immediately correct the error by simply slightly lifting and rotating the tiled square;
- if the tile does not fit in a corner or near a wall, then you can give it the required size using a regular sharp knife (scissors are not recommended - they can crush the cut of the slab).
For those who have at least once installed an Armstrong ceiling, the technology for installing the structure seems extremely simple. It does not require special tools or equipment. Installation work, if all steps of the instructions are followed, can be handled by two novice craftsmen.
The only thing that prevents Armstrong products from gaining popularity is that the installation reduces the height of the room, and this is unacceptable for many apartments.
Embedded elements
The structure of the frame of the Armstrong suspension system is such that it is possible to install not only ceiling tiles in it. Various equipment for the system are made in a square shape, with dimensions of 600x600 mm.
The most popular of the elements built into the ceiling are lamps. Raster panels are framed panels, inside of which there are several lamps. Ceiling lamp variations are also produced. They have a more standard look. This model consists of a panel with a socket, and the lampshade protects it.
Installing a lamp in an Armstrong ceiling
For a suspended kitchen ceiling, a built-in ventilation panel will be relevant. The advantage of its placement will be the fact that all communications and the drainage system can be hidden behind the panels. There are also air conditioning units for ceiling systems. In addition to the equipment variations presented above, there are many others.
Ceiling ventilation panel Armstrong
All built-in elements place additional load on the Armstrong suspended ceiling. For this reason, it is not recommended to install them on wooden walls to which the frame is secured with nails. For greater stability of the suspension system with equipment, additional fastenings are used. A pendant is placed on the remaining metal profiles, which is then attached to prepared units on the ceiling.
Accommodation options
An important feature of the Armstrong suspension system is its block system. It is not necessary to place only a row of mineral fiber panels. You can add lamps, air conditioners, ventilation grilles and other equipment to it. This will increase the overall practicality of installing the hanging system.
Ventilation grille for suspended ceiling
Or you can add external beauty and design to it. There is already a lot of room for improvement. With ordinary panels, metal or mirror ones can be placed in the frame cells. This will not add functionality to the ceiling, but it will transform its appearance. There are special panels on which drawings are applied. They are made not only from metal and PVC, but also from glass. Such solutions will be more expensive in price, but will also look more interesting.
Mirror panels in the Armstrong ceiling
With the help of a variety of variations of panels on the Armstrong ceiling, you can create a whole ornament. And this will add color to the room in which it is located and make it more beautiful, as well as more unique. A look at such a ceiling will be pleasant for both the owners and guests of the house.
Pattern on the panels in the Armstrong ceiling